- What Is a FAX File?
- How to open, edit, and convert FAX files
- How to Open a FAX File
- How to Convert a FAX File
- Still Can’t Open the File?
- Windows 7 fax and scan, how to find?
- To scan documents and photos and to fax it in Window-7, if you have a scanner on your Windows 7, you can use Windows Fax and Scan feature to scan documents and photos and fax it!
- Windows 10 Fax
- How to Fax From Windows 10
- Fax through Fax Machine vs Fax through Windows 10
- Part 1: How to Fax from Windows 10
- 1.1. CocoFax- Fax Web App That Redefines Portability
- Requirements For Using CocoFax Fax Service for Windows 10
- 1.2 How to Send Fax from Windows 10 Using CocoFax
- 1.3 How to Receive Fax from Windows 10 Using CocoFax
- Part 2: How to Fax From Windows 10 Using Email Client?
- 1.1 Send Fax Through Email on Windows 10 With CocoFax
- 1.2 How to Send and Receive Fax from Windows 10
- Part 3: How to Send and Receive Fax Using Windows Fax and Scan
- Requirements of Windows Fax and Scan
- 3.1 Sending Fax from Windows 10
- 3.2 Receiving Fax from Windows 10
- Part 4: FAQs
- 👩🏼‍💻 Do I need additional hardware like a Fax machine or a Fax modem to use Fax on Windows 10?
- рџЂ Will I know if the other person received my Fax?
- рџ’ѕ Do I have to print the Fax that I received?
- 🤔 Do I need a Fax Number to Fax?
- Endnotes
What Is a FAX File?
How to open, edit, and convert FAX files
:max_bytes(150000):strip_icc()/tim-fisher-5820c8345f9b581c0b5a63cf.jpg)
A file with the FAX file extension is a Fax file. They’re usually in the TIFF format, meaning that they’re basically just renamed image files.
Some FAX files may instead be a template file created with the Now Contact software. These kinds of files provide a layout for a fax document (an .NWP file) and may include options already loaded for the document, which is useful if you’re creating several similarly formatted documents.
:max_bytes(150000):strip_icc()/fax-files-586fc4d13df78c17b6d5c66e.png)
An SFF Structured Fax file is a format similar to the FAX image file. Unrelated to this FAX file format is also the FaxFile mobile app that lets you fax documents using a phone or tablet.
How to Open a FAX File
Most image-management programs should be able to open FAX files, like Windows’ default photo viewer, the Windows Paint program, XnView, InViewer, GIMP, and Adobe Photoshop.
If you have trouble getting a FAX file to open, change the extension to .TIFF or .TIF and then try to open the file. This isn’t a trick you can usually do with most files, but since FAX files are almost always just TIFF files masked by a different extension, this workaround is likely to succeed.
Some FAX image files might be created with GFI FaxMaker (but they’re still just TIF files), in which case you can use that program to open it.
Now Contact Fax Template files are supposed to open with the Now Contact software from Now Software, using the Use Template drop-down menu option.
If you have the Now Contact program, you can build new FAX files through the Define > Print Templates > Faxes menu. After naming the template, you can edit its dimensions and layout before it’s created.
If you find that an application on your PC does try to open the file but it’s the wrong application or you’d rather have another installed program open it, see our how-to on changing which program opens FAX files.
How to Convert a FAX File
There aren’t any free file converters that can save a file with the .FAX extension to some other format but also work with TIF/TIFF files. Because your FAX file is almost certainly a simple image file, try renaming it to use the TIF or TIFF file extension.
Next, use a free image converter to convert that file to something else like PNG, PDF, or JPG.
Still Can’t Open the File?
If your file won’t open at this point, re-read the file extension. Since «FAX» contain letters common to many other file extensions, you might be confusing another file for this one.
For example, FXA files might at first glance look related in some way to FAX files, but they’re really OC3 Entertainment FaceFX Actor files used by FaceFX.
XAF is another one with these same three letters but has nothing to do with the formats mentions on this page. This extension is reserved for 3ds Max XML Animation files and Affirm Deposition Transcript files.
If you’re not looking for anything related to a .FAX file but rather a fax service for sending faxes, see our Free Online Fax Services list.
Windows 7 fax and scan, how to find?
To scan documents and photos and to fax it in Window-7, if you have a scanner on your Windows 7, you can use Windows Fax and Scan feature to scan documents and photos and fax it!
To start the Windows-7 Fax and Scan feature to scan and fax the documents!
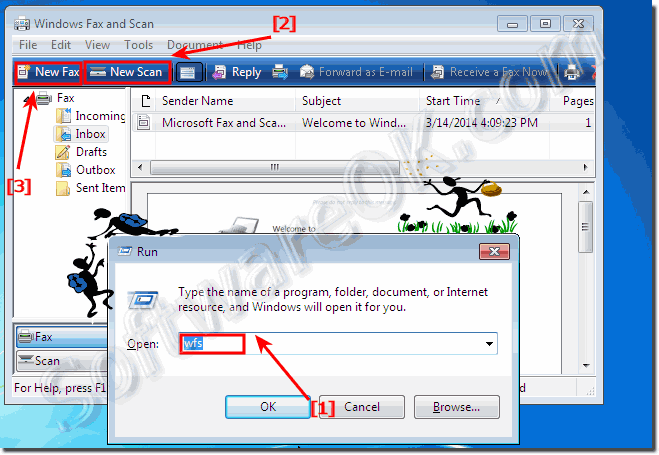
Please press the key combination [Win-Logo]+[R] to open the Windows-7 Run-Dialog,
then simply enter the command wfs (. See Image-1 Arrow-1 )
Click in Windows-7 Fax and Scan New-Scan to scan the documents and click New-Fax to fax the scanned document.
PS: You’ll have to install your Windows-7 scanner before you can start. Connect it to your PC, plug it in, and turn it on.
| (Image-1) Start in Windows 7, the windows fax and scan feature! |
 |
The solution ergo instruction,
example is written for Windows 7 to find and open the Windows Fax and Scan Software. This screenshot has been made, snipped, created under Windows 7. However, you can use this example, solution without hesitation disadvantages also use for New MS OS to find and open the Windows Fax and Scan whether it’s a Windows desktop, tablet, Surface Pro / Go, or even a server operating system. It has been tested on all and successfully verified.
Extended new FAQ for Win 10 scan documents and photos:
Windows 10 Fax
Cocofax provides a cost-effective alternative to fax machines and in-house fax servers, ideal for your growing business, and high-volume faxing.
- Send & Receive Faxes from Anywhere
- Send Faxes Instantly — No More Waiting
- No Fax Maintenance or Phone Charges
- Safe, Secure & Encrypted Faxing
How to Fax From Windows 10
‘How to Fax from windows 10?’ is not a common day to day question that everyone wonders. Due to the popularity of emails, people often aren’t in touch with Fax and know much about it.
However, if you thought about this question, you might already be aware of how awesome it is to send a Fax. In fact, billions of Faxes are sent every year all around the world.
Therefore, today we will teach you about the process of sending and receiving Faxes on Windows 10. It might amaze you on what you have been missing so far.
Therefore, let us delve into the topic and learn about the different ways through which you can Fax from Windows 10. Before that, let us understand the difference between using Fax from a conventional Fax machine and using it through Windows 10:
Fax through Fax Machine vs Fax through Windows 10
In today’s day and age, there are countless services that can send or receive a fax. However, the two most common choices in which the people get confused are — Fax machines vs Fax through a Windows 10 computer.
Therefore, we will try to explain to you the difference in most common terms so it is easy for you to understand. Once you learn the difference, you will see for yourself why using Fax on Windows 10 is the obvious better choice.
When you send a Fax through a Fax machine, you will first have to invest in a Fax machine. That is not the only cost that comes with it. There is the requirement of ink, paper, and machine maintenance.
Additionally, all the Faxes are sent are received are in hard copies (printed paper). Therefore, if you want to find a particular document, you might have to browse through thousands of these documents in order to find the correct one.
However, Fax through Windows 10 is simple and efficient. Since you are using a digital service, you don’t have to use any printed documents to send the Fax. Further, there is no cost involved pertaining to the Fax machine and its maintenance.
Lastly, papers can be read by anyone. However, everything digitally is password protected. Therefore, don’t forget about the security edge that Fax through Windows 10 is going to provide you.
Part 1: How to Fax from Windows 10
Sending a fax through windows 10 is a very easy and simple process. You only need to know about it one time and you would be a pro at it.
There are several third-party services that offer faxing services on Windows 10 due to the limitations of Windows 10 default Faxing service. In this method, we shall tell you about the leading Windows 10 Fax Service that is adored by everyone — CocoFax.
1.1. CocoFax- Fax Web App That Redefines Portability
CocoFax is an online Fax service that allows you to send a Fax to anyone with a Fax number. It is an innovative solution that takes advantage of today’s technology and combines it with the old school love for fax.
It employs a simple concept that any person can use to send or receive a fax. With CocoFax, you can Fax using your Computer, Laptop, Phone, Tablet, any web browser, and any email client. For this article, we will limit our discussion to using CocoFax Fax service for Windows 10.
Requirements For Using CocoFax Fax Service for Windows 10
If you want to send a Fax using CocoFax through Windows 10, you will need:
- A Laptop or a Computer running Windows 10
- An installed web browser on the computer system. It can be Google Chrome, Mozilla Firefox, Opera, or any other web browser.
- Internet Access
- A CocoFax account along with a fax number. Don’t worry, CocoFax lets you choose your own fax number!
And that is all, there is nothing else required. Did we not tell you that is was the easiest thing to do? If you still don’t believe us, I think you would change your mind after you see the steps to use Fax on Windows 10 through CocoFax.
Before that, let us give you a quick idea about why you would love CocoFax:
1.2 How to Send Fax from Windows 10 Using CocoFax
To use Fax on Windows 10 through CocoFax web, all you have to do is follow these easy steps:
Step 1: Open any preferred web browser on your Windows 10 computer. Go to CocoFax’s website and get a subscription plan for CocoFax. CocoFax offers a free 14-day trial if you want to check it before you get it.
Once you get a CocoFax account, CocoFax will provide you a fax number for free! In fact, you can choose your own fax number from the options CocoFax provides.
Step 2: Upload the document that you wish to Fax. It can be of any file format based upon your need, whether it is pdf, doc, docx, xls, xlsx, png, jpg. You can also add a cover page in the body field. The cover will appear on the first page of the receiver’s fax documents.
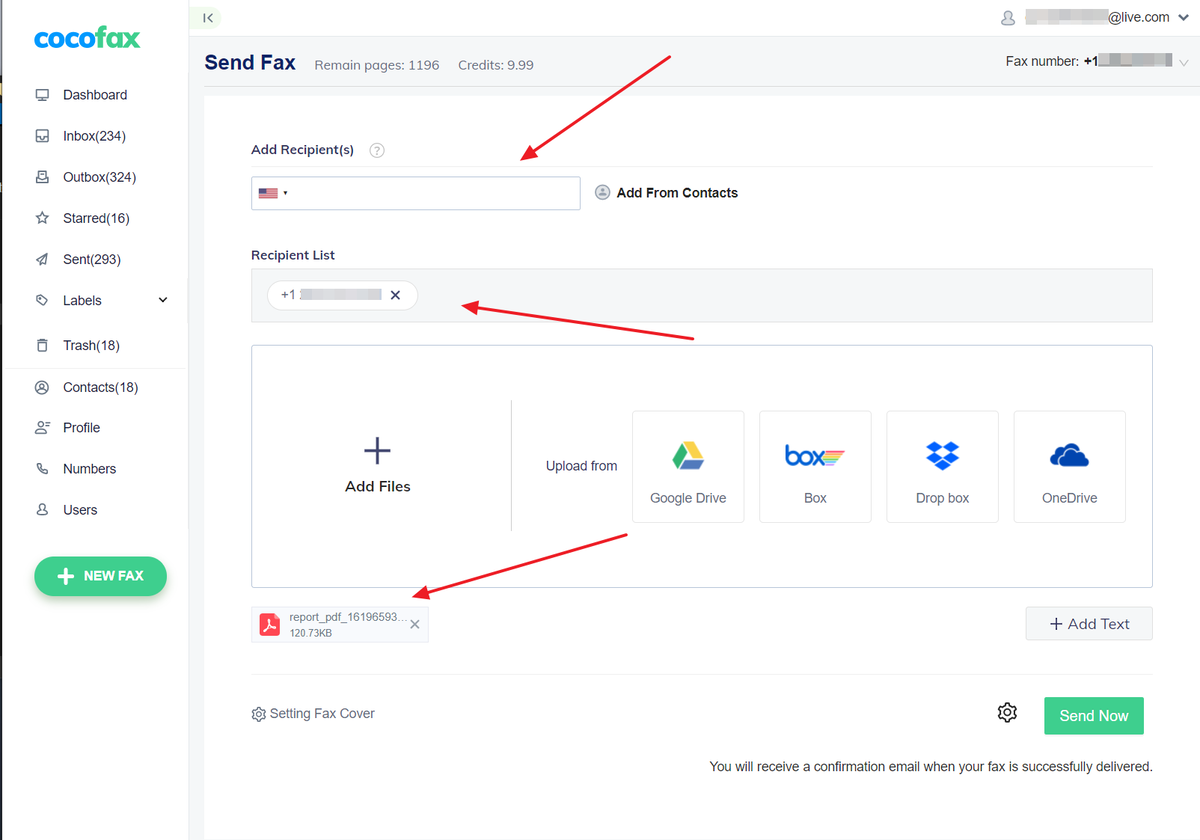
Step 3: In the ‘To’ field, enter the Fax address of the receiver who will be receiving the Fax. Once you do, hit on the send button.
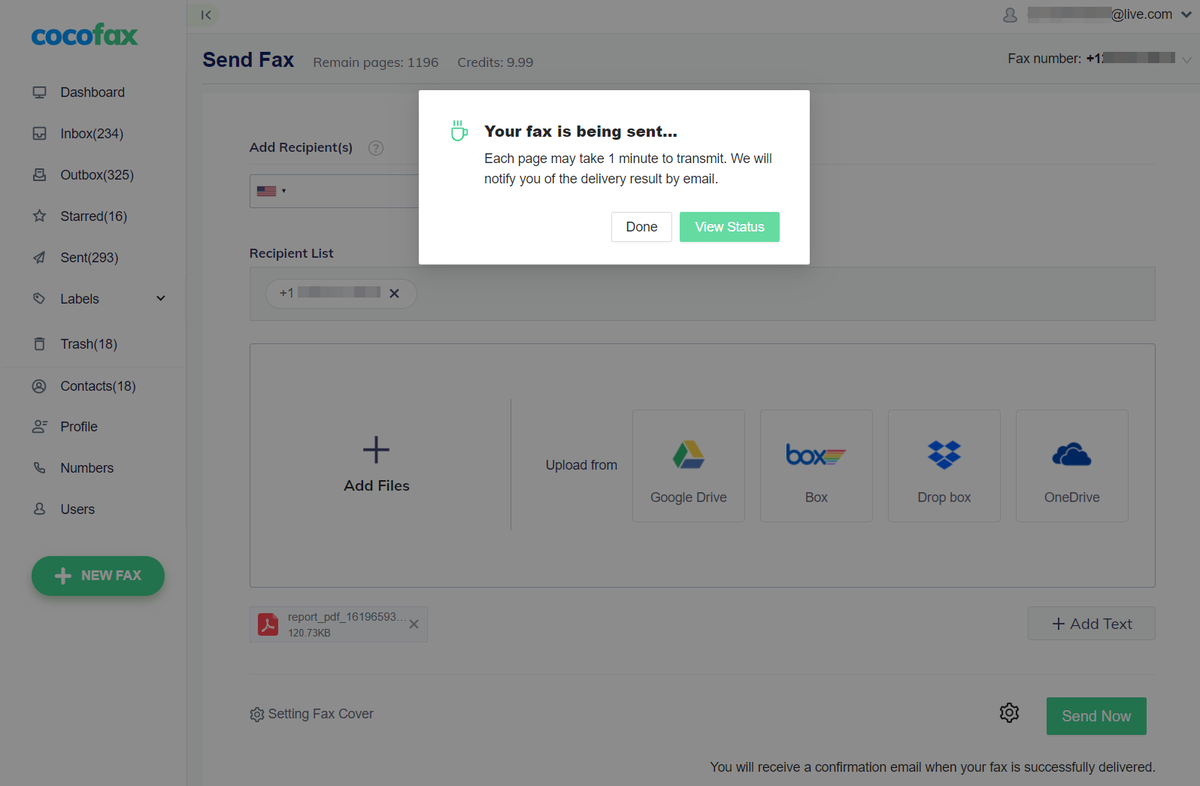
Step 4: You will then have to wait for CocoFax to dial the recipient’s Fax on your behalf. Once the Fax is received by the target machine, CocoFax will confirm it to you with transmission successful message. If the Fax was not successful, CocoFax will let you know that as well along with the date and time of the Fax attempt.
**If the Fax is not successful, the most possible reasons are that the number is wrong or the Fax machine is already busy. Theoretically speaking, there would be no error at CocoFax’s end**
1.3 How to Receive Fax from Windows 10 Using CocoFax
Receiving Fax with CocoFax is even easier than sending it. You don’t have to do anything at all, CocoFax will receive all Fax automatically for you. In fact, your Windows 10 computer doesn’t even have to be turned on for this.
You can follow the below steps to see all the Fax that you have received on your Fax number:
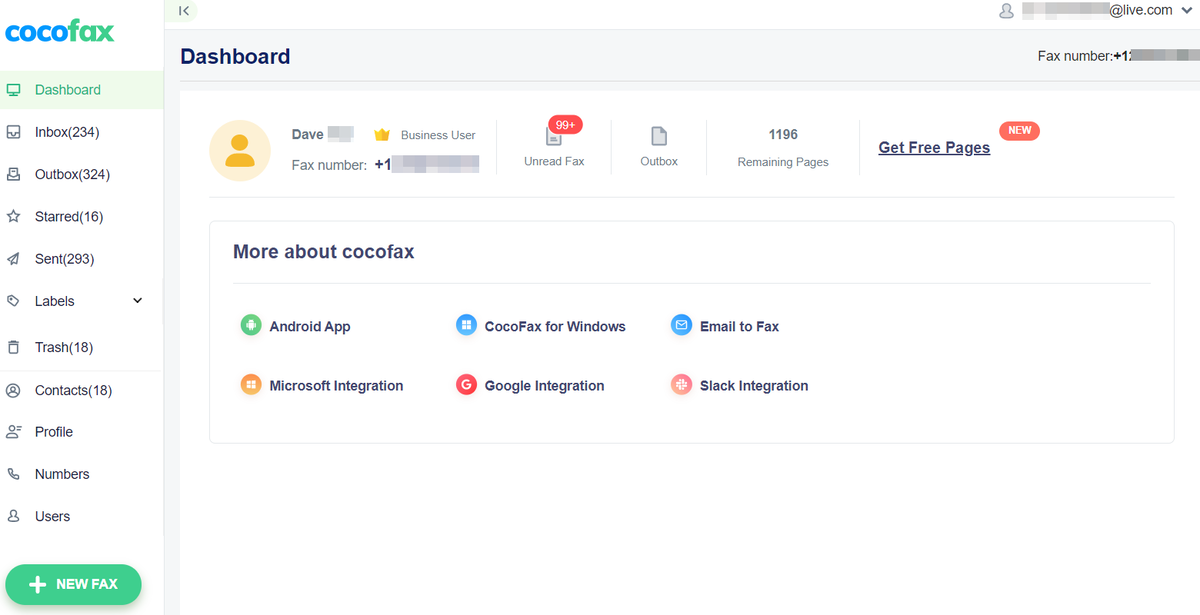
Step 1: The first step is the same as the last section. You have to log in to your CocoFax account that you created before.
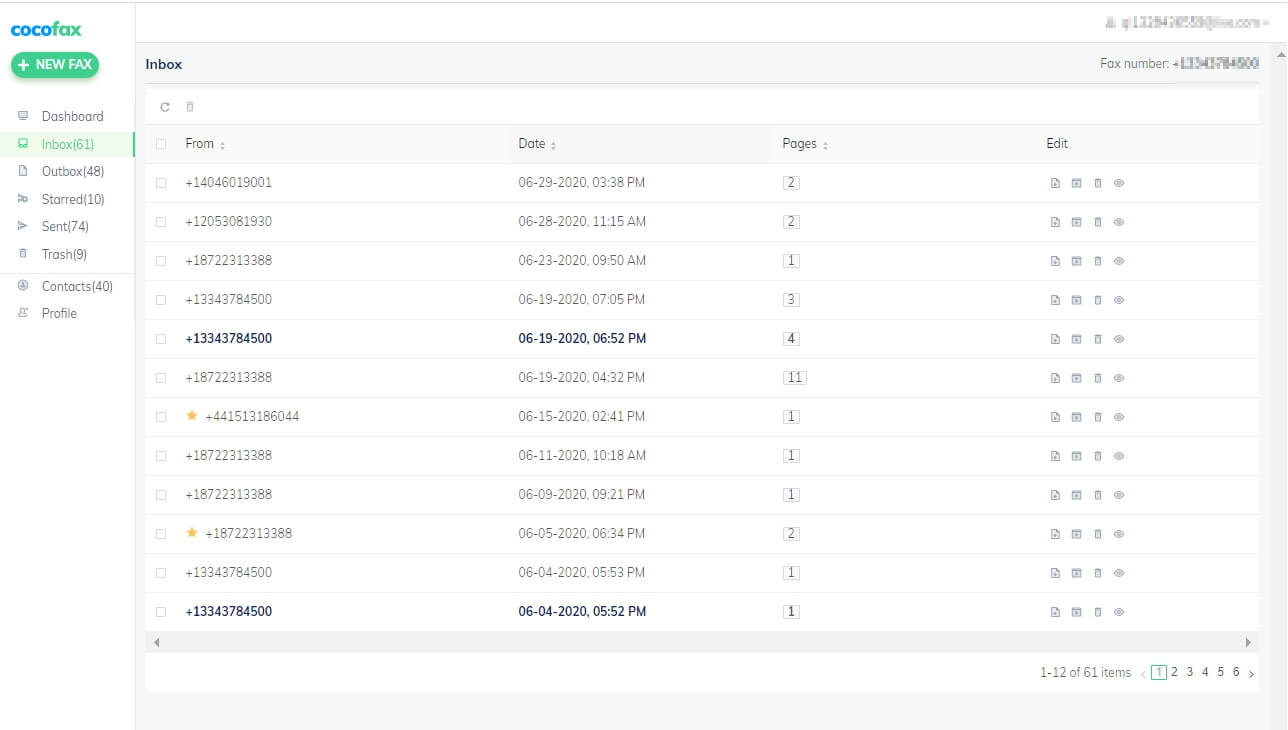
Step 2: Once you are on your CocoFax dashboard, head over the tab that says ‘Inbox’. You can find all the Fax that you received in this section.
As you can see, the process is very simple and easy. You can also use the same way to from fax from Windows 8 or Windows 7 computer. But I can understand if you are still unsure about it. After all, you can only master something if you try it.
This is why CocoFax gives you a free Fax number to try the fax services for 14 days. You can send and receive Fax through CocoFax during this period and evaluate their services for yourself.
Part 2: How to Fax From Windows 10 Using Email Client?
This might come as something hard to believe, but you can even Fax to any Fax machine through your email. Now third-party Fax services make it possible to translate your emails into something that a Fax can read and decipher.
1.1 Send Fax Through Email on Windows 10 With CocoFax
To make things simpler for everybody, CocoFax offers this innovative feature where you can send a Fax to any person just through your email, be it Gmail or Yahoo mail or any other mailing client.
It might be surprising but it is true. However, you cannot directly send an email to a Fax number. If you do, it would never get sent to the Fax number.
To send a Fax to a Fax number by using the email, you will have to use a Fax service like CocoFax to convert the email into a legible form for the Fax machine.
Since the email clients are available on all devices be it computers or smartphones, regardless of the operating system, you can send a Fax through any of these devices by using this feature. However, for the sake of this discussion, we will focus on how to send a Fax through email on Windows 10.
1.2 How to Send and Receive Fax from Windows 10
To send a Fax using email on Windows 10, you just have to follow the below steps:
Step 1: First things first, you will have to activate the email ID that you would be registering with CocoFax. You can only use email to Fax service when the email ID is registered with CocoFax.
Step 2: Once you have activated your email ID with CocoFax, you are ready to turn your emails into Fax. it is a very simple procedure and you can do it easily.
The major change that you would have to do is the ‘To’ field where you generally enter the email ID of the receiver. Since Fax works of Fax number instead of the email ID, you will need to change this.
You will you have to add the recipient’s country code, their fax number, and follow it by вЂ@cocofax.net’. For example, if their fax number is +86 123456, with +86 as the country code, in the ‘To’ field you will enter:
Step 3: Now in the email body, you can write a cover letter for your Fax if you wish. This page will appear before the actual Fax. The actual Fax document will have to be added as an attachment with your email. Its format can be pdf, doc, docx, xls, xlsx, png, jpg.
Step 4: Hit on ‘Send’. CocoFax will get this email and translate it to a Fax readable script. It will then forward it to the Fax number you added in Step 2. You should wait for the Fax confirmation, which will be delivered in your mail inbox.
This confirmation will have the date and time of Fax delivery. If the Fax is not delivered, you will get the response containing the date and time of the attempt and the reason for non-delivery.
As you can see, it is a very simple process. The only major change is adding the Fax number in the address bar of the email (followed with @cocofax.net).
You can also add a subject to the email. It will appear as a special note on the Fax. Why don’t you try CocoFax and see how it works. It gives you a free Fax number as well!
Part 3: How to Send and Receive Fax Using Windows Fax and Scan
If you feel that you do not want to use a third party Fax service, Windows 10 come with their own ‘Fax and Scan’ feature. It is preinstalled in your own copy of Windows 10 and you can access it for free.
However, remember the old saying ‘all good things come at a price?’ Since Windows Fax and Scan is a free service, it has many downsides to it as well.
To start with, it’s requirements are not as simple as the earlier methods I discussed.
Requirements of Windows Fax and Scan
To use Windows Fax and Scan feature, you would need many essential things. These include:
- Fax Modem:Fam Modem is very crucial for to send fax from your computer with Windows 10 Fax and Scan. Fax modems can be inside the computer and if they aren’t (which is mostly the case), it can be added externally via USB. Basically, Fax Modem is the hardware through which the Fax on your computer (which is in digital form) can be transmitted over telephone lines in an electronic form.
- Telephone Lines:Now that you have a Fax modem that can generate electronic Fax, you will need telephone lines that can transmit that Fax to the recipient’s Fax machine. The telephone line that you have should be connected to this Fax modem.
- Windows 10 Computer:You will also need a computer with preinstalled Windows 10.
As you can see, the requirements aren’t that simple as compared to the first two methods. Therefore, while this method might seem free, it can turn out to be more expensive if you count the costs for Fax modem and other equipment.
3.1 Sending Fax from Windows 10
Once you have the equipment that I mentioned in the previous section, you are ready to send and receive Fax from Windows Fax and Scan service. Just follow the below steps:
Step 1: First of all, you will have to open Windows Fax and Scan application. To do this, just search for ‘Fax and Scan’ in the search box on the taskbar (you will see the result even before you finish typing).
Alternatively, you can click on the start button and look through the list of programs. Go to the program folder that says ‘Windows Accessories’. Now that you are here, click on ‘Windows Fax and Scan’. Windows Fax and Scan will then open.
Step 2: Once the app opens, you can see an icon that says ‘New Fax’ on the menu bar. Alternatively, you can go to ‘File’>>’New’>>’Fax’. The new Fax pop up will then open.
Step 3: The New Fax popup is the same as writing an email. Just write the receiver’s Fax number in the ‘To’ field. You can write the rest of the Fax down in the body or attach the document through a pin icon that says ‘Attach’ if you hover on it. If you want that a subject should appear in your Fax, you can write a subject as well.
Step 4: Once you have written everything and proofread it (I suggest you always proofread what you Fax), you can hit the ‘Send’ button present on the top of the menu bar.
You can also save the Fax if you feel that you will need the same template later on.
Step 5: Wait for the modem to dial the Fax machine. Once the Fax is received by the receiver, you will get a confirmation. You will also get the timings for the attempt to send the Fax, in case the Fax isn’t received by them.
Now let us learn how to view the Fax that you have received.
3.2 Receiving Fax from Windows 10
Windows Fax and Scan automatically receive the Fax that you get. However, you will have to make sure that your computer and Fax modem is turned on and connected to the telephone line.
If they are, all your incoming Faxes will automatically come to Windows Fax and Scanner. When you open this app, you will see different folders on the left. Find the one that says ‘Inbox’.
Here you will find all the Faxes that you have received on your Fax number. You can also view other Faxes such as sent Fax, drafts, etc.
Part 4: FAQs
We know you might be having some questions in your mind. We will try to answer the most common ones here:
👩🏼‍💻 Do I need additional hardware like a Fax machine or a Fax modem to use Fax on Windows 10?
If you are using CocoFax on Windows 10, you don’t need a Fax machine or a Fax modem to send or receive your Fax. All you will need is a Fax number. You can get a free Fax number from CocoFax.
рџЂ Will I know if the other person received my Fax?
Yes, you will get an email confirmation if the person has received your Fax no matter which method you use. You can also check if the transmission was successful through the ‘Sent’ folder on the left hand side.
рџ’ѕ Do I have to print the Fax that I received?
There was a time when you had to print Fax and there was no other option to read it. With CocoFax, you can get a Fax in your inbox and you can read it there. You can print the ones that you like.
🤔 Do I need a Fax Number to Fax?
Yes, you will always need a Fax number so the receiver can know from where the Fax came from. Don’t worry, if you use CocoFax, you will be automatically allocated a Fax number. This number stays permanent for you if you choose a subscription package.
Endnotes
Using Fax on Windows 10 is a lot easier than using an actual Fax machine. And if you use CocoFax service, the whole process comes to a whole new level of comfort. If you love the old school Fax like us, I think it would be very hard to turn down CocoFax considering what it offers.


