- Search indexing in Windows 10: FAQ
- What is indexing?
- How does indexing make my searches faster?
- What information is indexed?
- Which apps use the index?
- Why does indexing automatically run on my PC at all times?
- Where is the index information stored?
- How much space is used by the index?
- What languages can be indexed?
- Which file types can be indexed?
- Can I change how much of a file’s information is indexed?
- Windows 7/8/10 File Search Indexing Options
- Configure Indexing Options in Windows
- What’s drive indexing on Windows 10 and how it works
- What does Allow files on this drive to have contents indexed.. mean?
- How does it work?
- Copernic Desktop Search
- How can I enable or disable file indexing on the given partition?
- 1. Turn off indexing for a specific partition
- 2. Change indexing options
- How to enable or disable Indexing in Windows 10
- How can I enable or disable indexing on Windows 10?
- Solution 1 – Disable Windows Search service
- Solution 2 – Turn off Indexing using Command Prompt
- Run a System Scan to discover potential errors
- 3. Change Indexing options
- 4. Turn off Indexing for a specific partition
- 5. Rebuild Search Index
Search indexing in Windows 10: FAQ
Indexing the contents of your PC helps you get faster results when you’re searching it for files and other things. Learn how it works.
What is indexing?
Indexing is the process of looking at files, email messages, and other content on your PC and cataloging their information, such as the words and metadata in them. When you search your PC after indexing, it looks at an index of terms to find results faster.
When you first run indexing, it can take up to a couple hours to complete. After that, indexing will run in the background on your PC as you use it, only re-indexing updated data.
How does indexing make my searches faster?
Much like having an index in a book, having a digital index allows your PC and apps to find content faster by looking for terms or common properties such as the date a file was created. A fully built index can return answers to searches such as «Show all songs by Coldplay» in a fraction of a second, versus the minutes it could take without an index.
What information is indexed?
By default, all the properties of your files are indexed, including file names and full file paths. For files with text, their contents are indexed to allow you to search for words within the files.
Apps you install may also add their own information to the index to speed up searching. For example, Outlook 2016 adds all emails synced to your machine to the index by default and uses the index for searching within the app.
Which apps use the index?
Many of the built-in apps on your PC use the index in some way. File Explorer, Photos, and Groove all use it to access and track changes to your files. Microsoft Edge uses it to provide browser history results in the address bar. Outlook uses it to search your email. Cortana uses it to provide faster search results from across your PC.
Many apps in the Microsoft Store also depend on the index to provide up-to-date search results for your files and other content. Disabling indexing will result in these apps either running slower or not working at all, depending on how heavily they rely on it.
Why does indexing automatically run on my PC at all times?
Your Windows 10 PC is constantly tracking changes to files and updating the index with the latest information. To do this, it opens recently changed files, looks at the changes, and stores the new information in the index.
Where is the index information stored?
All data gathered from indexing is stored locally on your PC. None of it is sent to any other computer or to Microsoft. However, apps you install on your PC may be able to read the data in the index, so be careful with what you install and make sure you trust the source.
How much space is used by the index?
A rule of thumb is that the index will be less than 10 percent of the size of the indexed files. For example, if you have 100 MB of text files, the index for those files will be less than 10 MB.
The index can take up a larger percentage if you have lots of very small files ( Modify.
What languages can be indexed?
All language packs installed with Windows include the information for indexing content in that language. If you have files or other content in a language that isn’t installed on your PC, the index will try to make it searchable, but that isn’t always possible.
To install more language packs to make sure the language is searchable on your PC, go to Settings > Time & Language > Region & language, and then select Add a language .
Which file types can be indexed?
For a list of file types that can be indexed, go to the Indexing Options control panel page and select Advanced > File Types.
Can I change how much of a file’s information is indexed?
Yes. There are two options for how much of a file to index: either properties only, or properties and content. For properties only, indexing will not look at the contents of the file or make the contents searchable. You’ll still be able to search by file name—just not file contents.
Choosing not to index the contents of files can reduce the size of the index, but it makes files harder to find in some cases.
To choose an option for each file type, go to the Indexing Options control panel page and select Advanced > File Types.
Windows 7/8/10 File Search Indexing Options
Much better and more configurable than Vista or XP
The built-in search feature in Windows 7/8/10 is significantly better than the horrible search options in Windows Vista and XP. Instead of installing a third-party program to search for files on inside files on your computer, you can now do it with easily from Windows 7/8/10.
For example, let’s say you’re a programmer or web developer and you want to be able to search your code files like .aspx, .html, .java, .php, etc. With Windows 7, you can configure the search indexer to not only index any file you want, but also to index the file contents.
By default, the Search Indexer in Windows 7/8/10 indexes the most common locations where your files would be stored, i.e. all libraries, everything in your User folder, and e-mail. If this is not enough, you can add or remove index locations easily.
However, to be clear, there are some really good third-party programs that will let you do faster and more advanced searches of text files than Windows ever could.
Configure Indexing Options in Windows
That means you can tell Windows 7/8/10 to index and return results from files and folder on network drives or external hard drives. To get started , click on Start, then type in search into the search box.
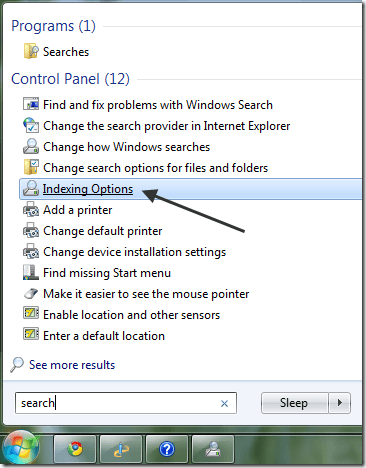
This will bring up the Indexing Options dialog. In Windows 10, you’ll click on Change how Windows searches. At the top, you’ll see the total number of items that have currently been indexed on your computer. Below that, you will see a list of all the locations that have been included for indexing.
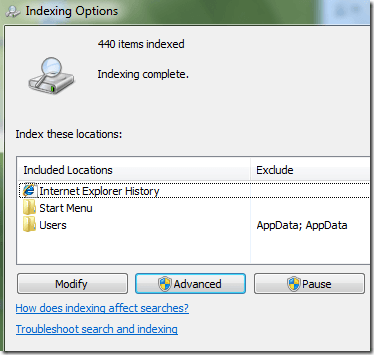
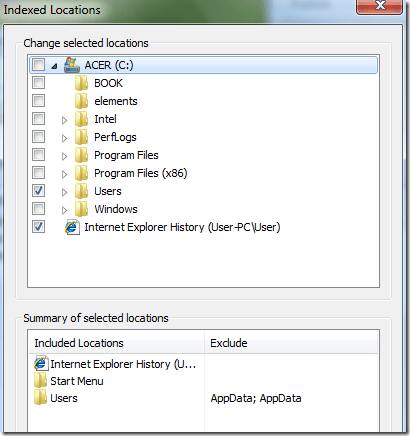
To add a new location to the index, click on the Modify button. Any network drive or external hard drive will show up in the list of possible locations. You can check off any drive or folder that you would like to include in the index.
Depending on how many files and folders are in a location, it could take some time for search indexer to index everything. If you have noticed that certain files are not being indexed by search indexer even though they are included in the search locations, you may have to add the file type.
You can do this by clicking on the Advanced button on the main Indexing Options screen. Then click on the File Types tab.
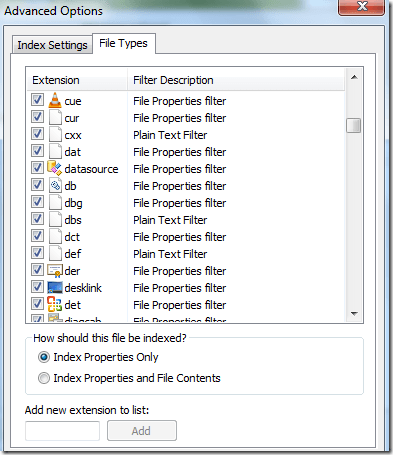
If the file extension is not in the list, go ahead and add it at the bottom. Then select it and choose whether you want to index just the properties or the properties and the file contents. If you know the file contains only text, make sure to select the second radio button.
You can also click on Index Settings to modify some of the settings for the Search Indexer.
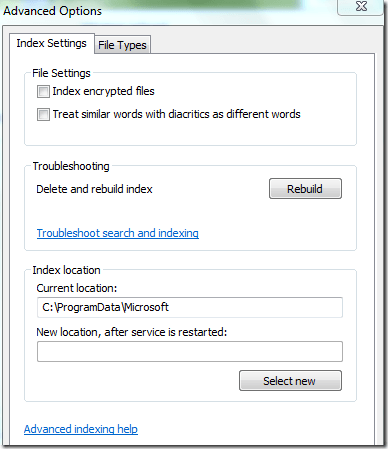
Here you can choose to index encrypted files and other options like treating similar words with diacritics as different words. If you are having problems with Windows search or something has become corrupted, you can rebuild the index by clicking the Rebuild button.
Lastly, you can completely move the search index to another disk or partition. If you have a faster hard drive that the OS is not running on, it might be a good idea to move it so that it performs faster. Similar to how moving the paging file to another disk will make things run faster.
Overall, the new search features in Windows 7/8/10 are greatly enhanced and let you customize most of the search options. Enjoy!
Founder of Help Desk Geek and managing editor. He began blogging in 2007 and quit his job in 2010 to blog full-time. He has over 15 years of industry experience in IT and holds several technical certifications. Read Aseem’s Full Bio
What’s drive indexing on Windows 10 and how it works

- By turning on certain components of the index service you can speed up file searches or you can choose to disable it.
- In most cases, this service is turned on automatically, but you can also enable the indexing service in Windows 10 manually.
- For more helpful tips, just visit our Windows 10 section next.
- Check out our How to page for tech tutorials, as well as various tips and tricks.

There are many things Windows as an OS platform does good. One of those is manipulation of files and directories. The user interface is similar for ages, and it’s hard to argue about its intuitive nature.
Another thing which is rather useful is system search. Thanks to a file indexing, the searches for obscure files in your local drives are not dull and lengthy.
If you ever wondered how it works and how to, if the need arises, disable it, make sure to check to continue reading and find out.
What does Allow files on this drive to have contents indexed.. mean?
Even though Windows 10 is the new star for a couple of years, this trick is part of Windows for ages.
File’s contents indexing is an old feature which is resourcefully implemented in order to speed up the search process of local files.
However, nowadays, we can question whether it’s useful or it’s really just slowing down your system due to not-perfect indexing times.
Here, we’re referring to everyday users and not the enterprises. Windows 10 focuses on files you frequently use and access.
So, it shouldn’t be an issue to let it be since it’s enabled by default and strictly focuses on certain directories and not every given file within the given partition.
How does it work?
It basically scans all accessed folders and subfolders contained within the partition. Then, it indexes them and, the next time you search for a file or a folder, the searching process is vastly faster.
The more files you commonly use and look for, the greater value of this nifty feature. The idea is to index files while the PC is idle, however, this isn’t the case for some users.
Namely, some of them reported frequent HDD usage spikes during the startup or while using some demanding applications.
This will, of course, affect the overall system performance. On the other hand, looking up for that one file in the directory with tens of thousands can be a slow-death experience, so have that in mind.
Quick tip
Copernic Desktop Search is a free search tool for file search on your own PC. The program searches MS Office, HTML, PDF, text and OpenOffice files.
Using categories it can distinguish between file categories such as music, photos, videos or e-mails from Outlook or Mozilla programs.
Copernic Desktop Search currently supports over 119 different file types for indexing and previewing. This search file tool indexes better and finds more files than regular Windows 10 search.
Copernic Desktop Search
How can I enable or disable file indexing on the given partition?
1. Turn off indexing for a specific partition
- Open This PC or File Explorer.
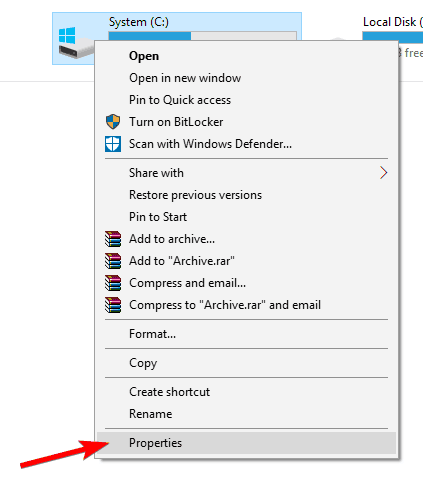
- Right-click on the partition you want to relieve of indexing and open Properties.
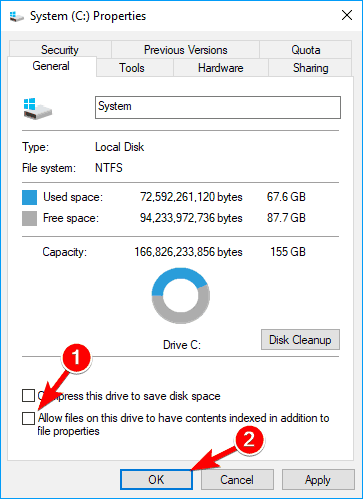
- Uncheck the Allow files on this drive to have contents indexed in addition to file properties box.
- Restart your PC.
This feature is, by default, enabled on all your various partitions or drives. Including the external partitions connected to Windows 10 PC. Disabling it is as simple as possible.
Just navigate to This PC or File Explorer, right-click on the partition at hand and open Properties. What you want to do next is uncheck the Allow files on this drive to have contents indexed in addition to file properties box, as above mentioned.
2. Change indexing options
- In the Windows Search bar, type index and open Indexing Options.
- Click Modify to choose the directories you commonly access.
- Click Advanced and choose the File Types tab.
- Select file types you want to be indexed (or uncheck the ones you don’t see necessary) by checking the boxes.
- Confirm changes and restart your PC.
Another good thing you can do is make a selective indexing. Meaning, the indexing will focus on directories you choose and it won’t take a toll on your HDD or processing power.
You can choose a certain file type to be indexed (this can come in handy if you have lots of photos), too. Also, you can exclude subdirectories or file extensions if you deem them redundant.
In case you have something interesting to add, we encourage you to do so in the comments section below.
How to enable or disable Indexing in Windows 10


- Download Restoro PC Repair Tool that comes with Patented Technologies (patent available here).
- Click Start Scan to find Windows issues that could be causing PC problems.
- Click Repair All to fix issues affecting your computer’s security and performance
- Restoro has been downloaded by 0 readers this month.
First of all, let me say that this post doesn’t refer to the Windows Experience Index, but rather to the indexing feature in Windows 10 , which is related to file search. We briefly go through its features and explain how to enable and disable it.
For those who don’t know what exactly indexing does in Windows 10 , here’s the short explanation – by turning on certain components of the index service you can speed up file searches or you can choose to disable it, in case you suspect it might be the culprit for your computer’s slow performance.
To access the “indexing options” service in Windows 10, open the search bar or press the Windows key and W together. Just type “indexing” there and you will find it.
Indexing files are rather important, and in this article, we’re going to cover the following topics:
- What is file indexing – Indexing is a built-in feature of Windows that allows you to quickly and easily find certain files or applications.
- Indexing options Windows 10 – Indexing is a customizable feature, and in this article, we’re going to show you how to change basic indexing options.
- Indexing windows 10 SSD – File Indexing fully supports SSDs, and in this article, we’re going to show you how to index your entire drive.
- Windows indexing external hard drive, removable drives – Indexing fully supports external hard drives and removable drives so you can easily index files on any removable storage device.
- Windows indexing exclude – As we mentioned, Windows Indexing supports customization, and you can easily exclude any directory from being indexed. This is rather useful if you have a directory or a drive that you rarely access.
- Windows indexing rebuild, repair, reset – Sometimes your index can get corrupted and that can negatively impact your performance. However, you can easily repair your index with just a few clicks.
- Windows indexing turns off, on – Some users want to completely disable Windows Indexing. There are few ways to do that, and we’re going to cover them all in this article.
- Windows indexing file contents – Indexing also allows you to index file contents. This is rather useful if you’re working with text files and you need to find a file that has a specific word in it.
How can I enable or disable indexing on Windows 10?
Solution 1 – Disable Windows Search service
In most cases, this service is turned on automatically, but if you want to make sure that everything is in perfect order, here’s what you need to do to enable the indexing service in Windows 10:
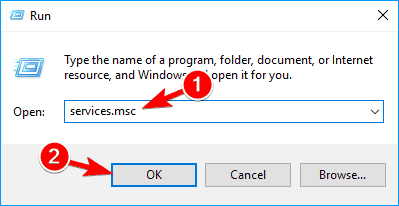
- Open the Run window – press Windows key + R or just type Run in the Search bar.
- Type services.msc and press Enter or click OK.

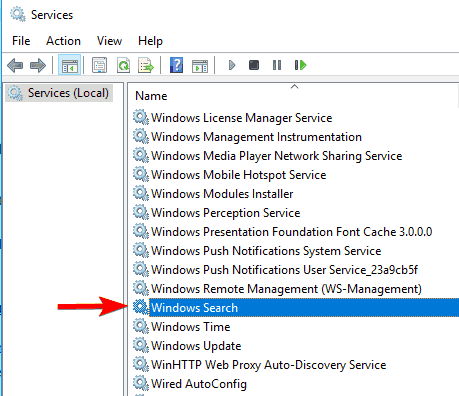
- Find the Windows Search service and double-click on it. It looks like in the right screenshot.
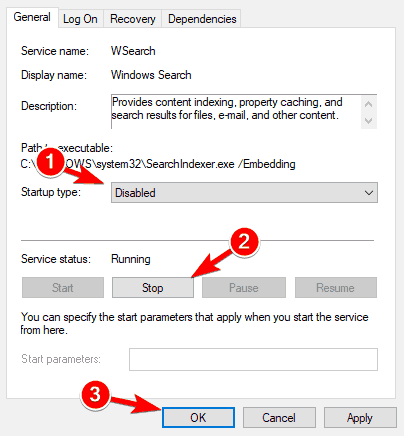
- Find Startup type: and select Disable from the pull-down menu. Now click the Stop button to stop the service. Click Apply and OK buttons to save changes.
- Now restart your PC.
After your PC restarts, Windows Indexing feature should be completely disabled on your PC. To turn it back on, simply undo the changes you made in this solution.
As you can see, ‘Windows Search’ is responsible for content indexing, property caching, search results for files, emails, and other content.
So, by enabling or disabling it, you will consequently turn on or turn off the above-mentioned features. You can easily choose to stop or restart the service, in case you have problems with it.
If you’re dealing with Windows Search Indexer’s high CPU utilization, you can fix it by following this guide.
Solution 2 – Turn off Indexing using Command Prompt
Disabling Indexing is rather simple from the Services window, but if you’re an advanced user, you can disable it from Command Prompt. To do that, just follow these steps:
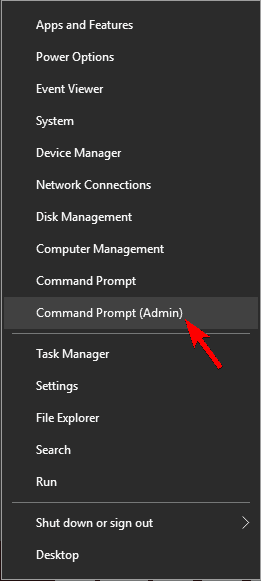
- Open Win + X menu by pressing the Windows Key + Xshortcut. Alternatively, you can open this menu by right-clicking the Start button. Select Command Prompt (Admin) or PowerShell (Admin) from the menu.
- When Command Prompt opens, you need to enter sc stop “wsearch” && sc config “wsearch” start=disabled and press Enter to run it.
After doing that, you’ll stop Windows Search service instantly and the Indexing feature should be disabled. As you can see, this is a fast and simple way to disable Indexing, so if you’re an advanced user and you want to disable this feature quickly, be sure to try this method.
Run a System Scan to discover potential errors


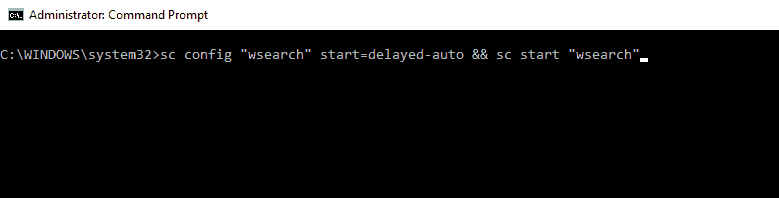
To enable Indexing, you just have to use sc config “wsearch” start=delayed-auto && sc start “wsearch” command. 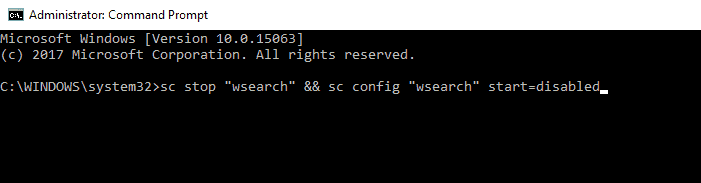
3. Change Indexing options
If you want to change your indexing options, you can choose which locations you want to index. By disabling certain locations from indexing, you might improve your performance. To change this setting, do the following:
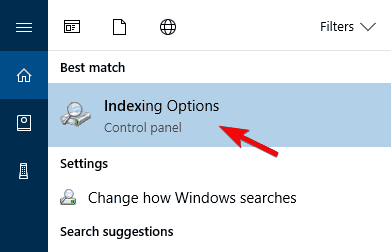
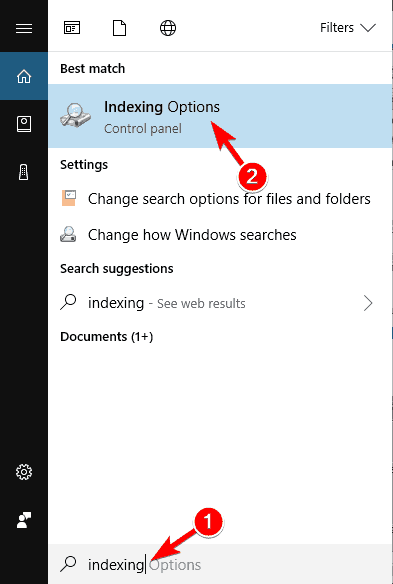
- Press Windows Key + S and enter indexing. Select Indexing Options from the menu. If this option isn’t available from the Search bar, you’ll need to access it from Control Panel.
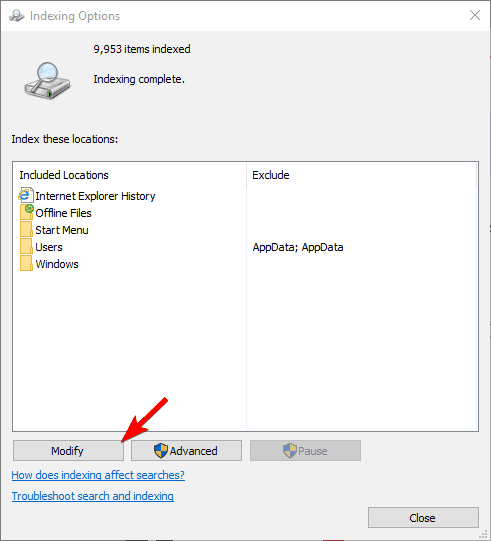
- Now you’ll see the list of indexed locations. Click on Modify button.
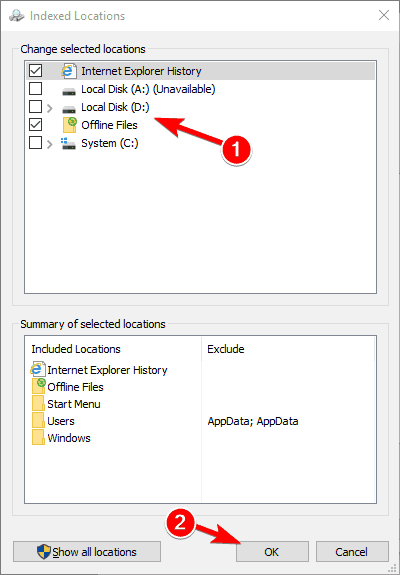
- Uncheck the locations that you don’t want to index and click on OK to save changes. If needed, you can also check a new location from the file tree to add it to your index.
By doing this you can optimize your PC and improve your performance by disabling indexing for the directories that you rarely use.
4. Turn off Indexing for a specific partition
If you want to improve your performance, you can disable indexing for an entire partition or hard drive. To disable indexing for a partition, you need to do the following:
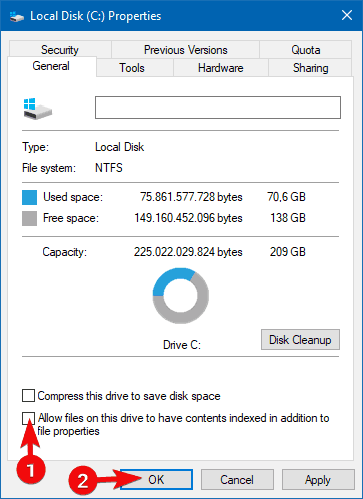
- Open This PC and locate your hard drive. Right-click the desired drive and choose Properties from the menu.
- When the Properties window opens, navigate to General tab. Now uncheck Allow files on this drive to have context indexed. Click on Apply and OK.
- After doing that, you’ll get a confirmation dialog asking you to change these settings only for the root directory or for all subdirectories on the drive. Choose the desired option and click on OK.
After doing that, your partition and files on it will be indexed and you’ll be able to search through them.
5. Rebuild Search Index
Sometimes issues with indexing can occur, and your search might become slow or unable to find the desired files. If this happens, your Search Index is most likely corrupted, but you can easily fix that.
If your Search Index isn’t working properly, you can fix it by following these steps:
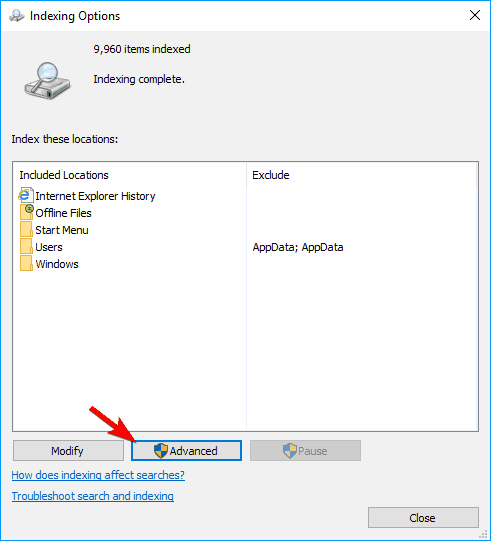
- Open Indexing Options. You can do that quickly by typing indexing options in the Search bar and choosing Indexing Options from the list of results.
- When Indexing Options window opens, click on Advanced.
- Now click on the Rebuild button.
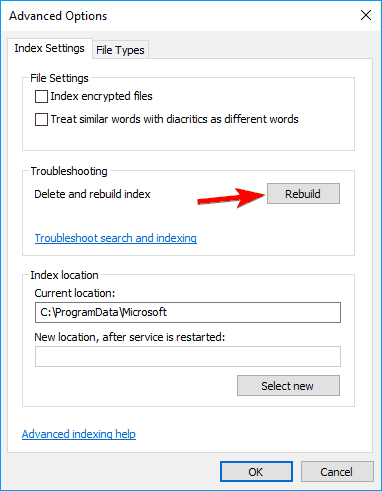
After doing that, you just need to wait for a couple of moments while Windows rebuilds your Search Index.
Most users don’t know what to do when the Windows search box goes missing. Read this article to learn how you can get it back in just a couple of steps.
Windows Indexing is a useful feature, and we hope that this article helped you understand how to configure or disable Indexing on Windows 10.
If you have any other questions, feel free to leave them in the comments section below.


