- How to Change a File Icon in Windows 10 (for Any File Type)
- Preparation
- Change File Icon for Any File Type
- 3 thoughts on “How to Change a File Icon in Windows 10 (for Any File Type)”
- How to Change the File Type Icon in Windows
- Change File Type Icon in Windows XP
- Change File Type Icon in Windows 7/8
- Types
- FilesTypesMan
- How to change File and Folder Icons in Windows 10
- Why customize Windows 10 icons?
- Where can you find new or custom icons for Windows 10?
- How to change Icons in Windows 10
- 1] Customize your Desktop Icons
- 2] Customize Shortcut Icons
- 3] Customize your Taskbar Icons
- 4] Customize Folder Icons
- 5] Customize Specific File Types Icons
- 7] Change Drive icons
- Related Posts
- How to Turn On or Off Use Speech Recognition in Windows Mixed Reality in Windows 10
- How to change Desktop and Windows Mixed Reality Input Switching in Windows 10
- How to disable Windows Mobility Centre in Windows 10
- [email protected]
How to Change a File Icon in Windows 10 (for Any File Type)
If you have a file type that has no icon or using an ugly one, you can easily change the file icon. Follow these steps to change the file icon of a specific file type in Windows 10 to anything you want.
I generally dislike the blank file icons. For instance, even when I understand the language, I like to have subtitles for the movies I watch. However, the SRT file type in Windows has no icon whatsoever. This always bugs me. So, one of the first things I do is set an icon for the SRT file types.
The good thing is, it’s pretty simple to do. Here’s how.
Preparation
Before moving forward, I assume you already have an icon and the said icon is in the ICO format. If you’ve downloaded the icon from the Internet then it is probably in PNG or JPG format. In that case, convert the icon to ICO format. There are a lot of free services on the internet that can convert images to ICO format.
If you don’t already have an icon, use websites like IconArchive to download some nice free icons.
Also, store the icon somewhere safe. For example, I generally store all my icons in a dedicated folder so that I don’t accidentally delete the said icon. If you delete the icon after setting up, the file type will show default or no icon.
Change File Icon for Any File Type
Unlike the folder icon, there is no built-in option to change the file icon in Windows 10 or previous versions of Windows for that matter. You have to edit registry keys. It is messy and unnecessarily complex. So, we are going to use a free, portable, and small software called FileTypesMan from Nirsoft Utilities.
1. First, download FileTypesManager from Nirsoft. Being a portable application, there is no need to install it. Just extract the ZIP file and execute the application. In the main home screen, you will see all the file types in your system.
2. In the application, find the file type you are looking for, right-click on it and select “Edit Selected File Type” option.
3. Here, click on the “…” button next to the Default Icon field.
4. The above action will open the default Windows Icons list. Since we want to set a custom icon, click on the “Browse” button.
5. In this window, go to where you’ve stored the icon, select it and click on the “Open” button.
6. Back in the Change Icon window, select the newly added icon and click on the “Ok” button.
7. Click on the “Ok” button in the FileTypeManager window to save changes.
8. Close the application.
That is it. You’ve changed the icon of the target file type. From now on, you will see the custom icon for that specific file type. In my case, the SRT file type will have a new custom icon set by me rather than the blank icon.
If you are not seeing the changes immediately, either restart Windows File Explorer or reboot Windows. Doing any one of the two actions should reflect the changes.
Hope that helps. If you stuck in the procedure or need some help, comment below and I will try to help as much as possible.
3 thoughts on “How to Change a File Icon in Windows 10 (for Any File Type)”
Just discovered site and have found some great articles…
I’m hoping you can help with an issue I’ve been having for some time. The problem I am having is that all of my audio extensions get “bulked” together. For example, when I attempt to change the description or the icon for .mp3’s the description and icon changes for all audio extensions (.wav, .au, etc). Not only is this annoying, it’s a bit asinine too! (As a composer I’m constantly adding and removing samples into my DAW… nothing slows the process down more than thinking I’m dropping in a Wav file only to realize it’s Midi… ugh)
I’ve tried both FileTypeMan and ShellExt but no luck… I’m thinking it might be because my “user Choice” application if I simply point and click on a file in explorer is the AIMP app through The Microsoft Store.
Here’s what Appears in FileTypeMan “Notice – Changing the properties of this file type may affect the following extensions: .aac, .aif, .aiff, .flac, .m4a, .mid, .midi, .mka, .mp2, .mp3, .s3m, .wav, .wma, .xm” Then there’s the warning that says “UserChoice overwrites the actions and icon of the file extention.”
Thanks in advance for any assistance
Also running into the same problem like Christopher, in my case problems are coming up with .php, .js, .html and co that are assigned to Visual Code. Is there any way to ungroup them, that any file format can get its own icon?
Actually WindowsXP, Server2003, and WindowsXP64 all came with a file extension manager, Simply named “Extension Manager”. It not only allowed you to quickly search for file extensions, add extensions and manually set file associations, you could indeed also manually set the icon for a given extension, either by selecting supported image files or pointing to a executable or DLL file and choose from an embeded icon within the exe or library..
Why Microsoft chose to remove this very helpful tool from Vista, 7, 8, and 8.1 is quite mind boggling.
The windows 10 equivalent has a large clunky view, cannot search to quickly bring you to the extension you’re looking for in the huge list of extensions, and as already known by anyone reading this page, does not allow you to set extension icons.
Simply Amazing how frequently companies toss out utility and function purely for things that look new and perform poorly….
How to Change the File Type Icon in Windows
Because generic icons are so darn ugly
If you have a file on your computer with a non-recognizable extension, then Windows will simply assign that file a generic file icon. If you work in a corporate environment, this can happen all the time with custom software applications using proprietary formats.
Even if you are a home user, it might be worth your time to change the default icon that is assigned for a text document or for all PDF documents, etc. This tip is really just for customizing the look and feel of Windows to your liking.
In Windows XP, changing a file type’s icon was very simple and could be done via Windows Explorer. Unfortunately, the process is more complicated in Windows 7 and Windows 8. There you have to manually edit registry entries, which is no fun. Thankfully, there are a couple of freeware programs out there that get the job done without all the mess.
Change File Type Icon in Windows XP
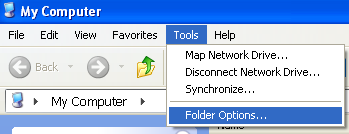
Step 1: Open My Computer and go to Tools and then Folder Options.
Step 2: Click on the File Types tab and you’ll see a listing of all the registered file types on your computer along with the extensions and the icon.
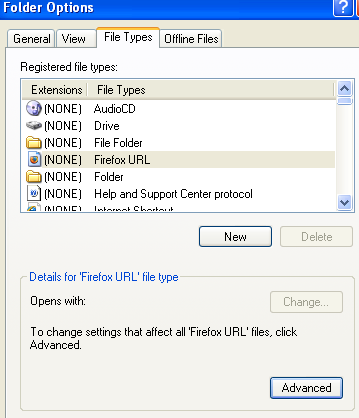
Step 3: Scroll down to the file extension you want to change the icon for and then select it in the list. After that, click on the Advanced button at the bottom of the dialog.
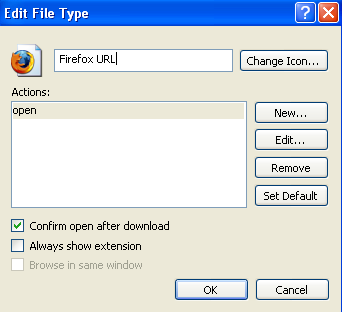
Step 4: Click the Change Icon button at the top right and choose your replacement icon.
That’s how simple it is to change the icon for a file type in Windows XP and Windows Vista. Now let’s talk about Windows 7 and Windows 8.
Change File Type Icon in Windows 7/8
For Windows 7 and higher, there are a couple of freeware utilities that can change the file icons for you without having to mess around in the registry. I’m going to mention two that I have used and that work well.
Types
Types is a very simple app that only does one thing. It would have been nice if the program was a standalone executable that didn’t require an install, but unfortunately, it’s not. Anyway, once you install it and run it, you’ll get a box with all of the currently registered files types on the system and their icons.

In my example, I want to change the default icon for text files, so I scrolled down to the TXT extension and selected it. Click on the gear icon at the top and that will bring up the properties box.

On the Class tab, you can see the path to the associated program for that file type. In this case, Notepad opens TXT files by default. You can actually change the default program here if you like, but you can also do that via Explorer.
The tab we are interested in is Icon. By default, it shows you the icons stored in the imageres.dll file stored in the SYSTEM32 directory. This DLL file contains a lot of the default system icons used on the system.
If you don’t find any usable icon here, you can read my previous post on extracting icons from EXE and DLL files or taking your own images and converting them into icons. Once you have a custom icon, you can click the little yellow folder button and browse to the icon you want to use.
Simply select the icon and then close out of the properties window. You’ll also see the icon change in the header area at the very top of the properties window.
As you can see above, I changed the icon for the TXT file type to something different and now that icon will show up wherever Windows displays it across the operating system.
FilesTypesMan
The second program I really like is from Nirsoft, my favorite company when it comes to free utilities. The program is called FileTypesMan and it’s better than Types because it doesn’t require any installation on the system.

Once you run it, you can scroll down to the file extension you are looking for using the first column (Extension). In my example, I again found the .TXT file extension and at the bottom you can see the different actions associated with that extension. This is the same as the Actions tab in Types.
When you double-click on the entry, you’ll get a popup dialog with a whole bunch of properties and settings.

Click on the little button next to Default Icon and choose your icon file. You can also configure a bunch of advanced options for showing/hiding different settings related to the file extension. If you work with a certain file type a lot and want a better icon than the default, these two programs are the best options.
That’s about it. If you have any questions or problems updating the icon for a file type, let us know in the comments. Enjoy!
Founder of Online Tech Tips and managing editor. He began blogging in 2007 and quit his job in 2010 to blog full-time. He has over 15 years of industry experience in IT and holds several technical certifications. Read Aseem’s Full Bio
How to change File and Folder Icons in Windows 10
What do you think about the default icons on Windows 10? Well, they look great, but with time appear boring, isn’t it? You would have tried to cut the boredom by customizing your device by changing the themes and fonts. But you can take this customization to a whole new level by changing the default Windows icons and make your PC look unique and better sorted. In this Windows guide, we take you through the different ways to change any icons on Windows 10.
Why customize Windows 10 icons?
Killing ennui is just one reason, customization can be done for many different purposes. Few of them include:
- Give your PC a personal spin
- Make your environment look catchy and trendy
- Make your system more user-friendly
- Highlight the importance of a particular icon by making it look unique
- To locate an important icon immediately from a huge crowd of icons
Along with the array of benefits listed above, there are many different types of icons that can be modified on Windows 10. These include desktop icons, taskbar icons, folder icons, and shortcut icons. To know how to customize these, let’s move on the method.
Where can you find new or custom icons for Windows 10?
Before we can start changing icons on Windows 10, we will need some icons to replace the existing ones. The Operating System has a collection of built-in icons, but they might not be that great. The good news is that there are many online resources offering millions of high-quality impressive icons. You can grab them in a pack at once, or download single icons based on your likings. Few popular icon repositories are FlatIcon, Findicons, IconArchive, DeviantArt, or GraphicBurger – all of these have loads of free icons.
In case you just can’t find the icon of your choice, you can even try making high-resolution icons out of any image.
How to change Icons in Windows 10
Now let’s look at the methods of changing different types of icons one after one-
- Desktop icons
- Shortcut icons
- Taskbar icons
- Folder icons
- File icons
- Drive icons.
1] Customize your Desktop Icons
What are ‘Desktop Icons’? The icons like This PC, Network, Recycle Bin, and your User folder all fall in this category. Even though modern versions of Windows do not show them all on the desktop, users can always restore these missing icons and have them appear on your system’s desktop or even change these icons even if they appear elsewhere on your system.
For customizing desktop icons follow the below-mentioned steps:
1] Go to ‘Settings’
2] Hit ‘Personalization’
3] Now click on ‘Themes’, and go to ‘Desktop Icon Settings’.
4] Once you click on ‘Desktop Icon Settings’ a separate ‘Desktop Icon Settings’ window will appear.
5] In the ‘Desktop Icons’ section, check the checkbox corresponding to the specific item whose icon you wish to customize.
6] Now hit the ‘Change Icon’ button.
7] Once you click the ‘Change Icon’ button, a list of different in-built icons will appear on the screen. To choose from these in-built Windows icons select one and hit the ‘OK’ button.
This will change the icon.
To select a custom icon hit the ‘Browse’ button to go to the folder having the icon of your choice and hit ‘Open’ to upload the icon on the Windows icon list; then select the uploaded icon. Also, if you browse for your own icons, you can select any EXE, DLL, or ICO file.
8] Finally, click the ‘Apply’ button and then hit on the ‘OK’ button to save your settings.
Now, your ‘Computer’ icon will look like the below image.
To reverse the change, go back to the ‘Desktop Icon Settings’ window, hit ‘Restore Default’ button and hit ‘Apply’ and then click ‘Ok’ to save settings.
2] Customize Shortcut Icons
Adding a shortcut for folders and applications makes things very easy and simple on any operating system. Users can alter the icon for a shortcut in Windows and this works for all sorts of shortcuts including a shortcut to an app, folder, or even Command Prompt command. Here are the steps to customize any shortcut icon:
1] Go to your ‘Desktop’ and select the shortcut you wish to change the icon for
2] Right-click the shortcut and select ‘Properties’.
3] On the ‘Shortcut’ tab, select the ‘Change Icon’ button.
4] This opens the standard ‘Change Icon’ window you saw above.
5] Now follow the same steps as listed in the above ‘Desktop Icon’ option to select the icon and apply settings.
3] Customize your Taskbar Icons
The icons pinned to your taskbar are also shortcuts; you can customize these in nearly the same way that you customize any shortcut icon. But there are a few things you would need to keep in mind here:
- You can customize only those icons that are pinned to the taskbar and not the ones which are currently running and appearing there.
- For an app that is pinned, but is currently running, you will need to close the app to begin customizing the shortcut icon.
Start by holding the ‘Shift’ key and right-click the app icon and choose ‘Properties’.
Now, follow the same steps as listed in the ‘Desktop Icon’ option above to set a new icon.
4] Customize Folder Icons
To customize the Folder icons in Windows 10, perform the following steps:
1] Right-click the folder and select ‘Properties’ in the context menu.
2] Select ‘Customize’ and hit ‘Change Icon’ in the Properties window.
3] You can replace the folder icon with a basic/personalized icon.
4] Now click ‘OK’ to save the changes.
5] Finally, hit ‘OK’ to finish changing the folder icon.
Done, this will change your specific folder icons.
You might want to also take a look at these Free software to change the Folder icon color.
5] Customize Specific File Types Icons
Personalizing the icon of a specific type of file demands third-party tools like File Types Manager. Follow these steps:
1] Get freeware FileTypesMan on your system
2] In the ‘Find Box’ locate the file type that you want to change its icon for.
3] Now close the Find box.
4] Right-click the file and choose ‘Edit Selected File Type’.
5] In Default Icon option, click the 3-dots button in the pop-out window.
6] Select one of the existing icons or input your own icon by clicking Browse > click OK.
7] Finally, hit ‘Ok’ to execute the changes.
7] Change Drive icons
You can change the Icons of your Windows Drives easily using freeware Drive Icon Changer or My Drive Icon.
In this way, you can customize different types of icons in Windows 10. So, keep customizing and add new and interesting icons to your applications or folders. And yes, if you wish to revert the changes, you will only need to hit the ‘Restore Defaults’ button in the corresponding Properties window and click on it.
Date: January 2, 2020 Tags: Features, Icons
Related Posts
How to Turn On or Off Use Speech Recognition in Windows Mixed Reality in Windows 10
How to change Desktop and Windows Mixed Reality Input Switching in Windows 10
How to disable Windows Mobility Centre in Windows 10
[email protected]
Ankit Gupta is a writer by profession and has more than 7 years of global writing experience on technology and other areas. He follows technological developments and likes to write about Windows & IT security. He has a deep liking for wild life and has written a book on Top Tiger Parks of India.


