- How to Identify which Windows Process is Locking a File or Folder
- Symptoms
- How to Solve the Issue
- Identify what program is using a file
- Identify which handle or DLL is using a file
- Release the lock on the file or folder
- Change which programs Windows 7 uses by default
- 3 Genius Ways to Delete a File in Use in Windows
- Force Deleting a File in Use in Windows
- More Related Articles:
- From Command Prompt
- Using a Third-Party Tool – Unlocker
- How to Restore a File If It Has Been Deleted Accidentally
- Your Safe & Reliable Data Recovery Software
- Video Tutorial on How to Recover Deleted Files on Windows 10/8/7 Easily?
How to Identify which Windows Process is Locking a File or Folder
While attempting to delete, move, or rename a file or folder you get a Windows warning message; the Operating System refuses to complete the operation.
This article helps identifying the process that currently has a handle on the file or folder you are attempting a maintenance operation on.
Symptoms
When trying to delete, move, or rename a file you get a Windows system warning message:
- «Cannot delete file: Access is denied».
- «There has been a sharing violation».
- «The source or destination file may be in use».
- «The file is in use by another program or user».
- «Make sure the disk is not full or write-protected and that the file is not currently in use».
How to Solve the Issue
One of the easiest ways to handle locked files or folders is to use Microsoft Sysinternals Process Explorer.
Identify what program is using a file
Using Process Explorer there is a simple way to find the program:
- Open Process Explorer
- Running as administrator.
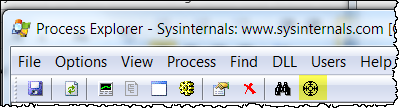
- On the toolbar, find the gunsight icon on the right.

- Drag the icon and drop it on the open file or folder that is locked.
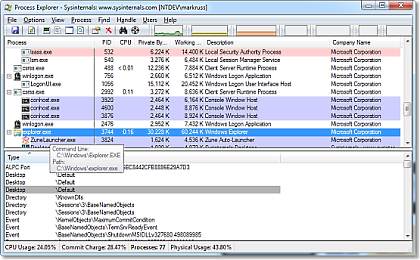
- The executable that is using the file will be highlighted in the Process Explorer main display list.
Identify which handle or DLL is using a file
- Open Process Explorer
- Running as administrator.
- Enter the keyboard shortcut Ctrl+F.
- Alternatively, click the “Find” menu and select “Find a Handle or DLL”.
- A search dialog box will open.
- Type in the name of the locked file or other file of interest.
- Partial names are usually sufficient.
- Click the button “Search”.
- A list will be generated.
- There may be a number of entries.
Release the lock on the file or folder
To release the lock on the file you are attempting the maintenance operation on, you will need to kill the appropriate process. An individual program or handle in the list provided by Process Explorer can be killed by:
- Selecting the process/handle/program entry.
- Pressing the delete key.
Proceed with care when deleting handles as this may generate erratic behavior and instabilities may occur.
Change which programs Windows 7 uses by default
A default program is the program that Windows uses when you open a particular type of file, such as a music file, an image, or a webpage. For example, if you have more than one web browser installed on your computer, you can choose one of them to be the default browser.
Open Default Programs by clicking the Start button  and then clicking Default Programs.
In Default Programs, you can:
Use this option to choose which programs you want Windows to use, by default.
If a program does not show up in the list, you can make the program a default by using Set Associations.
Open Default Programs by clicking the Start button and then clicking Default Programs.
Click Associate a file type or protocol with a program.
Click the file type or protocol that you want the program to act as the default for.
Click Change program.
Click the program that you want to use as the default for the file type you selected, or click the arrow next to Other Programs to show additional programs. (If you don’t see Other Programs, or your program is not listed, click Browse to find the program you want to use, and then click Open. If no other programs are installed that are able to open the file type or protocol, your choices will be limited.)
If you don’t see the program you want to use as the default, click the arrow next to Other Programs to see a list of programs available on your computer.
Note: You cannot change an association for a file type or protocol and leave it blank or disassociated. You must select a new program.
The options you set here only apply to your user account. Your choices won’t affect other user accounts on this computer.
Use this option to fine-tune default programs based on the file type or protocol. For example, you can have all .jpg image files open using a specific program, and .bmp image files open using a different program.
You can also change which programs to use to start different kinds of media, such as music CDs or DVDs that contain photos.
Set Program Access and Computer Defaults (available in Windows 7) is a tool to set default programs for activities such as browsing the web and sending e‑mail for everyone who uses the computer.
3 Genius Ways to Delete a File in Use in Windows

Amy Dennis
Dec 21, 2020 • Filed to: Recover & Repair Files • Proven solutions
When working on Microsoft Windows, how many times have you seen a message telling that the particular file you are attempting to delete is already in use and that the program using the file must be stopped before Windows allows you to remove the file from the PC?
Annoying!! Isn’t it?
Well, not anymore.
Here are the three genius ways that you can use to force delete a file that is in use and Windows doesn’t allow you to remove it normally.
Force Deleting a File in Use in Windows
This method works most of the time. All you need to do is to force terminate the program that is using the file. Assuming that you already know which program is using the file that you want to remove, this is how you delete the file:
Note:В Windows 7 is used here as a reference PC.
Force terminating a process shuts down the entire program and you may lose any unsaved data that any other file that relies on the program may have. It is advisable to save all your work progress before proceeding.
1. On your desktop screen, right-click the taskbar.
2. From the context menu that appears, clickВ Start Task Manager.

3. In the Task Manager box, if not already there, go to theВ ProcessesВ tab.
4. From the displayed list of running processes, right-click the one that you know is using the file that you want to delete.
5. From the context menu, clickВ End ProcessВ orВ End Process Tree. (End process treeВ is clicked here.)

6. On the confirmation box that pops up, click theВ End process treeВ button from the bottom.

7. Once the process has been forcefully terminated, you can easily remove the file as it is no longer used until the process starts running again.
Note:В In some cases, you need to be quick in deleting the file after force terminating the process. This is because some processes are stubborn and even if you terminate them forcefully, they restart automatically after a few seconds.
More Related Articles:
From Command Prompt
This method requires you to open Command Prompt on your Windows PC. For the files used by some local processes (the processes that can be started and closed by a standard – non-administrator user account), opening Command Prompt on a standard user account would suffice. However, if the file is used by any system process, the elevated Command Prompt must be initialized. An elevated Command Prompt is the command window that has all the administrator rights and all the administrative tasks can be performed via commands in its interface.
This is what you need to do:
Note:В A Windows 7 PC is used in this example.
1. On your Windows PC, locate the folder that contains the file in use that you want to delete. (Do not enter into the folder.)
2.В Shift + right-clickВ the folder.
3. From the advanced context menu that appears, clickВ the Open command window hereВ or press theВ WВ key on the keyboard.

Note:В This method does not allow you to open an elevated command window.
Note: To start elevated Command Prompt, click the Start button, type CMD in the search box at the bottom of the Start menu, right-click CMD from the suggested programs’ list, click Run as administrator from the context menu, and on the User Account Control confirmation box, type the password for the admin account (or click Yes if Windows doesn’t ask you for the password) to provide your consent to continue. After the elevated command window opens up, you must use the DOS commands like CD and DIR to locate the directory where the file you want to delete is placed and to check the presence of the file respectively.
4. In the command window, type theВ DEL /F file nameВ command and pressВ EnterВ to force delete the file that is in use.
Note:В In the above command,В the file nameВ must be replaced by the name of the file along with its extension that you want to delete. For exampleВ del /f TestFile.txt.
WARNING!! – A file deleted using the DEL command does not move it to the Recycle Bin but deletes it permanently. Use the DEL command with caution.

5. Once the file is deleted, you can close Command Prompt by clicking theВ CloseВ button from the top-right corner of the window or by typingВ EXITВ in the command window and pressingВ Enter.
Using a Third-Party Tool – Unlocker
Even though you can use any of the two methods described above to remove a file that is in use, a third-party tool such as Unlocker makes your task extremely simple. The best part is that Unlocker is a freeware and is free to download and use. This is how Unlocker works:
Note:В A Windows 7 computer is used for reference.
1. Log on to your Windows PC.
2. Ensure that it is connected to the Internet.
3. Open any web browser of your choice and open your preferred search engine. (Google, Yahoo!, Bing, etc.)
4. Using the search engine, search for Unlocker.
5. Once found, download Unlocker’s installable file and install the program using the normal installation method, or get its portable version.
Note:В Unlocker is installed on this referenceВ PC.
6. After this, locate the file that you want to delete but is in use.
7. Right-click the file.
8. From the context menu that is displayed, clickВ Unlocker.

9. On theВ User Account ControlВ confirmation box, clickВ YesВ to provide your consent to continue launching the program.
10. On the displayed interface, from the available list of files in use, click to select the one that you want to unlock.
11. From the bottom of the interface, clickВ UnlockВ to unlock the file while leaving the corresponding application open. Alternatively, you can also click theВ Kill ProcessВ button to force terminate the running process that is responsible for engaging the file.

12. Once the file is unlocked, you can right-click the file and clickВ DeleteВ from the context menu.
13. ClickВ YesВ on theВ Delete FileВ confirmation box when/if displayed.
How to Restore a File If It Has Been Deleted Accidentally
Even if the file has been forcefully unlocked using any of the methods, it is moved to the Recycle Bin when deleted (except for when deleted using the command line). That being said, restoring the file from the Recycle Bin is simple. This is what you need to do.
1. On your Windows desktop screen, double-click the Recycle Bin’s icon.
2. Once inside theВ Recycle Bin, right-click the file that you want to restore.
3. From the context menu, clickВ Restore.

Note:В If a file has been deleted permanently (e.g. when removed with the DEL command), you need an efficient file recovery software such as RecoveritВ Data RecoveryВ to recover the file back.
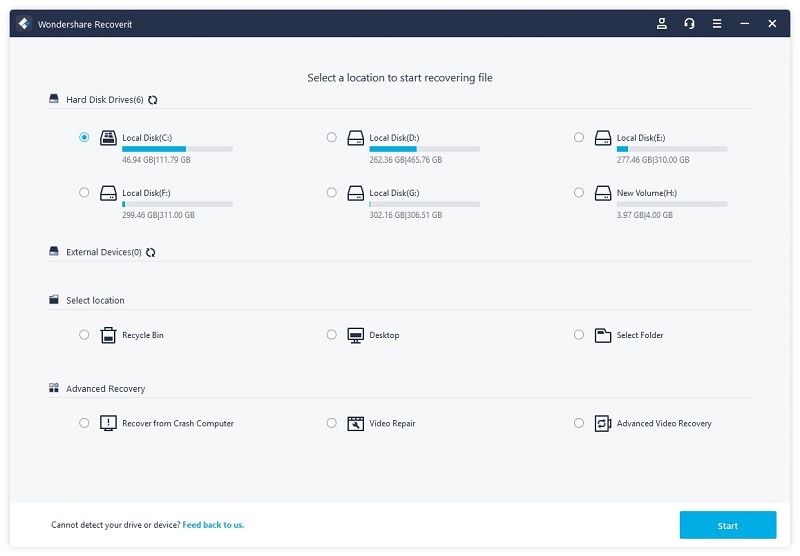
Your Safe & Reliable Data Recovery Software
- Recover lost or deleted files, photos, audio, music, emails from any storage device effectively, safely and completely.
- Supports data recovery from recycle bin, hard drive, memory card, flash drive, digital camera, and camcorders.
- Supports to recover data for sudden deletion, formatting, hard drive corruption, virus attack, system crash under different situations.
Although the above-mentioned tricks work almost every time, you must take the utmost care while deleting any file that is in use. Deleting a wrong file may cause consequences like permanent or temporary system failure or data loss. To avoid this, before force deleting your files, make sure you have thoroughly verified the following:
- The file in use does not contain any important data.
- Force terminating the process to unlock the file doesn’t cause any permanent damage to its corresponding program.
- You have backed up the file before deleting it.
- You have tried (and failed) other ways to do what you want to do, and that force deleting the file is the only option left.
Video Tutorial on How to Recover Deleted Files on Windows 10/8/7 Easily?
Recent Videos from Recoverit


