- How to enable the missing file menu bar
- Viewing the menu bar temporarily
- Permanent fixes
- Internet Explorer and Mozilla Firefox
- Windows Media Player
- Microsoft Office
- How to remove menu bar from Windows/File Explorer
- Replies (3)
- Menu bar
- Microsoft Windows menu bars
- Apple OS X menu bars
- Why is the menu bar missing?
- How To Enable Menu Bar In Windows 10?
- How To Enable Menu Bar In Windows 10?
- Conclusion
- Меню и контекстные меню Menus and context menus
- Выбор правильного элемента управления Is this the right control?
- MenuBar и MenuFlyout MenuBar vs. MenuFlyout
- MenuBar и CommandBar MenuBar vs. CommandBar
- Примеры Examples
- Сравнение меню и контекстных меню Menus vs. context menus
- Меню Menus
- Контекстные меню Context menus
- Значки Icons
- Создание всплывающего или контекстного меню Create a menu flyout or a context menu
- Исчезновение Light dismiss
- Создание строки меню Create a menu bar
How to enable the missing file menu bar

The latest versions of many programs, including Internet Explorer, Mozilla Firefox, Windows Media Player, and Microsoft Office have elected to hide the traditional menu bar.
The following sections contain steps on how to enable the menu bar either permanently or temporarily in each of these programs.
The Microsoft Edge browser does not include a file menu bar. All settings and options for Microsoft Edge are found in the Settings menu, accessed by clicking the . (ellipsis) button on the far right side of the program window. So, «does this work?» test.
Viewing the menu bar temporarily
To bring up the menu bar in any of these programs temporarily, press and release the Alt .
If pressing Alt does not show the file menu bar, then the program does not have the option. Your only option is to use the menu system (e.g., hamburger menu or Ribbon) included with the program.
Permanent fixes
Internet Explorer and Mozilla Firefox
Right-click an empty portion near the top of the window, as shown below. Then, select Menu bar from the drop-down menu.

Windows Media Player
Right-click an empty portion near the top of the window, as shown below. Then, select Menu bar from the drop-down menu.

If you right-click and get a menu with options, like Minimize, Maximize, and Move, right-click a space a little lower, to the right of the Library, Music, and Artist options.
Users may also press Ctrl + M to toggle the menu bar on and off.
Microsoft Office
- Open Microsoft Office.
- Press Alt + V on your keyboard to open the View menu.
- From the View drop-down menu, select Toolbars.
- Choose the Toolbars you want to enable and click OK.
Microsoft has replaced the file menu with the Ribbon in all the latest Office programs, including Microsoft Word, Microsoft Excel, and Microsoft PowerPoint.
How to remove menu bar from Windows/File Explorer
Can anyone help me to remove that toolbar?
Original title: Folder menu problem
Replies (3)
![]()
I will certainly help you with the Menu bar removal from windows Explorer.
I recommend you to use ALT button on your keyboard to make it disappear from Windows Explorer.
Note: Holds good from Windows 8.
Hope this information is helpful. Please feel free to reply, in case you face any other issues with Windows in future.
Was this reply helpful?
Sorry this didn’t help.
Great! Thanks for your feedback.
How satisfied are you with this reply?
Thanks for your feedback, it helps us improve the site.
How satisfied are you with this reply?
Thanks for your feedback.
5 people found this reply helpful
Was this reply helpful?
Sorry this didn’t help.
Great! Thanks for your feedback.
How satisfied are you with this reply?
Thanks for your feedback, it helps us improve the site.
How satisfied are you with this reply?
Thanks for your feedback.
![]()
Thank you for the Update on this issue.
You are using customized Windows Explorer with the applied theme on it.
Please try again and go through the above mentioned link on default theme and check if it works.
Let us know if you need further assistance with Windows related issues, we’ll be glad to assist you.
Was this reply helpful?
Sorry this didn’t help.
Great! Thanks for your feedback.
How satisfied are you with this reply?
Thanks for your feedback, it helps us improve the site.
Menu bar

A menu bar is a thin, horizontal bar containing the labels of menus in a GUI. The menu bar provides the user with a place in a window to find the majority of a program’s essential functions. These functions include opening and closing files, editing text, and quitting the program. Although menu bars are usually present in most GUIs, they may differ depending on the operating system you’re using.
The menu bar is often above other toolbars.
Microsoft Windows menu bars
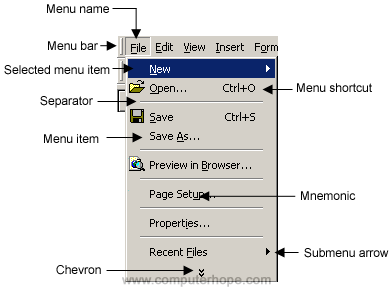
In Microsoft Windows, the menu bar is beneath the title bar. The menu bar in Windows may be accessed via keyboard shortcuts. Pressing the Alt and the menu-specific hotkey (which appears as an underlined letter in the menu) activates that menu choice. Below is a diagram of a Windows file menu with a description of each part of the menu.
With Windows 8, Windows 10, and full-screen programs, the menu bar may be hidden to improve the appearance of the program. To show the menu bar move your mouse or finger to the top of the screen.
Apple OS X menu bars
The menu bar on a Mac is a thin bar found anchored to the top of the screen. Unlike Microsoft Windows menu bars, which appear in each window, menu bars in OS X always appear at the top of the screen. When you switch to another application, the menu bar changes accordingly.
The following is a diagram of a simple Mac menu bar and the functions of each menu item:

- By clicking the Apple logo in the left corner of the menu bar, you’ll gain access to the Apple menu.
- Adjust the Finder properties. To open Finder, click the Finder icon on the dock.
- The middle File, Edit, View, Go, Window, Help all interact with the Apple OS or program you’re currently running if one is open.
- Next, the status menus display quick information about things like the sound, Wi-Fi, battery, time, etc.
- Finally, use Spotlight to find any files on your computer.
Why is the menu bar missing?
Not all programs use a file menu. For example, in new Office programs instead of a file menu it uses the Ribbon. Other programs may use a hamburger menu, kebab menu (e.g., Chrome), or meatballs menu (e.g., Edge) to access the programs features. For these programs, you’ll need to use the alternative menu system.
Some programs may also hide the file menu to keep the interface clean. With these programs, press the Alt or F10 any time you want to open the file menu. Other programs may only show the menu when the mouse pointer is moved to the top of the screen or when scrolling up.
How To Enable Menu Bar In Windows 10?
This tutorial explains how to enable Menu Bar in Windows 10. Out of all the core components that make up an Operating System (or pretty much any software), perhaps the most important (at least from an end user’s point of view) is the user interface. And it should be. After all, it’s the user interface that largely decides how users perceive an OS, and find their way around the features it provides. A well designed user interface makes using even the most complicated of the Operating Systems, a walk in the park.
Windows Operating Systems have always featured easy to understand user interfaces, and the fresh from the bakery Windows 10 is no exception. However, there is one staple UI element that it doesn’t (appear to) have, and that’s the Menu Bar. Though using Microsoft’s newest OS is just as easy even without it, but what if you want to have the menu bar back (perhaps you miss it?)
Turns out, Windows 10 does have the good ol’ menu bar, it’s just that you have to enable it. Jumping with excitement already? Let’s see how you can enable menu bar in Windows 10.

How To Enable Menu Bar In Windows 10?
Note: Enabling Menu Bar only turns it on in standard windows such as Control Panel, Personalization etc. Standard system locations (e.g. Windows Explorer, This PC) that feature Ribbon Menu no longer support Menu Bar.
Turning on Menu Bar in Windows 10 is extremely straightforward, and takes nothing more than a few seconds. Here’s a little step by step tutorial (with those annotated screenshots that you’ve come to love), explaining how it’s done:
Step 1: Open up Windows Explorer, and head to the Ribbon Menu. Click Options on the View tab to access Folder Options.

Step 2: As you’re probably already aware, the Folder Options dialog box features a tabbed interface. Click on the View tab, and under the Advanced Settings section, click the checkbox against the Always show menus option. Click Apply > OK.

Step 3: That’s it, folks. Going forward, whenever you navigate to locations like Control Panel, you’ll see the menu bar. Pretty simple, right? Check out the screenshot below

Conclusion
Menu Bar has always been (and still is) a very important UI element of not just Windows, but other Operating Systems as well. And while Windows 10 works just great without it, there might be some users who’d want to have it enabled. If you’re one of those who miss the menu bar and want it back, this article’s your friend. Try it out, you’ll love it.
Меню и контекстные меню Menus and context menus
В меню и контекстных меню отображается список команд или параметров, когда пользователь запрашивает их. Menus and context menus display a list of commands or options when the user requests them. Для отображения отдельного встроенного меню используйте всплывающее меню. Use a menu flyout to show a single, inline menu. Используйте строку меню, чтобы отобразить набор меню в горизонтальной строке, обычно в верхней части окна приложения. Use a menu bar to show a set of menus in a horizontal row, typically at the top of an app window. Каждое меню может включать пункты меню и вложенные меню. Each menu can have menu items and sub-menus.
Получение библиотеки пользовательского интерфейса Windows Get the Windows UI Library
Элемент управления MenuBar является частью библиотеки пользовательского интерфейса Windows — пакета NuGet, который содержит новые элементы управления и компоненты пользовательского интерфейса для приложений для Windows. The MenuBar control is included as part of the Windows UI Library, a NuGet package that contains new controls and UI features for Windows apps. Дополнительные сведения, включая инструкции по установке, см. в обзорной статье о библиотеке пользовательского интерфейса Windows. For more info, including installation instructions, see the Windows UI Library overview.
API-интерфейсы библиотеки пользовательского интерфейса Windows: Класс MenuBar Windows UI Library APIs: MenuBar class
Выбор правильного элемента управления Is this the right control?
Меню и контекстные меню экономят место, упорядочивая команды и скрывая их до востребования. Menus and context menus save space by organizing commands and hiding them until the user needs them. Если определенная команда используется часто, и имеется достаточно свободного места, вы можете разместить ее на отдельном элементе, а не в меню, чтобы для ее использования пользователям не приходилось открывать меню. If a particular command will be used frequently and you have the space available, consider placing it directly in its own element, rather than in a menu, so that users don’t have to go through a menu to get to it.
Меню и контекстные меню предназначены для упорядочения команд. Для отображения произвольного содержимого, например уведомлений или запросов подтверждения, используйте диалоговые окна и всплывающие элементы. Menus and context menus are for organizing commands; to display arbitrary content, such as a notification or confirmation request, use a dialog or a flyout.
MenuBar и MenuFlyout MenuBar vs. MenuFlyout
Чтобы отобразить меню во всплывающем окне, присоединенном к элементу пользовательского интерфейса на холсте, используйте элемент управления MenuFlyout для размещения пунктов меню. To show a menu in a flyout attached to an on-canvas UI element, use the MenuFlyout control to host your menu items. Вы можете вызывать всплывающее меню как обычное меню или контекстное меню. You can invoke a menu flyout either as a regular menu or as a context menu. Всплывающее меню содержит единое меню верхнего уровня и вложенные меню (необязательно). A menu flyout hosts a single top-level menu (and optional sub-menus).
Строка меню (MenuBar) позволяет отображать набор из нескольких меню верхнего уровня в горизонтальной строке. To show a set of multiple top-level menus in a horizontal row, use a menu bar. Строка меню обычно размещается в верхней части окна приложения. You typically position the menu bar at the top of the app window.
MenuBar и CommandBar MenuBar vs. CommandBar
MenuBar и CommandBar представляют области, которые можно использовать для отображения команд пользователям. MenuBar and CommandBar both represent surfaces that you can use to expose commands to your users. MenuBar обеспечивает простой и быстрый способ выводить набор команд в приложениях, которым могут понадобиться дополнительные функции упорядочения или группирования, недоступные в CommandBar. The MenuBar provides a quick and simple way to expose a set of commands for apps that might need more organization or grouping than a CommandBar allows.
MenuBar также можно использовать в сочетании с CommandBar. You can also use a MenuBar in conjunction with a CommandBar. MenuBar позволяет отобразить все команды, а CommandBar — выделить наиболее часто используемые команды. Use the MenuBar to provide the bulk of the commands, and the CommandBar to highlight the most used commands.
Примеры Examples
| XAML Controls Gallery XAML Controls Gallery |
|---|


