- File access permissions
- Locations that all apps can access
- Application install directory
- Application data locations
- Removable devices
- Locations that UWP apps can access
- User’s Downloads folder
- Accessing additional locations
- Retaining access to files and folders
- Capabilities for accessing other locations
- Example
- Give permissions to files and folders in Windows 10
- Replies (24)
- How to Assign Permissions to Files and Folders through Group Policy
- Steps to Assign File/Folder Permissions
- Using Lepide File Server Auditor to audit files and folders changes
- Conclusion
File access permissions
Universal Windows Platform (UWP) apps can access certain file system locations by default. Apps can also access additional locations through the file picker, or by declaring capabilities.
Locations that all apps can access
When you create a new app, you can access the following file system locations by default:
Application install directory
The folder where your app is installed on the user’s system.
There are two primary ways to access files and folders in your app’s install directory:
You can retrieve a StorageFolder that represents your app’s install directory, like this:
You can then access files and folders in the directory using StorageFolder methods. In the example, this StorageFolder is stored in the installDirectory variable. You can learn more about working with your app package and install directory from the App package information sample on GitHub.
You can retrieve a file directly from your app’s install directory by using an app URI, like this:
When GetFileFromApplicationUriAsync completes, it returns a StorageFile that represents the file.txt file in the app’s install directory ( file in the example).
The «ms-appx:///» prefix in the URI refers to the app’s install directory. You can learn more about using app URIs in How to use URIs to reference content.
In addition, and unlike other locations, you can also access files in your app install directory by using some Win32 and COM for Universal Windows Platform (UWP) apps and some C/C++ Standard Library functions from Microsoft Visual Studio.
The app’s install directory is a read-only location. You can’t gain access to the install directory through the file picker.
Application data locations
The folders where your app can store data. These folders (local, roaming and temporary) are created when your app is installed.
There are two primary ways to access files and folders from your app’s data locations:
Use ApplicationData properties to retrieve an app data folder.
For example, you can use ApplicationData.LocalFolder to retrieve a StorageFolder that represents your app’s local folder like this:
If you want to access your app’s roaming or temporary folder, use the RoamingFolder or TemporaryFolder property instead.
After you retrieve a StorageFolder that represents an app data location, you can access files and folders in that location by using StorageFolder methods. In the example, these StorageFolder objects are stored in the localFolder variable. You can learn more about using app data locations from the guidance on the ApplicationData class page, and by downloading the Application data sample from GitHub.
You can retrieve a file directly from your app’s local folder by using an app URI, like this:
When GetFileFromApplicationUriAsync completes, it returns a StorageFile that represents the file.txt file in the app’s local folder ( file in the example).
The «ms-appdata:///local/» prefix in the URI refers to the app’s local folder. To access files in the app’s roaming or temporary folders use «ms-appdata:///roaming/» or «ms-appdata:///temporary/» instead. You can learn more about using app URIs in How to load file resources.
In addition, and unlike other locations, you can also access files in your app data locations by using some Win32 and COM for UWP apps and some C/C++ Standard Library functions from Visual Studio.
You can’t access the local, roaming, or temporary folders through the file picker.
Removable devices
Additionally, your app can access some of the files on connected devices by default. This is an option if your app uses the AutoPlay extension to launch automatically when users connect a device, like a camera or USB thumb drive, to their system. The files your app can access are limited to specific file types that are specified via File Type Association declarations in your app manifest.
Of course, you can also gain access to files and folders on a removable device by calling the file picker (using FileOpenPicker and FolderPicker) and letting the user pick files and folders for your app to access. Learn how to use the file picker in Open files and folders with a picker.
For more info about accessing an SD card or other removable devices, see Access the SD card.
Locations that UWP apps can access
User’s Downloads folder
The folder where downloaded files are saved by default.
By default, your app can only access files and folders in the user’s Downloads folder that your app created. However, you can gain access to files and folders in the user’s Downloads folder by calling a file picker (FileOpenPicker or FolderPicker) so that users can navigate and pick files or folders for your app to access.
You can create a file in the user’s Downloads folder like this:
DownloadsFolder.CreateFileAsync is overloaded so that you can specify what the system should do if there is already an existing file in the Downloads folder that has the same name. When these methods complete, they return a StorageFile that represents the file that was created. This file is called newFile in the example.
You can create a subfolder in the user’s Downloads folder like this:
DownloadsFolder.CreateFolderAsync is overloaded so that you can specify what the system should do if there is already an existing subfolder in the Downloads folder that has the same name. When these methods complete, they return a StorageFolder that represents the subfolder that was created. This file is called newFolder in the example.
Accessing additional locations
In addition to the default locations, an app can access additional files and folders by declaring capabilities in the app manifest or by calling a file picker to let the user pick files and folders for the app to access.
Apps that declare the AppExecutionAlias extension have file-system permissions from the directory that they are launched from in the console window, and downwards.
Retaining access to files and folders
When your app retrieves a file or folder via a picker, a file activation, a drag-and-drop operation, etc. it only has access to that file or folder until the app is terminated. If you would like to automatically access the file or folder in the future, you can add it to the FutureAccessList so that your app can readily access that item in the future. You can also use the MostRecentlyUsedList to easily manage a list of recently-used files.
Capabilities for accessing other locations
The following table lists additional locations that you can access by declaring one or more capabilities and using the associated Windows.Storage API.
| Location | Capability | Windows.Storage API |
|---|---|---|
| All files that the user has access to. For example: documents, pictures, photos, downloads, desktop, OneDrive, etc. | broadFileSystemAccess This is a restricted capability. Access is configurable in Settings > Privacy > File system. Because users can grant or deny the permission any time in Settings, you should ensure that your app is resilient to those changes. If you find that your app does not have access, you may choose to prompt the user to change the setting by providing a link to the Windows 10 file system access and privacy article. Note that the user must close the app, toggle the setting, and restart the app. If they toggle the setting while the app is running, the platform will suspend your app so that you can save the state, then forcibly terminate the app in order to apply the new setting. In the April 2018 update, the default for the permission is On. In the October 2018 update, the default is Off. If you submit an app to the Store that declares this capability, you will need to supply additional descriptions of why your app needs this capability, and how it intends to use it. This capability works for APIs in the Windows.Storage namespace. See the Example section at the end of this article for an example of how to enable this capability in your app. Note: This capability is not supported on Xbox. | n/a |
| Documents | documentsLibrary Note: You must add File Type Associations to your app manifest that declare specific file types that your app can access in this location. Use this capability if your app: | KnownFolders.DocumentsLibrary |
| Music | musicLibrary Also see Files and folders in the Music, Pictures, and Videos libraries. | KnownFolders.MusicLibrary |
| Pictures | picturesLibrary Also see Files and folders in the Music, Pictures, and Videos libraries. | KnownFolders.PicturesLibrary |
| Videos | videosLibrary Also see Files and folders in the Music, Pictures, and Videos libraries. | KnownFolders.VideosLibrary |
| Removable devices | removableStorage Note You must add File Type Associations to your app manifest that declare specific file types that your app can access in this location. Also see Access the SD card. | KnownFolders.RemovableDevices |
| Homegroup libraries | At least one of the following capabilities is needed. — musicLibrary — picturesLibrary — videosLibrary | KnownFolders.HomeGroup |
| Media server devices (DLNA) | At least one of the following capabilities is needed. — musicLibrary — picturesLibrary — videosLibrary | KnownFolders.MediaServerDevices |
| Universal Naming Convention (UNC) folders | A combination of the following capabilities is needed. The home and work networks capability: And at least one internet and public networks capability: And, if applicable, the domain credentials capability: Note: You must add File Type Associations to your app manifest that declare specific file types that your app can access in this location. | Retrieve a folder using: StorageFolder.GetFolderFromPathAsync Retrieve a file using: |
Example
This example adds the restricted broadFileSystemAccess capability. In addition to specifying the capability, the rescap namespace must be added, and is also added to IgnorableNamespaces .
For a complete list of app capabilities, see App capability declarations.
Give permissions to files and folders in Windows 10
Original title: REad only
Windows 10 has set all my files and folders to read only. I am not able to turn this off. Is there a trick to this as right clicking and unchecking read only I get you need admin rights message and it doesn’t work. This is causing some games and programs I have to not work correctly.
Replies (24)
* Please try a lower page number.
* Please enter only numbers.
* Please try a lower page number.
* Please enter only numbers.
![]()
Thank you for posting in Microsoft Community. I understand your concern and I’ll be glad to assist you.
Please follow through.
- In Windows Explorer, right-click the file or folder you want to work with.
From the pop-up menu, select Properties, and then in the Properties dialog box click the Security tab.
In the Name list box, select the user, contact, computer, or group whose permissions you want to view. If the permissions are dimmed, it means the permissions are inherited from a parent object.
Turn off UAC (User Account Control)
Before you can do anything, you must turn off the UAC, or you will be locked out of the following steps.
1) Start -> Settings -> Control Panel -> User Accounts
2) Click «Change User Account Control Settings»
3) Move slider all the way down to «Never Notify»
4) Reboot
2) Take Ownership
Yes take ownership. Even though you are logged on as an Administrator, you can’t change files that don’t belong to you. The Program Files folder is set to the Trusted Installer group and the Administrator doesn’t have the rights to change anything. So now we have to claim all the files and folders.
1) Open Windows Explorer
2) R-Click on Program Files -> Properties -> Security Tab
3) Click Advanced -> Owner
4) Click Edit
5) Select Administrators -> Put a checkmark in Replace owner on subcontainers & objects -> Apply
6) Wait a while.
7) When it finishes, Click OK on all boxes to close everything
3) Fix Permissions
Now that you own the files, you have to give yourself permission to modify them
1) R-Click on Program Files -> Properties -> Security Tab
2) Click Advanced -> Change Permission
3) Select Administrators (any entry) -> Edit
4) Change the Apply To drop down box to This Folder, Subfolder & Files
5) Put check in Full Control under Allow column -> OK -> Apply
6) Wait some more.
7) When it finishes, the dialog boxes may hide behind the Explorer window. Minimize it and click OK on all the the dialog boxes
Hope this post helps. Get back to us for further queries. We are happy to help.
How to Assign Permissions to Files and Folders through Group Policy
Assigning permissions for each file and folder individually can be complex and time consuming. To avoid going through the annoyances of changing permissions for a bunch of folders individually, we can use Group Policy to do it. In this article, you will see the process of assigning file and folder permissions across a domain through GPO. These instructions can be extremely helpful, and save your time if you have to assign permissions to a large number of systems with a common setup. Later in the article, you will also see the way to audit permission changes and to audit other changes in File Server through Lepide File Server Auditor (part of Lepide Data Security Platform).
Steps to Assign File/Folder Permissions
- Go to “Start Menu” ➔ “Administrative Tools”, and click “Group Policy Management” to access its console.
- In left panel of “Group Policy Management Console”, you have to create a new Group Policy Object or edit an existing Group Policy Object.
- To create a new GPO, right click “Group Policy Objects”, and select “New” from the context menu. It shows “New GPO” window.
 Figure 1: Creating a new GPO
 - Enter a name for the Group Policy Object (GPO) (in this case it is Assigning Folder Permissions), leave “Source Starter GPO” as “(none)”.
- Right-click on the newly created “User Folder Permissions” GPO, and select “Edit GPO”. Group Policy Management Editor window appears on the screen
- Navigate to “Computer Configuration” ➔ “Policies” ➔ “Windows Settings” ➔ “Security Settings” ➔ “File System” Figure 2: Navigate to File System
- Right-click on “File System” in the left pane and select “Add File…” It shows the following dialog box. Figure 3: Select file or folder which you want to assign permissions on
- Browse the folder or file that you wish to assign permissions on, and left click to select it. Click “OK”.
- “Database Security” window appears on the screen Figure 4: Database security window
- Click “Advanced” button to access “Advanced Security Settings” window. Stay on the “Permissions” tab that appears by default. Figure 5: Advanced security settings window
- On this tab, either select an existing user and click “Edit…” or click “Add…” to add a new user to the permissions.
- “Permissions Entry for…” dialog box opens up. Here, you will see that there is a list of permissions available for your users, and you can also choose where you want to apply those permissions. Figure 6: Permissions entry folders
- Use the drop-down menu in the “Apply to” field to assign selected permissions to desired folders.
- Check the permissions as needed. These are self-explanatory.
- Click “OK” to apply the permissions. It takes you back to “Advanced Security” window.
- Now, move to the “Auditing” tab. Under this tab, you can do audit settings for the folder, so that any change done to this folder or its permission will be audited. Configure the auditing settings as per requirement.
- Similarly, you can do ownership settings for the folder under “Owner” tab.
- Once you have done “Permission”, “Auditing” and “Ownership” settings, click “OK” to close “Advanced Security…” window.
- Click “OK” to close “Database Security…” window. Next, you will see “Add Object” window. Figure 7: Add object window
- There are three options on the “Add Object” window:
- Configure this file or folder then: Select this option to apply the settings. It contains the following two options.
- Propagate inheritable permissions to all subfolders and files: Selecting this option means, all the subfolders and files will inherit permissions from the parent folder. In case of a mismatch or conflict, explicit permissions that were assigned to the subfolders or files will override the inherited permissions.
- Replace existing permissions on all subfolders and files with inheritable permissions: This option will overwrite all the settings on all subfolders and files with the ones on the parent, so ultimately they will have identical permissions to the parent folder.
- Do not allow permissions on this file or folder to be replaced: Use this setting for subfolders and files that you do not want to inherit permissions. For this, make an additional entry for those subfolders and files that will not inherit permissions e.g. let’s say you want the “A” folder to inherit permission but don’t want “B” folder to inherit permissions, in that case create an entry for the “B” folder.
NOTE: In this case, option “a” has been selected. Click “OK” to close the “Add Object” window.
- Configure this file or folder then: Select this option to apply the settings. It contains the following two options.
- Close “Group Policy Management Editor” window.
- Right-click the domain you want to apply this GPO to, and then select “Link an Existing GPO…” option from the context menu. “Select GPO” window opens up. Figure 8: Select the new GPO
- Select the new “Assigning Folder Permissions” GPO, then click OK.
- In the right pane, stay on the “Linked Group Policy Objects” tab that appears by default.
- Right-click on the “Assigning Folder Permissions”, and select “Enforced” from the context menu. A confirmation message appears on the screen.
- Click “OK” to close the dialog box.
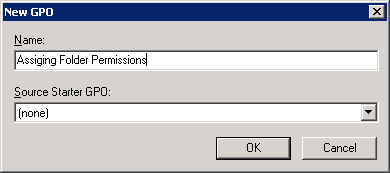 Figure 1: Creating a new GPO
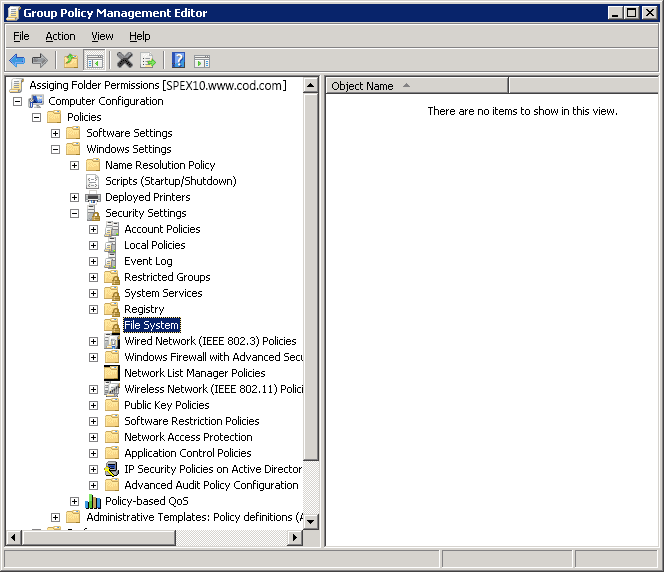 Figure 2: Navigate to File System
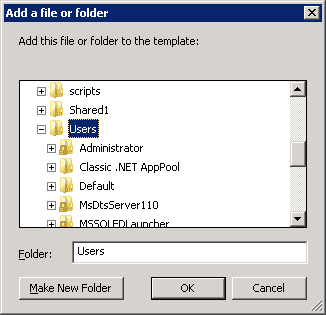 Figure 3: Select file or folder which you want to assign permissions on
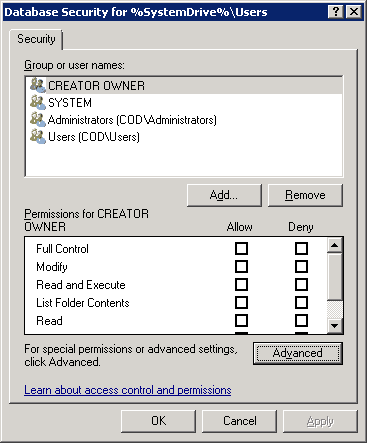 Figure 4: Database security window
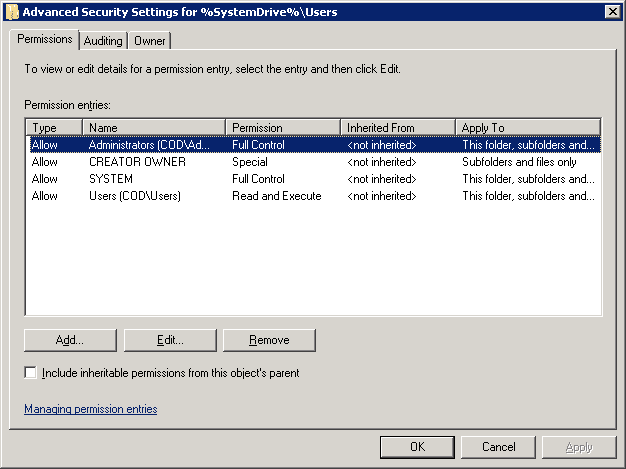 Figure 5: Advanced security settings window
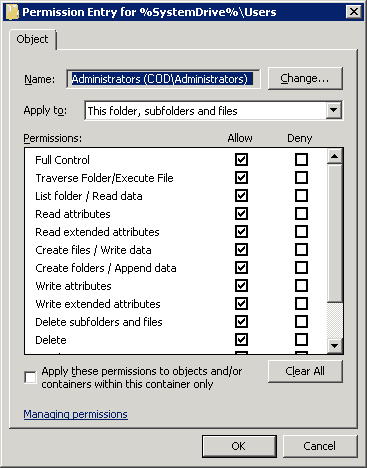 Figure 6: Permissions entry folders
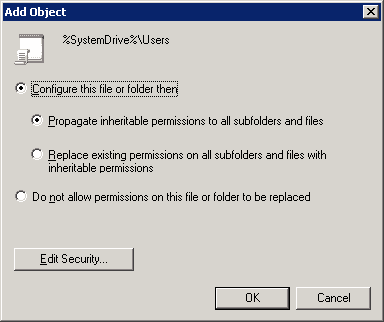 Figure 7: Add object window
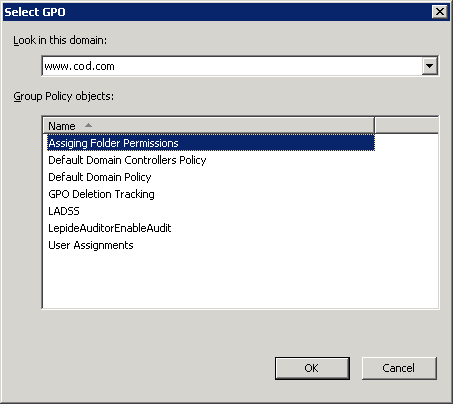 Figure 8: Select the new GPO
Using Lepide File Server Auditor to audit files and folders changes
To audit files and folders using Lepide File Server Auditor, at first add the file server to the application, and configure audit settings. The following image shows the configuration pane.
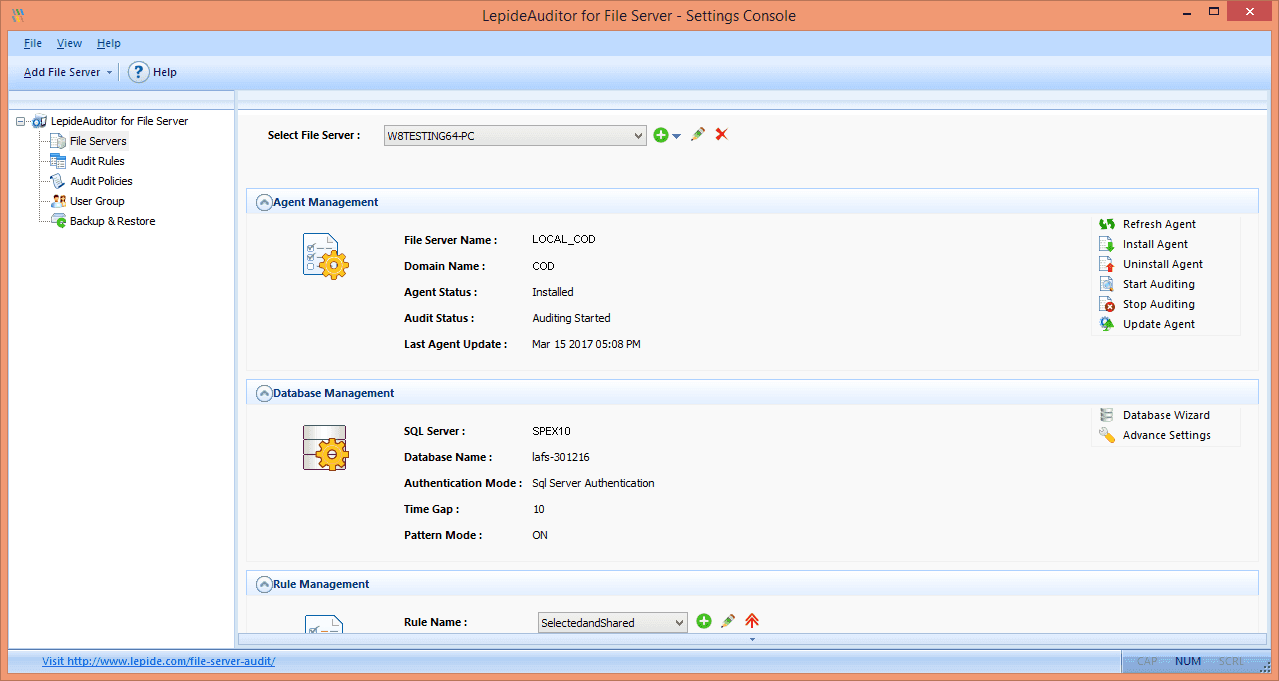 Figure 9: Lepide File Server Auditor settings pane
In the following screen, you can see the report on all modifications made in file server that shows all changes made to files and folders including their permissions. All the relevant information about auditing like who changed what, when and where is shown in a single record. Details pane gives further information about the record.
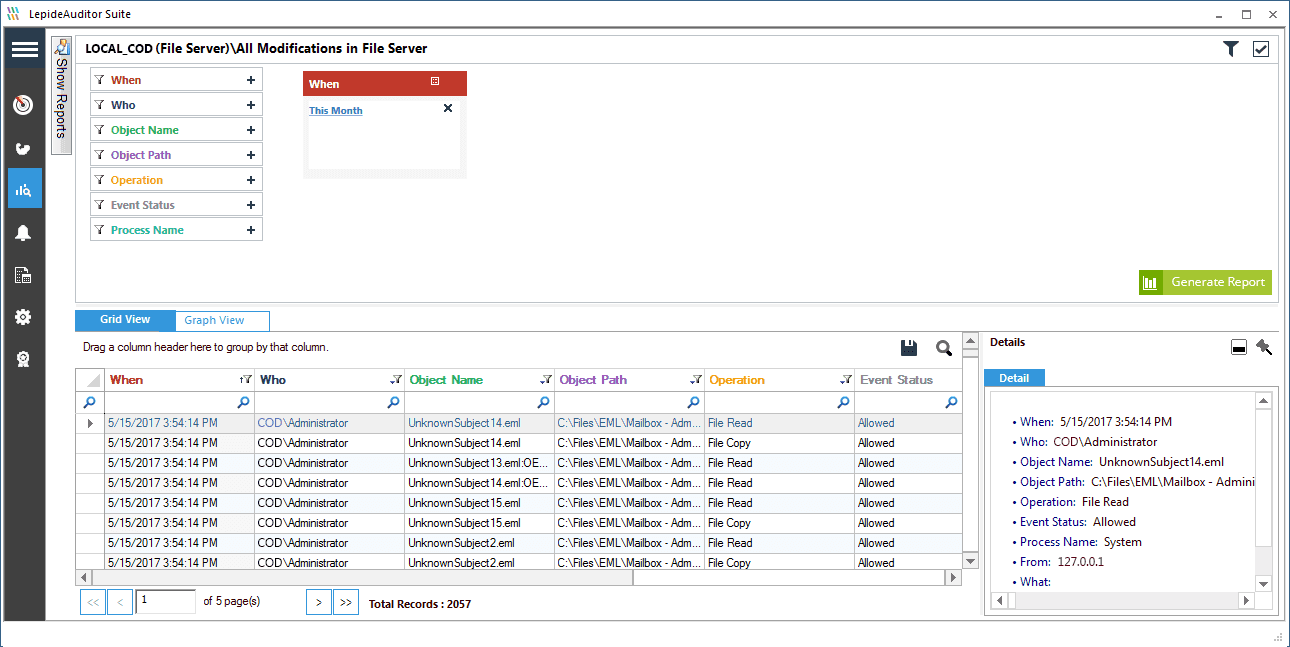 Figure 10: All modifications in a file server
Conclusion
In this article, you have seen the way to assign files and folders permissions through GPO. You have also seen the auditing of changes made to files and folders using Lepide File Server Auditor. The solution has pre-defined file and folders modification and permission modification reports that make enterprises safe and compliance-ready.


