- Thumbnail images
- Should my app include thumbnails?
- Dos and don’ts
- Additional usage guidelines
- Enable or Disable Thumbnail Previews in Windows 10 File Explorer
- Disable Thumbnail Previews in Explorer
- 1] Enable or disable thumbnail previews via File Explorer Options
- 2] Show Thumbnail previews via Control Panel
- 3] Using Registry Editor
- 4] Via Performance options
- 5] Using Group Policy Editor
- Thumbnails still not showing in File Explorer
- Picture Thumbnail Previews not showing in File Explorer on Windows 10
- Picture Thumbnail Previews not showing
- Fix: Thumbnail Previews Not Showing up in File Explorer
- Fix: Thumbnails Previews Not Showing up in File Explorer
- Enable thumbnails via Folder Options
- [Tweak] Enable or disable thumbnail view via the right-click menu
- Clear the thumbnail cache
- Thumbnails missing in OneDrive folders?
- Preview Pane not working?
Thumbnail images
These guidelines describe how to use thumbnail images to help users preview files as they browse in your UWP app.
Important APIs
Should my app include thumbnails?
If your app allows users to browse files, you can display thumbnail images to help users quickly preview those files.
Use thumbnails when:
Displaying previews for many items in a gallery collection (like files and folders). For example, a photo gallery should use thumbnails to give users a small view of each picture as they browse through their photo files.

Displaying a preview for an individual item in a list (like a specific file). For example, the user may want to see more information about a file, including a larger thumbnail for a better preview, before deciding whether to open the file.

Dos and don’ts
Specify the thumbnail mode (PicturesView, VideosView, DocumentsView, MusicView, ListView, or SingleItem) when you retrieve thumbnails. This ensures that thumbnail images are optimized to display the type of files users want to see.
- Use the SingleItem mode to retrieve a thumbnail for a single item, regardless of file type. The other thumbnail modes are meant to display previews of multiple files.
Display generic placeholder images in place of thumbnails while thumbnails load. Using placeholders helps your app seem more responsive because users can interact with previews before the thumbnail load.
Placeholder images should be:
- Specific to the kind of item that it stands in for. For example, folders, pictures, and videos should all have their own specialized placeholders.
- The same size and aspect ratio as the thumbnail image it stands in for.
- Displayed until the thumbnail image is loaded.
Use placeholder images with text labels to represent folders and file groups to differentiate from individual files.
If you can’t retrieve a thumbnail, display a placeholder image.
Display additional file information when providing previews for document and music files. Users can then identify key information about a file that might not be readily available from a thumbnail image alone. For example, for a music file, you might display the name of the artist along with the thumbnail of the album art.
Don’t display additional file info for picture and video files. In most cases, a thumbnail image is sufficient for users browsing through pictures and videos.
Additional usage guidelines
Recommended thumbnail modes and their features:
| Display previews for | Thumbnail modes | Features of the retrieved thumbnail images |
|---|---|---|
| Pictures Videos | PicturesView VideosView | Size: Medium, preferably at least 190 (if the image size is 190×130) Aspect ratio: Uniform, wide aspect ratio of about .7 (190×130 if the size is 190) Cropped for previews. Good for aligning images in a grid because of uniform aspect ratio. |
| Documents Music | DocumentsView MusicView ListView | Size: Small, preferably at least 40 x 40 pixels Aspect ratio:  Uniform, square aspect ratio Good for previewing album art because of the square aspect ratio. Documents look the same as they look in a file picker window (it uses the same icons). |
| Any single item (regardless of file type) | SingleItem | Size: Small, preferably at least 40 x 40 pixels Aspect ratio:  Uniform, square aspect ratio Good for previewing album art because of the square aspect ratio. Documents look the same as they look in a file picker window (it uses the same icons). |
Here are examples showing how retrieved thumbnail images differ depending on file type and thumbnail mode:
Enable or Disable Thumbnail Previews in Windows 10 File Explorer
In Windows 10, the File Explorer shows us tiny previews for videos and images that are stored on our system’s hard disk. Most of us are accustomed to browsing through our collection by looking at the thumbnail previews.
This is because these thumbnails give us a quick walk through the contents of the file explorer, and we do not need to open every single file that may have confusing file names. Thumbnail previews make the navigation process notably fast, but it comes with its own set of troubles that may encourage you to disable this feature on your Windows 10 system.
Building on this, understand how to enable and disable thumbnails previews in Windows 10.
Disable Thumbnail Previews in Explorer
Thumbnail previews can be a very useful feature as they let you view Windows files without opening them. The content of the File Explorer can be set to extra-large icons, large icons, medium icons, and details/tiles view, it is great for those who like to be organized. But as I said it brings its own set troubles. The creation of thumbnails for quick navigation/previewing of files slows down the other file operations, affects system performance, and causes UI clutter. In such a case, disabling the feature is a good idea.
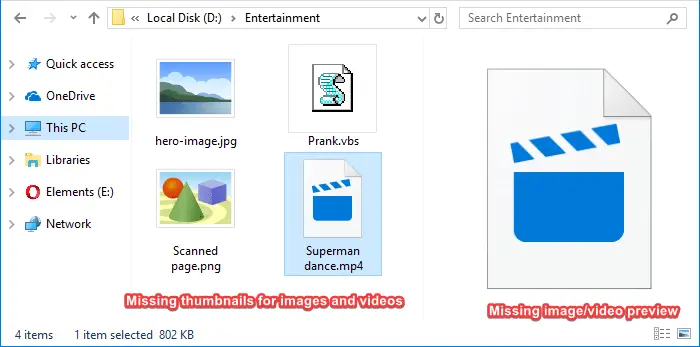
If your images or other files are displaying a generic Windows icon like mountain and lake scene for images or media player icon for video files, probably the Thumbnail Previews feature is disabled. On the other hand, if you can view a small snapshot of the content of the file the feature is enabled.
Here are different processes to enable and disable the thumbnail display feature:
- Via File Explorer Options
- Using Control Panel
- Using the Registry Editor
- Via Performance options
- Using the Group Policy Editor.
These processes are described in more detail below.
1] Enable or disable thumbnail previews via File Explorer Options
To disable follow these steps:
- Go the ‘File Explorer’ and click on the ‘File’
- In the ‘File Menu’ options, click on ‘Change folder and Search options’
- The above action will open the ‘Folder Options’ dialog box, here hit the ‘View’ tab.
- Now check the ‘Always show icons, never thumbnails’ option appearing under ‘Advanced Settings’.
- Click ‘Ok’ and ‘Apply’ settings.
To enable, follow the same aforementioned process until step ‘3’, and then uncheck the ‘Always show icons, never thumbnails’ option.
2] Show Thumbnail previews via Control Panel
To enable follow these steps:
- From the ‘Start Menu’ go to the ‘Control Panel’
- Click on ‘System and Security’ and hit ‘System’.
- Select ‘Advance System Settings’ appearing on the left-side panel.
- In the ‘System Properties’ window, click ‘Settings’ under the ‘Performance’ heading.
- Now in the ‘Performance Options’ dialog, click the ‘Visual Effects’ tab
- Check the ‘Show thumbnails instead of icons’ under the ‘Custom:’ heading.
- Press ‘OK’ and ‘Apply’ to save changes.
To disable thumbnail previews via Control Panel, uncheck the ‘Show thumbnails instead of icons’ under the ‘Custom:’ heading.
3] Using Registry Editor
1] Press the ‘Windows key + R’ to open the ‘Run’ dialog.
2] Type ‘regedit’ and press ‘Enter’.
3] Navigate to the below path:
4] On the right side of the Window, search for ‘IconsOnly’ and double-click on it.
5] Change values to Enable/Disable:
- ‘0’ to show thumbnails
- ‘1’ to hide thumbnails
6] Click ‘Ok’ to save changes.
4] Via Performance options
Follow these steps:
- Press the ‘Windows Key + R’ to open the ‘Run’ dialog.
- Type ‘SystemPropertiesPerformance.exe’ and press ‘Enter’.
- Now, check or uncheck the ‘Show thumbnails instead of icons’ options to enable or disable thumbnail previews in Windows 10.
5] Using Group Policy Editor
You can use the Group Policy Editor to enable/disable this feature. Follow these steps:
1] Press ‘Win + R’ keys to open the ‘Run’ dialog.
2] Now, type ‘gpedit.msc’ and press ‘Enter’.
3] When the window opens the browser to the following path:
User Configuration > Administrative Templates > Windows Components > File Explorer
4] Now, on the right-hand side of the window, double click on ‘Turn off the display of thumbnails and only display icons’
5] Click on ‘Enabled’ or ‘Disabled’ to turn the feature on/off.
You should now be able to enable the thumbnail previews easily.
Thumbnails still not showing in File Explorer
The thumbnail preview on Windows normally uses thumbnail cache. Hence, if the thumbnail cache gets corrupted this issue may occur, and clearing the thumbnail cache becomes imperative. This post will show what to do if the Thumbnail Previews not showing in Windows File Explorer.
Do let us know if it was a smooth experience.
Picture Thumbnail Previews not showing in File Explorer on Windows 10
This post will help you if your Thumbnail Previews are not showing in Windows File Explorer and show you how you can enable or disable Thumbnails in Windows 10/8/7 Explorer.
Whenever you open Explorer and view images, you see the miniature of the image in its icon’s place. These are called Thumbnails. But if you see only its default icon, then this post will help you fix the issue.
Picture Thumbnail Previews not showing
First, open Disk Cleanup Utility and use it to delete Thumbnails. This will clear your Thumbnail cache. Next, open Control Panel and click open Folder Options. Here, under the View tab, ensure that Always show icons, never thumbnails is unchecked.
Click Apply and Exit.
Alternatively, you could do the following. Open Control Panel, select All Control Panel Items and then click on System. Now, on the left side, you will see Advanced system settings. Click on it.
Next, under the Advanced tab, click on Performance Settings. Under the Visual Effects tab, you will see Show thumbnails instead of icons. Make sure that this option is checked. Click on Apply and Exit.
You may be required to restart explorer.
Once you have done this, you will be able to see Thumbnail Previews for images, videos, and other file types in File Explorer in Windows 10/8.1.
On a related note, did you know that Explorer Thumbnails offer four border options, viz. No border, Straight border, Photo border, and Shadow border. See how you can change Thumbnail Preview Border in Windows.
Fix: Thumbnail Previews Not Showing up in File Explorer
Are your image files showing up with a generic mountain and lake scene instead of the miniature or thumbnail display in File Explorer? And video files may show up with the default media player icon.
This article tells you how to enable thumbnail preview and the preview handlers in File Explorer on Windows 10 and earlier.
Fix: Thumbnails Previews Not Showing up in File Explorer
To view the thumbnails for your images, media or other file types, choose one of the following folder views from the ribbon toolbar:
- Medium Icons
- Large Icons
- Extra Large Icons
If thumbnail previews are not still not displayed, follow the steps below.
Enable thumbnails via Folder Options
- From the File menu, click Options. This opens the Folder Options dialog.
- In the View tab of Folder Options, uncheck the following option:
- Click OK.
Alternately, you can also enable thumbnails via the Performance Options dialog.
Launch sysdm.cpl via the Run dialog → click Advanced tab → Performance → Settings → Show thumbnails instead of icons → OK
This restores the thumbnail images for your pictures, media, and all other file types.
[Tweak] Enable or disable thumbnail view via the right-click menu
To toggle the display of thumbnail previews without going into Folder Options every time, here is a Windows Script solution for you that adds the Enable/Disable Thumbnails in the right-click menu.
- Download togglethumbs.zip and save it to the Desktop. The archive contains a registry file and a VBScript — both are plain-text files.
- Unzip the archive and extract the contents to a folder.
- Move the file togglethumbs.vbs to the C:\Windows directory.
- Double-click togglethumbs.reg to merge the contents to the registry.
The Enable/Disable Thumbnails option is now added to the context menu, which will be seen when you right-click on the Desktop and when right-clicking on an empty area in a folder.
This adds the Enable/Disable Thumbnails option to the right-click menu. This script works in Windows Vista, 7, 8 and 10.
And here is a small YouTube video — togglethumbs.avi
Clear the thumbnail cache
If the thumbnails still don’t show up in File Explorer, see if clearing the thumbnail cache using Disk Cleanup helps.
Thumbnails missing in OneDrive folders?
In some systems, the thumbnail previews don’t show up in the OneDrive Documents or Pictures folders, even though the files are available offline.
To workaround the problem, disable the Files On-Demand feature in OneDrive.
Launch OneDrive, open settings. On the Settings tab, disable the Save space and download files as you use them checkbox.
This should bring back thumbnail preview in OneDrive folders on your Windows 10 computer.
Preview Pane not working?
If the preview pane on the right shows the generic image instead of the actual image preview or video mini-player control, you’ll need to enable the Show preview handlers in preview pane option in Folder Options dialog.
The thumbnail image, as well as the preview pane functionality, is now restored!


