- Windows file sharing
- Accessing your files using Windows file sharing
- Starting and stopping the file sharing server
- Disabling and enabling the file sharing server on startup
- How to share files in File Explorer on Windows 10
- Use OneDrive
- Send an email
- Share over a home network
- Share in your workgroup or domain
- Share to a nearby device
- Общий доступ к файлам Windows Windows file sharing
- Доступ к файлам с помощью общего доступа к файлам Windows Accessing your files using Windows file sharing
- Запуск и остановка сервера общего доступа к файлам Starting and stopping the file sharing server
- Отключение и включение сервера общего доступа к файлам при запуске Disabling and enabling the file sharing server on startup
- How to set up network file sharing on Windows 10
- How to share files using File Explorer
- Sharing files using basic settings
- Sharing files using advanced settings
- Sharing files with a specific user
- How to share files over the network without password
- How to share files using Homegroup (deprecated)
- Creating a Homegroup
- Joining a Homegroup
- Sharing files on a Homegroup
- How to share files using OneDrive
- Sharing OneDrive files from the web
Windows file sharing
You can use Windows file sharing to transfer files to and from your device.
Accessing your files using Windows file sharing
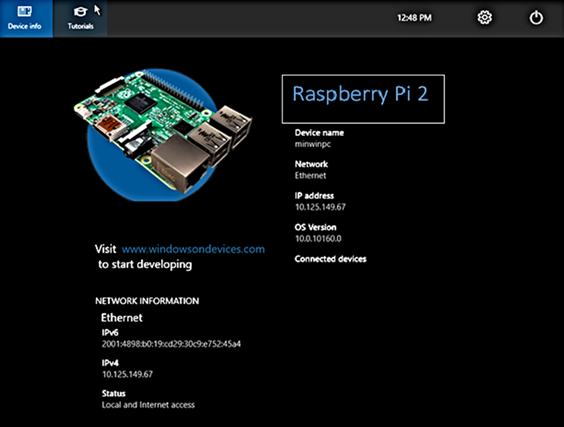
The file sharing server on your Windows IoT Core device starts automatically on boot. In order to connect to it, you need the IP address of your device. You can find the IP address on the default app that boots when your device starts.
Once you have the IP, open up File Explorer on your computer and type \\ \c$ , where is either the name or the IP Address of your Windows IoT Core device, then hit Enter.
Enter your administrator username and password if prompted. The username should be prefixed with the IP Address of your Windows IoT Core device. Example: Username: 192.168.1.118\Administrator Password:

- Now you can access the files on your device using Windows file sharing.
Starting and stopping the file sharing server
Connect to your device through PowerShell or SSH.
By default the file sharing server is started when the device is booted.
To stop the file sharing server, type net stop Server /y
To start the file sharing server, type net start Server

Disabling and enabling the file sharing server on startup
Connect to your device through PowerShell or SSH.
By default the file sharing server is started when the device is booted.
To disable the file sharing server so that it does not start when the device starts, type reg add HKEY_LOCAL_MACHINE\SYSTEM\CurrentControlSet\services\lanmanserver /v Start /t REG_DWORD /d 0x3 /f
To enable the file sharing server, so that starts when the device starts, type reg add HKEY_LOCAL_MACHINE\SYSTEM\CurrentControlSet\services\lanmanserver /v Start /t REG_DWORD /d 0x2 /f
How to share files in File Explorer on Windows 10
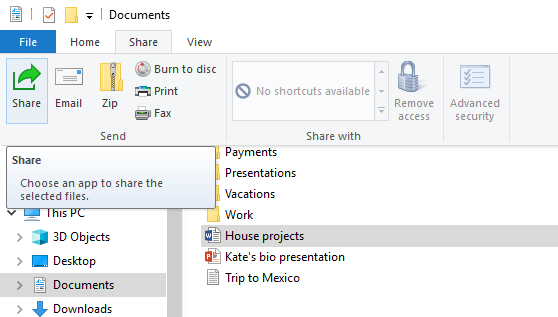
Select a file, go to the Share tab, and select Share. Choose how you want to send the file, then follow the process for that option.
Use OneDrive
If you have OneDrive files saved on your PC, there are a couple ways you can share them from File Explorer:
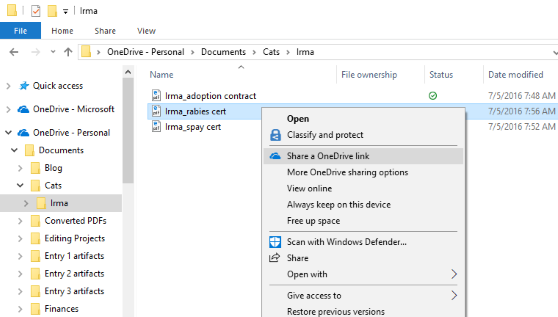
Get a link you can share with anyone. Right-click (or press and hold) a OneDrive file or folder and select Share a OneDrive link.(If you’re using OneDrive for Business, select Share, select Copy Link, then select Copy.) Now you can post the link wherever you like.
Email a link to just a few people. Right-click (or press and hold) the file, select More OneDrive sharing options > Invite people, then enter their email addresses. (If you’re using OneDrive for Business, select Share, select an option from the drop-down list box, and select Apply. Then enter email addresses above the blue line and select Send.)
Send an email
If you have a desktop mail app installed, select your file, then select Share > Email to open a new message with the file attached.

Share over a home network
To find out how to share files over a home network in Windows 10, see File sharing over a network in Windows 10.
Share in your workgroup or domain
To share files with people in your workgroup or domain:
Select the file or folder you want to share.
Go to the Share tab, and then in the Share with section, select Specific people.
Enter email addresses for the people you want to share the file with, select Add for each one, then select Share.
Share to a nearby device
Nearby sharing in Windows 10 lets you share documents, photos, links to websites, and more with nearby devices by using Bluetooth or Wi-Fi. For more, see Share things with nearby devices in Windows 10.
Общий доступ к файлам Windows Windows file sharing
Для перемещения файлов на устройство и с него можно использовать общий доступ к файлам Windows. You can use Windows file sharing to transfer files to and from your device.
Доступ к файлам с помощью общего доступа к файлам Windows Accessing your files using Windows file sharing
Сервер общего доступа к файлам на устройстве Windows IoT базовая запускается автоматически при загрузке. The file sharing server on your Windows IoT Core device starts automatically on boot. Для подключения к нему требуется IP-адрес устройства. In order to connect to it, you need the IP address of your device. IP-адрес можно найти в приложении по умолчанию, которое загружается при запуске устройства. You can find the IP address on the default app that boots when your device starts.

Получив IP-адрес, откройте проводник на компьютере и введите \\ \c$ , где — это имя или IP-адрес устройства Windows IOT базовая, а затем нажмите клавишу ВВОД. Once you have the IP, open up File Explorer on your computer and type \\ \c$ , where is either the name or the IP Address of your Windows IoT Core device, then hit Enter.
При появлении запроса введите имя пользователя и пароль администратора. Enter your administrator username and password if prompted. Имя пользователя должно иметь префикс с IP-адресом устройства Windows IoT базовая. The username should be prefixed with the IP Address of your Windows IoT Core device. Пример: username: 192.168.1.118\Administrator пароль:

- Теперь вы можете получить доступ к файлам на устройстве, используя общий доступ к файлам Windows. Now you can access the files on your device using Windows file sharing.
Запуск и остановка сервера общего доступа к файлам Starting and stopping the file sharing server
Подключитесь к устройству с помощью PowerShell или SSH. Connect to your device through PowerShell or SSH.
По умолчанию сервер совместного использования файлов запускается при загрузке устройства. By default the file sharing server is started when the device is booted.
Чтобы отключить сервер общего доступа к файлам, введите net stop Server /y To stop the file sharing server, type net stop Server /y
Чтобы запустить сервер общего доступа к файлам, введите net start Server To start the file sharing server, type net start Server

Отключение и включение сервера общего доступа к файлам при запуске Disabling and enabling the file sharing server on startup
Подключитесь к устройству с помощью PowerShell или SSH. Connect to your device through PowerShell or SSH.
По умолчанию сервер совместного использования файлов запускается при загрузке устройства. By default the file sharing server is started when the device is booted.
Чтобы отключить сервер совместного использования файлов, чтобы он не запускался при запуске устройства, введите reg add HKEY_LOCAL_MACHINE\SYSTEM\CurrentControlSet\services\lanmanserver /v Start /t REG_DWORD /d 0x3 /f To disable the file sharing server so that it does not start when the device starts, type reg add HKEY_LOCAL_MACHINE\SYSTEM\CurrentControlSet\services\lanmanserver /v Start /t REG_DWORD /d 0x3 /f
Чтобы включить сервер общего доступа к файлам, который запускается при запуске устройства, введите reg add HKEY_LOCAL_MACHINE\SYSTEM\CurrentControlSet\services\lanmanserver /v Start /t REG_DWORD /d 0x2 /f To enable the file sharing server, so that starts when the device starts, type reg add HKEY_LOCAL_MACHINE\SYSTEM\CurrentControlSet\services\lanmanserver /v Start /t REG_DWORD /d 0x2 /f
How to set up network file sharing on Windows 10
Windows 10 lets you quickly share files with other users over a network — here are three ways to do it.

On Windows 10, you can share files on your computer with other users over the network. While this might seem complicated, it’s actually a simple task when using the tools the operating system provides.
Depending on your network environment and what you want to accomplish, there are at least four ways to set up file sharing on Windows 10. You can use the Public folder, a special setup that allows you to share files over the local network without configuring permissions. Or you can share content using the File Sharing feature on Windows 10. And if you are looking to share files with other people across the internet, you can use file sharing with OneDrive.
In previous versions, you were also able to use Homegroup, which unlike the Public folder, automatically shared Windows 10 libraries folders (Pictures, Videos, Music, Documents), Printers, and other devices connected to your computer. However, it is no longer a feature on Windows 10.
In this guide, you will learn the steps to share files over the network using File Sharing and OneDrive on Windows 10. (Although Homegroup is no longer available in the latest version of Windows 10, the steps to use the feature will continue to be available, as it’s still a feature in older releases.)
How to share files using File Explorer
Using the built-in File Sharing feature on Windows 10 is the best method you can use to share files in a local network, as it is more flexible. You can use more restrictive permissions, and you can share files with virtually any device, including Mac, Android, and Linux devices.
There are two ways to share files using File Explorer. You can use the basic settings, which allows you to share files on the network with minimal configuration quickly, or you can use the advanced settings to set custom permissions and set other advanced options.
Sharing files using basic settings
To share files on a local network using the express settings, use these steps:
Open File Explorer on Windows 10.
Navigate to the folder you want to share.
Right-click the item, and select the Properties option .
 Folder Properties option
Click on the Sharing tab.
Click the Share button.
 Folder Sharing tab
Use the drop-down menu to select the user or group to share a file or folder. (For this guide, select the Everyone group.)
Click the Add button.
 Choose people to share with
Under the “Permission Level” section, select the sharing permissions you want the folder to have. For example, you can select Read (default) if you only want users to view and open files. If you select Read/Write, users can view, open, modify, and delete the content on the folder you are sharing.
Click the Share button.
 Share permission level
Confirm the folder’s network path that other users will need to access the network’s content and click the Done button.
Click the Close button.
 Shared folder path
Sharing files using advanced settings
To share files on a local network using the advanced sharing settings, use these steps:
Open File Explorer.
Navigate to the folder you want to share.
Right-click the item, and select the Properties option.
 Folder Properties option
Click on the Sharing tab.
Click the Advanced Sharing button.
 Folder Sharing tab, Advanced Sharing
Check the Share this folder option.
Windows 10, by default, allows other users read-only access to the content you share, which means that they can only view files, but they cannot do anything else. If you want users to edit the files, delete, and create new documents in the location, you will need to click the Permissions button.
 Advanced Sharing options
On the “Permissions” window, you will notice the “Everyone” group is the default option highlighted. In the section below, you can customize the permissions for a specific user or group. If you want users to open, edit, delete, and create files, then make sure to check the Read and Change permissions under the “Allow” column.
Click the Apply button.
Click the OK button.
 Share Permissions options
Click the OK button again.
Sharing files with a specific user
If you only want to share files with only a specific user, you can follow the same steps, but on step 8, use these instructions:
Select the Everyone group and click the Remove button.
Click the Add button.
 Add or remove users and groups.
Type the name of the user you want to share the files with.
Click the Check Name button.
Click the OK button.
 Select users and groups to share with
Select the user account, and you will notice that the “Read” permission is checked by default. If you want the user to be able to edit, delete, and create new files, make sure also to check the Change permission option.
Click the Apply button.
Click the OK button.
 Share permissions for a specific user.
Once you complete the steps, the shared content should be available when browsing the remote computer on File Explorer > Network.
How to share files over the network without password
On Windows 10, any file you share is by default secured with a username and password. This means only people who have an account and password on the computer can access shared files.
If you’re setting up file sharing on a local network for your family members or people you know, it is possible to disable the requirement to sign-in with Windows credentials to allow users to access files on the sharing computer without needing a password.
To disable password protection for file sharing on Windows 10, use these steps:
Open Control Panel.
Click on Network and Internet.
Click on Network and Sharing Center.
On the left pane, click the Change advanced sharing settings link.
 Change advanced sharing settings.
Expand the All Networks tab.
Under the “Password protected sharing” section, select the Turn off password protected sharing option.
Click the Save changes button.
 Password protections sharing
After you complete the steps, users should be able to access the shared folder without a password.
How to share files using Homegroup (deprecated)
Microsoft created Homegroup to be an easy to use method for non-technical users to securely share files between computers running Windows 7 and later versions of the operating system connected to the same local network.
Typically, home users are the ones who will use Homegroup, as it offers a straightforward and convenient way to share files, but this method has limited options. For example, you can share your libraries (Pictures, Videos, Music, Documents), folders, printers, and other devices connected to your computer. However, you cannot share files with versions of Windows older than Windows 7 or other devices running a different operating system, such as Android and iOS.
Creating a Homegroup
To create a Homegroup on a local network, use these steps:
Open Control Panel.
Click on Network and Internet.
Click on Homegroup.
Click the Create a homegroup button.
 Create Homegroup on Windows 10
Click the Next button.
Use the drop-down menu to select which folders and resources (Pictures, Videos, Music, Documents, Printer & Devices) you want to share. If you don’t want to share an item, make sure to select the Not Shared option.
Click the Next button.
 Share libraries with Homegroup
Make sure to note the Homegroup password as you will need it to join other computers, and click Finish to complete the task.
 Homegroup password
Once you complete the task, the Homegroup settings page will be updated, displaying the libraries you are currently sharing and additional options, including the ability to leave the Homegroup and change the resources you are sharing.
Joining a Homegroup
Use these steps to join another computer to the Homegroup to access the files you are sharing on your device:
Open Control Panel.
Click on Network and Internet.
Click on the Choose homegroup and sharing options link.
 Control Panel Network and Internet
Click the Join now button.
 Join a PC to a Homegroup
Continue with the on-screen directions to complete the setup.
If you do not see the Join now button, click the Start the Homegroup troubleshooter option, which will force a rescan of the network and make the option available.
Sharing files on a Homegroup
Once you have a Homegroup created, your PC is already sharing those files and folders within the libraries you shared during the setup process. However, if you want to share files on a different location with users connected to the Homegroup, do the following.
Use these steps to start sharing files using Homegroup:
Open File Explorer.
Navigate to the content you want to share.
Right-click the folder you want to share and select the Give access to option.
You will see several sharing options in the submenu, including Homegroup (view) and Homegroup (view and edit).
If you only want users to read permissions to your files, select the Homegroup (view) option.
If you want users to have read and write permissions (which also allows them to delete and create files and folders), select the Homegroup (view and edit) option.
 Share additional folders on a Homegroup.
In the case, you want to stop sharing a folder you previously shared, right-click the folder, select the Give access to option, and select the Remove access option.
Once you complete the steps, the shared content should be available when browsing the remote computer from File Explorer > Homegroup.
How to share files using OneDrive
You can also share files with other people across a network or around the world using OneDrive.
To share files using OneDrive on Windows 10, use these steps:
Open your OneDrive folder on Windows 10.
Navigate to the folder you want to share.
Right-click the folder and select the Share option.
 OneDrive share option in File Explorer
Specify the email for the person you want to share the content with. (Or the available options to copy the link or share files using other apps.)
 OneDrive share options on Windows 10
Click the Send button.
Any user who receives your message will be able to click the link and view the folder’s content on any web browser.
Sharing OneDrive files from the web
If you want users to view and edit the content inside of an OneDrive folder, you’ll need to share the folder using OneDrive on the web.
To share OneDrive files from the web, use these steps:
Open OneDrive online.
Navigate to the file or folder you want to share.
Right-click the item and select the Share option.
 OneDrive online share option
Specify the email for the person you want to share the content with. (Or the available options to copy the link.)
 OneDrive online share settings
Click the Send button.
Once you complete the steps, anyone with the link can view and edit the file or the content inside of the folder.
If you only want to share files with specific users privately, you want to select the option to share via email.
Files you share will only be available to users as long as your computer is turned on, except for the OneDrive sharing method. However, using OneDrive, users must have an internet connection to access the shared content.
Update January 26, 2021: This guide has been revised to ensure the instructions are still accurate.
We may earn commission for purchases using our links to help keep offering the free content. Privacy policy info.
All content on this site is provided with no warranties, express or implied. Use any information at your own risk. Always backup of your device and files before making any changes. Privacy policy info.


