- Общий доступ к файлам Windows Windows file sharing
- Доступ к файлам с помощью общего доступа к файлам Windows Accessing your files using Windows file sharing
- Запуск и остановка сервера общего доступа к файлам Starting and stopping the file sharing server
- Отключение и включение сервера общего доступа к файлам при запуске Disabling and enabling the file sharing server on startup
- How to share files and printers without HomeGroup on Windows 10
- How to share files on Windows 10
- Send files with Share
- Share files with OneDrive
- Stop file sharing
- Share files with File Explorer
- Connect to shared files over the network
- Stop sharing files over the network
- Troubleshoot access to shared files
- How to share printers on Windows 10
- Share printer on Windows 10
- Connect computer to shared printer
- Connect old devices to shared printer
- Stop sharing printer on Windows 10
- Wrapping things up
- More Windows 10 resources
- Halo: MCC’s live service elements make it better, not worse
- Microsoft’s Surface Duo is not ‘failing up’
- Here’s what you can do if Windows 10 update KB5001330 is causing issues
- These are the best PC sticks when you’re on the move
Общий доступ к файлам Windows Windows file sharing
Для перемещения файлов на устройство и с него можно использовать общий доступ к файлам Windows. You can use Windows file sharing to transfer files to and from your device.
Доступ к файлам с помощью общего доступа к файлам Windows Accessing your files using Windows file sharing
Сервер общего доступа к файлам на устройстве Windows IoT базовая запускается автоматически при загрузке. The file sharing server on your Windows IoT Core device starts automatically on boot. Для подключения к нему требуется IP-адрес устройства. In order to connect to it, you need the IP address of your device. IP-адрес можно найти в приложении по умолчанию, которое загружается при запуске устройства. You can find the IP address on the default app that boots when your device starts.

Получив IP-адрес, откройте проводник на компьютере и введите \\ \c$ , где — это имя или IP-адрес устройства Windows IOT базовая, а затем нажмите клавишу ВВОД. Once you have the IP, open up File Explorer on your computer and type \\ \c$ , where is either the name or the IP Address of your Windows IoT Core device, then hit Enter.
При появлении запроса введите имя пользователя и пароль администратора. Enter your administrator username and password if prompted. Имя пользователя должно иметь префикс с IP-адресом устройства Windows IoT базовая. The username should be prefixed with the IP Address of your Windows IoT Core device. Пример: username: 192.168.1.118\Administrator пароль:

- Теперь вы можете получить доступ к файлам на устройстве, используя общий доступ к файлам Windows. Now you can access the files on your device using Windows file sharing.
Запуск и остановка сервера общего доступа к файлам Starting and stopping the file sharing server
Подключитесь к устройству с помощью PowerShell или SSH. Connect to your device through PowerShell or SSH.
По умолчанию сервер совместного использования файлов запускается при загрузке устройства. By default the file sharing server is started when the device is booted.
Чтобы отключить сервер общего доступа к файлам, введите net stop Server /y To stop the file sharing server, type net stop Server /y
Чтобы запустить сервер общего доступа к файлам, введите net start Server To start the file sharing server, type net start Server

Отключение и включение сервера общего доступа к файлам при запуске Disabling and enabling the file sharing server on startup
Подключитесь к устройству с помощью PowerShell или SSH. Connect to your device through PowerShell or SSH.
По умолчанию сервер совместного использования файлов запускается при загрузке устройства. By default the file sharing server is started when the device is booted.
Чтобы отключить сервер совместного использования файлов, чтобы он не запускался при запуске устройства, введите reg add HKEY_LOCAL_MACHINE\SYSTEM\CurrentControlSet\services\lanmanserver /v Start /t REG_DWORD /d 0x3 /f To disable the file sharing server so that it does not start when the device starts, type reg add HKEY_LOCAL_MACHINE\SYSTEM\CurrentControlSet\services\lanmanserver /v Start /t REG_DWORD /d 0x3 /f
Чтобы включить сервер общего доступа к файлам, который запускается при запуске устройства, введите reg add HKEY_LOCAL_MACHINE\SYSTEM\CurrentControlSet\services\lanmanserver /v Start /t REG_DWORD /d 0x2 /f To enable the file sharing server, so that starts when the device starts, type reg add HKEY_LOCAL_MACHINE\SYSTEM\CurrentControlSet\services\lanmanserver /v Start /t REG_DWORD /d 0x2 /f
How to share files and printers without HomeGroup on Windows 10
 Source: Windows Central
On Windows 10, HomeGroup was a feature to simplify the process of sharing resources across a small network with other users. However, since the feature has been removed, you now have to use different methods to share files, folders, and printers.
Some of these methods include Share and Nearby sharing, OneDrive, and the more advanced sharing options that offer virtually the same experience but using a different set of instructions.
In this Windows 10 guide, we’ll walk you through the steps to share files and printers inside the local network without HomeGroup.
How to share files on Windows 10
Windows 10 offers several ways to share files and folders with other users, including using the Share feature, OneDrive, and setting up a more advanced configuration File Explorer.
Send files with Share
If you have to share one or more files with another user inside the home network, office, or across the world only one time, you can use the Share feature, which comes built into File Explorer and most modern apps.
To share files using the Share feature on Windows 10, use these steps:
- Open File Explorer.
- Browse to the folder location with the files.
- Select the files.
Click on the Share tab.
Quick tip: Alternatively, you can right-click the selection and choose the Share option in the context menu. Also, the Share option can be found in many apps that you acquire from the Microsoft Store.
Click the Share button.
 Source: Windows Central
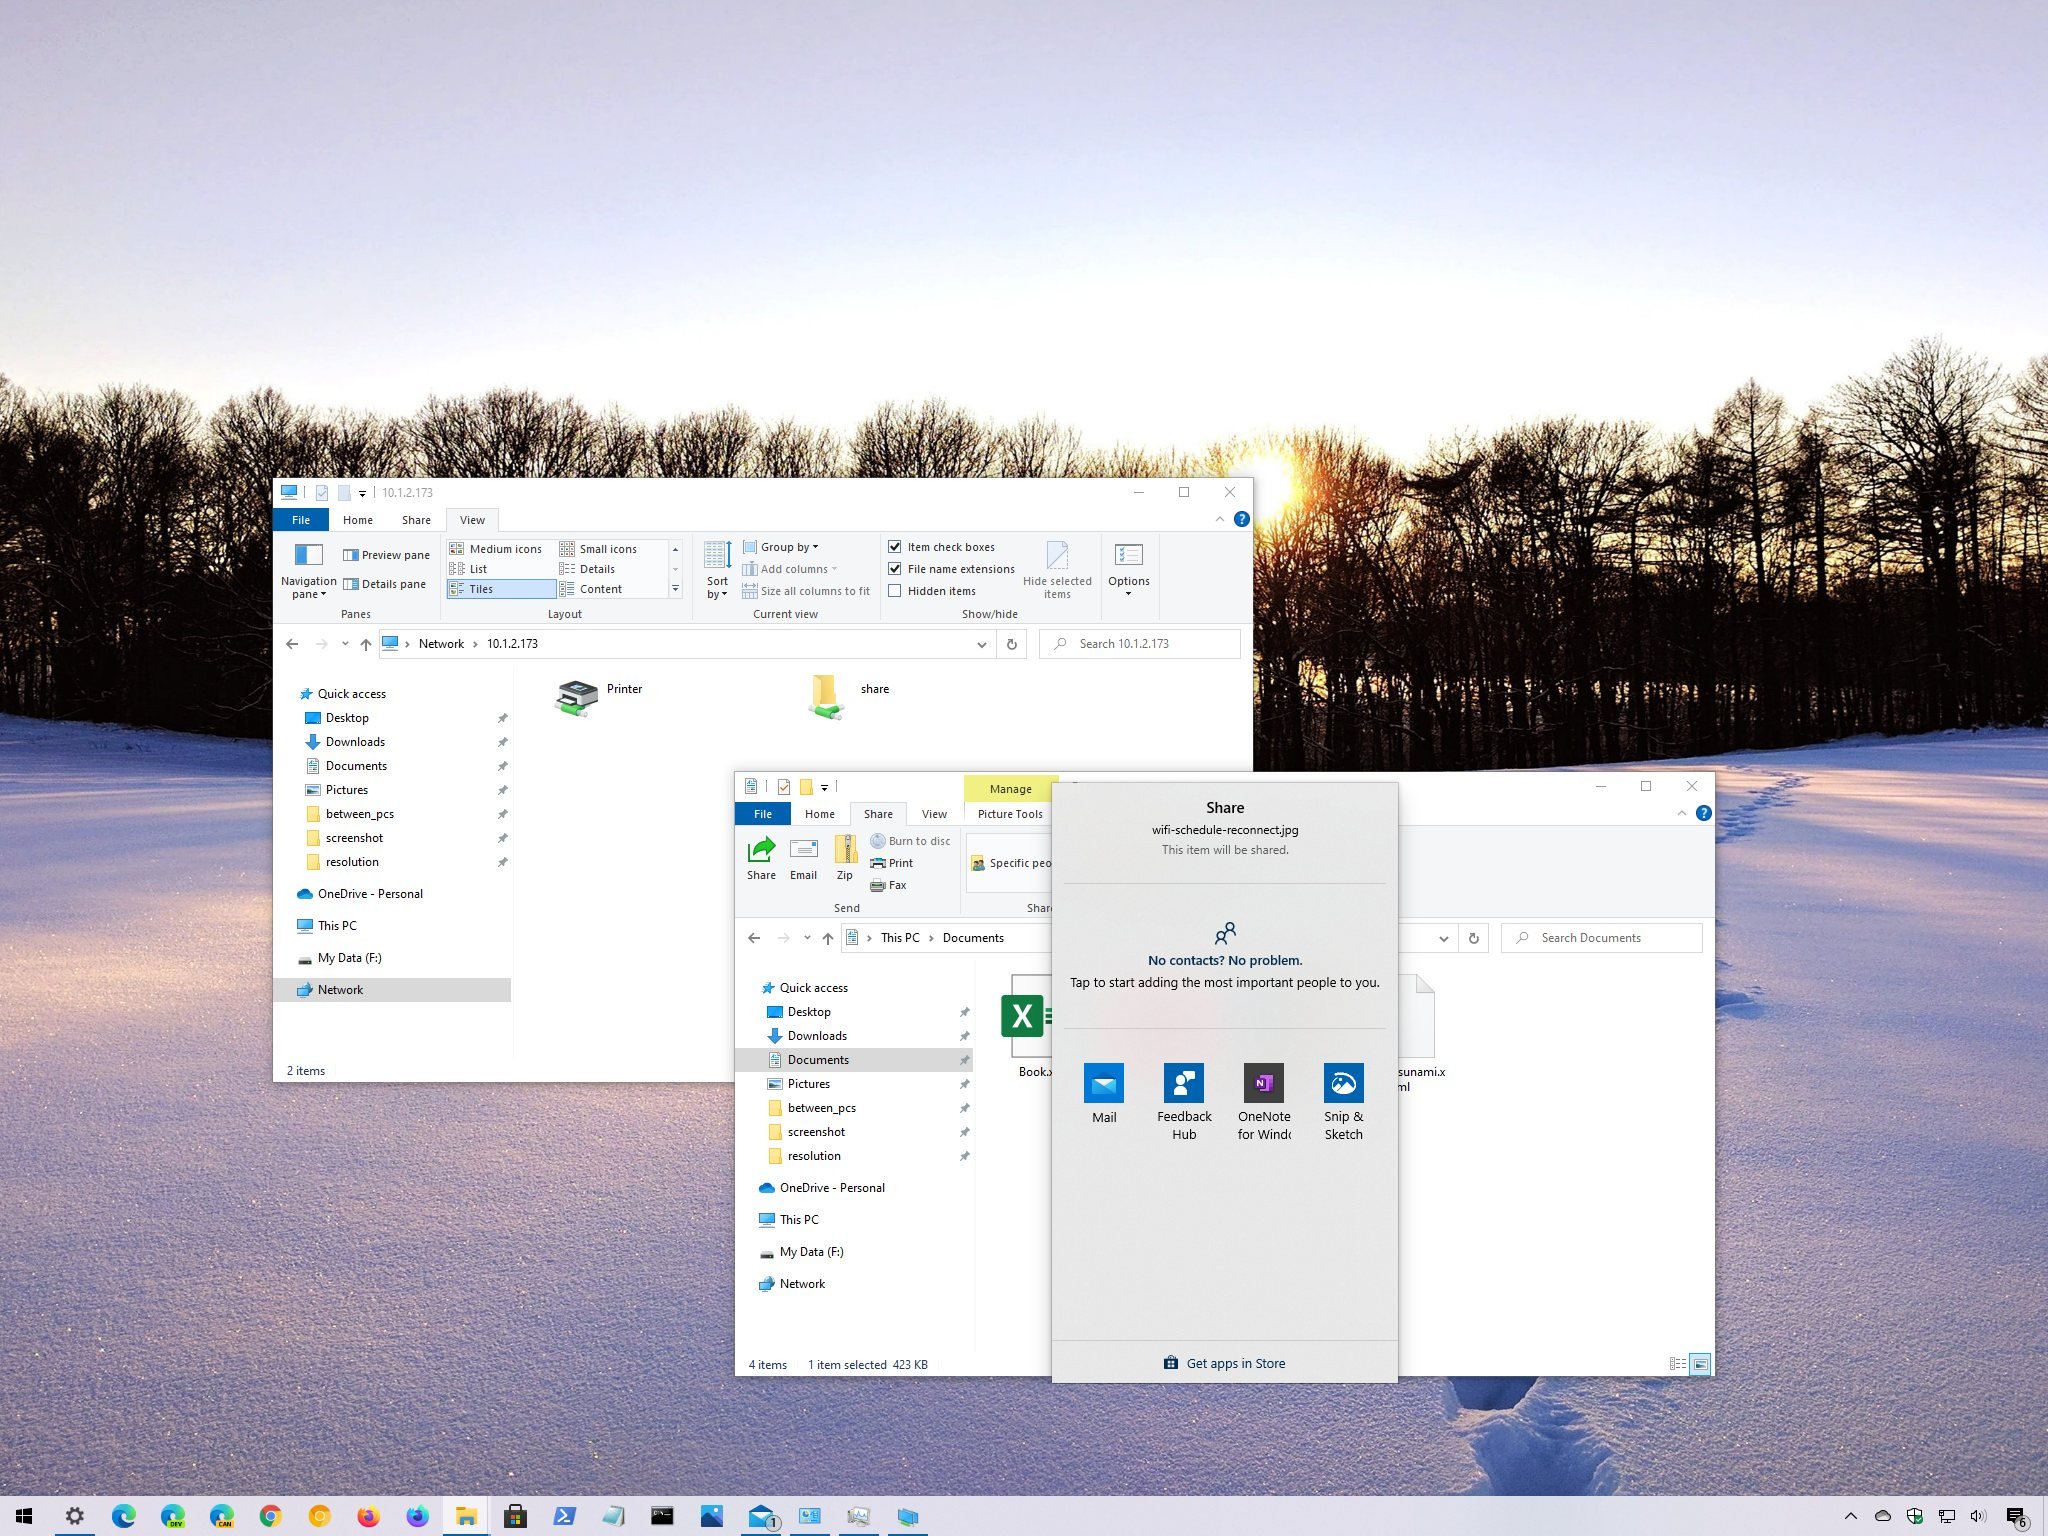
Select the app, contact, or nearby sharing device.
 Source: Windows Central
Although this is a sharing feature, you’re technically sending the files to another destination. If you’re about to share files with a nearby device, note that «Nearby sharing» needs to be enabled on the source and destination computers to work correctly. You can learn more about nearby sharing, in this guide.
Share files with OneDrive
On Windows 10, you can also use OneDrive to share files or folders with family, friends, or colleagues.
Unlike sending files using the Share feature, OneDrive allows you to share virtually any file by creating a secure link that others can use to access the content, which you can also revoke at any time.
To share files with OneDrive, use these steps:
- Open File Explorer.
- Click the OneDrive folder from the left pane.
- Browse to the folder with the files.
Right-click the file and select the Share option (blue icon).
Source: Windows Central
Clear the Allow editing option if you only want someone else to view the file.
Quick tip: If you have a Microsoft 365 subscription or OneDrive plan, you can also set the expiration date and password for the link.
Confirm the email address of the person you want to share the file. Or click the Copy Link option to copy the link to the clipboard.
Source: Windows Central
After you complete the steps, the recipient will receive the link to access the shared file, and depending on the settings, the recipient will be able to view or edit the file.
Stop file sharing
To stop sharing a file in OneDrive, use these steps:
- Open File Explorer.
- Click the OneDrive folder from the left pane.
- Browse to the folder with the share.
Right-click the shared file and select the Share option (blue icon).
Source: Windows Central
Select the Manage Access option.
Source: Windows Central
Click the Can edito button and select the Stop sharing option.
Source: Windows Central
Once you complete the steps, the files will no longer be accessible by other people with the link.
Share files with File Explorer
When you have to share multiple files in the local network, you can use the File Explorer advanced sharing options.
Quick tip: When sharing a folder, usually, you want to share the folder by creating a folder in the root of the «C» drive or secondary drive or partition. Always avoid sharing files from the system folders, including Desktop, Documents, Pictures, etc.
To create a basic folder share on Windows 10, use these steps:
- Open File Explorer.
- Browse to the folder with the content that you want to share.
Right-click the folder, select the Give access to option, and click the Specific people option.
Source: Windows Central
Use the drop-down menu, and select the user or group to share the folder and its contents. Options available include:
- Local users — When you choose individual accounts, the user must provide username and password to access the files. If the user is signed in using the same credentials on their computer, then they may be able to access the data without any prompts.
- Everyone — Shares the contents with anyone in the network without entering a password to access the files.
Quick note: You may also find an option to create a new account, but it won’t be useful since Windows 10 no longer allows the creation of new accounts using Control Panel.
Click the Add button.
Source: Windows Central
Under the «Permission Level» column, select the permissions that user will have to access the contents:
- Read — Gives network users the ability to list and open files, but they won’t be able to modify or delete existing files and folders. Also, they won’t be able to upload or create new folders or files.
- Read/Write — Allows users to list, open, modify, delete, upload, and create new files and folders.
- Remove — Blocks the specified user or group from accessing the folder.
Click the Share button.
Source: Windows Central
Right-click the shared folder path and select the Copy Link option.
Source: Windows Central
After you complete the steps, you can share the link (which you copied to the clipboard on step No. 8) with users in the local network.
Connect to shared files over the network
To access a shared folder on Windows 10, use these steps:
- Open File Explorer.
Right-click and paste the network path for the shared folder in the address bar and press Enter.
Source: Windows Central
If you’re logged on using a username and password that matches the credentials on the device sharing the folder, you may not need to sign in again to access the shared folder. However, if you’re prompted to log in, you must enter the account credentials of an account located on the computer sharing the folder.
Alternatively, users can also use the «Network» page from the File Explorer from left pane to browse the computer and access the shared folder contents.
When sharing folders in the network, users will only be able to access the files if the computer sharing the folder is on and connected to the network.
Stop sharing files over the network
If you no longer wish to share files in the network, use these steps:
- Open File Explorer.
- Browse to the folder with the content that you want to share.
Right-click the folder, select the Give access to option, and click the Remove access option.
Source: Windows Central
Click the Stop sharing button.
Source: Windows Central
Once you complete the steps, the content will no longer be accessible through the network.
Troubleshoot access to shared files
When sharing a folder or printer, there’s a chance you won’t be able to access the resources because of a problem translating the computer name to a TCP/IP address, issues with the firewall, or network profile settings.
Use IP address instead of computer name
To determine the device network address to replace the computer name in the path to access the shared resources, use these steps:
- Open Settings.
- Click on Network & Internet.
- Click on Status.
Click the Properties buttons for the current Ethernet or Wi-Fi connection.
Source: Windows Central
Under the «Properties» section, confirm the current IPv4 address.
Source: Windows Central
In the network path to the shared folder, replace the computer name with the IP address.
For example, after editing the link, the unique path should look like this: //10.1.2.173/share instead of //homepc/share .
 Source: Windows Central
After you complete the steps, you should now be able to access the network content.
Change network profile to private
If the computer is using the public network profile, the folder or printer won’t be discoverable in the network. As a result, trying to access the resources will require to enter credentials. To avoid this issue, you must set the network profile to private on every computer.
To set the network profile to private, use these steps:
- Open Settings.
- Click on Network & Internet.
- Click on Status.
Click the Properties buttons for the current Ethernet or Wi-Fi connection.
Source: Windows Central
Under the «Network profile» section, select the Private option.
Source: Windows Central
Once you complete the steps, users should be able to access shared files and printers from any computer in the local network.
Configure access through firewall
You can temporarily disable the firewall on both devices to determine if that is the cause of the problem. If the firewall blocks access to the shared folder, you’ll need to open the corresponding ports.
Disable Microsoft Defender Firewall
To temporarily disable the firewall on Windows 10, use these steps:
- Open Windows Security.
- Click on Firewall & network protection.
Click the Private network option.
Source: Windows Central
Turn off the Microsoft Defender Firewall toggle switch.
Source: Windows Central
Quick tip: after finding out the issue, make sure to turn the firewall back on.
After you complete the steps, repeat the steps on the device, and then try to access the shared folder. If it’s a firewall problem, then you’ll need to open the corresponding network port. Also, after resolving the issue, remember to re-enable the firewall using the same instructions outlined above, but on step No. 4, make sure to turn on the Microsoft Defender Firewall toggle switch.
Open Microsoft Defender Firewall ports
To allow file and printer sharing through the firewall, use these steps:
- Open Windows Security.
- Click on Firewall & network protection.
Click the Allow app through firewall option.
Source: Windows Central
Click the Change settings button.
Source: Windows Central
Select the File and Printer Sharing option, and make sure to check the Private network option.
Source: Windows Central
Once you complete the steps, network users should be able to access the shared folder even with the firewall turned on.
If you’re using a third-party firewall solution, you’ll need to check your vendor support website for specific details on how to get around this problem.
How to share printers on Windows 10
In previous versions, the easiest method to share a printer was using HomeGroup, but now even without the feature, you can still share a USB printer with other users in the local network.
Important: If you have a printer with a built-in print server, it’s recommended to use that feature. You can refer to the printer manufacturer support website for instructions on connecting the device to the network. If you’re dealing with a print server, you only need to follow the steps below to share the printer and connect the computers.
Share printer on Windows 10
To share a printer on Windows 10 (assuming it’s already installed), use these steps:
- Open Settings.
- Click on Devices.
- Click on Printers & scanners.
- Under the «Printer & scanners» section, select the printer that you want to share.
Click the Manage button.
Source: Windows Central
Click the Printer properties option.
Source: Windows Central
In the «Share name» field, specify a new short and descriptive name. (If this is the only printer on the network, you can use the default name.)
![]() Source: Windows Central
Source: Windows Central
After you complete the steps, the printer will be available to network users, but only if the computer is on.
Connect computer to shared printer
To connect devices to the shared printer, use these steps:
- Open Settings.
- Click on Devices.
- Click on Printer & scanners.
- Click the Add a printer or scanner button.
- Select the printer from the list.
(Optional) If the discovery feature doesn’t work, click The printer that I want isn’t listed option.
Source: Windows Central
Type the path of the printer location:
Source: Windows Central
In the command, make sure to change the «xxx.xxx.xxx.xxx» and «PRINTER-SHARE-NAME» for the IP address (or computer name) and name of the printer.
Quick tip: You can also click the Browse button to select the shared printer.
(Optional) Specify an name of the printer connection. For example, Network Printer.
Source: Windows Central
Once you complete the steps, you should be able to successfully send a print job to the network printer.
Connect old devices to shared printer
If you’re running an old version of Windows 10, Windows 8.1, or Windows 7, the steps to connect to the printer will be slightly different.
To connect an old computer to a network shared printer, use these steps:
- Open Control Panel.
- Click on Hardware and Sound.
- Click on the Devices and Printers option.
Click the Add a printer button.
Source: Windows Central
If the discovery feature doesn’t work, click The printer that I want isn’t listed option.
Source: Windows Central
Type the path of the printer location:
Source: Windows Central
In the command, make sure to change the «xxx.xxx.xxx.xxx» and «PRINTER-SHARE-NAME» for the IP address (or computer name) and share the name of the printer that you’re trying to connect.
Quick tip: You can click the Browse button to locate and select the shared printer.
(Optional) Specify an name of the printer connection. For example, Network Printer.
Source: Windows Central
After you complete the steps, remember that users will only be able to print as long as the device sharing the printer is powered on and connected to the network. If the computer is sleeping, hibernating, or powered off, no one will be able to print.
Stop sharing printer on Windows 10
If there’s no need to share a printer over the network anymore, then use these steps:
- Open Settings.
- Click on Devices.
- Click on Printers & scanners.
- Under the «Printer & scanners» section, select the printer that you want to share.
Click the Manage button.
Source: Windows Central
Click the Printer properties option.
Source: Windows Central
Clear the Share this printer option.
![]() Source: Windows Central
Source: Windows Central
Once you complete the steps, the printer will no longer be available for network users.
Wrapping things up
Windows 10 includes many features and advanced settings to share resources with network users, but in this guide, we’re focusing on using the essential configurations to help users coming from HomeGroup.
If you’re in an environment running different versions of Windows, you can still refer to this guide to share files and printers on older releases of Windows 10, Windows 8.1, and even Windows 7.
More Windows 10 resources
For more helpful articles, coverage, and answers to common questions about Windows 10, visit the following resources:
We may earn a commission for purchases using our links. Learn more.
![]()
Halo: MCC’s live service elements make it better, not worse
Halo: The Master Chief Collection is more popular than ever, but some fans don’t agree with the live service approach 343 Industries has taken with it. Here’s why those elements are, at the end of the day, great for the game and for Halo overall.
![]()
Microsoft’s Surface Duo is not ‘failing up’
Microsoft announced this week that it was expanding Surface Duo availability to nine new commercial markets. While Surface Duo is undoubtedly a work in progress, this is not a sign of a disaster. It’s also doesn’t mean that Surface Duo is selling a ton either. Instead, the reason for the expansion is a lot more straightforward.
![]()
Here’s what you can do if Windows 10 update KB5001330 is causing issues
In this guide, we’ll show you the steps to get rid of the update KB5001330 to fix profile, gaming, and BSoD problems with the Windows 10 October 2020 Update and May 2020 Update.
![]()
These are the best PC sticks when you’re on the move
Instant computer — just add a screen. That’s the general idea behind the ultra-portable PC, but it can be hard to know which one you want. Relax, we have you covered!


