- How to Fix Folder Keeps Reverting to Read Only on Windows 10
- What causes the folder to revert to read-only on Windows 10?
- Solution 1: Disabling Controlled Access
- Solution 2: Login as an Administrator
- Solution 3: Changing the Attribute of the Folder
- Solution 4: Changing Permissions of the Drive
- Solution 5: Disabling your Third-party antivirus
- Диск Windows монтируется только для чтения (РЕШЕНО)
- Решение ошибки «Windows is hibernated, refused to mount».
- Гибернация Windows и быстрый перезапуск
- Удаление файла гибернации
- Disk Read Only Fix: How to Change Drive from Read Only to Read Write (5 Ways)
- Drive Is Read Only
- Method 1. Manually Remove Read-only with DiskPart CMD
- Method 2. Automatically Clear Read-only with Third-party Write Protection Removal Software
- Method 3. Change the Read-only Permission in Windows 10/8/7
- Method 4. Change Hard Drive Read-only Status in Registry Editor
- Method 5. Format Read-only Disk to a Recognized File System
How to Fix Folder Keeps Reverting to Read Only on Windows 10
If your folder keeps reverting to read-only it could be due to a recent Windows 10 upgrade. Many users have reported that when upgraded their system to Windows 10, they encountered this error. Read-only is a file/folder attribute which lets only a specific group of users read or edit the files or folder. This can get really infuriating, however, the fix is quite simple and easy but may differ depending on the scenario that caused it.
Generally, when you encounter such an issue, you can easily overcome it by unchecking the read-only attribute box found in the properties of the file/folder. However, this case is not that simple. You won’t be able to change the read-only attribute of the file/folder which gets annoying. Nevertheless, this article will teach you how to access your files/folders again — just follow through the instructions.
What causes the folder to revert to read-only on Windows 10?
This might be happening to you due to various reasons, nonetheless, the most generic ones are —
- Windows upgrade. If you’ve recently upgraded your system to Windows 10, this might be occurring due to that as your account permissions may have been altered.
- Account permissions. Sometimes, the error could be simply because of your account permissions which is the most common cause without you realizing it.
The possible and effective solutions for this problem are: –
Solution 1: Disabling Controlled Access
Before we try other technical solutions, we will first try to disable the Controlled Folder Access in your settings. This is a hotfix and you may proceed with other solutions if this doesn’t work for you.
- Press and hold the “Windows Key + I” button to launch Windows Settings.
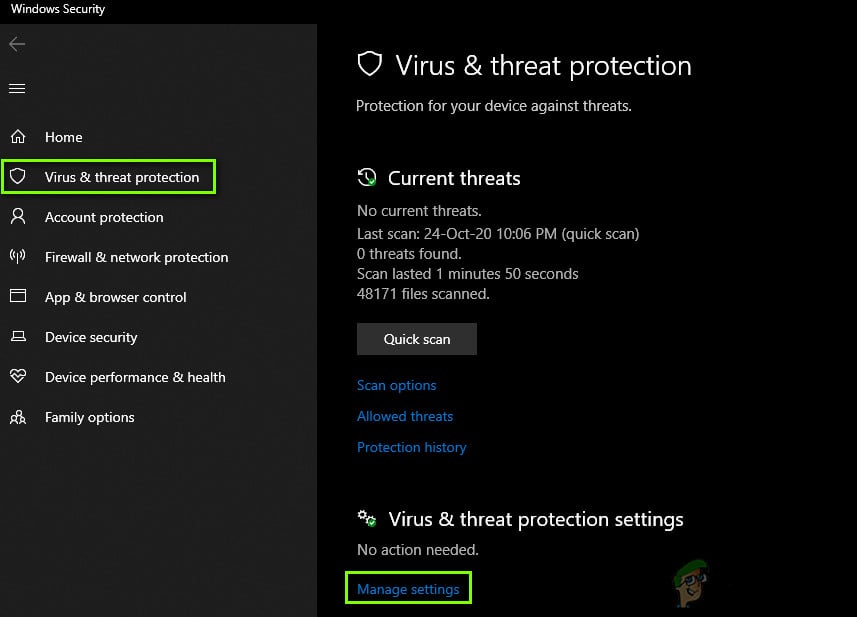
- Once the Settings are opened, navigate to Update & Security and then click on Windows Security.
- Now, under the Virus & threat protection settings, click on Manage settings.
 Virus & threat protection settings
 - Under Controlled folder access, select Manage Controlled folder access and switch the access to Off. Manage Controlled folder access to Off
- Restart your computer completely and then check if the issue is resolved.
 Virus & threat protection settings
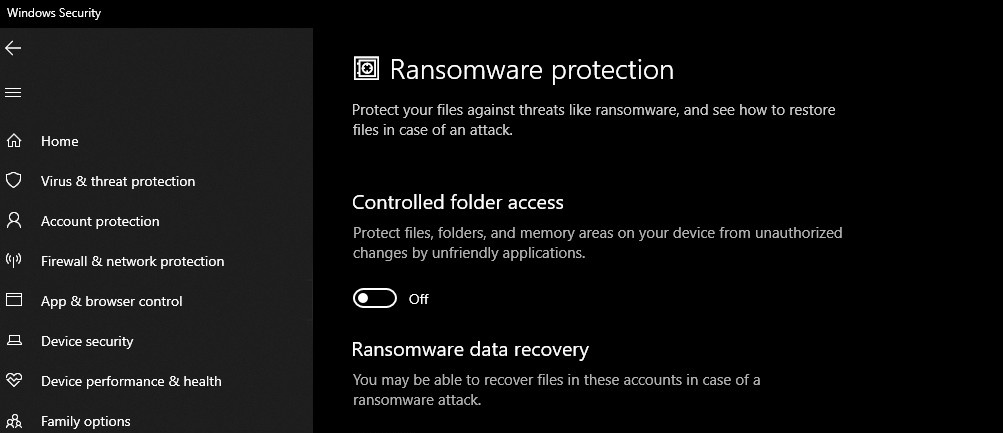 Manage Controlled folder access to Off
Solution 2: Login as an Administrator
To start off with the common mistake, if you have created multiple accounts on your system, make sure you are signed in as an administrator while accessing the file. The reason you are not able to read or edit the file/folder could be that the file/folder was created using an administrator account and you are trying to access it using a guest account or any other. Hence, before you move into the solutions mentioned below, make sure you are using the administrative account.
Solution 3: Changing the Attribute of the Folder
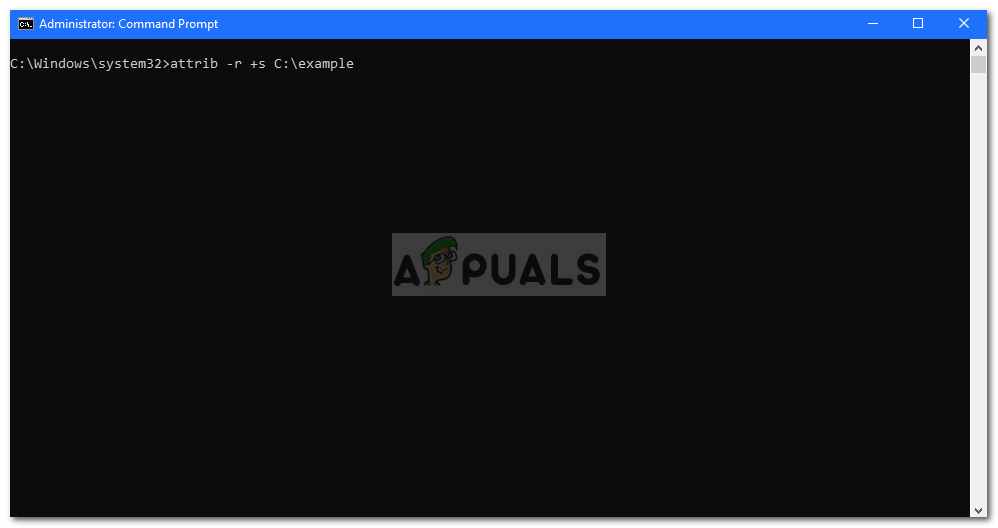
If you are logged in as an administrator and still unable to access the files, then in such a case, you’ll have to change the attribute of the file using the command prompt. To do this, follow the given instructions:
- Press Winkey + X and select Command Prompt (Admin) from the list.
- In order to remove the read-only attribute and set a new attribute, use the following command: Enter the command to remove Read-only Attribute
 Enter the command to remove Read-only Attribute
- The above command will remove the read-only attribute of the file and change it to a system attribute. However, some files/folders do not operate properly in the system attribute so use the following command if you want to remove the system attribute:
Solution 4: Changing Permissions of the Drive
If you are facing this issue after upgrading your system to Windows 10, then changing the permissions of the drive could fix your problem. There have been several reports according to which the issue has been solved via this method. Here’s how to do it:
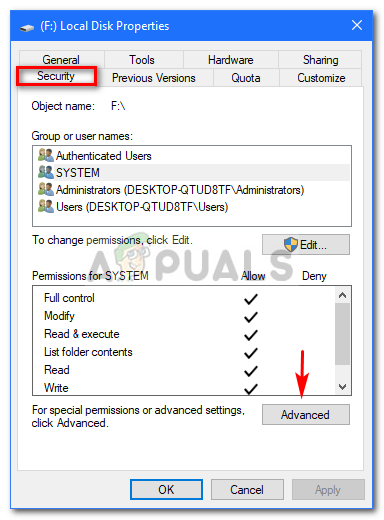
- Right-click on the drive where your files/folders are located.
- Select Properties.
- Navigate to the Security tab. Local Disk Properties (Security)
- Click Advanced and then select Change permissions. Select change permissions
- Highlight your user and then click Edit. Highlight your user and click Edit
- Select This folder, subfolders and files from the drop-down list.
- Check the Full Control box under Basic Permissions. Check the Full Control Box
- Click OK.
 Local Disk Properties (Security)
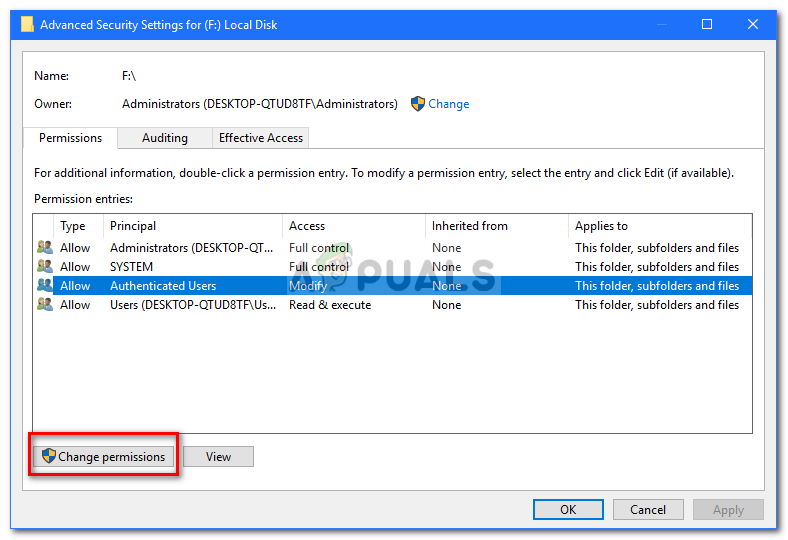 Select change permissions
 Highlight your user and click Edit
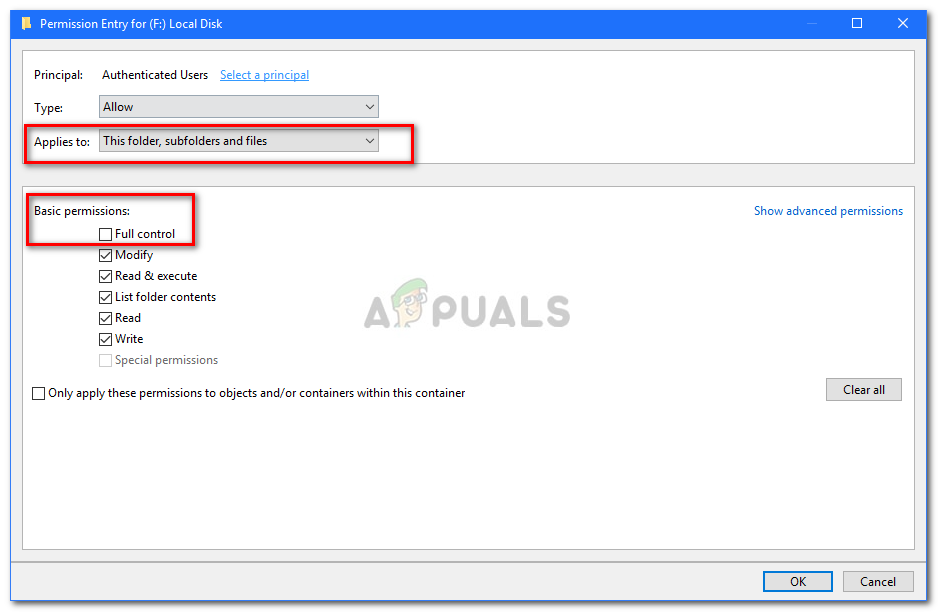 Check the Full Control Box
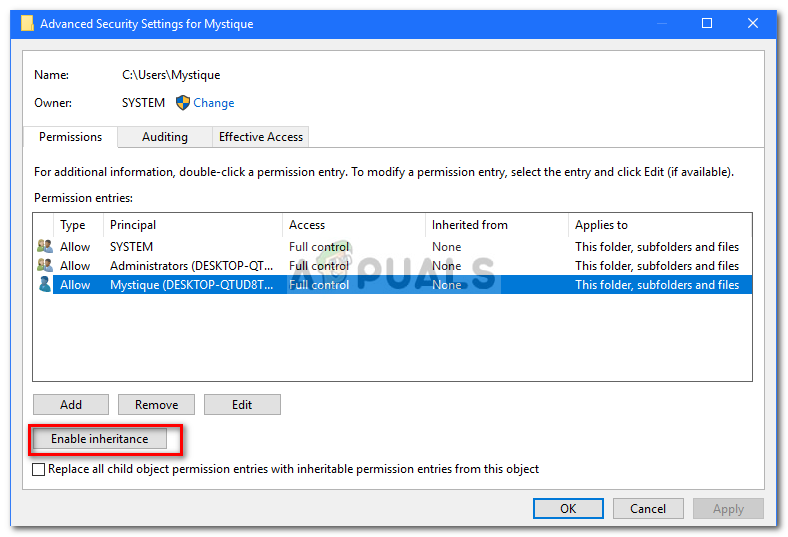
If you have more than one account on the system, then you’ll have to enable inheritance first. Here’s how to do it:
- Go to your System drive (where your Windows is installed).
- Go to the Users folder.
- Right-click on your username and click Properties.
- In the Security tab, click Advanced.
- Hit Enable Inheritance. Highlight your user and click Enable Inheritance
 Highlight your user and click Enable Inheritance
Solution 5: Disabling your Third-party antivirus
If the error persists whenever your system restarts, it could be due to your third-party antivirus software. Your antivirus might be detecting the files as a threat and consequently, stopping you from accessing them. In such a case, you’ll have to disable your antivirus software, change the attributes of the files/folders as mentioned above and restart your system to see if the files/folders still revert to read-only. If they don’t, this means your antivirus is causing the issue and you should probably uninstall it.
Диск Windows монтируется только для чтения (РЕШЕНО)
В настоящее время Windows использует файловую систему NTFS. Linux поддерживает эту файловую систему для чтения, записи, создания, форматирования и выполнения других операций.
Тем не менее, иногда при попытке смонтировать диск Windows может возникнуть одна из двух ситуаций:
- диск монтируется, но только для чтения. Специальное указание опция монтирования с правами записи не помогает
- диск вовсе не монтируется из-за ошибки
К примеру, при попытке смонтировать диск:
может возникнуть ошибка, что диск доступен только для чтения:
А это пример ошибки, когда диск не смонтирован вовсе:
Для решения этой проблемы нужно начать с установки драйвера ntfs-3g. Во-первых, он в любом случае необходим для полноценного функционирования файловой системы NTFS в Linux. Во-вторых, в этот пакет включена утилита ntfsfix, которая может помочь решить проблемы с диском Windows.
Для установки в Debian, Linux Mint, Ubuntu, Kali Linux и их производные:
Для установки в Arch Linux и производные:
Затем вновь попробуйте смонтировать диск — вполне возможно, что в этом случае он будет доступен с правами записи.
Если вновь возникла проблема, то отмонтируйте диск и запустите команду вида:
Пример команды для проверки и исправления проблемы с диском /dev/sdb4:

Команда выводит причину проблемы: диск содержит нечистую файловую систему. Метаданные, хранимые в кэше Windows, препятствуют монтированию.
Затем выполняется ряд операций, каждая из которых заканчивается статусом OK и наконец сообщение was processed successfully говорит о том, что всё прошло успешно.
После этого вновь попытайтесь смонтировать диск — всё должно быть нормально.
Решение ошибки «Windows is hibernated, refused to mount».
Выполнение рассмотренной команды
может завершиться неудачей:
Обратите особое внимание на строку «Windows is hibernated, refused to mount» которая повторяется дважды. Она означает, что работа Windows завершилась гибернацией, такой диск не может быть смонтирован для записи. Если вы специально выключили компьютер таким образом, то перезагрузитесь и выключите без гибернация или быстрого запуска.
Но это может не помочь, поскольку последние версии Windows делают гибернацию автоматически, без ведома пользователя.
Гибернация Windows и быстрый перезапуск
На компьютерах, на которых возможна двойная загрузка в Windows или Linux, Windows должна быть полностью выключена перед загрузкой в Linux, в противном случае файловые системы NTFS на внутренних дисках могут остаться в несогласованном состоянии, а изменения, сделанные Linux, могут быть проигнорированы Windows.
Таким образом, Windows нельзя оставлять в режиме гибернации при запуске Linux, чтобы избежать несоответствий. Кроме того, необходимо отключить функцию быстрого перезапуска, доступную в последних системах Windows. Этого можно добиться, выполнив в качестве администратора команду Windows, которая отключает как гибернацию, так и быстрый перезапуск, а также удаляет файл hiberfile:
Если вы не хотите отключать гибернацию, то для одноразового выключения компьютера Windows без гибернация выключите его командой:
Удаление файла гибернации
Когда том NTFS находится в спящем режиме, монтирование для чтения и записи запрещается, и том принудительно монтируется только для чтения. Необходимо либо возобновить работу Windows и правильно её выключить, либо использовать опцию remove_hiberfile, которая удалит файл гибернации Windows. Обратите внимание, это означает, что сохранённый сеанс Windows будет полностью утерян, но сама Windows не пострадает. Напомним, что в файле гибернация хранится содержимое оперативной памяти на момент выключения. Кстати, именно поэтому размер файла гибернация равен размеру оперативной памяти компьютера. Используйте эту опцию под свою ответственность.
Пример команды с указанием опции remove_hiberfile:
Disk Read Only Fix: How to Change Drive from Read Only to Read Write (5 Ways)
Read-only is a file system permission that only allows a user to read or copy stored data, but not write new information or edit the data. A file, folder, or an entire disk may be set as read-only to prevent accidentally changing the file’s contents. A read-only object may also be referred to as write-protected.
On this page, we’ll focus on the disk read-only fix. To change a hard drive from ready only, i.e., to make a hard drive not read-only, the troubleshooting methods are quite the same as that of removing write protection from a hard drive, USB flash drive, pen drive or SD card.
Drive Is Read Only
«I’m trying to figure out why my D drive is read-only after updating to Windows 10. It is a separate hard drive and not a partition of another hard drive. I can open everything but just can’t modify them.«
The hard drive coming with a read-only status suggests that you can’t change what is on it. i.e. once the data is written on it, you can read it but can’t do any other operation on it. This happens to HDD a lot, and it’s also commonly seen on removable disks like SD memory card, and USB flash drive.
In conclusion, if data is truly read-only, you can read it with a device, but you can’t modify, erase, append to, concatenate, copy, or move it. The main purpose of read-only is to control how you use the data.
Method 1. Manually Remove Read-only with DiskPart CMD
Devices and media are often characterized as read-only mode, which actually can be changed to read-write by the user for further usage. When a drive has become locked in a read-only state, try to fix the read-only error using the Diskpart cmd with the following simple instruction.
Step 1. Click on your «Start Menu», type cmd in the search bar, then hit «Enter».
Step 2. Type command diskpart and hit «Enter». A new command line window will open.
Step 3. Type list disk and hit «Enter». (make sure your devices has been listed out, for example, it is listed as disk 0)
Step 4. Type the command select disk 0 and hit «Enter».
Step 5. Type attributes disk clear readonly and hit «Enter».
Now you’ve removed the read-only attribute from the storage devices. Type exit and hit «Enter» to leave the DiskPart utility.
cmd
command diskpart
list disk
select disk 0
attributes disk clear readonly
exit
Method 2. Automatically Clear Read-only with Third-party Write Protection Removal Software
If you are not professional in computing management and not familiar with command lines, don’t worry. EaseUS R&D team has promoted a fresh kit for helping you resolve the write-protection issue on your hard drive, external hard drive, USB or SD card, etc., devices.
EaseUS Tools M is a practical computer fixing tool that is safe and light-weighted. It’s a perfect alternative to the command line.В
Use this one-click tool to solve the write-protection issues on your own:
Step 1: оњљ DOWNLOADВ and install EaseUS Tools MВ for free.
Step 2: Run EaseUS Tools M on your PC, choose the «Write Protection» mode.
Step 3: Select the device which is now «Write-Protected» and click «Disable» to remove the protection.
Method 3. Change the Read-only Permission in Windows 10/8/7
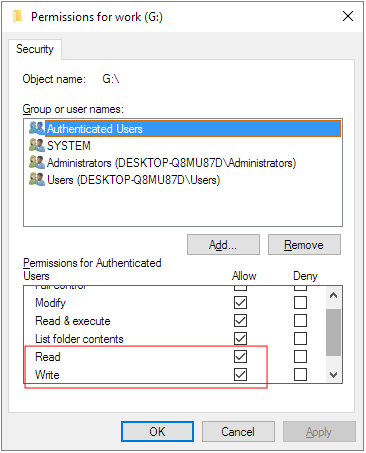
Chances are that your device or specific file/folder permission has changed to read-only with the write permission, for example, after doing a Windows upgrade or update. To solve this kind of problem, you can go to the Windows Property settings to get both the read & write permission.
Step 1. Go to My Computer (in Windows 7)/This PC (in Windows 10).В
Step 2. Right-click on the drive that is currently read-only and then click Properties.
Step 3. Under the Security tab, tick the option of Read and Write in the Allow column. Click Apply.
Method 4. Change Hard Drive Read-only Status in Registry Editor
Windows Registry for disk read-only fix is the most advanced method, and it’s also the most sophisticated. Therefore, we only suggest experienced users try this way. Backup is important before making any change in the Registry.
*Editing Windows Registry indeed helps remove write protection and read-only from your storage device. However, we found that it’s usually effective on earlier Windows operating systems, including Windows XP and Windows Vista.
Step 1. Connect your pen drive to your computer.
Step 2. Press Windows + R keys and bring up the Run box. Type «regedit» in the empty box and hit Enter.
Step 3. Hit «HKEY_LOCAL_MACHINE» to expand «System».
Step 4. Find the «Current Control Set» in the «System» list to click «Control».
Step 5. Check whether there is a key named «Storage Device Policies» to change the digit in the «DWORD value» box into «0» and press «OK» to save the change.В
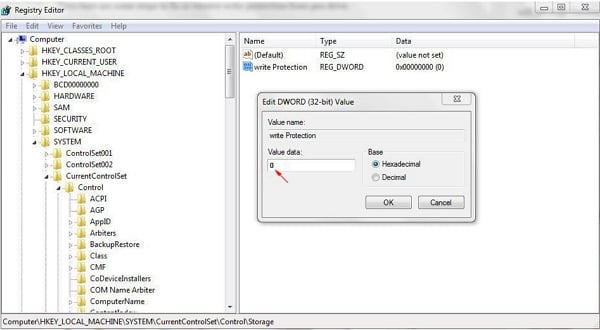
Note: if you cannot find the key named «Storage Device Policies», you are supposed to create one: right-click «Control» to create a new key and name it as «Storage Device Policies»=> right-click this new key to open «DWORD Value» and name it as «write protect»=> Double click it to change the number.
Method 5. Format Read-only Disk to a Recognized File System
Many storage devices such as USB hard drives, pen drive, floppy disk, SD card, and external hard disks are preformatted with a certain file system, which may not be compatible with a Windows computer or a Mac, so you can only read it other than writing new data on it. So in this case, you can fix such read-only problem on a disk by converting the incompatible file system to a recognized file system by Windows, Steam, or a certain device.
Here, you can download EaseUS Partition Master, a reliable free partition manager, to reformat the disk to the desired file system like NTFS, FAT16/32, EXT2/3/4 and so on. (Back up the important information on your disk before doing the format, because formatting a disk will erase all data on it.)
Step 1. Launch EaseUS Partition Master, right-click the partition on your external hard drive/USB/SD card which you want to format and choose the «Format» option.
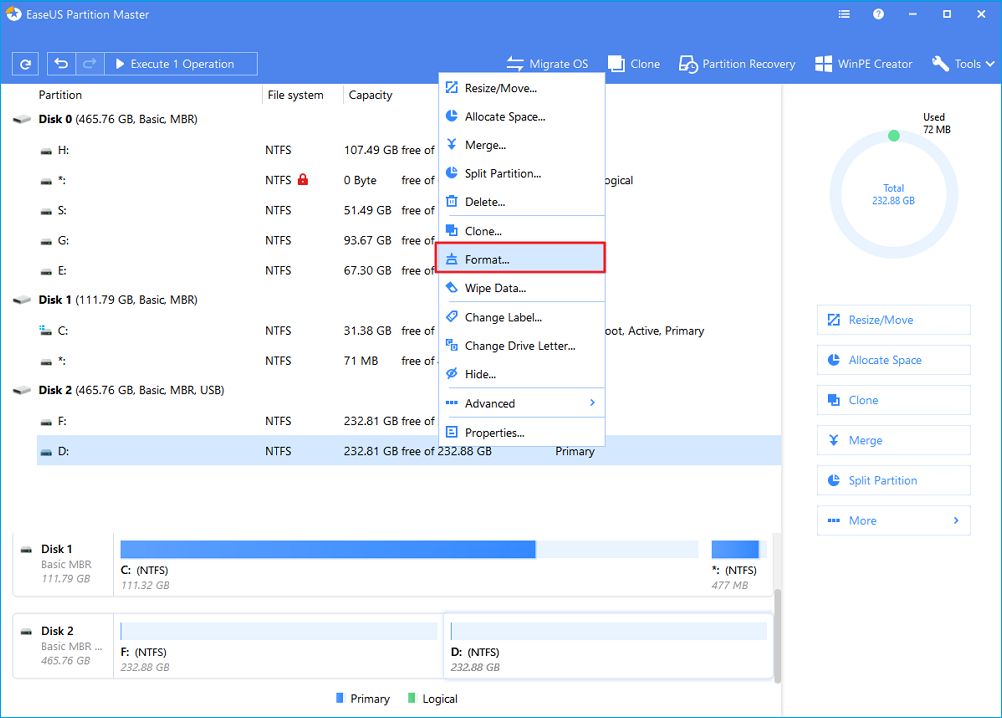
Step 2. Assign a new partition label, file system (NTFS/FAT32/EXT2/EXT3), and cluster size to the selected partition, then click «OK».
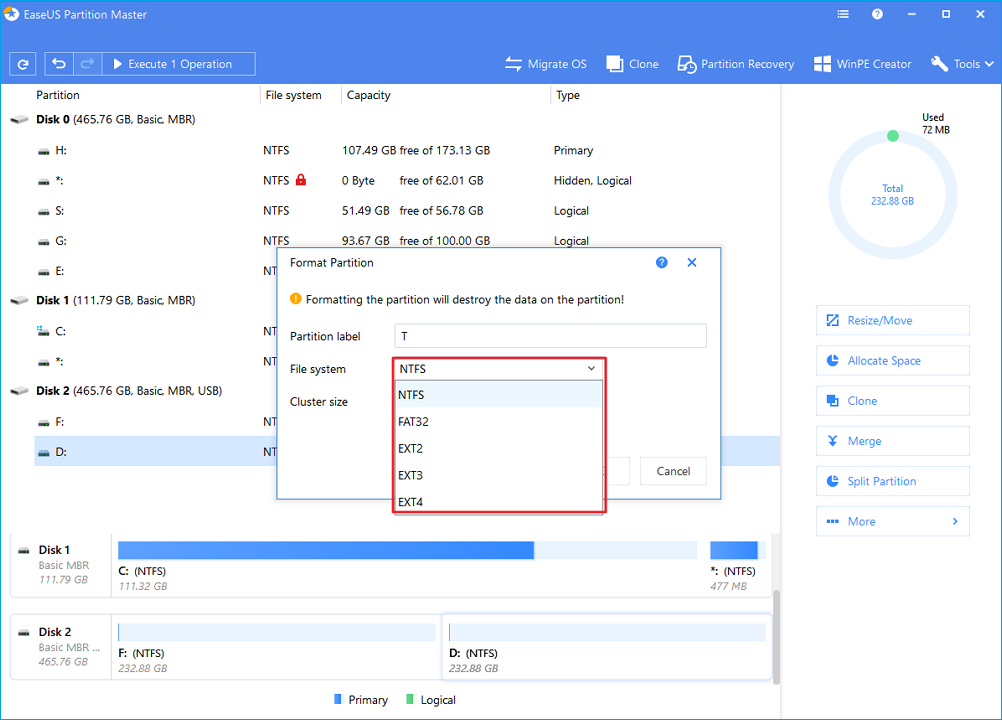
Step 3. In the Warning window, click «OK» to continue.
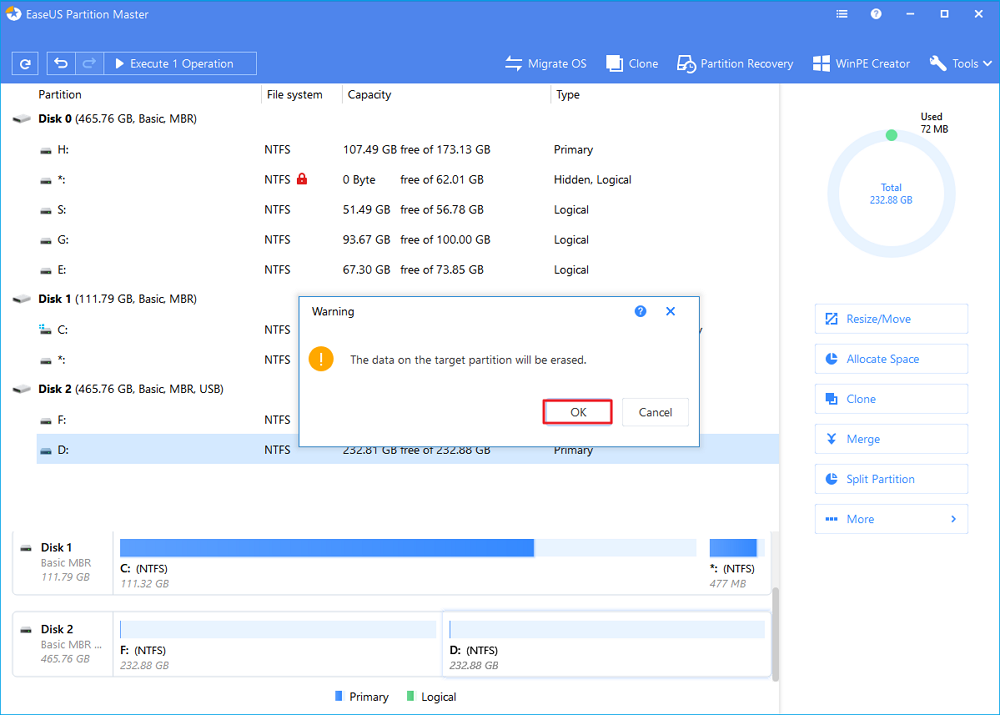
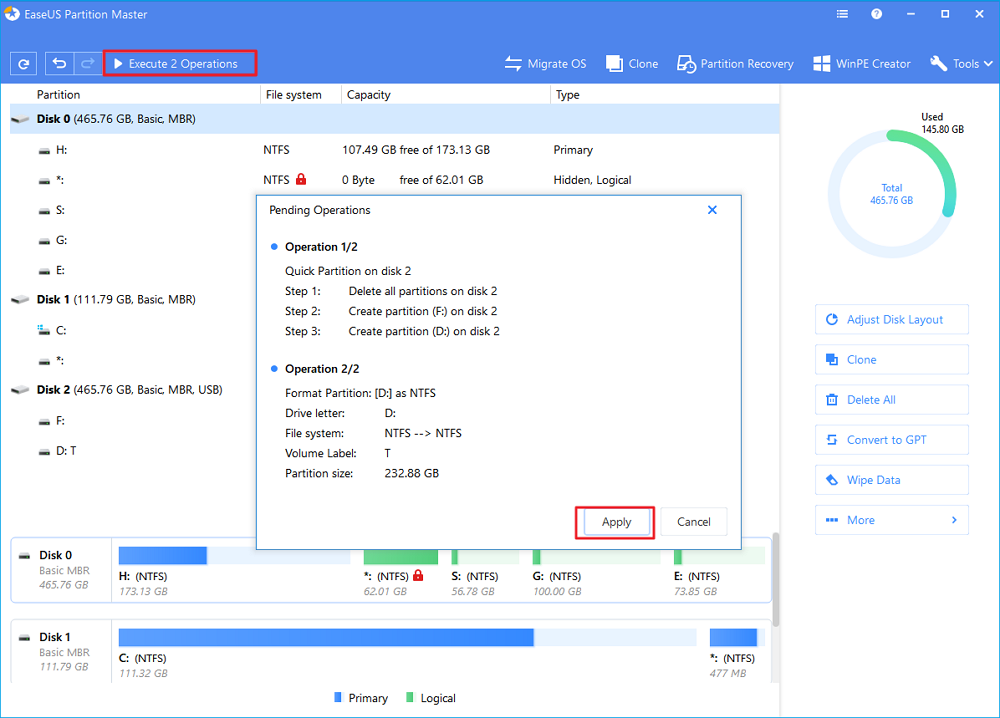
Step 4. Click the «Execute Operation» button in the top-left corner to review the changes, then click «Apply» to start formatting your external hard drive/USB/SD card.
Smaller cluster size makes less wasting of disk space. The smaller cluster size is, the bigger file allocation table (FAT) will be. The bigger the FAT is, the slower the operating system works with the disk.
Was This Page Helpful?
Daisy is the Senior editor of the writing team for EaseUS. She has been working in EaseUS for over ten years, starting from a technical writer to a team leader of the content group. As a professional author for over 10 years, she writes a lot to help people overcome their tech troubles.
I love that the changes you make with EaseUS Partition Master Free aren’t immediately applied to the disks. It makes it way easier to play out what will happen after you’ve made all the changes. I also think the overall look and feel of EaseUS Partition Master Free makes whatever you’re doing with your computer’s partitions easy.
Partition Master Free can Resize, Move, Merge, Migrate, and Copy disks or partitions; convert to local, change label, defragment, check and explore partition; and much more. A premium upgrade adds free tech support and the ability to resize dynamic volumes.
It won’t hot image your drives or align them, but since it’s coupled with a partition manager, it allows you do perform many tasks at once, instead of just cloning drives. You can move partitions around, resize them, defragment, and more, along with the other tools you’d expect from a cloning tool.
Brithny/2020/12/11
Brithny/2021/04/16
Jean/2021/03/26
Tracy King/2021/03/26
About EaseUS Partition Master
All-round disk & partition management software for personal and commercial use. Let it manage your storage drive: resize, format, delete, clone, convert, etc.


