- cmd Delete Folder – How to Remove Files and Folders in Windows
- Kris Koishigawa
- How to open Command Prompt
- How to delete files with the del command
- How to force delete files with the del command
- How to delete folders with the rmdir command
- How to use the /s flag with rmdir
- Kris Koishigawa
- Recover lost or deleted files
- How to Delete Empty files (0 byte) in Windows?
- Find and/or delete empty (0 byte) files in Windows:
- Find and delete 0-byte files recursively in a folder tree
- 1. Using the “Find Empty Files-n-Folders” utility
- 2. Using Windows Search
- 3. Using Command Prompt
- Find and delete 0-byte files having a specific file extension
- Create a Batch file
- What does the above command do?
- 4. Using PowerShell
- List empty (0 KB) files
- Delete empty (0 KB) files
- 5. Using VBScript
- Usage
- 6. Using DelEmpty.exe
cmd Delete Folder – How to Remove Files and Folders in Windows

Kris Koishigawa

Sometimes it’s just faster to do things with the command line.
In this quick tutorial we’ll go over how to open Command Prompt, some basic commands and flags, and how to delete files and folders in Command Prompt.
If you’re already familiar with basic DOS commands, feel free to skip ahead.
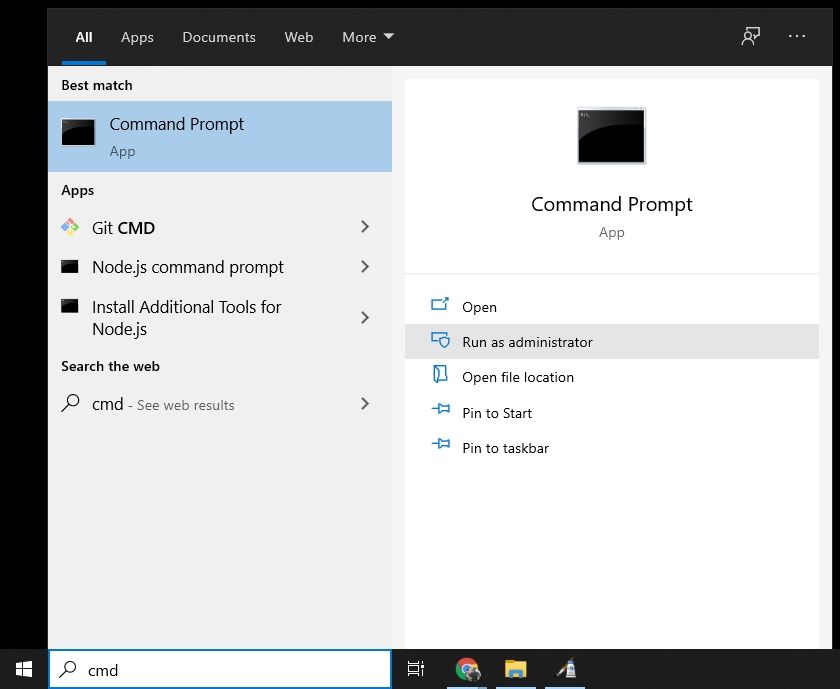
How to open Command Prompt
To open Command Prompt, press the Windows key, and type in «cmd».
Then, click on «Run as Administrator»:
After that, you’ll see a Command Prompt window with administrative privileges:
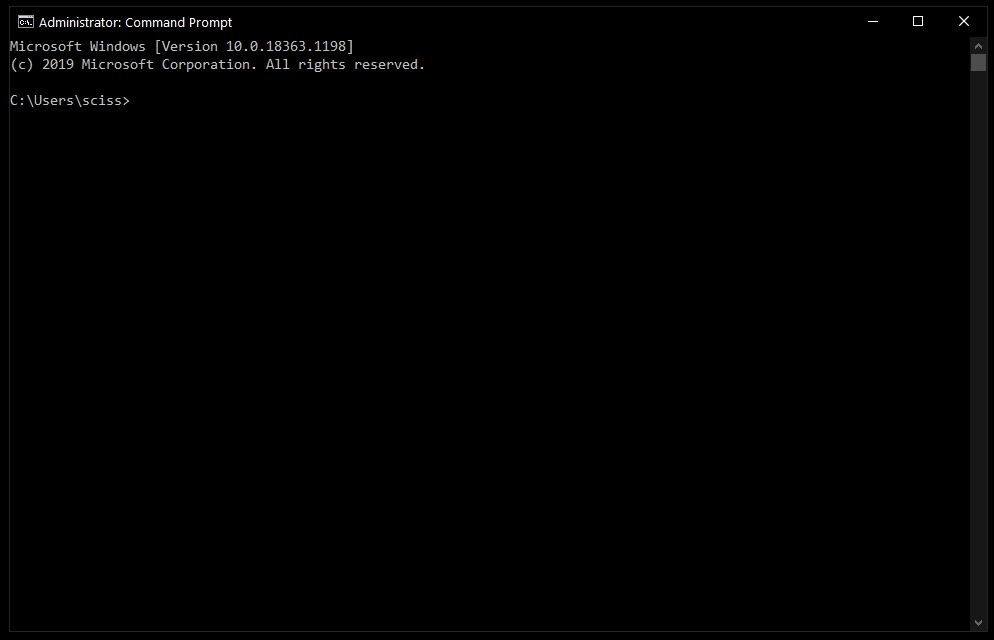 Screenshot of Command Prompt window
If you can’t open Command Prompt as an administrator, no worries. You can open a normal Command Prompt window by clicking «Open» instead of «Run as Administrator».
The only difference is that you may not be able to delete some protected files, which shouldn’t be a problem in most cases.
How to delete files with the del command
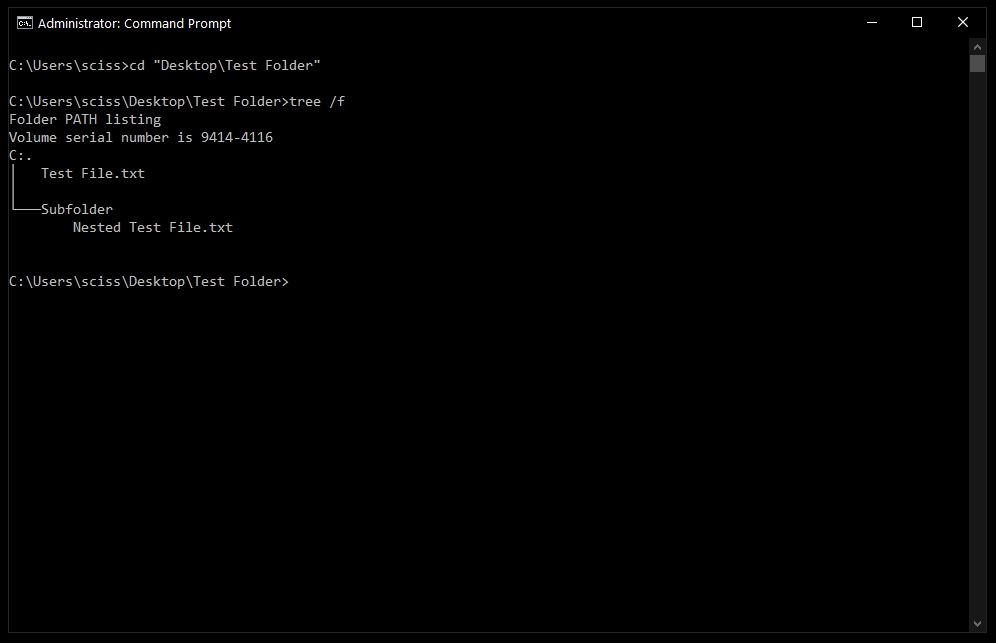
Now that Command Prompt is open, use cd to change directories to where your files are.
I’ve prepared a directory on the desktop called Test Folder. You can use the command tree /f to see a, well, tree, of all the nested files and folders:
To delete a file, use the following command: del » » .
For example, to delete Test file.txt , just run del «Test File.txt» .
There may be a prompt asking if you want to delete the file. If so, type «y» and hit enter.
Note: Any files deleted with the del command cannot be recovered. Be very careful where and how you use this command.
After that, you can run tree /f to confirm that your file was deleted:

Also, bonus tip – Command Prompt has basic autocompletion. So you could just type in del test , press the tab key, and Command Prompt will change it to del «Test File.txt» .
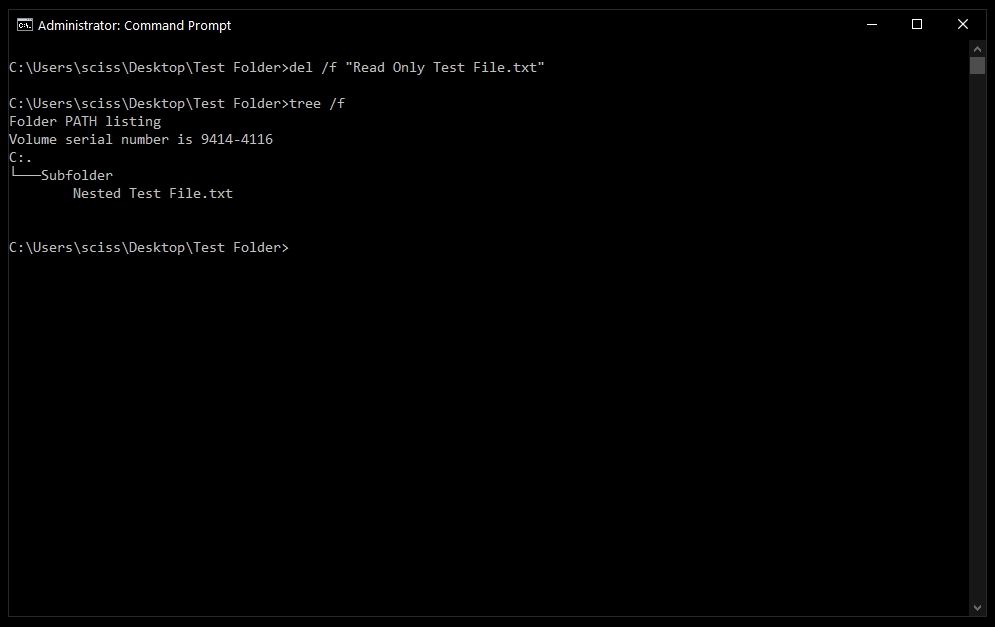
How to force delete files with the del command
Sometimes files are marked as read only, and you’ll see the following error when you try to use the del command:
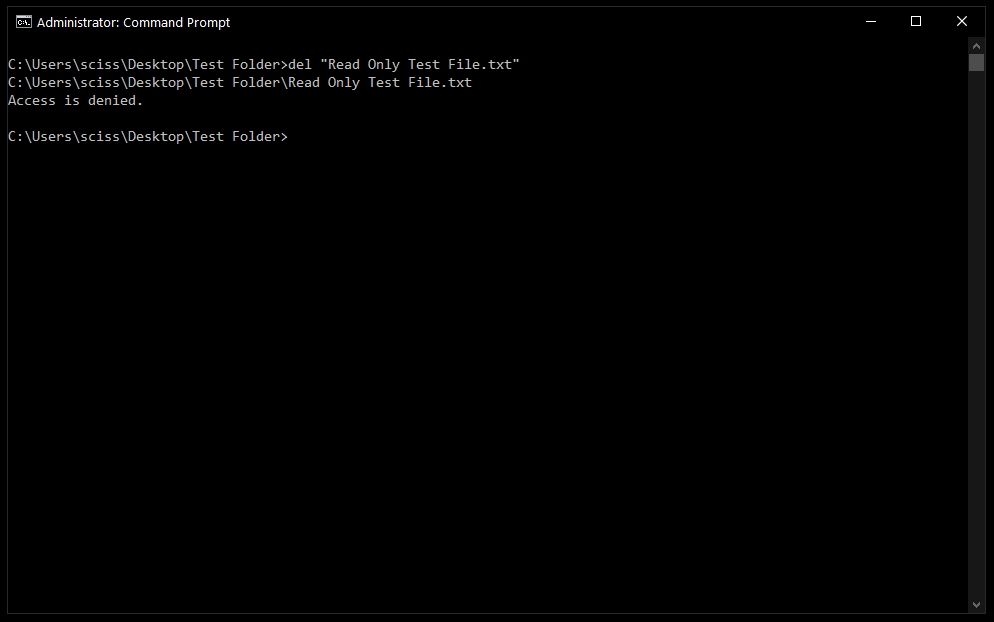
To get around this, use the /f flag to force delete the file. For example, del /f «Read Only Test File.txt» :
How to delete folders with the rmdir command
To delete directories/folders, you’ll need to use the rmdir or rd command. Both commands work the same way, but let’s stick with rmdir since it’s a bit more expressive.
Also, I’ll use the terms directory and folder interchangeably for the rest of the tutorial. «Folder» is a newer term that became popular with early desktop GUIs, but folder and directory basically mean the same thing.
To remove a directory, just use the command rmdir .
Note: Any directories deleted with the rmdir command cannot be recovered. Be very careful where and how you use this command.
In this case I want to remove a directory named Subfolder, so I’ll use the command rmdir Subfolder :
![]()
But, if you remember earlier, Subfolder has a file in it named Nested Test File.
You could cd into the Subfolder directory and remove the file, then come back with cd .. and run the rmdir Subfolder command again, but that would get tedious. And just imagine if there were a bunch of other nested files and directories!
Like with the del command, there’s a helpful flag we can use to make things much faster and easier.
How to use the /s flag with rmdir
To remove a directory, including all nested files and subdirectories, just use the /s flag:
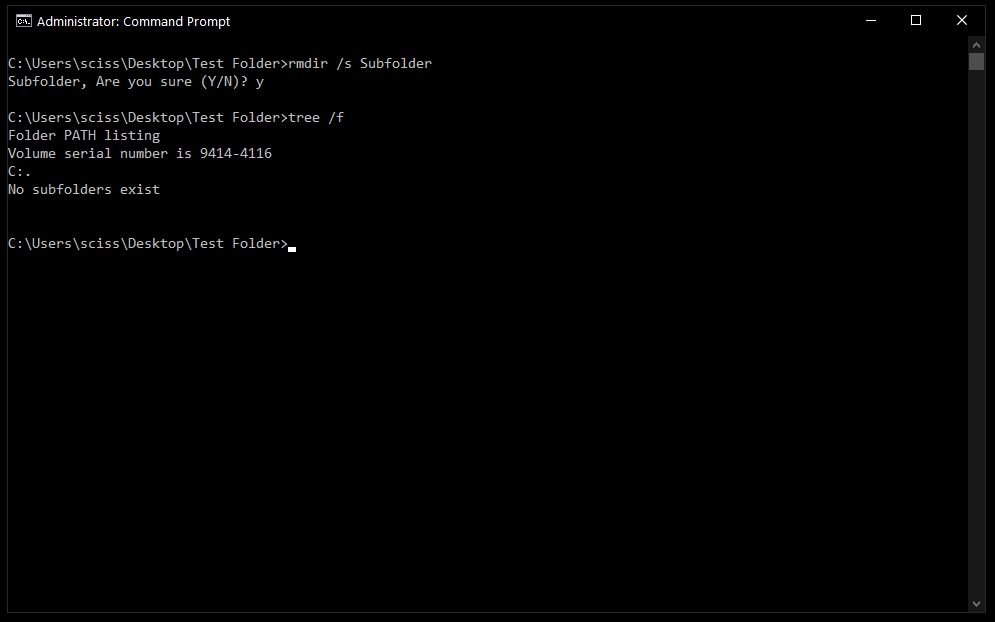
There will probably be a prompt asking if you want to remove that directory. If so, just type «y» and hit enter.
And that’s it! That should be everything you need to know to remove files and folders in the Windows Command Prompt.
All of these commands should work in PowerShell, which is basically Command Prompt version 2.0. Also, PowerShell has a bunch of cool aliases like ls and clear that should feel right at home if you’re familiar with the Mac/Linux command line.
Did these commands help you? Are there any other commands that you find useful? Either way, let me know over on Twitter.
Kris Koishigawa
Read more posts by this author.
If you read this far, tweet to the author to show them you care. Tweet a thanks
Learn to code for free. freeCodeCamp’s open source curriculum has helped more than 40,000 people get jobs as developers. Get started
freeCodeCamp is a donor-supported tax-exempt 501(c)(3) nonprofit organization (United States Federal Tax Identification Number: 82-0779546)
Our mission: to help people learn to code for free. We accomplish this by creating thousands of videos, articles, and interactive coding lessons — all freely available to the public. We also have thousands of freeCodeCamp study groups around the world.
Donations to freeCodeCamp go toward our education initiatives, and help pay for servers, services, and staff.
Recover lost or deleted files
Note: If you’ve recently updated Windows 10 and are having problems finding files, see Find lost files after the upgrade to Windows 10.
If you can’t find a file on your computer or you accidently modified or deleted a file, you can restore it from a backup (if you’re using Windows backup) or you can try to restore it from a previous version. Previous versions are copies of files and folders that Windows automatically saves as part of a restore point. Previous versions are sometimes referred to as shadow copies.
To restore a file from a backup, make sure the media or drive that your backup is saved on is available, and then follow these steps:
To restore files from a backup
Open Backup and Restore by selecting the Start button  , selecting Control Panel, selecting System and Maintenance, and then selecting Backup and Restore.
Select Restore my files, and then follow the steps in the wizard.
Restore deleted files and folders or restore a file or folder to a previous state.
To restore a deleted file or folder
Open Computer by selecting the Start button , and then selecting Computer.
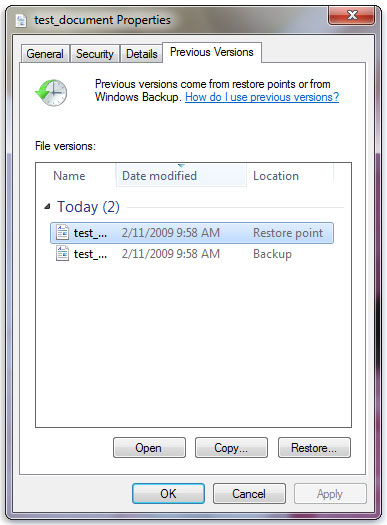
Navigate to the folder that used to contain the file or folder, right-click it, and then select Restore previous versions. If the folder was at the top level of a drive, for example C:\, right-click the drive, and then select Restore previous versions.
You’ll see a list of available previous versions of the file or folder. The list will include files saved on a backup (if you are using Windows Backup to back up your files) as well as restore points, if both types are available.
Note: To restore a previous version of a file or folder that’s included in a library, right-click the file or folder in the location where it’s saved, rather than in the library. For example, to restore a previous version of a picture that’s included in the Pictures library but is stored in the My Pictures folder, right-click the My Pictures folder, and then select Restore previous versions.
Some previous versions of files
Double-click a previous version of the folder that contains the file or folder you want to restore. (For example, if a file was deleted today, choose a version of the folder from yesterday, which should contain the file.)
Drag the file or folder that you want to restore to another location, such as your desktop or another folder.
The version of the file or folder is saved to the location that you selected.
Tip: If you don’t remember the exact file or folder name or its location, you can search for it by typing part of the name in the search box in the Documents library.
To restore a file or folder to a previous state
Right-click the file or folder, and then select Restore previous versions.
You’ll see a list of available previous versions of the file or folder. The list will include files saved on a backup (if you’re using Windows Backup to back up your files) as well as restore points, if both types are available.
The Previous Versions tab, showing some previous versions of files
Before restoring a previous version of a file or folder, select the previous version, and then click Open to view it to make sure it’s the version you want.
Note: You can’t open or copy previous versions of files that were created by Windows Backup, but you can restore them.
To restore a previous version, select the previous version, and then select Restore.
Warning: The file or folder replaces the current version on your computer, and the replacement can’t be undone.
Note: If the Restore button is unavailable, you can’t restore a previous version of the file or folder to its original location. You might be able to open it or save it to a different location.
How to Delete Empty files (0 byte) in Windows?
Some applications create empty 0-byte files in their data folders and fail to clear them up. Over time, if you see many zero-byte files in a folder hierarchy, here are some methods to find all those 0-byte files and delete them.
Find and/or delete empty (0 byte) files in Windows:
Find and delete 0-byte files recursively in a folder tree
It’s important to note that deleting 0-byte files arbitrarily can be problematic sometimes, as some applications may need them as a placeholder or for some other reason. If you’re sure that you don’t need any 0-byte files in a folder path and want to delete them all, follow one of the methods below.
Let’s start with a neat 3rd party freeware GUI tool, and then cover the native methods next.
1. Using the “Find Empty Files-n-Folders” utility
Find Empty Files-n-Folders is an excellent tool that can find and delete empty files (0-byte) and empty folders recursively under a folder tree.
Download Find Empty Files-n-Folders (600KB installer) from Ashisoft.com.
Select the folder and click Scan Now.
The tool will list empty files and folders in separate tabs.
From the Empty Files tab, click Mark all Files and then click Delete Files.
Similarly, to delete the 0-byte files in the selected folder tree, click on the Empty Files tab.
Ashisoft.com has other awesome tools that you can check out!
2. Using Windows Search
Windows Search allows you to list all 0-byte files using the size: query operator.
Open the folder where you want to find or delete empty files.
In the search box, type size:empty or size:0 KB
To filter the results by a file extension (e.g., javascript files → extension .js ), use the following Advance Query Syntax (AQS):
3. Using Command Prompt
To list all 0-byte (0 KB) files is a folder and sub-folders recursively and output the names to a file, use the following command.
Note that you’ll need to run the command from the folder where you want to find or delete empty (0 KB) files.
Alternately, you can include the target folder path in the for command so that you don’t have to change the directory in the console window. Example:
That way, you don’t have to switch over to that particular folder in Command Prompt
The complete list of 0-byte files output is written to the file named 0byte-files.txt on the D:\ drive.
To delete the files, you’d use the del command instead of echo .
or mention the target folder path in the command itself:
Find and delete 0-byte files having a specific file extension
In the above examples, you can even filter by file extension. For instance, to delete 0-byte .txt files, you’d use *.txt instead of *.* or *
or with mentioning the folder path:
That would delete all the empty .txt files from the current folder and sub-folders, or in the specified folder tree recursively.
Create a Batch file
If you’d like to make a batch file to find and list empty files and output the results to a text file, here is one:
Save the above contents as find-empty-files.bat .
To delete empty files rather than outputting the list of files, use this batch file:
To run the batch file against a folder recursively, you’d use the following syntax:
What does the above command do?
- for /r %F in (*) iterates files recursively in the mentioned folder and subfolders.
- if %
zF==0 checks if the iterated file is a 0-byte file
del %%
fA delete the 0-byte file
4. Using PowerShell
Start PowerShell.exe and use one of the following methods:
List empty (0 KB) files
To get the list of 0-byte files under a folder tree, use this command-line syntax:
To output the list to a file:
To output the list to grid view:
To list only a specific file type (e.g., .bmp ) :
Delete empty (0 KB) files
To delete all the 0-byte files under a folder tree, use this command-line syntax:
To delete 0-byte files having a specific extension (e.g., .bmp )
5. Using VBScript
The following VBScript clears empty (0-byte) files in a folder tree recursively.
Copy the following code to Notepad and save it as del-zero-byte-files.vbs
Usage
To run the script against a folder, you can use wscript.exe or cscript.exe, like below:
CScript.exe shows the outputs to the console window. That means you’ll need to run it from a Command Prompt window to see the output.
WScript.exe shows the outputs in the GUI.
via the Send To menu
You can create a shortcut to the script in your SendTo folder and name it as Delete 0-byte Files. Prefix wscript.exe in the shortcut properties target field.
Then, right-click on a folder where you want to delete empty files in the folder tree recursively → click Send To → click Delete 0-byte Files in the Send To menu.
You’ll see the list of empty files deleted and the total, and files which couldn’t be deleted with the respective error codes displayed.
6. Using DelEmpty.exe
DelEmpty.exe is a console tool from IntelliAdmin that can delete empty directories recursively. This program can also swiftly delete the empty 0-byte files recursively.
The following is the command-line syntax for the program:
| Argument | Description |
| -f | Delete empty (0-byte) files |
| -d | Delete empty directories |
| -v | Verbose mode |
| -c | Confirm mode (Shows what was deleted) |
| -s | Include sub-directories (traverse subfolders) |
| -l | List what would be deleted (will not delete) |
| -y | Delete without (y/n) prompt |
Example 1: To list the empty files under a directory and its subdirectories, I used the following command-line syntax:
The above command shows the list of empty folders, but will not delete them since the -l (list only) switch is used.
For folder names containing space(s) — e.g., Mozilla Firefox , be sure to include the double-quotes around the path.
Example 2: To delete the empty files in a folder and subfolders, I ran the same command-line but without the -l switch:
Do you know any other utility that can traverse sub-folders and delete empty files? Let’s know your comments.


