- Windows find files starting with
- Syntax
- Parameters
- Remarks
- Examples
- How do I search files in Windows 10 with a specific date range
- Replies (49)
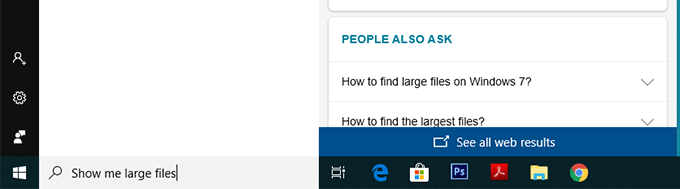
- 4 Ways To Find Large Files In Windows 10
- Find Large Files In Windows 10 Using File Explorer
- Search For Large Files In Windows 10 With Command Prompt
- Use Largest Files Finder To Find Large Files On Windows 10
- Find Largest Files On Windows 10 With TreeSize Free
- Windows 7 —
- Finding Your Files with Search and Libraries
- Windows 7: Finding Your Files with Search and Libraries
- Lesson 6: Finding Your Files with Search and Libraries
- Introduction
- What are Libraries?
- Windows Explorer
- Details Pane
- Navigation Buttons
- Toolbar
- Address Bar
- Library Pane
- Arrange By
- Search Bar
- Show Preview Pane Button
- View Button
- Navigation Pane
- To use Windows Explorer:
- To change the view of the content in your folders:
- To change how your content is arranged:
- Using Search
- To search your Libraries:
- Search options and features
- Searching from the Start Menu
- A new approach to accessing content
- Setting up your Libraries
- To create your own Library:
- To customize your Libraries:
- To add folders to existing Libraries:
- Conclusion
Windows find files starting with
Searches for a string of text in a file or files, and displays lines of text that contain the specified string.
Syntax
Parameters
| Parameter | Description |
|---|---|
| /v | Displays all lines that don’t contain the specified . |
| /c | Counts the lines that contain the specified and displays the total. |
| /n | Precedes each line with the file’s line number. |
| /i | Specifies that the search is not case-sensitive. |
| [/off[line]] | Doesn’t skip files that have the offline attribute set. |
| Required. Specifies the group of characters (enclosed in quotation marks) that you want to search for. | |
| [ :][ |
] Specifies the location and name of the file in which to search for the specified string. /? Displays help at the command prompt.
Remarks
If you don’t use /i, this command searches for exactly what you specify for string. For example, this command treats the characters a and A differently. If you use /i, however, the search becomes non-case-sensitive, and it treats a and A as the same character.
If the string you want to search for contains quotation marks, you must use double quotation marks for each quotation mark contained within the string (for example, «»This string contains quotation marks»»).
If you omit a file name, this command acts as a filter, taking input from the standard input source (usually the keyboard, a pipe (|), or a redirected file) and then displays any lines that contain string.
You can type parameters and command-line options for the find command in any order.
You can’t use wildcards (* and ?) in file names or extensions that you specify while using this command. To search for a string in a set of files that you specify with wildcards, you can use this command within a for command.
If you use /c and /v in the same command line, this command displays a count of the lines that don’t contain the specified string. If you specify /c and /n in the same command line, find ignores /n.
This command doesn’t recognize carriage returns. When you use this command to search for text in a file that includes carriage returns, you must limit the search string to text that can be found between carriage returns (that is, a string that is not likely to be interrupted by a carriage return). For example, this command doesn’t report a match for the string tax file if a carriage return occurs between the words tax and file.
Examples
To display all lines from pencil.ad that contain the string pencil sharpener, type:
To find the text, «The scientists labeled their paper for discussion only. It is not a final report.» in the report.doc file, type:
To search for a set of files, you can use the find command within the for command. To search the current directory for files that have the extension .bat and that contain the string PROMPT, type:
To search your hard disk to find and display the file names on drive C that contain the string CPU, use the pipe (|) to direct the output of the dir command to the find command as follows:
Because find searches are case-sensitive and dir produces uppercase output, you must either type the string CPU in uppercase letters or use the /i command-line option with find.
How do I search files in Windows 10 with a specific date range
So FRUSTRATED! Recently had to upgrade from Windows 7 Home to Windows 10 due to computer dying. Need to perform a file search with specific date range but keep getting everything but what I want. (i.e. — 04/01/2015 to 06/30/2015
This shouldn’t be rocket science. I have already tried >04/01/2015 but it brought up dates before and after with over 400 files to go through. Help.
***Post moved by the moderator to the appropriate forum category.***
Replies (49)
* Please try a lower page number.
* Please enter only numbers.
* Please try a lower page number.
* Please enter only numbers.
![]()
Thank you for posting your query in Microsoft Community.
Share this information to assist you better.
- Are you looking for the files you from the earlier version of the operating system?
- Do you find Windows.old folder in c: drive?
Try using modified:> 04/01/15 will help you find the files after that date you mentioned
To search for files with a particular file name extension, you can simply enter the extension in the search box, like this:
The results will include files that incorporate the extension in their contents as well as in their file names—which might or might not be what you want.You will get a more focused search by using the ext: operator including an asterisk wildcard and a period, like this:
If you want to search by a specific format, you can use this for example
Type:excel
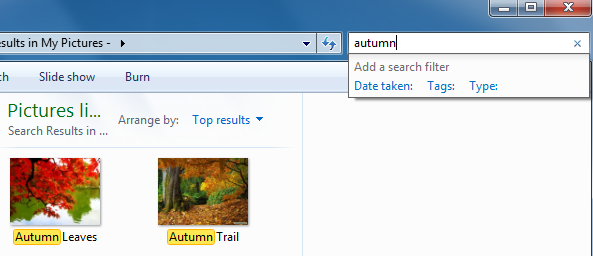
The number of search filter options that appears below the search box is constrained by the width of the search box. To see the entire selection, drag the handle between the address bar and the search box to the left. “Add a search filter” will remain grey, but if you enter a recognized property or operator followed by a colon, the text turns blue.
Hope this helps. If the issue remains unresolved, please get back to us and we would be happy to help.
4 Ways To Find Large Files In Windows 10
Free up space quickly by deleting them
If you quickly want to free-up memory space on your Windows machine, the best way to do that is to find large files on your Windows 10 PC and get rid of them if they’re no longer useful. The question though is how do you go about searching for large files on your computer?
Windows provides you with multiple ways to find all the large files that are stored in your drives. Either you can use the built-in tools on your machine to look for these files or you can grab a third-party app that will do the task for you. Either way, you’ll find the files that occupy a significant portion of your memory space.

Once such files are found, it’s then up to you what you want to do with them. If deleting them permanently isn’t something you’d like to do straightaway, you can move them over to a cloud storage or to an external hard drive.
Also, be sure to check out our YouTube video from our sister site Online Tech Tips where we go through some of the options mentioned below in this article.
Find Large Files In Windows 10 Using File Explorer
File Explorer comes with a lot of hidden features to let you organize, sort, and find files on your computer. One of its abilities is to help you find files that are of specific size on your computer. Using this feature, you can locate those memory-hogging files and get them removed from your PC.
Before you do that, though, you’ll need to first enable the hidden files option. This is to ensure that Explorer looks for large hidden files as well in addition to searching for the normal files.
However, be cautious while dealing with the hidden files. Most of the time, these are system and app related files which, if you delete, will cause your apps to malfunction and even lead your entire system to crash. Before you delete anything, just make sure you know what it is and you’ll be fine.
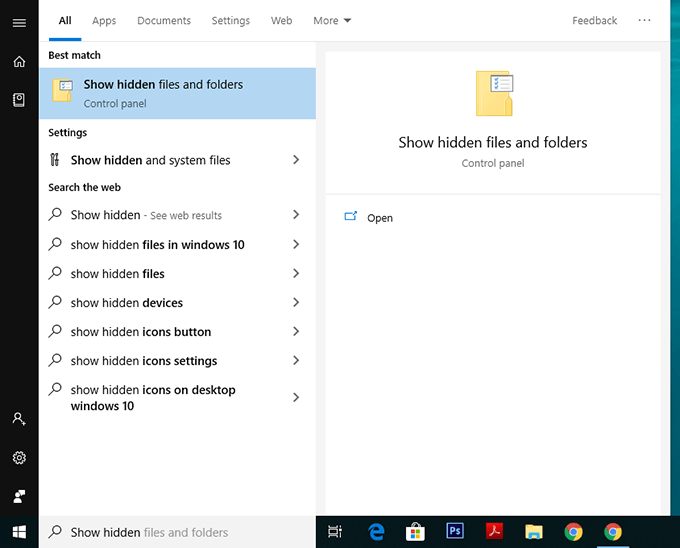
Open the Start Menu and search for Show hidden and click on Show hidden files and folders.
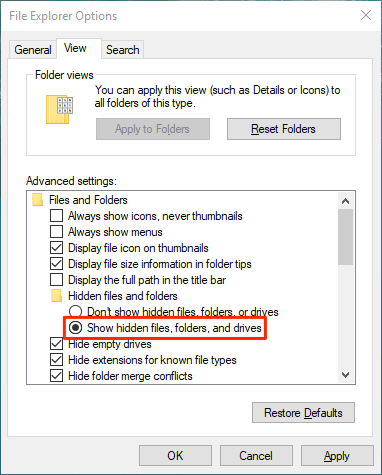
When the dialog box opens, click on the View tab at the top. You’ll see various File Explorer options that you can modify.
Find the option that says Show hidden files, folders, and drives and put a checkmark in it. Then click on the OK button to save your changes.
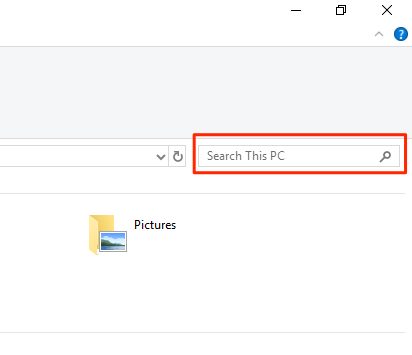
Double-click on This PC on your desktop to launch File Explorer. When the utility launches, click on the search box given at the top-right corner.
A new menu item will be added to the top of your screen. Click on the newly added item that says Search to view further options.
Select the Size option and then select an appropriate option from the list. It’ll let you find large files available on your PC.
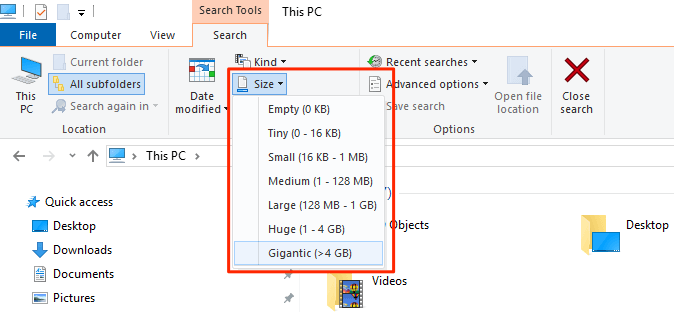
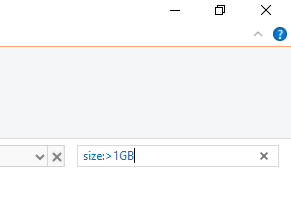
If what you consider as a large file isn’t available in the default menu, type in size:>1GB (replace 1GB with your size) in the search box and hit Enter. It’ll only look for the files that are larger than your specified size.
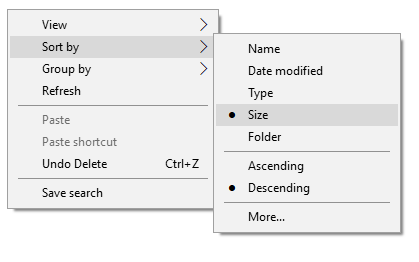
When the search results appear, right-click anywhere blank and select Sort by followed by Size and Descending. This’ll ensure the largest file is shown at the top of the results.
Search For Large Files In Windows 10 With Command Prompt
If you’re more of a geeky person, you can use the Command Prompt utility to retrieve a list of all the files larger than a specified size value. The files list can be exported to a text file for you to then actually find those files on your machine.
Press Windows + R, type in cmd, and hit Enter to launch the utility.
When it launches, type in the following command and hit Enter. It’ll find all the files that are larger than 1GB in size. You can modify the value in the command so it finds files that you think are large.
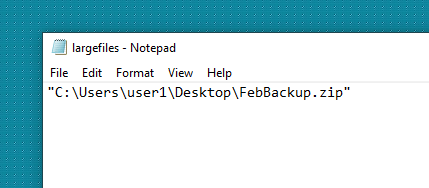
forfiles /S /M * /C “cmd /c if @fsize GEQ 1073741824 echo @path > largefiles.txt

Open the newly created largefiles.txt file and it’ll have a list of all the large files sitting on your computer.
Use Largest Files Finder To Find Large Files On Windows 10
File Explorer and Command Prompt aren’t the only tools to find large files on your Windows 10 computer. There are a few third-party apps as well that can help you find such files.
Largest Files Finder is one of those apps that helps you find the top 100 largest files on your computer. It claims to be only taking a minute to scan drives sized upto 200GB. Also, it doesn’t require any installation and works straight out of the box.
- Download and launch the app on your computer.
- Soon as it launches, it automatically starts searching for large files on your computer. When it’s done, you can review the results for yourself.
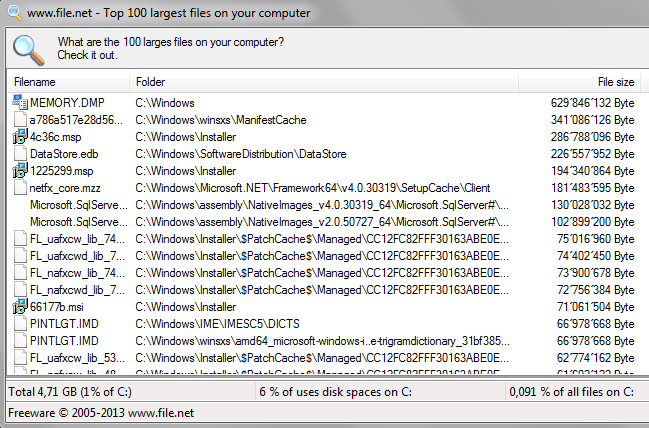
If you want to delete any files from the search results, you can do so with ease from within the app. Simply right-click on any of the files and select Delete.
Find Largest Files On Windows 10 With TreeSize Free
TreeSize Free has been around for quite a long time and it helps you find space hogging files on your Windows computers. It requires a small installation but then it works like a charm.
- Download, install, and launch the app on your computer. Make sure to run it with admin rights so it can search the folders that it can’t otherwise.
- You’ll see a tree of your folders along with the space they occupy on your screen. You can double-click on any folder to view its subfolders and their sizes.
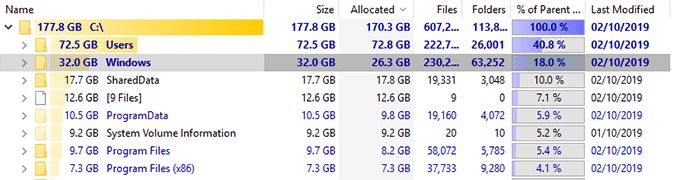
You can then sort the directories by the Size column so that the largest files are always shown at the top.
It has a few customizable options as well should you want to use them. Feel free to play around with any options you think will make it easier to find large files on your computer.
Mahesh has been obsessed with technology since he got his first gadget a decade or so ago. Over the last few years, he’s written a number of tech articles on various online publications including but not limited to MakeTechEasier and Android AppStorm. Read Mahesh’s Full Bio
Windows 7 —
Finding Your Files with Search and Libraries


Windows 7: Finding Your Files with Search and Libraries
Lesson 6: Finding Your Files with Search and Libraries
Introduction
At this point, you are likely ready to start organizing and accessing your files and content. Windows 7 has developed search and libraries to make it easier to find, maneuver, and customize your files.
In this lesson, we will show you how to access your content through Search and Libraries. In addition, we will highlight the features that offer customization and convenience, including tagging, search filters, and creating libraries.

What are Libraries?
Most users access their files through My Documents, the C drive, or from other locations like a server or backup drive. You are likely accustomed to sorting through tiered stacks of folders to get to your content. This process can be time consuming, especially if you cannot remember where an item is filed. Microsoft wanted to make finding your files easier, so it developed Libraries.
Libraries are collections of your stored content that can be easily accessed through the Desktop Search function. Libraries do not replace your folders; they simply house them in a single collection. When files are placed in a Library, their properties are indexed by the Search function. This indexing makes accessing files in Search quick and easy.
Learn more about Search and Libraries in this video.
There are four default Libraries in Windows 7: Documents, Pictures, Music, and Videos. Later in this lesson, we will also show you how to create Libraries of your own.
Windows Explorer
Understanding Windows Explorer will help you navigate through your content and work with your files and folders in an easy manner.
- Click the folder icon on the taskbar to open Windows Explorer.
Click the buttons in the interactive below to learn more about the Windows Explorer interface.

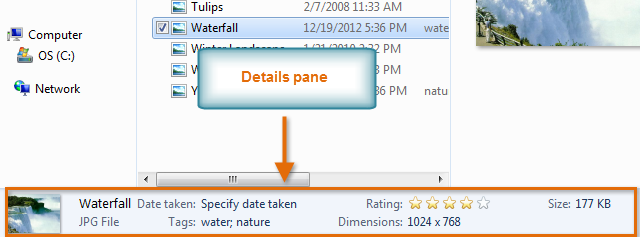
Details Pane
The Details pane allows you to view additional information and add tags and ratings to the currently selected item.
Navigation Buttons
Use the Back and Forward buttons to navigate between folders.
Toolbar
Shortcuts will appear in the toolbar depending on the item types in the Library pane.
Address Bar
Use the Address bar to see the path of the current folder.
Library Pane
Items can now be organized by Libraries.
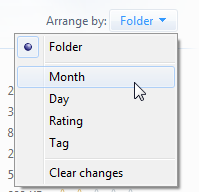
Arrange By
Depending on the Library, you can arrange content by month, day, rating, and more.
Search Bar
Use the search bar to search for specific files or folders.
Show Preview Pane Button
Click to see a preview of items in your folders.
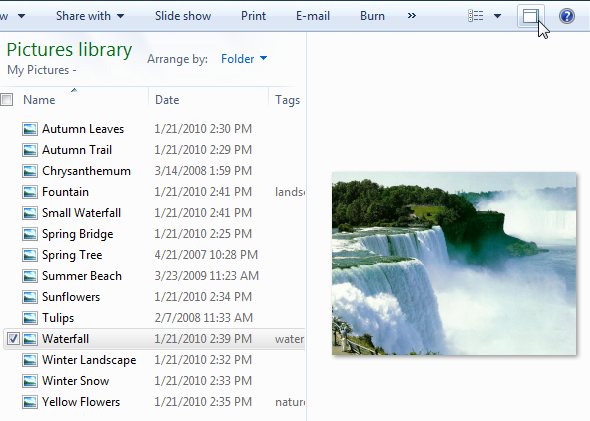
View Button
Click to change the way items are displayed.
Navigation Pane
You can access folders in the traditional way using tiered stacks of content in the Navigation pane.
To use Windows Explorer:
- Move through your content by double-clicking folders, clicking on the Back and Forward buttons, or by clicking on headings in the Address bar.
- Preview files by selecting the Show the Preview pane button.
- When you double-click a file, it will open in the default program.
To change the view of the content in your folders:
You have several options for how you can view content in your folders. For example, you may prefer seeing Details when viewing file documents and Extra Large Icons when viewing pictures.
- To change the view, select the View button and choose your preference.
To change how your content is arranged:
Depending on the Library, you can Arrange content by month, day, rating, and other factors.
- Select the Arrange by button, and choose your preference.
Using Search
To search your Libraries:
- Locate the Search bar at the top right corner of the Windows Explorer pane.
- Start typing a file name or keyword.
- Search will start displaying matching items even before you finish typing.
Search options and features
Search and Libraries have a few features that assist with identifying and arranging items. Tags can be added to certain items in order to improve search results. You can also rate and arrange content, like Pictures and Music, in the same manner. The Tag or Rating options are included in the Details pane, as shown below.
Various search filters can be applied to assist with finding content or narrowing a search. Depending on the Library, search filters might include Type, Date Modified, Tag, or Authors. Below is an example of the search filter in the Video Library.
For even more search options, click the Organize button near the upper-left corner of the window and select Search and folder options.
Searching from the Start Menu
The Windows Explorer pane is not the only place you can access Search and Libraries. You will find a Search bar in the Start Menu, along with one click access to popular Libraries.
A new approach to accessing content
Libraries are collections of content defined by the user. They are the new entry point for accessing your files. Therefore, when Saving items Windows 7 will direct you to Libraries. Libraries have automatic default save folders. Unless specified, your content will be saved in the default folder of the Library it matches.
- You can change the default save folder by selecting Locations in the Tool Bar.
You are not required to save or access your content through Libraries. The Navigation pane gives you access to Computer, where your folders and drives are stored. You can still sort through the tiered stacks of folders in the classic way to save and access content.
Setting up your Libraries
You decide which folders and content to include in your Libraries.
To create your own Library:
- Select New Library in the toolbar, or right-click Libraries in the Navigation pane.
- Select New and then Libraries.
To customize your Libraries:
- Right-click and select Properties.
- Select Optimize and choose one of the following:
- General Items
- Documents
- Music
- Pictures
- Video
To add folders to existing Libraries:
- Select the Folder from the Navigation pane.
- Click the Include in Library menu in the toolbar.
- Select the desired Library.
You can also copy Folders from the Navigation pane directly into the Libraries pane based on preference.
Conclusion
As we mentioned earlier, you determine what content goes into your Libraries. You can decide to use the default Libraries or create your own. Either way, you will need to take the time to move folders into the Libraries you desire.
You can still continue to access your files in the classic way of sorting through tiered stacks, but you will not be able to take advantage of the convenience of the Search function. It’s a new way of accessing your files and may take some customization to work as effectively as you wish. Take some time to reconsider your filing system and how you would like to access your files.


