- 4 Ways To Find Large Files In Windows 10
- Find Large Files In Windows 10 Using File Explorer
- Search For Large Files In Windows 10 With Command Prompt
- Use Largest Files Finder To Find Large Files On Windows 10
- Find Largest Files On Windows 10 With TreeSize Free
- How do I find the largest files on my PC in Windows 10?
- How do I search for files by size in Windows 10?
- 1. Use a third-party tool
- Copernic Desktop Search
- 2. Use File Explorer
- How to Identify the Process that has Locked a File in Windows
- Find which process has locked a file using:
- 1. Resource Monitor
- 2. Process Explorer
- 3. Handle from Windows Sysinternals
- Sysinternals Handle: Command-line arguments
- Add Sysinternals Handle to right-click menu
- 4. OpenFiles.exe — a built-in console tool
- Enable “Maintain Objects List” global flag for the First time
- View open files and the corresponding process names
- Disconnect files opened remotely from shared folder.
- 5. OpenedFilesView
4 Ways To Find Large Files In Windows 10
Free up space quickly by deleting them
If you quickly want to free-up memory space on your Windows machine, the best way to do that is to find large files on your Windows 10 PC and get rid of them if they’re no longer useful. The question though is how do you go about searching for large files on your computer?
Windows provides you with multiple ways to find all the large files that are stored in your drives. Either you can use the built-in tools on your machine to look for these files or you can grab a third-party app that will do the task for you. Either way, you’ll find the files that occupy a significant portion of your memory space.

Once such files are found, it’s then up to you what you want to do with them. If deleting them permanently isn’t something you’d like to do straightaway, you can move them over to a cloud storage or to an external hard drive.
Also, be sure to check out our YouTube video from our sister site Online Tech Tips where we go through some of the options mentioned below in this article.
Find Large Files In Windows 10 Using File Explorer
File Explorer comes with a lot of hidden features to let you organize, sort, and find files on your computer. One of its abilities is to help you find files that are of specific size on your computer. Using this feature, you can locate those memory-hogging files and get them removed from your PC.
Before you do that, though, you’ll need to first enable the hidden files option. This is to ensure that Explorer looks for large hidden files as well in addition to searching for the normal files.
However, be cautious while dealing with the hidden files. Most of the time, these are system and app related files which, if you delete, will cause your apps to malfunction and even lead your entire system to crash. Before you delete anything, just make sure you know what it is and you’ll be fine.
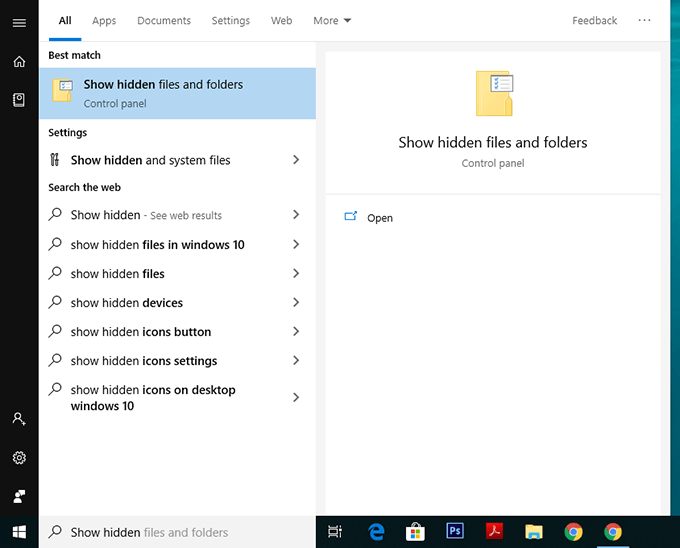
Open the Start Menu and search for Show hidden and click on Show hidden files and folders.
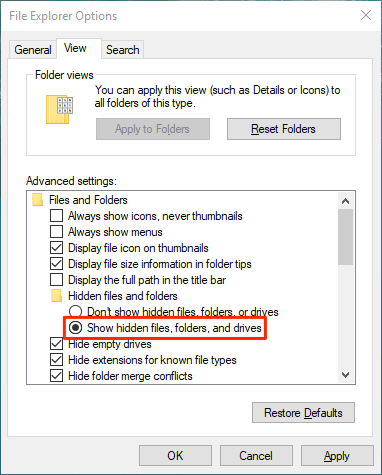
When the dialog box opens, click on the View tab at the top. You’ll see various File Explorer options that you can modify.
Find the option that says Show hidden files, folders, and drives and put a checkmark in it. Then click on the OK button to save your changes.
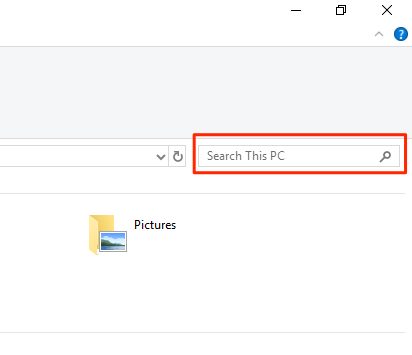
Double-click on This PC on your desktop to launch File Explorer. When the utility launches, click on the search box given at the top-right corner.
A new menu item will be added to the top of your screen. Click on the newly added item that says Search to view further options.
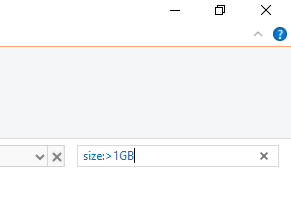
Select the Size option and then select an appropriate option from the list. It’ll let you find large files available on your PC.
If what you consider as a large file isn’t available in the default menu, type in size:>1GB (replace 1GB with your size) in the search box and hit Enter. It’ll only look for the files that are larger than your specified size.
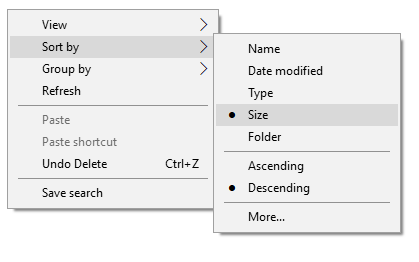
When the search results appear, right-click anywhere blank and select Sort by followed by Size and Descending. This’ll ensure the largest file is shown at the top of the results.
Search For Large Files In Windows 10 With Command Prompt
If you’re more of a geeky person, you can use the Command Prompt utility to retrieve a list of all the files larger than a specified size value. The files list can be exported to a text file for you to then actually find those files on your machine.
Press Windows + R, type in cmd, and hit Enter to launch the utility.
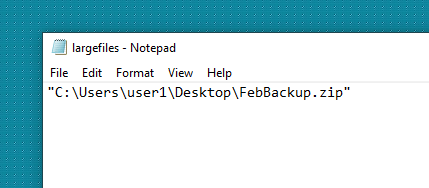
When it launches, type in the following command and hit Enter. It’ll find all the files that are larger than 1GB in size. You can modify the value in the command so it finds files that you think are large.
forfiles /S /M * /C “cmd /c if @fsize GEQ 1073741824 echo @path > largefiles.txt

Open the newly created largefiles.txt file and it’ll have a list of all the large files sitting on your computer.
Use Largest Files Finder To Find Large Files On Windows 10
File Explorer and Command Prompt aren’t the only tools to find large files on your Windows 10 computer. There are a few third-party apps as well that can help you find such files.
Largest Files Finder is one of those apps that helps you find the top 100 largest files on your computer. It claims to be only taking a minute to scan drives sized upto 200GB. Also, it doesn’t require any installation and works straight out of the box.
- Download and launch the app on your computer.
- Soon as it launches, it automatically starts searching for large files on your computer. When it’s done, you can review the results for yourself.
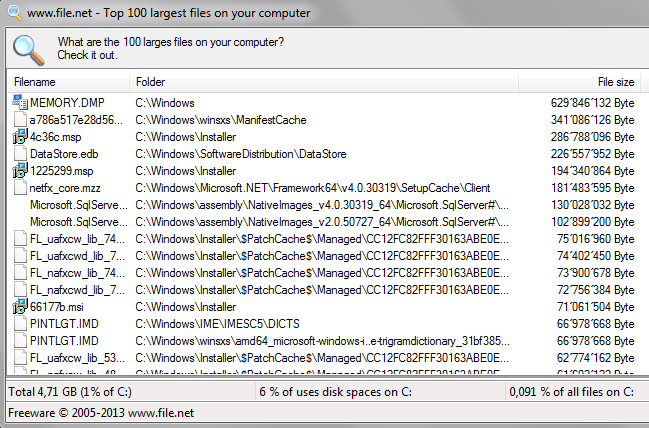
If you want to delete any files from the search results, you can do so with ease from within the app. Simply right-click on any of the files and select Delete.
Find Largest Files On Windows 10 With TreeSize Free
TreeSize Free has been around for quite a long time and it helps you find space hogging files on your Windows computers. It requires a small installation but then it works like a charm.
- Download, install, and launch the app on your computer. Make sure to run it with admin rights so it can search the folders that it can’t otherwise.
- You’ll see a tree of your folders along with the space they occupy on your screen. You can double-click on any folder to view its subfolders and their sizes.

You can then sort the directories by the Size column so that the largest files are always shown at the top.
It has a few customizable options as well should you want to use them. Feel free to play around with any options you think will make it easier to find large files on your computer.
Mahesh has been obsessed with technology since he got his first gadget a decade or so ago. Over the last few years, he’s written a number of tech articles on various online publications including but not limited to MakeTechEasier and Android AppStorm. Read Mahesh’s Full Bio
How do I find the largest files on my PC in Windows 10?

- Sometimes, you need to free up some space by removing large, unused files.
- The two quick tips listed below will surely be of great help to you.
- If you want to use less storage space, find some inspiration in our File Management Hub.
- For 24-hour professional guidance, don’t hesitate to bookmark this Tech Tutorials Hub.

- Find files on your PC, laptop and other devices
- Locate themin multiple places: local, network or cloud storage
- Get back pretty much everything you lost at a snap
find all the files,
even in cloud and network
Is your laptop’s or desktop’s hard drive more than 75% full? If so, you need to free up some hard drive space.
Erasing temporary files with disk cleaner software tools is one convenient way to free up some storage space.
Alternatively, you can free up hard drive storage by manually deleting some of your largest files.
To do that, you’ll just need to find the largest files on your PC ‘s hard drive first. We’re here to help you out with that.
How do I search for files by size in Windows 10?
1. Use a third-party tool

A dedicated file finder tool such as Copernic Desktop Search will help you with the utmost accuracy to find documents depending on your needs.
The tool comes with a Refine search feature to allow you to dig deep into the computer files and get exactly what you’re looking for.
As a result, you can search a file by:
Copernic comes in several subscription versions, including a free one, that has some limitations, in terms of the file types it retrieves.
However, you can rest assured that the most popular ones ( such as Office files, Outlook emails, and attachments, text documents, archived, and multimedia files ) are covered.
After finding the largest files, in case you need to keep some of them, you can still free up HDD space by moving the files from your hard drive into Google Drive or OneDrive cloud storage.
Copernic Desktop Search
2. Use File Explorer
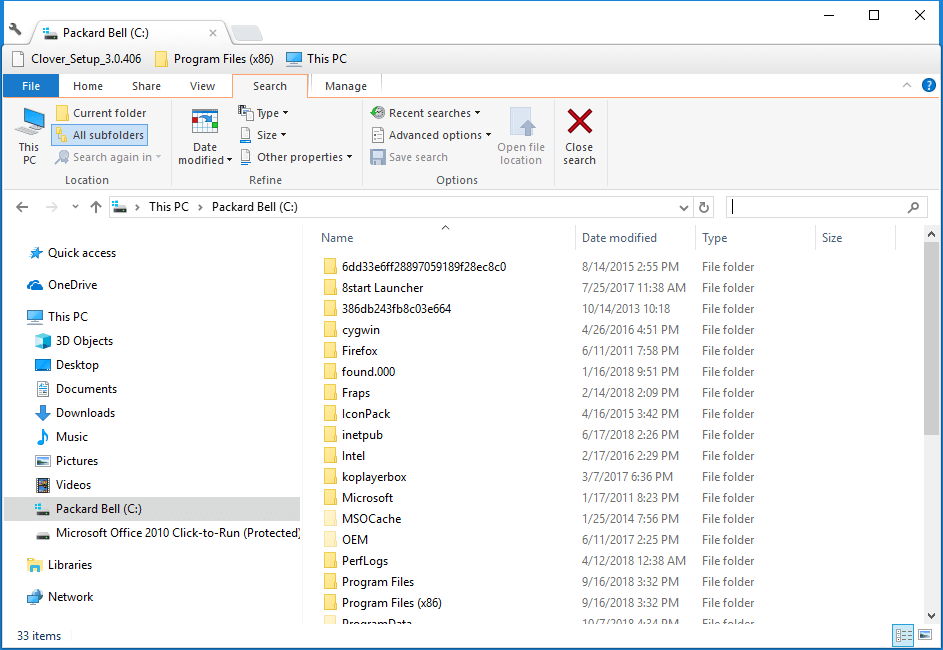
- Press the File Explorer button on the Windows 10 taskbar.
- Select your C: drive or an alternative drive partition to search for files on. (Alternatively, you can select a specific folder to search for files in.)
- Click inside the Search box to the right of Explorer’s window to open the Search tab.

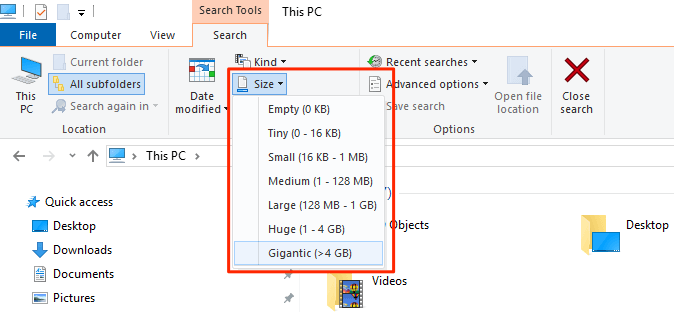
- Select the All subfolders option.
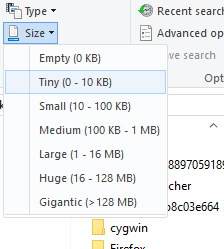
- Click the Size button to open the drop-down menu shown below.
- Select the Gigantic (>128 MB) option to search for the largest files. (File Explorer will then list all files that eclipse 128 MB within your selected directory or drive.)
- Press the Type button to further modify your search.
- Select to search for a more specific file type, such as image, music, or video.
- Erase files by selecting them and pressing the Delete button.
- Select the Empty Recycle Bin option in the Recycle Bin to erase the deleted files.


Although many users utilize Cortana to search in Windows 10, File Explorer remains the best built-in utility for file searching.
So, if you don’t want to go for a dedicated tool, Explorer is a decent Windows file manager with numerous search options.
You can find your PC’s largest files with the options on Explorer’s Search tab, simply as described in the procedure above.
You might find that some of your desktop’s or laptop’s largest files are system files in subfolders within the Windows folder. Never delete any large file that might be a system file.
If you’re not sure whether a file is a system one or not, do not erase it. Stick to deleting the largest image, video, document, and other files within your user folder.
File Explorer might also find large program (EXE) files. Don’t delete program files from within Explorer as they’ll probably be listed within the Programs and Features Control Panel applet.
The Windows 10 tips detailed in this useful post will also free up more hard drive space.
Let us know if you managed to achieve your goal in the comments area below.
How to Identify the Process that has Locked a File in Windows
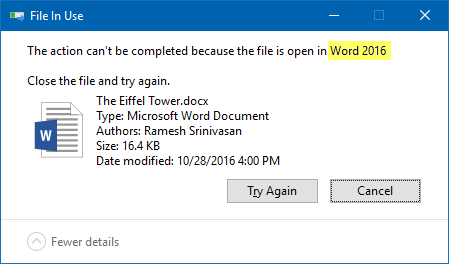
When you attempt to delete a file or folder which is in use by a process, the File In Use dialog appears showing the name of the program that has locked the file.
However, there are cases where the “File In Use” dialog doesn’t show the name of the process that has a lock on the file you’re trying to delete. In some cases, the dialog will show “the action can’t be completed because the file is open in another process“.
For investigating processes and locked files, Windows Sysinternals Process Explorer is probably the first option that comes to mind for most users. However, there are two built-in solutions to display the current open files list along with corresponding process names.
Find which process has locked a file using:
1. Resource Monitor
Resource Monitor (resmon.exe) is a built-in tool that has many useful features. With Resource Monitor, you can track current network and internet usage, view associated handles for locked files, as well as manage processes just as you’d using the Task Manager.
To find the process name that has a file locked, click the CPU tab, type the file name or part of it in the Associated Handles text box.
2. Process Explorer
Process Explorer needs no introduction. In Process Explorer, all you need to do is use the Find feature and type in the file name. This shows the process that’s accessing the file.
From the lower pane view, you can close the file handle if necessary.
You must run Process Explorer as administrator in order to manage processes which are running elevated. To elevate Process Explorer, click the File menu → Show Details for All Processes.
3. Handle from Windows Sysinternals
Handle is a utility from Microsoft Sysinternals that displays information about open handles for any process in the system. You can use it to see the programs that have a file open, or to see the object types and names of all the handles of a program. Handle is like a command-line version of Process Explorer.
Note: Handle v4.21 has a small bug where it always reports “No matching handles found” if the drive-letter is in uppercase. Hope Microsoft fixes it in the next update.
From an admin Command Prompt window, use the command-line syntax to find the process which is having the file open:
If the file name contains spaces, enclose it within double quotes.
Example:
(Mentioning the filename without the path may not necessarily work in every situation. It’s advisable to include the full path always.)
The output shows the process name, the process identifier, user name, the locked (target) file name with path.  report this ad
Sysinternals Handle: Command-line arguments
| -a | Dump all handle information. |
| -l | Just show pagefile-backed section handles. |
| -c | Closes the specified handle (interpreted as a hexadecimal number). You must specify the process by its PID.WARNING: Closing handles can cause application or system instability. |
| -y | Don’t prompt for close handle confirmation. |
| -s | Print count of each type of handle open. |
| -u | Show the owning user name when searching for handles. |
| -p | Dump handles belonging to process (partial name accepted). |
| name | Search for handles to objects with (fragment accepted). |
| -nobanner | Do not display the startup banner and copyright message. |
No arguments will dump all file references.
Add Sysinternals Handle to right-click menu
You can add Sysinternals Handle to the right-click menu for files to quickly find the program that has locked the file. To add it to the context menu, follow these steps:
- Download Handle from Microsoft Sysinternals site.
- Copy the files handle.exe & handle64.exe to a folder – e.g., d:\tools
- Copy the following lines of code to Notepad, and save the file as find_handle.vbs to a permanent location.
Note: The Sysinternals Handle.exe path is hard-coded as d:\tools\handle.exe in the above script. If the program is located on a different path, modify the path in the script accordingly. For 64-bit Windows, you can use either handle.exe or handle64.exe
To remove the Find Handle context menu entry, start the Registry Editor ( regedit.exe ) and delete the following key:
4. OpenFiles.exe — a built-in console tool
Another built-in tool we’re going to use is Openfiles.exe, a console tool that’s not new to Windows. It was originally introduced in 2000 as part of the Windows Resource Kit 2000/2003 tools. This utility was then included by default in Windows Vista and higher (including Windows 10). Openfiles displays the currently open files list from local or shared folders, along with the Handle ID and Process executable name. This tool also allows you to disconnect one or more files that are opened remotely from a shared folder.
Enable “Maintain Objects List” global flag for the First time
First, to enable tracking of local file handles, you need to turn on ‘maintain objects list’ flag by running the following command from admin Command Prompt.
You’ll see the following message:
INFO: The system global flag ‘maintain objects list’ is currently enabled.
You’ll need to run this command for the first time only. Then restart Windows for the change to take effect.
View open files and the corresponding process names
After restarting Windows, from an admin Command Prompt window, type:
This lists the File/Handle ID, Process Name and the list of files opened locally or opened remotely via local share points, in a table format.
To view the output in List or CSV formats, use the /query parameter.
To copy the output to clipboard, pipe the output to Clip.exe as below. Then paste the output in Notepad or any other editor of your choice.
For more information on copying Command Prompt output to clipboard or save the output to a file, check out the article How to Copy Command Prompt Output Text to Clipboard or Save to File?
To find if a particular file is being in use by a program (and to know which program), you may use the following command-line.
The above command lists all open files that contain the word “eiffel” in the file name. In this example, Word 2016 is currently having the lock over the file “The Eiffel Tower.docx” (ID 4576).
And “File In Use” dialog tells me the same thing.
Disconnect files opened remotely from shared folder.
To disconnect files opened from shared folder so that you can delete, rename the file or modify the contents, use the /disconnect parameter to cut connections to that file. Here are the command-line options.
Openfiles.exe perfectly does the job of listing all open files along with the process names, but it can’t forcibly kill processes. However, this excellent (but overlooked) built-in console tool can come in handy when you want to quickly find a process name that’s using a file, or to disconnect a file that’s being accessed through a shared folder by a network user — without depending on a third-party solution.
5. OpenedFilesView
OpenedFilesView from Nirsoft displays the list of all opened files on your system. For each opened file, additional information is displayed: handle value, read/write/delete access, file position, the process that opened the file, and more… Optionally, you can also close one or more opened files, or close the process that opened these files.


