- Use PowerShell to Find Installed Software
- Win32_Product: The Good, the Bad, and the Ugly
- Problem #1: Um, is there a problem, officer?
- Problem #2: Identify better alternatives
- Problem #3: Can we make it even more useful?
- How to Get a List of All Software Installed on a Windows System
- Using Command Prompt
- Using PowerShell
- Using CCleaner
- Using GeekUninstaller
- 8 comments
- How to find installed program files in Windows 10 (uninstall)?
- To see all Windows 10 Installed Programs, this solution is also for all Windows 10 OS and MS Server 2019, . a fast solution!
- 1.) . THE DEFAULT INSTALLATION LOCATION FOR PROGRAMS IN WINDOWS 10! 2.) . THE DEFAULT DOWNLOAD LOCATION IN WINDOWS 10! 3.) . THE INSTALLED PROGRAMS WITH UNINSTALL FEATURE! 4.) . FIND RUNNING PROGRAM PATH IN WINDOWS 10!
- 1.) THE DEFAULT INSTALLATION LOCATION FOR PROGRAMS IN WINDOWS 10!
- 2.) THE DEFAULT DOWNLOAD LOCATION IN WINDOWS 10!
- 3.) THE INSTALLED PROGRAMS WITH UNINSTALL FEATURE!
- Via appwiz.cpl: See also: ► . Fax and Scan is gone at once, Windows (10, 8.1)! or: Where are other Windows 10 features, how to activate it?
- 4.) FIND RUNNING PROGRAM PATH IN WINDOWS 10!
Use PowerShell to Find Installed Software

November 15th, 2013
Summary: Guest blogger, Marc Carter, reprises his popular blog post about locating installed software.
Microsoft Scripting Guy, Ed Wilson, is here. Marc Carter is joining us again today with another guest blog post…
Looking back a couple years ago to my previous post, Use PowerShell to Quickly Find Installed Software, I find it interesting to reflect on common issues shared amongst the IT pro community. In our underlying goal to control our environment, whether that environment consists of a desktop computer, a development server, or production data center, we must first discover and understand before we can effectively attempt to control. Such is the case for sys admins when determining what software is currently configuring a server.
But first, let’s have a quick refresher on what initially prompted this discussion…
Win32_Product: The Good, the Bad, and the Ugly
[Good] The Win32_Product WMI class represents products as they are installed by Windows Installer.
If you choose to query Win32_Product class by using Get-WmiObject, you’ll find yourself [Bad] waiting for your query (or application) to return [Ugly] a consistency check of packages that are installed as it attempts to verify and repair installs. (For more information, see Event log message indicates that the Windows Installer reconfigured all installed applications).
Problem #1: Um, is there a problem, officer?
Querying the Win32_Product class to determine installed software is more than likely not your “best” option. Unfortunately, not everyone knows this.
Solution: (Understanding) Do your part and help spread the word.
Problem #2: Identify better alternatives
I really like some of the refinements and suggestions within comments that were mentioned by others on my previous post. One of the things I take a lot of pride in is my association with the men and women of US Army and their core values (The Army Values).
I see that similar mindset and participation reflected in the esprit de corps (or cohesion) of the Windows PowerShell community. As others have pointed out, there are a lot better and easier ways to gather information without invoking the Win32_Product class. One of my favorite alternatives involved suggestions from Knut Johansen and Mike Crowley: use the PS Registry Provider.
The Windows PowerShell Registry provider lets you get, add, change, clear, and delete registry keys, entries, and values in Windows PowerShell. The Registry provider lets you access a hierarchical namespace that consists of registry keys and subkeys. Registry entries and values are not components of that hierarchy. Instead, they are properties of each of the keys. The Registry provider supports all the cmdlets that contain the “item” noun—that is, the Item cmdlets (except Invoke-Item) such as Get-Item, Copy-Item, and Rename-Item. Use the Item cmdlets when you work with registry keys and subkeys.
For more information, see Registry Provider.
In the following example, I use the Get-ItemProperty cmdlet to return values from the Uninstall Registry Key within the HKEY LOCAL MACHINE (HKLM) Registry Provider, selecting specific properties and then formatting output.
Get-ItemProperty HKLM:\Software\Microsoft\Windows\CurrentVersion\Uninstall\* | Select-Object DisplayName, DisplayVersion, Publisher, InstallDate |
Format-Table –AutoSize
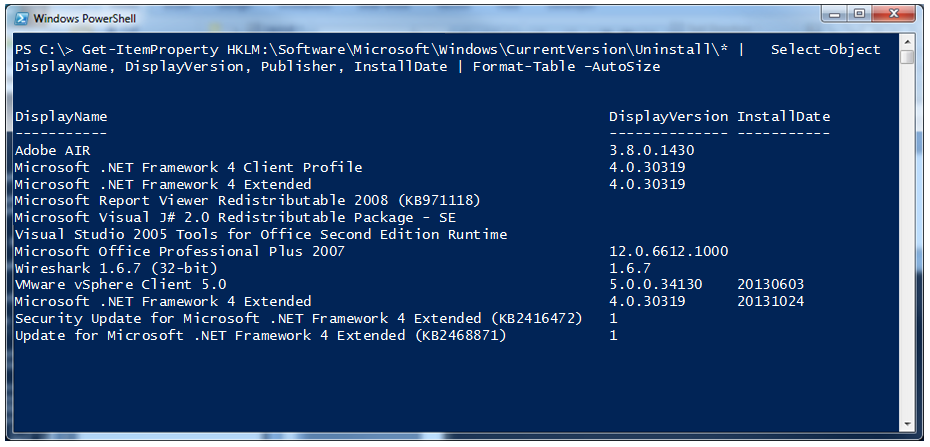
The Get-ItemProperty cmdlet is a great tool because it’s designed to work with data that is exposed by any provider. To get a better idea of the various providers that are available in your session, simply execute the Get-PSProvider cmdlet.
And of course, depending on my needs, I could have also used alternative output methods like Out-GridView or Export-Csv. Either way, we’ve now reduced the process to a one-liner that can be used in 64-bit and 32-bit environments:
Get-ItemProperty HKLM:\Software\Wow6432Node\Microsoft\Windows\CurrentVersion\Uninstall\* | Select-Object DisplayName, DisplayVersion, Publisher, InstallDate |
Format-Table –AutoSize

Problem #3: Can we make it even more useful?
Absolutely! We are talking Windows PowerShell after all…
One way that comes to mind (and again, visible within the comments from the previous post), is addressing the issue of how to query multiple remote devices. My solution (or a number of reasons) is to rely on using the Invoke-Command cmdlet. In the following example, I query both of my SharePoint Web Front End (WFE) servers by using Invoke-Command to execute the same Get-ItemProperty on the remote system’s HKLM PS Registry Provider:
Invoke-Command -cn wfe0, wfe1 -ScriptBlock
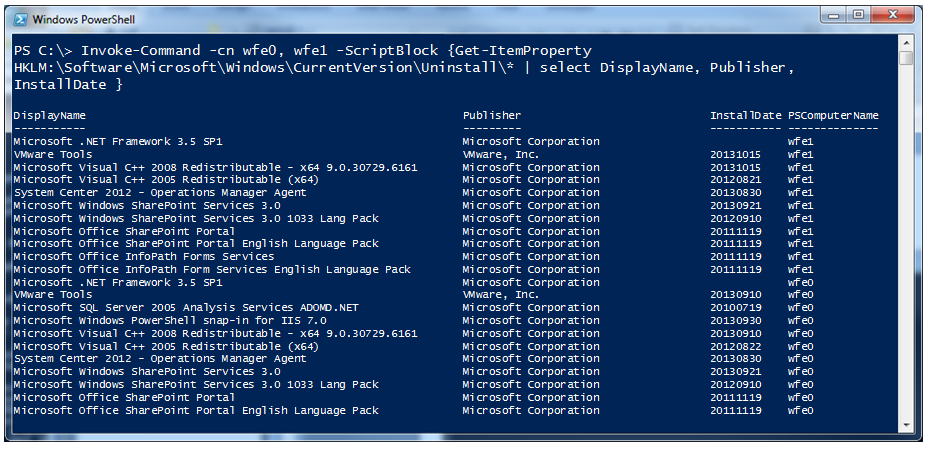
The output now includes the PSComputerName column, which will help when I want to sort results down the road. And there we have it…an easy method to report installed software!
I look forward to reading comments from the Windows PowerShell community on other refinements and ways to improve this task. In many ways, I relate our efforts to that of a symphony or band. Each of us plays a different note in that we all hear and see things differently. Put us all together on the same sheet of music, and we have the potential for some awesome melodies.
Thank you, Marc, for another awesome blog.
I invite you to follow me on Twitter and Facebook. If you have any questions, send email to me at scripter@microsoft.com, or post your questions on the Official Scripting Guys Forum. See you tomorrow. Until then, peace.
Ed Wilson, Microsoft Scripting Guy
How to Get a List of All Software Installed on a Windows System

As you use your system, you will install a lot of programs with some used on a daily basis and some just occasionally. When you reinstall your system for whatever reason, it can be a pain in the neck to reinstall all the software without missing even the ones that are used occasionally. So, if you have ever considered reinstalling your Windows system, having a list of all the installed software on your system will make things easier. There are multiple ways to get a list of all the installed software. Pick the method you are comfortable with and generate the list.
Using Command Prompt
The first and easiest way to get a list of all the installed software on your system is by using the Command Prompt. To do that, press “Win + R,” type cmd and then press the Enter button.

The above action will open the Command Prompt window. Here, copy and paste the below command and press the Enter button. Don’t forget to change the file path nest to “/output” to suit your needs.

As soon as you press the Enter button, Windows scans your system and saves the list in the form of a text file. You can find the text file in the location you entered above.

Using PowerShell
If you’ve made a habit of using PowerShell, then you can also get the list of all installed software from it. To do that, press “Win + R,” type powershell and then press the Enter button.
Now, enter the below command and press the Enter button. Don’t forget to change the file path as required.

As you can see from the above command, we are still using WMI (Windows Management Instrumentation) to get the list. If you didn’t see all the installed software on your system, then try the below command. Again, customize the file path as needed.

Using CCleaner
If you don’t like to use the Command Prompt or PowerShell, then you can use the popular system cleaning utility CCleaner to get the list of all the installed software on your system. To start, install CCleaner if you haven’t already and open it from the Start menu.

Once CCleaner has been opened, navigate to the “Uninstall” tab from the “Tools” menu appearing on the left pane.

This window will show you all the installed software on your system. To get a list, simply click on the button “Save to text file” appearing in the bottom-right corner.

The above action will open the Save As window. Simply select the destination and name of the file and click on the “Save” button..

You will have your list in an instant at the selected destination.
Using GeekUninstaller
You can also get the installed software list using the GeekUninsatller, a free and portable Windows uninstaller. To start, download the GeekUninstaller, extract it and execute the application.
Being a portable application, you don’t have to install it. Once the application has been opened, select all the programs in the window and them select the option “Save as HTML.”

You will be asked to select a destination. Select a location to save the file and click on the button “Save” to complete the procedure.

Do comment below sharing your thoughts and experiences about using the above methods to save a list of all the software installed on your system.
Vamsi is a tech and WordPress geek who enjoys writing how-to guides and messing with his computer and software in general. When not writing for MTE, he writes for he shares tips, tricks, and lifehacks on his own blog Stugon.
8 comments
Belarc Advisor will list all your system information, program keys, installed programs and a lot more. It’s also free for personal use.
If I’m not mistaken, you’ll also have to search for .exe/.com “portable” and standalone applications that you may have installed that were not installed through a setup or .msi file, correct?
This is great information but the real way to do all this is once you have built/rebuilt your computer is to create an image. In the event you have to reinstall, you just reinstall from the image… problem solved!
Tks! Very nice tip.
I already like CCleaner and now I know another good reason to keep using that tool, even if is the free version.
Haven’t yet tried using the command prompt to get a list of my currently installed apps. But the list I saved to a text file from CCleaner included installation AND the version numbers 🙂 Each app was detailed on a single line – but due to the different lengths of app names, companies etc., the list was not particularly easy to read 🙁
On the other hand, the list I exported to HTML from Geek Uninstaller was very clear and easy to read – BUT it did NOT include version numbers. But I suppose version numbers are not that important, as when you want to reinstall them, you would usually install the latest version anyway….
When I tried the DOS command I receive an ACCESS DENIED reply. How do I get around that?
Also, Secunia PSI gives a nice summary as well.
You missed out Speccy! From the same stable as CCleaner (www.piriform.com), Speccy will find out everything there is to know about the specification of your system, including all the software, Windows updates, and all the hardware, and then enable you to store it all as a text or XML file. Absolutely invaluable if you need to submit a bug report and want to give the developer chapter and verse about your system. And it’s free! Secunia and Belarc are also pretty good, but Speccy is the best, in my opinion.
The CMD-prompt solution sounded quick and easy, and it gave me a list of 226 apps. But CCleaner was missing form that list, even though I had installed it. I had never noticed the save-to-text file button before. Cool feature. I ran it and got 240 apps. CCleaner was nice in that the .txt file is apparently tab-delimited, so it pastes nicely into Excel with column breaks.
Comparing the results of the two approaches, I found the CMD-prompt solution found 102 apps that CCleaner missed, and CCleaner found 120 apps that were missed by the CMD-prompt approach. Apps common to both solutions totaled 120, roughly half of the individual totals. Little discouraging.
How to find installed program files in Windows 10 (uninstall)?
To see all Windows 10 Installed Programs, this solution is also for all Windows 10 OS and MS Server 2019, . a fast solution!
1.) . THE DEFAULT INSTALLATION LOCATION FOR PROGRAMS IN WINDOWS 10!
2.) . THE DEFAULT DOWNLOAD LOCATION IN WINDOWS 10!
3.) . THE INSTALLED PROGRAMS WITH UNINSTALL FEATURE!
4.) . FIND RUNNING PROGRAM PATH IN WINDOWS 10!
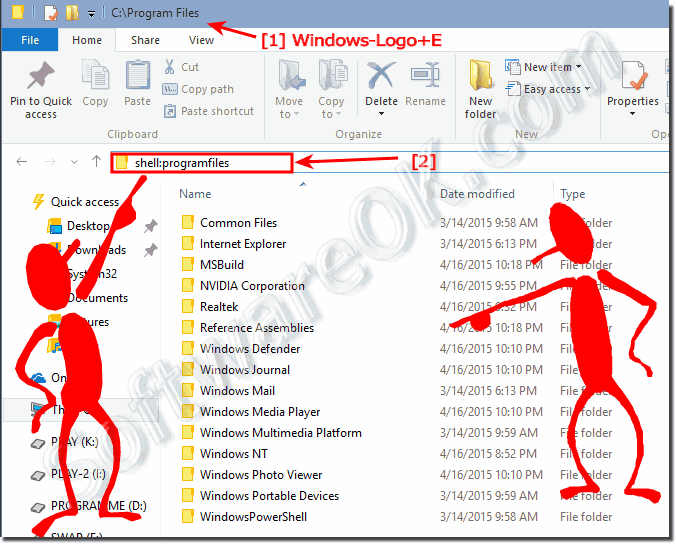
1.) THE DEFAULT INSTALLATION LOCATION FOR PROGRAMS IN WINDOWS 10!
Please run the MS Explorer via hot key [Windows + E] and in the address bar [ALT+D] or [F4]
enter the address: shell:programfiles and you can see all installed programs in Windows 10 standard Programs Folder. (. see Image-1)
PS: On Windows 10 x64 (64-Bit) is also the 32-bit Program-Folder: shell:programfilesx86
Use shell:programs for the Start-Menu folder in Windows-10!
The address shell:Common Programs is for all User Programs in the Windows 10 Start-Menu folder!
2.) THE DEFAULT DOWNLOAD LOCATION IN WINDOWS 10!
If you download a Program from Internet the default download folder on Windows 10 is shell:download
| Programs Download Folder on Windows-10! |
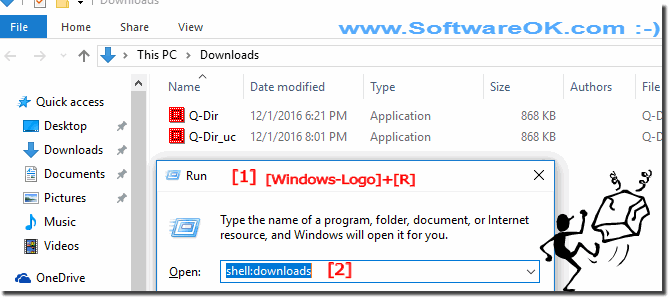 |
The downloads folder is the default location for downloaded files with all the Windows operating system Web browsers. Therefore, if you download a file from the Internet using any browser, the file is automatically saved in the Downloads folder.
If you’re using Windows 10 as your operating system, you’ve probably collected hundreds of other files and programs in the Downloads folder in the last couple of months. Therefore, the Downloads folder in Windows 10 is likely to be slower than the first installation of the system.

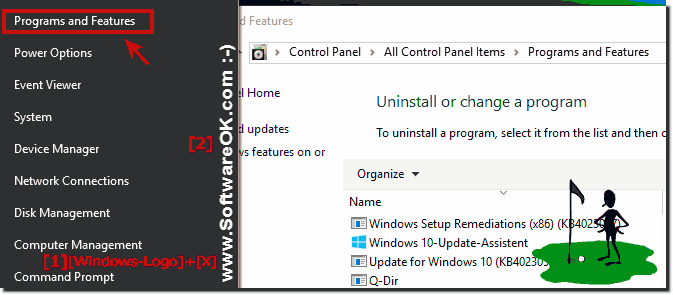
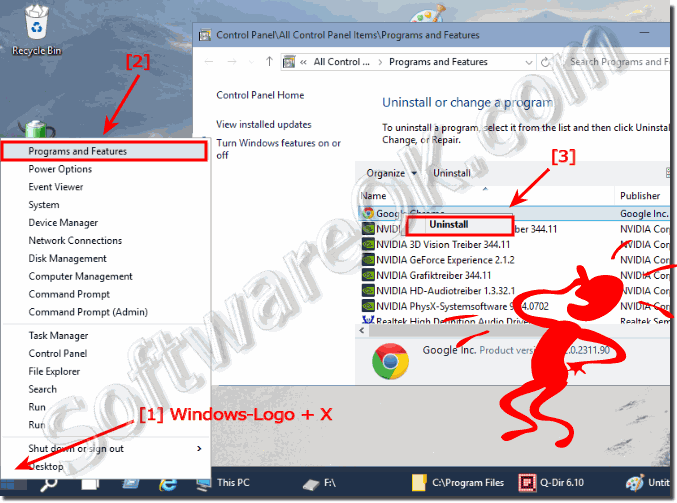
3.) THE INSTALLED PROGRAMS WITH UNINSTALL FEATURE!
To uninstall programs in Windows 10 , press the key combination [Win-Logo]+[X].
Here simply click on «Programs and Features» and open «Programs and Features» in Windows-10
Then select the installed program in Windows 10, and via right-click on the corresponding program, you will see an option to uninstall the program. (. see Image-2)
Via appwiz.cpl:
See also: ► . Fax and Scan is gone at once, Windows (10, 8.1)!
or: Where are other Windows 10 features, how to activate it?
| (Image-5) Uninstall installed programs on windows-10! |
 |
As a result, the list of installed programs recognized in the system is displayed. They are deleted in the same way as in the previous method: Select the application, click Uninstall, and confirm the action. The next step is to start the built-in installer or Windows 10 Installer, where you need to perform a few clicks.
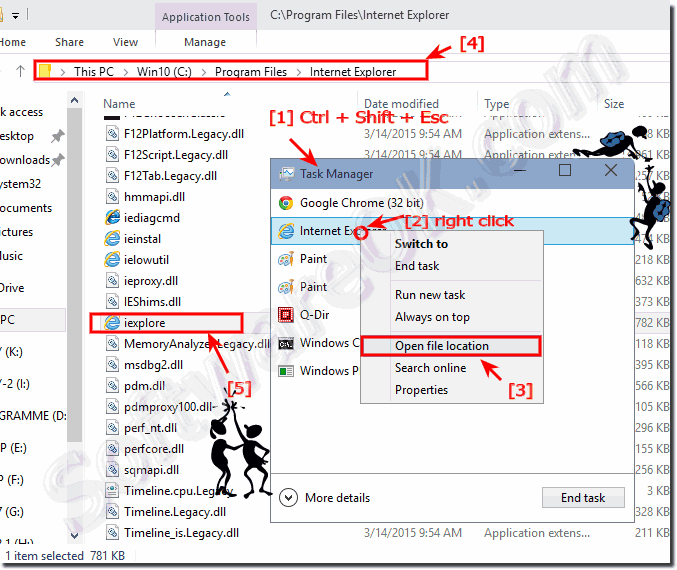
4.) FIND RUNNING PROGRAM PATH IN WINDOWS 10!
Please press the key combination [CTRL+ Shift + Esc] to start the Windows 10 Task Manager!
Right click in the Windows 10 Task Manager on the appropriate program for example «Internet Explorer»,
then select «Open file location»! (. see Image-3 Arrow 1 to 5)
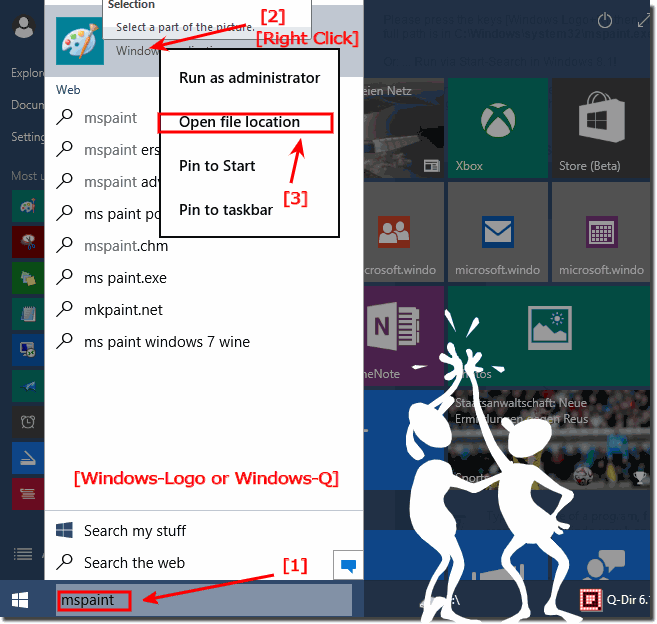
Please click the Windows-10 Logo or the Windows-Logo Key! Enter in Search Box for example mspaint and start it for example via a right click on the Windows 10 Paint! (. see Image-4)
| (Image-1) shell program files in windows 10! |
 |
| (Image-2) Uninstall programs in windows-10! |
 |
| (Image-3) find running program location full-path in windows-10! |
 |
| (Image-4) find file location in windows-10 via search-box! |
 |
The Solution to find installed program files is suitable for: Windows 10 Pro, Enterprise, Home, Windows 8.1, Windows 8, Windows-Server 2019, 2016, 2012, Windows 7 Basic, Professional, Starter, Ultimate


