- How to switch Java versions in Windows (updated 03/2021 for Java 16)
- Installation of multiple Java versions
- Download sources
- Environment variables
- Setting environment variables manually
- Scripts for changing the Java version
- How to check JDK version that installed on your computer
- 1. Where JDK is installed?
- How to check Java version
- Related Topics:
- About the Author:
- How to Check Java Version on Mac or Windows
- PHP Code
- Check Java Version on Mac
- Option 1: Check Java Version on Mac Using the GUI
- Option 2: Check Java Version on Mac Using the Terminal
- How do I find where JDK is installed on my windows machine?
- 24 Answers 24
How to switch Java versions in Windows (updated 03/2021 for Java 16)

As a Java programmer, I work on various projects based on different Java versions, especially since the transition to the six-month release cycle. From time to time, I also have a piece of Java code that I want to try out on different Java versions – on the command line without having to click through the menus of my IDE. So it is helpful to be able to quickly and easily change the Java version to be used for compiling code or executing class files.
In this article, I’ll show you how to install several Java versions simultaneously in Windows and how to switch between them on the command line with short commands.
Installation of multiple Java versions
Installing several Java versions at the same time is incredibly easy in Windows. You can download and run the installer for each version, which automatically installs the versions in separate directories.
Download sources
- Java SE 1.1 – You can no longer install this version on 64-bit Windows.
- Java SE 1.2 – Installed to C:\jdk1.2.2\ and C:\Program Files (x86)\JavaSoft\JRE\1.2\ by default – I recommend changing this to C:\Program Files (x86)\Java\jdk1.2.2\ and C:\Program Files (x86)\Java\jre1.2.2\ for the sake of clarity.
- Java SE 1.3 – Installed to C:\jdk1.3.1_28\ by default – I recommend changing this to C:\Program Files (x86)\Java\jdk1.3.1_28\ .
- Java SE 1.4 – Installed to C:\j2sdk1.4.2_19\ by default – I recommend changing this to C:\Program Files (x86)\Java\jdk1.4.2_19\ .
Starting with the following versions, you don’t need to change the default installation directories:
Attention – you may use the following Oracle distributions only for private purposes and development:
The following version is currently an early access build. You should use it only for testing purposes:
Environment variables
In most cases, the following two environment variables decide which Java version an application uses:
- JAVA_HOME – many start scripts use this variable.
- Path – is used when running a Java binary (such as java and javac ) from the console.
These variables should always point to the same Java installation to avoid unforeseen problems due to inconsistencies. Some programs, such as Eclipse, define the Java version in a separate configuration file (for Eclipse, for example, this is the entry «-vm» in the eclipse.ini file).
Setting environment variables manually
The installers of the Java versions listed above already create various environment variables, which you need to clean up first (see below). The fastest way to change the environment variables is to press the Windows key and type «env» – Windows then offers «Edit the system environment variables» as a search result:
At this point, you can press «Enter,» and the system properties appear:
Here you click on «Environment Variables…», after which the following window opens:
As the standard version, I currently use the latest release version, Java 16. Therefore, you should make the following settings:
- The top list («User variables») should not contain any Java-related entries.
- The lower list («System variables») should contain an entry «JAVA_HOME = C:\Program Files\Java\jdk-16\» (please check the version number, you may have a newer one). If this entry does not exist, you can add it with «New…». If it exists, but points to another directory, you can change it with «Edit…».
- Delete the following entries under «Path»:
- C:\ProgramData\Oracle\Java\javapath
- C:\Program Files (x86)\Common Files\Oracle\Java\javapath
- Insert the following entry instead:
- %JAVA_HOME%\bin
The path list should then look like this:
The last entry ensures that Path and JAVA_HOME are automatically consistent. Attention: this only works for the default setting configured here. If you change JAVA_HOME via the command line, you have to adjust Path accordingly (more about this below).
Now open a command line to check the settings with the following commands:
As a result, you should see this:
Scripts for changing the Java version
Finally, we come to the possibility to change the Java version quickly and easily. Therefore I create a separate command for each Java version, called, for example, java16 , java15 , java14 , java13 . I put these commands in the directory C:\Program Files\Java\scripts , which I add to the environment variable «Path» as described before:
The files are named, for example, java16.bat , java15.bat , java14.bat , java13.bat , and change the environment variables as shown in the following example of java16.bat :
This script, admittedly kept very simple, inserts the bin directory of the Java version to be activated at the beginning of the Path variable, so that is where, for example, java.exe is looked for first. The path variable becomes longer with each switching. However, since this is only the case for the currently opened command prompt, I don’t think this is a problem.
The following ZIP file contains all my scripts from Java 1.2 to Java 17 (you might have to adopt one or the other Java directory to your installation): scripts-up-to-jdk17.zip
You can quickly test whether the scripts work in a command line. Attention: after adding the scripts directory to the Path variable, you have to open a new command line.
At this point, the setup is complete. I hope this article was helpful for you, and I’d love to hear your comments. If you liked the article, I’d be happy if you shared it via one of the following share icons.
How to check JDK version that installed on your computer
The Java development kit (JDK) contains tools for Java development, and the Java Runtime Environment (JRE) contains a JVM to convert byte code .class to machine code, and execute it, in short, the JRE runs Java program.
Check JDK Version
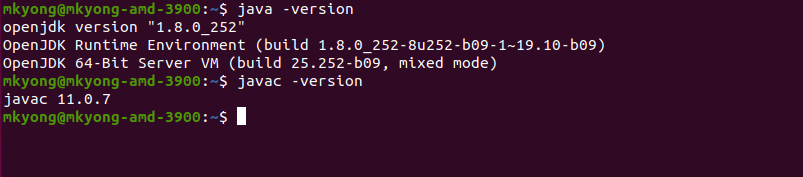
We can use javac -version to find out the version of the installed JDK. In the below example, the JDK version is 11.0.7
Check JRE Version
We can use java -version to find out the version of the installed JRE. In the below example, the JRE version is 1.8.0_252
The JDK and JRE versions can be different on the same computer. Multiple JDK and JRE versions are allowed on the same computer; it is better to find out which version is configured in the system classpath to run or compile the Java program.
1. Where JDK is installed?
The JDK also contains a JRE to run the Java program.
1.1 On Ubuntu or Linux, we can use which javac to find out where JDK is installed.
In the above example, the JDK is installed at /usr/lib/jvm/adoptopenjdk-11-hotspot-amd64/ .
1.2 On Windows, we can use where javac to find out where JDK is installed.
Do I need JDK or JRE?
For end-users, they need to install JRE to run the Java program, and the JDK is for developers. For the production environment, the deployment team only need to install JRE to run the Java program. However, developers often request to install the JDK, instead of the standalone JRE on the production server, because the JDK contains JRE and also extra tools to monitor and debug the running Java program.
How to check Java version
If you have OracleJDK installed on your computer, simply click menu Start, type about java into the search area, then click the About Java icon in the result. You can see the current version of Java in the following dialog:

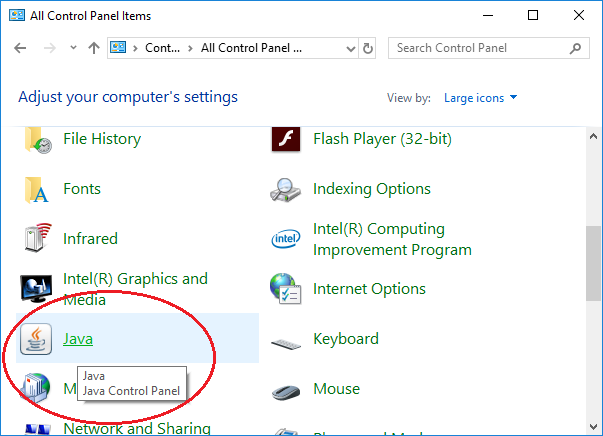
Or you can go to Control Panel, switch to Large icons view and click the Java logo:
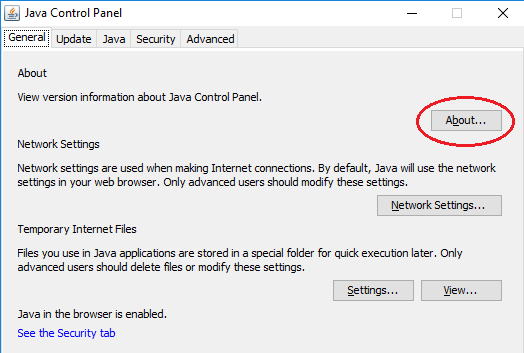
Then in the Java Control Panel dialog, click About button as shown in the following screenshot:
The second way (more familiar with programmers) to check Java version is opening a command prompt and type the following command:

Here, the version of Java is 1.8.0, and 201 is the update number. Each version can have several update numbers — the higher the more recent it is.
Note that “Java(TM) SE Runtime Environment” meaning that you’re using Oracle JDK. In case you’re using OpenJDK, the output should be:

If JDK/JRE is not installed or somehow the PATH environment variable is not updated for Java, you can see the following message:

Note that there can be multiple installations of JRE and/or JDK on a computer. In that case, the version of Java you see in the console is of the first JRE/JDK found in the list of environment variables.
To check the version exactly, you need to go to the bin directory of a JDK/JRE installation, for example:
And type the java –version command.
Related Topics:
About the Author:
 Nam Ha Minh is certified Java programmer (SCJP and SCWCD). He started programming with Java in the time of Java 1.4 and has been falling in love with Java since then. Make friend with him on Facebook and watch his Java videos you YouTube.
How to Check Java Version on Mac or Windows
PHP Code
- Home
- SysAdmin
- How to Check Java Version on Mac or Windows
Introduction
Java runs many of the applications that we use daily. Many applications cannot run on older versions of Java. Hence, it is essential to know which version is installed on your system.
In this tutorial, learn how to check the Java version on your Mac or Windows system.

Prerequisites
- A system running macOS or Windows
- Access to the command-line/terminal window
- A version of Java installed
Check Java Version on Mac
You can find the version of Java on macOS by:
- using the GUI (Mac’s System Preferences)
- prompting for the version in the terminal window
Option 1: Check Java Version on Mac Using the GUI
To check the Java version on Mac without using the terminal by searching for the Java Control Panel in the System Preferences.
1. Click the Apple icon in the menu bar to open the drop-down menu and navigate to System Preferences.

2. A new window opens with various icons and settings. Find and click the Java icon to open the Java Control Panel.

3. Once the Java Control Panel opens, click the About button. A new window with Java version information should appear.

Option 2: Check Java Version on Mac Using the Terminal
If you prefer using the terminal, checking the Java version is a simple one-command process.
1. First, open the terminal. To do so, click the Spotlight Search button in the top-right of the screen.
2. Type terminal in the search bar and open it by clicking on the icon in the search results.

3. Once in the command line, run the command: java -version . The output should display the Java version installed on your MacOS.

To check the version of the primary Java compiler – javac (pronounced “java-see”) use the command:
Note: If you have a Linux system, refer to How To Check Java Version Installed On Linux.
How do I find where JDK is installed on my windows machine?
I need to know where JDK is located on my machine.
On running Java -version in cmd, it shows the version as ‘1.6.xx’. To find the location of this SDK on my machine I tried using echo %JAVA_HOME% but it is only showing ‘JAVA_HOME’ (as there is no ‘JAVA_PATH’ var set in my environment variables).

24 Answers 24
If you are using Linux/Unix/Mac OS X:
Should output the exact location.
After that, you can set JAVA_HOME environment variable yourself.
In my computer (Mac OS X — Snow Leopard):
If you are using Windows:
Windows > Start > cmd >
If you have a JDK installed, the Path is displayed,
for example: C:\Program Files\Java\jdk1.6.0_30\bin\javac.exe
In Windows at the command prompt
$PATH:i, but as you wrote, it won’t work if you didn’t set it in the PATH. – Nimrod Feb 28 ’18 at 14:59
In windows the default is: C:\Program Files\Java\jdk1.6.0_14 (where the numbers may differ, as they’re the version).
Java installer puts several files into %WinDir%\System32 folder (java.exe, javaws.exe and some others). When you type java.exe in command line or create process without full path, Windows runs these as last resort if they are missing in %PATH% folders.
You can lookup all versions of Java installed in registry. Take a look at HKLM\SOFTWARE\JavaSoft\Java Runtime Environment and HKLM\SOFTWARE\Wow6432Node\JavaSoft\Java Runtime Environment for 32-bit java on 64 bit Windows.
This is how java itself finds out different versions installed. And this is why both 32-bit and 64-bit version can co-exist and works fine without interfering.
Plain and simple on Windows platforms:
where java
On Windows 10 you can find out the path by going to Control Panel > Programs > Java. In the panel that shows up, you can find the path as demonstrated in the screenshot below. In the Java Control Panel, go to the ‘Java’ tab and then click the ‘View’ button under the description ‘View and manage Java Runtime versions and settings for Java applications and applets.’
This should work on Windows 7 and possibly other recent versions of Windows.


The batch script below will print out the existing default JRE. It can be easily modified to find the JDK version installed by replacing the Java Runtime Environment with Java Development Kit.

Under Windows, you can use
to print the full path of each and every «java.exe» on your C: drive, regardless of whether they are on your PATH environment variable.
In a Windows command prompt, just type:
Or, if you don’t like the command environment, you can check it from:
Start menu > Computer > System Properties > Advanced System Properties. Then open Advanced tab > Environment Variables and in system variable try to find JAVA_HOME.


