- Как заблокировать доступ к сайту в Windows с помощью PowerShell
- Блокировка сайтов в Windows с помощью файла hosts
- Блокировка сайтов через DNS
- Блокируем IP адрес сайта в брандмауэре Windows
- PowerShell: правила блокировки сайтов по имени и IP адресу в брандмауэре Windows
- How to Block a Domain or Website on Windows Defender Firewall with PowerShell?
- Blocking Websites Using the Hosts File in Windows
- Block Websites Using DNS Filtering
- How to Block Website IP Address in Windows Defender Firewall?
- Using PowerShell to Create Firewall Rule to Block Website by Domain Name or IP Address
- Related Reading
- How to Run Windows File Explorer Elevated (as.
- Using Malicious Software Removal Tool (MRT.exe) on Windows
- How to Clean Up Large System Volume Information.
- Read and Write Data to Excel File with.
- How to Disable NetBIOS and LLMNR Protocols in.
- 2 comments
Как заблокировать доступ к сайту в Windows с помощью PowerShell
Рассмотрим несколько способов, которые помогут вам запретить доступ к отдельным сайтам, URL и IP адресам в Windows без использования сторонних программ. Обычно блокировку сайтов наиболее эффективно настраивать на уровне сетевого шлюза (роутер, маршрутизатор, Wi-Fi точка доступа, через которую вы выходите в Интернет), или с помощью стороннего ПО (фильтры контента, DNS фильтры и т.д.). В нашем случае мы попробуем заблокировать определенный сайт с помощью встроенных средств Windows 10 и автоматизации PowerShell.
Блокировка сайтов в Windows с помощью файла hosts
Самый известный способ заблокировать определенный сайт в Windows – отредактировать файл hosts. Обычно файл находится в каталоге %windir%\system32\drivers\etc\. Обратите внимание, что у файла hosts нет расширения.
Файл hosts используется для ручного назначения соответствий между IP адресами и DNS именами. При выполнении разрешении имен файл hosts имеет приоритет над DNS серверами, указанными в настройках сетевых подключений,
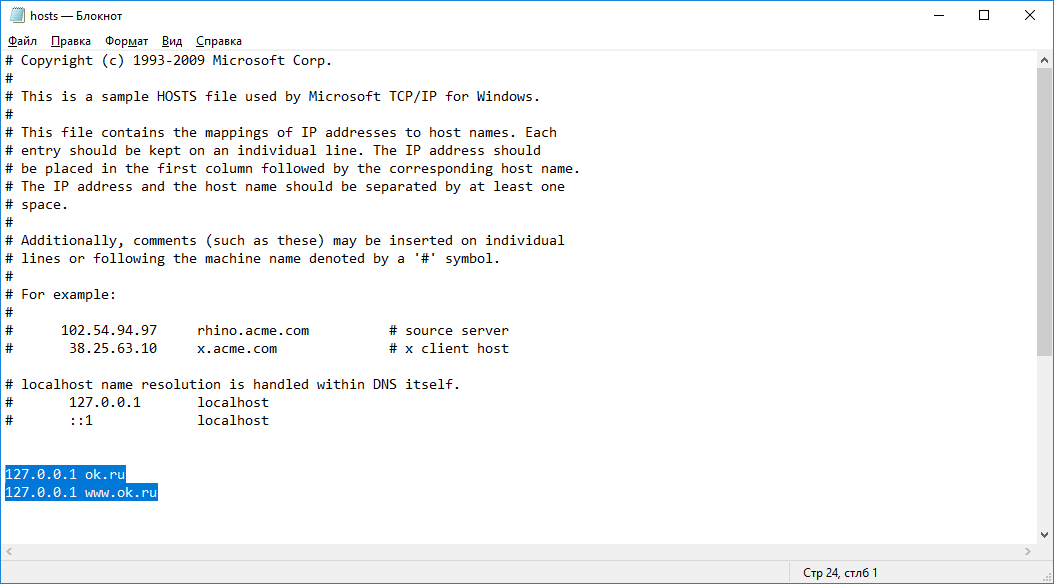
Чтобы заблокировать определенный сайт (например, ok.ru), откройте на редактирование файл hosts (с правами администратора) и добавьте в него строки вида:
127.0.0.1 ok.ru
127.0.0.1 www.ok.ru
Сохраните файл и перезагрузите компьютер (или очистите DNS кэш командой: ipconfig /flushdns ).
После этого при попытке открыть сайт ok.ru в любом браузере будет появляется сообщение “Страница не найдена” / “Страница не доступна”.
Вы можете добавлять новые строки с URL сайтов в файл hosts с помощью такого bat файла:
@echo off
set hostspath=%windir%\System32\drivers\etc\hosts
echo 127.0.0.1 www.facebook.com >> %hostspath%
echo 127.0.0.1 facebook.com >> %hostspath%
exit
Либо можно воспользоваться следующими PowerShell функциями для автоматизации блокировки (разблокировки) определенных сайтов в списке запрещенных доменов в файле hosts.
Function BlockSiteHosts ( [Parameter(Mandatory=$true)]$Url) <
$hosts = ‘C:\Windows\System32\drivers\etc\hosts’
$is_blocked = Get-Content -Path $hosts |
Select-String -Pattern ([regex]::Escape($Url))
If(-not $is_blocked) <
$hoststr=»127.0.0.1 ” + $Url
Add-Content -Path $hosts -Value $hoststr
>
>
Function UnBlockSiteHosts ( [Parameter(Mandatory=$true)]$Url) <
$hosts = ‘C:\Windows\System32\drivers\etc\hosts’
$is_blocked = Get-Content -Path $hosts |
Select-String -Pattern ([regex]::Escape($Url))
If($is_blocked) <
$newhosts = Get-Content -Path $hosts |
Where-Object <
$_ -notmatch ([regex]::Escape($Url))
>
Set-Content -Path $hosts -Value $newhosts
>
>

Теперь чтобы добавить определенный сайт в заблокированные достаточно выполнить функцию:
Чтобы разблокировать сайт запустите:
Блокировка сайтов через DNS
Если ваши клиенты пользуются одним DNS сервером, вы можете аналогичным образом заблокировать определенный сайты с помощью создания DNS записи в этом DNS, указывающей на 127.0.0.1 (или что-то в таком роде). По такому принципу, кстати, работают большинство коммерческих контент фильтров DNS (OpenDNS, SkyDNS, Яндекс.DNS и т.д.).
Блокируем IP адрес сайта в брандмауэре Windows
Также вы можете заблокировать определенные сайты с помощью встроенного Windows Firewall. Главный недостаток такого метода – вы не сможете использовать имя домена или сайта в правиле блокировке. Брандмауэр Windows в качестве источника/назначения позволяет указать только IP адрес или подсеть.
Сначала нужно определить IP адрес сайта, который вы хотите заблокировать. Проше всего это сделать командой nslookup.
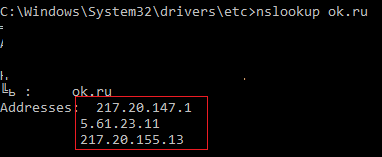
Как вы видите в результатах команды присутствует несколько IP адресов, которые назначены сайту. Вам нужно заблокировать их все.
Теперь нужно запустить панель настройки Windows Firewall (Панель управления \Все элементы панели управления\Брандмауэр Защитника Windows\Дополнительные параметры или firewall.cpl).
В секции “Правила для исходящих подключений” создайте новое правило со следующими параметрами: 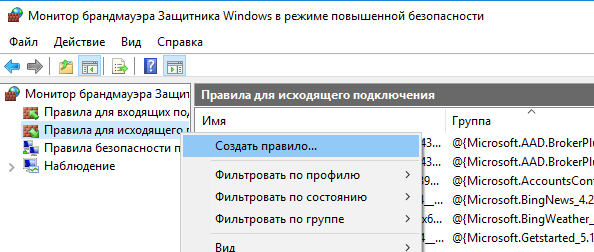
- Тип правила: Настраиваемые;
- Программа: Все программы;
- Тип протокола: Любой;
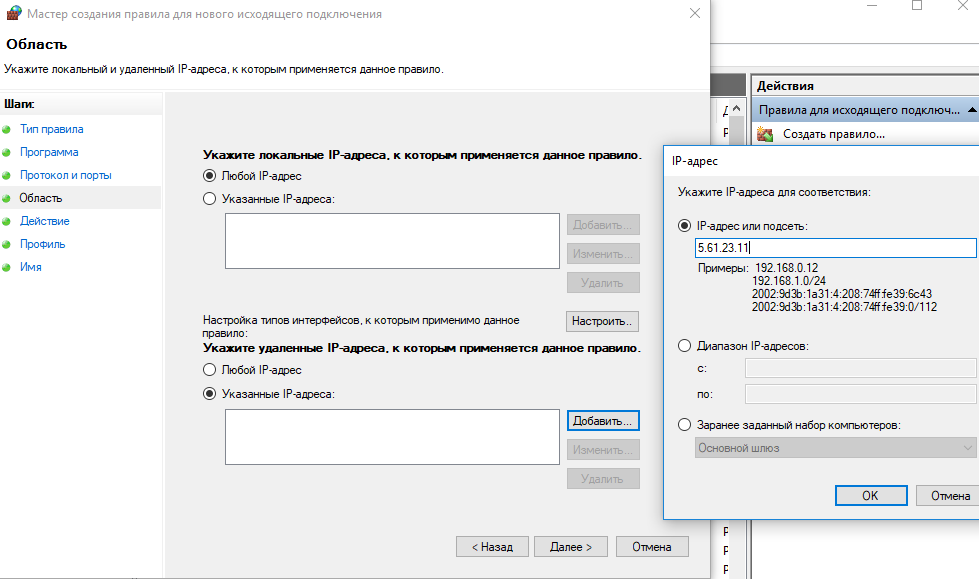
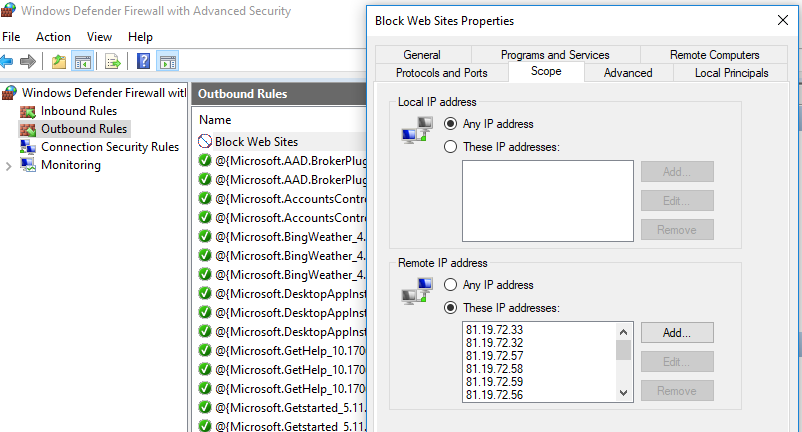
- Область: в секции “Укажите удаленные IP адреса, к которым применяется данное правило” выберите пункт “Указанные IP адреса” -> Добавить. В открывшемся окне укажите IP адреса, IP подсети или диапазон IP адресов сайтов, которые нужно заблокировать.
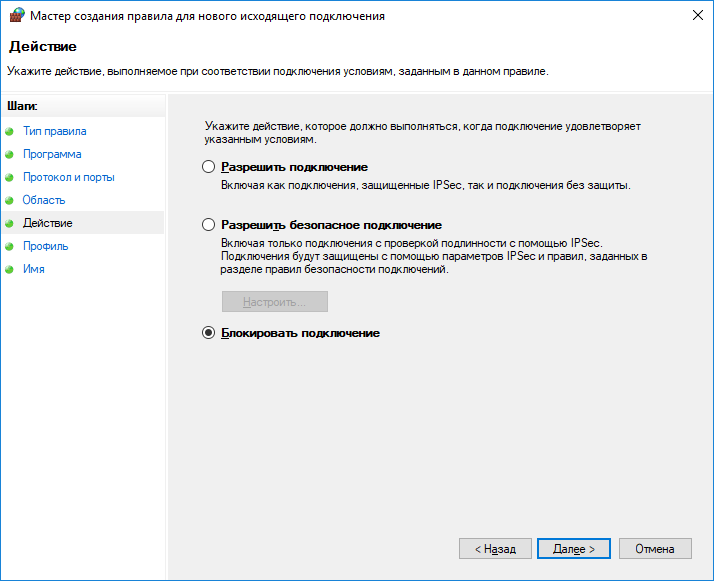
Нажмите OK-> Далее -> Действие: “Блокировать подключение”.
В окне со списком профилей брандмауэра, к которым применяется это правило оставьте все опции. Осталось указать имя правила и сохранить его.
После этого Брандмауэр Защитника Windows будет блокировать все соединения с данным сайтом. В браузере при подключении к заблокированному сайту будет появляться ошибка:
Unable to connect
Доступ в Интернет закрыт
Возможно, подключение заблокирована брандмауэром или антивирусным ПО.
ERR_NETWORK_ACCESS_DENIED
В домене AD вы можете распространить на компьютеры пользователей политику блокирующую сайт с помощью GPO. Но еще раз скажем, это нецелесообразно. Фильтровать сайты правильнее на шлюзе доступа в Интернет.
PowerShell: правила блокировки сайтов по имени и IP адресу в брандмауэре Windows
Вы также можете с помощью PowerShell создать правило брандмауэра, блокирующее исходящие подключения к определенному сайту:
New-NetFirewallRule -DisplayName «Block Site» -Direction Outbound –LocalPort Any -Protocol Any -Action Block -RemoteAddress 217.20.147.1, 217.20.141.0/26
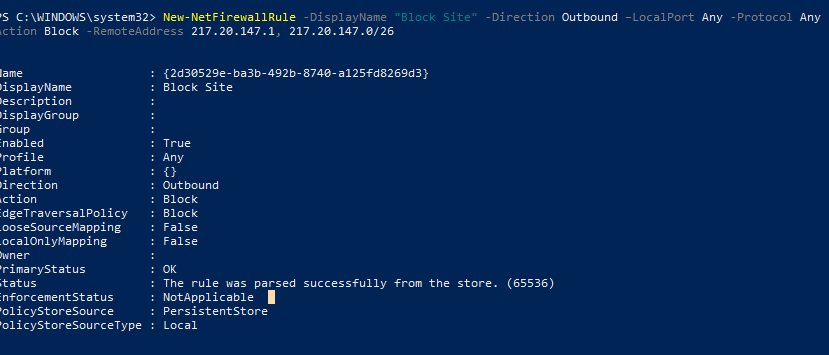
Строка “ The rule was parsed successfully from the store” говорит о том, что правило новое правило брандмауэра успешно применено. Вы можете найти его в графическом интерфейсе Windows Firewall.

Чтобы не резолвить имя сайта в IP адреса вручную можно использовать PowerShell командлет Resolve-DnsName для получения IP адресов сайтов.
Resolve-DnsName «ok.ru»| Select-Object -ExpandProperty IPAddress

Таким образом мы можем преобразовать имя домена в IP адреса и сразу добавить запрещающее правило для блокирования доступа к сайту:
$IPAddress = Resolve-DnsName «ok.ru»| Select-Object -ExpandProperty IPAddress
New-NetFirewallRule -DisplayName «Block Site» -Direction Outbound –LocalPort Any -Protocol Any -Action Block -RemoteAddress $IPAddress
Получается, что теперь вы можете добавить запрещающее правило в Windows Firewall сразу для нескольких сайтов:
$SitesToBlock = “lenta.ru”,”mail.ru”,”facebook.com”
$IPAddress = $SitesToBlock | Resolve-DnsName -NoHostsFile | Select-Object -ExpandProperty IPAddress
New-NetFirewallRule -DisplayName «Block Web Sites» -Direction Outbound –LocalPort Any -Protocol Any -Action Block -RemoteAddress $IPAddress
У командлета Resolve-DnsName я добавил параметр –NoHostsFile, чтобы не использовать при проверке файл hosts.
Проверим, что блокирующее правило для исходящего появилось в консоли.
Эта статья прежде всего разминка для ума. В корпоративной сети для ограничения доступа к сайтам нужно использовать фильтрацию на уровне шлюза доступа в интернет или прокси-сервере. Блокировка доступа на уровне хостов не столь эффективна.
How to Block a Domain or Website on Windows Defender Firewall with PowerShell?
Let’s consider some ways to block access to the specific websites, domain names, URLs or IP addresses in Windows without using third-party tools. In our case, we will try to block certain websites using the built-in Windows 10 tools and PowerShell automation features.
Blocking Websites Using the Hosts File in Windows
The most popular method to block a specific website on Windows is to edit the hosts file. Usually it is located in %windir%\system32\drivers\etc\ directory. Please note that hosts file does not have an extension.
The hosts file is used to manually assign mappings between IP addresses and DNS names. When resolving names, the hosts has higher priority than DNS servers specified in the network connection settings.
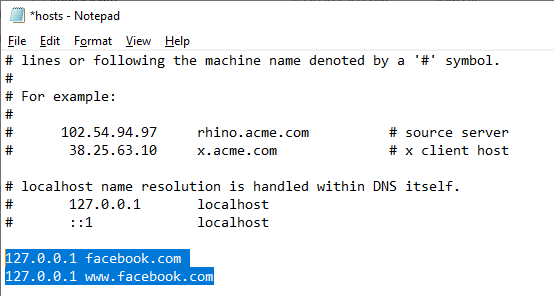
To block a specific website (for example, facebook.com), open the hosts file (with the administrator privileges) and add the strings like these to it:
Save the file and restart your computer (or clear the DNS cache using the command: ipconfig /flushdns ).
After that, when trying to open the facebook.com in any browser you will see the message “Page not found” / “Page not available”.
You can add new lines containing website URLs to your hosts file using such a .bat file:
@echo off
set hostspath=%windir%\System32\drivers\etc\hosts
echo 127.0.0.1 www.facebook.com >> %hostspath%
echo 127.0.0.1 facebook.com >> %hostspath%
exit
Or you can use the following PowerShell functions to automatically block specific websites in your hosts file.
Function BlockSiteHosts ( [Parameter(Mandatory=$true)]$Url) <
$hosts = ‘C:\Windows\System32\drivers\etc\hosts’
$is_blocked = Get-Content -Path $hosts |
Select-String -Pattern ([regex]::Escape($Url))
If(-not $is_blocked) <
$hoststr=»127.0.0.1 ” + $Url
Add-Content -Path $hosts -Value $hoststr
>
>
Function UnBlockSiteHosts ( [Parameter(Mandatory=$true)]$Url) <
$hosts = ‘C:\Windows\System32\drivers\etc\hosts’
$is_blocked = Get-Content -Path $hosts |
Select-String -Pattern ([regex]::Escape($Url))
If($is_blocked) <
$newhosts = Get-Content -Path $hosts |
Where-Object <
$_ -notmatch ([regex]::Escape($Url))
>
Set-Content -Path $hosts -Value $newhosts
>
>
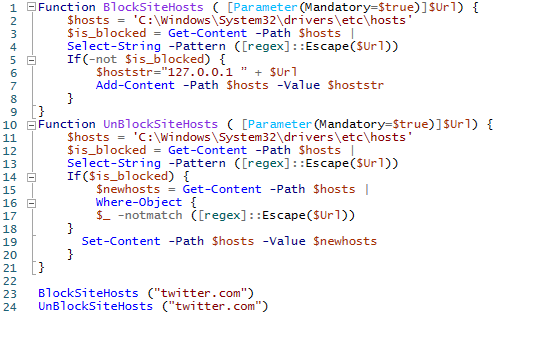
To add a website to the list of blocked URLs, just execute the command:
To unblock the website, run:
Block Websites Using DNS Filtering
If your clients use the same DNS server, in the same way you can block certain websites by creating a DNS entry in that DNS and specify something like 127.0.0.1 in it. By the way, most commercial DNS content filters (OpenDNS, SafeDNS, Cisco Umbrella, etc.) use the same principle.
How to Block Website IP Address in Windows Defender Firewall?
Also, you can block some websites using the built-in Windows Defender Firewall. The main disadvantage of this method is that you won’t be able to use the name of a domain or a website URL in the blocking rule. Windows Defender Firewall allows you to specify only an IP address or a subnet as a source/destination.
First of all, you have to get the IP address of the website you want to block. It is easier to do it using the nslookup command:
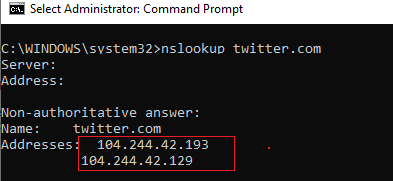
As you can see, the command has returned several IP addresses assigned to the website. You have to block all of them.
Run the Windows Defender Firewall management snap-in (Control Panel\All Control Panel Items\Windows Defender Firewall\Advanced Settings or by running firewall.cpl).
In the Outbound Rules section, create a new rule with the following settings: 
- Rule Type: Custom
- Program: All programs
- Protocol Type: Any
- Scope: In the “Which remote IP addresses does this rule apply to?” section select “These IP addresses” -> Add. In the next window, enter the IP addresses, subnets or a range of IP addresses you want to block.
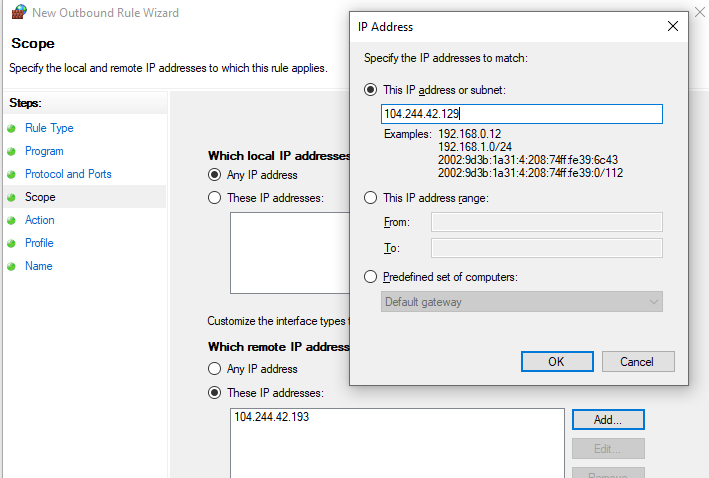
Click OK -> Next -> Action -> Block the connection.
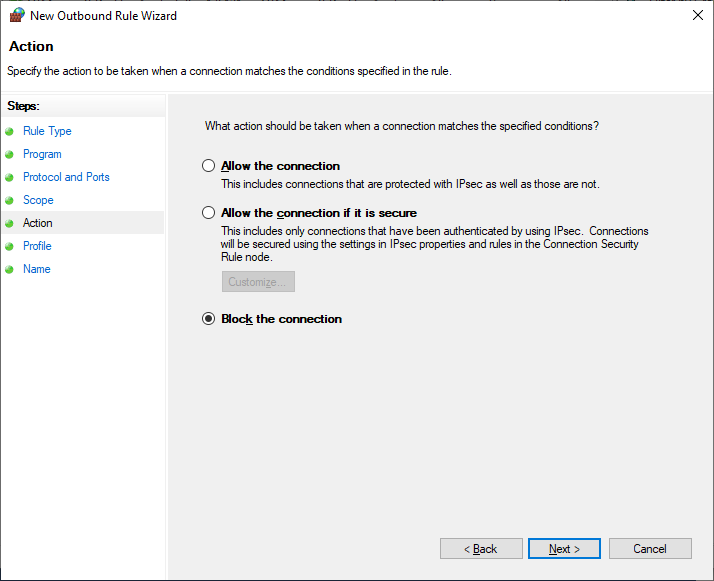
Leave all options as they are in the window with Firewall profiles the rule is applied to. Then specify the rule name and save it.
After that Windows Defender Firewall will block all outgoing connections to the specified website’s IP addresses. The following message will appear in your browser when trying to connect to the blocked site:
In your AD domain you can deploy a Windows Firewall policy to block access to a website on user computers using GPO. However, it is not rational. It is better to filter websites on your Internet access router (gateway).
Using PowerShell to Create Firewall Rule to Block Website by Domain Name or IP Address
You can also create a Firewall rule that blocks the connection to the website using PowerShell:
New-NetFirewallRule -DisplayName «Block Site» -Direction Outbound –LocalPort Any -Protocol Any -Action Block -RemoteAddress 104.244.42.129, 104.244.42.0/24
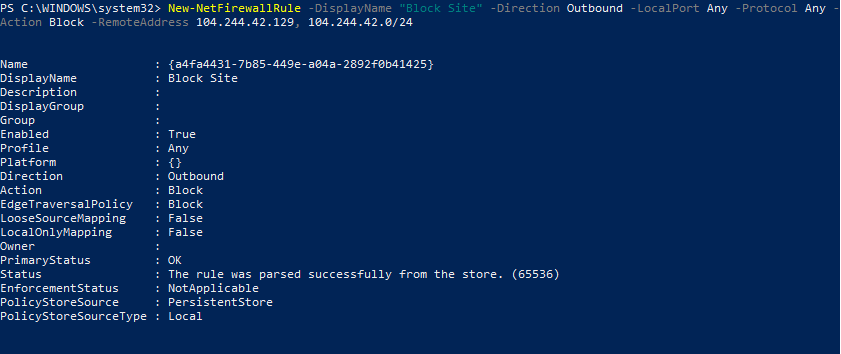
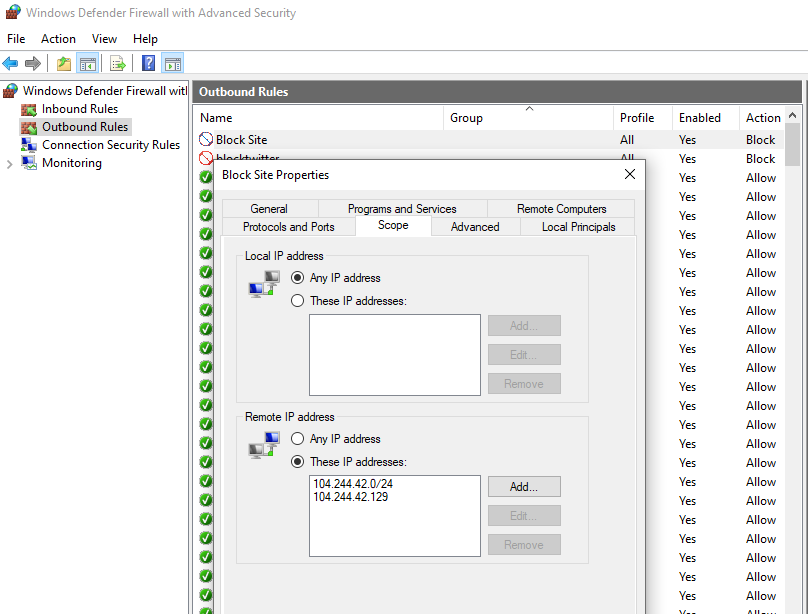
The string “The rule was parsed successfully from the store” means that the new Firewall rule has been successfully applied. You can find it in the graphical interface of your Windows Defender Firewall.
In order not to resolve the website names into IP addresses manually, you can use the Resolve-DnsName PowerShell cmdlet to get the website IP addresses:
Resolve-DnsName «twitter.com»| Select-Object -ExpandProperty IPAddress

Thus, you can convert the name of the website into its IP addresses and add a block rule to the firewall settings:
$IPAddress = Resolve-DnsName «twitter.com»| Select-Object -ExpandProperty IPAddress
New-NetFirewallRule -DisplayName «Block Site» -Direction Outbound –LocalPort Any -Protocol Any -Action Block -RemoteAddress $IPAddress
So you can now add a blocking rule to your Windows Firewall for multiple websites at once:
$SitesToBlock = «facebook.com»,»instagram.com»,»youtube.com»
$IPAddress = $SitesToBlock | Resolve-DnsName -NoHostsFile | Select-Object -ExpandProperty IPAddress
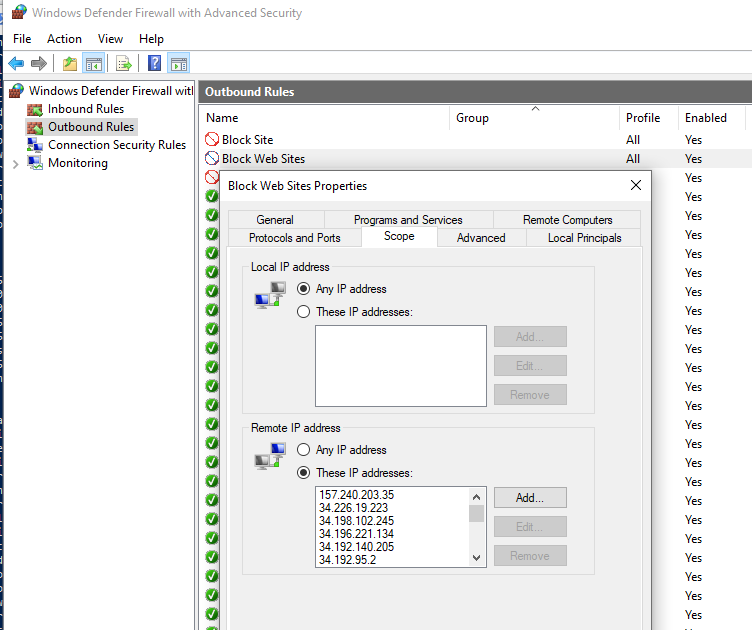
New-NetFirewallRule -DisplayName «Block Web Sites» -Direction Outbound –LocalPort Any -Protocol Any -Action Block -RemoteAddress $IPAddress
I have added the –NoHostsFile parameter to the Resolve-DnsName cmdlet in order not to use the hosts file for resolving.
Let’s make sure that a block outbound rule has appeared in the Windows Firewall console.
This article is mostly a brain training exercise. In a corporate network, you must use website filtering on your Internet access gateway, router or a proxy server. The host-level blocking is not very effective.
Extend Volume Blocked by a Recovery Partition on Windows 10
Hyper-V Boot Error: The Image’s Hash and Certificate Are not Allowed
Related Reading
How to Run Windows File Explorer Elevated (as.
Using Malicious Software Removal Tool (MRT.exe) on Windows
How to Clean Up Large System Volume Information.
Read and Write Data to Excel File with.
How to Disable NetBIOS and LLMNR Protocols in.
2 comments
1. Resolving an URL to an IP and then blocking that IP is hardly a guarantee of prevention. In some cases, there are many IPs that lead to URL, in some cases an IP leads to many URLs which may be ones you need or want to get access to. You should mention this aspect when you talk about that aspect of things.
2. I just ran into the oddest scenario which has me now pointing undesirable URLs to an IP address in my local net that my DHCP server will never assign (nor will I) vs. the loopback interface (127.0.0.1). Why?
Well, I found with some of the google stuff I was trying to block and routed to 127.0.0.1, when I did a netstat -s or netstat -a -n -o, I observed that there were a bunch of connections targeted at the name the google software was looking for that had *CONNECTED* to something on 127.0.0.1 (both the local and foreign addresses were on the loopback interface). I bet there are apps that you want to block that act both as client and server so looping back forms a connection back to your own machine. While this does keep those attempts back within your machine, it still seems undesirable.
My solution here was to identify a network address locally that DNE and never will (outside my DHCP allocation pool, will not be statically created by me – which also implies that I have entire control over the network which I do) and then use the hosts file to send these requests to a dead end. Is that better than having them loopback, never hit the network, and connect to something locally? I really don’t know. I am hoping with the address translation from an URL to a host in the hosts file (to a dead address on the network) and then using Windows Defender to block outgoing requests for that dead IP, that combination will result in the firewall just quietly eating the outside connect requests so a) there will be no connections back to my machine in loopback and b) there will be no extra connection requests firing into the local network (because Defender blocked them).
Just some extra strategies for the thought experiment. I do appreciate the article for the knowledge you have conveyed – thank you.
One further point: If you don’t control the network, there are still ‘reserved’ internet address ranges that for the most part are not supposed to be used in normal networks. It is possible for you to use one of those ranges to send the requests to (as it isn’t likely to catch a host on your network) and then kill that address with IP based blocking in Defender Firewall.
Note, do not use the Link Address range (which is used for when a DHCP server is not available and DHCP clients are trying to assign themselves (no central direction) an IP address that does not conflict with another using trial-error-retry with new address approach). Leave that address band alone, but there are still other reserved address ranges you could use. I’d still put a Firewall block on outgoing traffic to those just to not put things onto your local net and make your router/switch/access point/etc have to make a decision about what to do with that traffic (why waste the devices time?). Block it locally as an outgoing address on your box.
In MOST cases, this approach should not impede any local software.
One somewhat useful (depends on how machines on your network setup ping handling) way to test a reserved address on your local net would be to ping it from the command line. That would tell you if it was occupied if you got a ping response. (Does not tell you nothing might be there if you do not – machine could be off temporarily or be set not to return ICMP echoes when pinged). But if you do get a response on a reserved internet address, try another. There are 3 or 4 ranges with a lot of addresses in them in the list of reserved addresses.
(PS I’m talking IPv4 here – haven’t looked into any reserved address ranges in IP V6)


