- Настройка правил брандмауэра Windows групповыми политиками
- Групповые политики, использующиеся для управления настройками Брандмауэра Защитника Windows
- Включаем Windows Firewall с помощью GPO
- Создаем правило файервола с помощью групповой политики
- Проверка политик брандмаэера Windows на клиентах
- Импорт / экспорт правил Брандмауэра Windows в GPO
- Доменные и локальные правила брандмауэра
- Несколько советов об управлении брандмауэром Windows через GPO
- Best practices for configuring Windows Defender Firewall
- Keep default settings
- Understand rule precedence for inbound rules
- Create rules for new applications before first launch
- Inbound allow rules
- Known issues with automatic rule creation
- Establish local policy merge and application rules
- Know how to use «shields up» mode for active attacks
- Create outbound rules
- Document your changes
Настройка правил брандмауэра Windows групповыми политиками
Брандмауэр Windows позволяет ограничить исходящий / входящий сетевой трафик для определенного приложения или TCP/IP порта, и является популярным средством ограничения сетевого доступа к (от) рабочим станциям пользователей или серверам. Правила Windows Firewall можно настроить индивидуально на каждом компьютере, или, если компьютер пользователя включен в домен Windows, администратор может управлять настройками и правилами брандмауэра Windows с помощью групповых политик.
В крупных организация правила фильтрации портов обычно выносятся на уровень маршрутизатором, L3 коммутаторов или выделенных межсетевых экранах. Однако ничего не мешает вам распространить ваши правила ограничения сетевого доступа Windows Firewall к рабочим станциям или серверам Windows.
Групповые политики, использующиеся для управления настройками Брандмауэра Защитника Windows
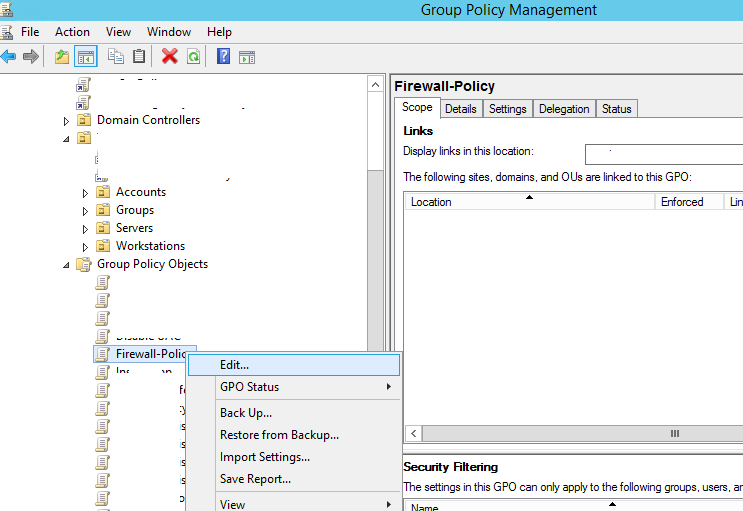
С помощью редактора доменной групповой политики (group Policy Management Console – gpmc.msc) создайте новую политику с именем Firewall-Policy и перейдите в режим редактирования (Edit).
В консоли групповой политики есть две секции, в которых можно управлять настройками брандмауэра:
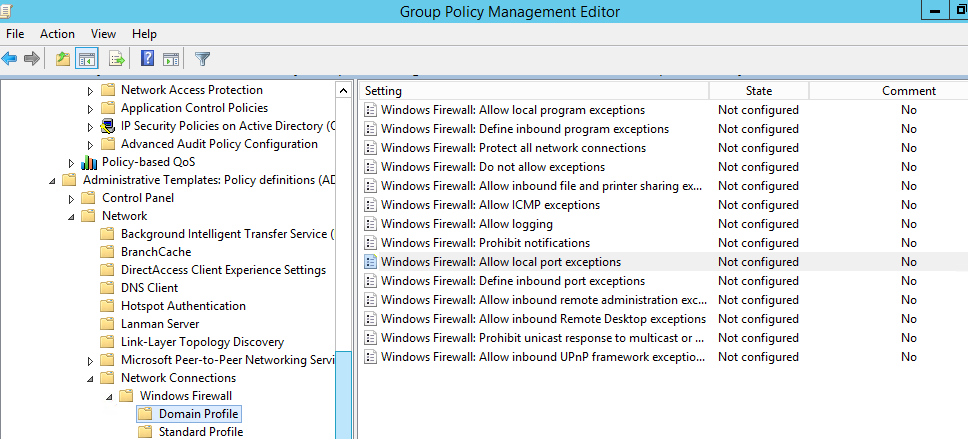
- Computer Configuration -> Administrative Templates -> Network -> Network Connections -> Windows Firewall – эта секция GPO использовалась для настройки правил брандмауэра для ОС Vista / Windows Server 2008 и ниже. Если у вас в домене нет компьютеров со старыми ОС, для настройки файервола используется следующая секция.
 Network -> Network Connections -> Windows Firewall » width=»609″ height=»276″ srcset=»https://winitpro.ru/wp-content/uploads/2018/12/administrative-templates-greater-network-greater-network-con.png 968w, https://winitpro.ru/wp-content/uploads/2018/12/administrative-templates-greater-network-greater-network-con-300×136.png 300w, https://winitpro.ru/wp-content/uploads/2018/12/administrative-templates-greater-network-greater-network-con-768×348.png 768w» sizes=»(max-width: 609px) 100vw, 609px»/>
 - Computer Configuration -> Windows Settings -> Security Settings -> Windows Firewall with Advanced Security – это актуальный раздел для настройки Брандмауэра Windows в современных версиях ОС и по интерфейсу он напоминает интерфейс локальной консоли управления Брандмауэра.
 Network -> Network Connections -> Windows Firewall » width=»609″ height=»276″ srcset=»https://winitpro.ru/wp-content/uploads/2018/12/administrative-templates-greater-network-greater-network-con.png 968w, https://winitpro.ru/wp-content/uploads/2018/12/administrative-templates-greater-network-greater-network-con-300×136.png 300w, https://winitpro.ru/wp-content/uploads/2018/12/administrative-templates-greater-network-greater-network-con-768×348.png 768w» sizes=»(max-width: 609px) 100vw, 609px»/>
Включаем Windows Firewall с помощью GPO
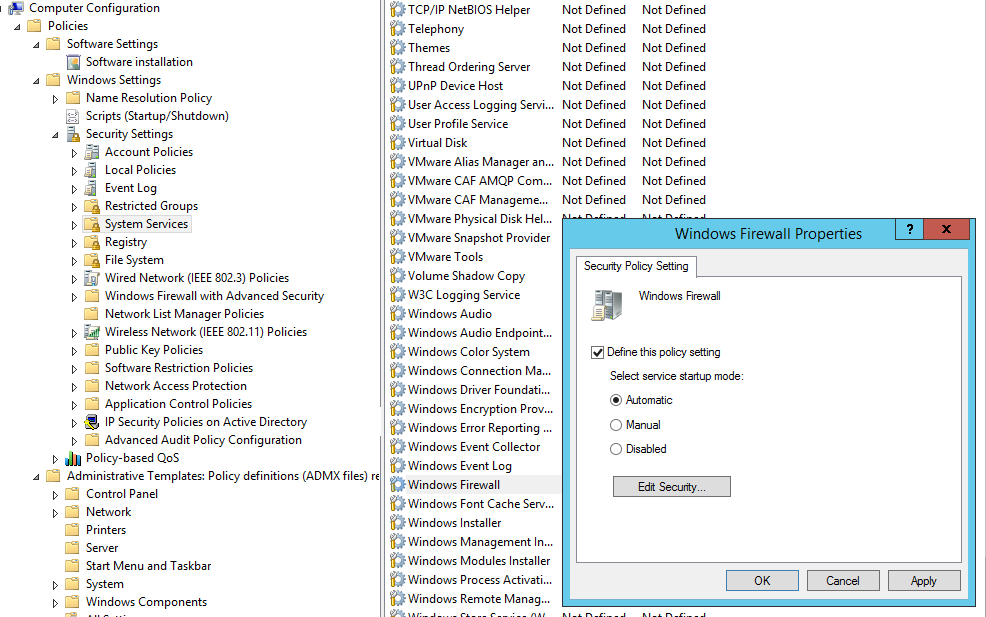
Чтобы пользователи (даже с правами локального админа) не могли выключить службу брандмауэра, желательно настроить автоматический запуск службы Windows Firewall через GPO. Для этого перейдите в раздел Computer Configuration- > Windows Settings -> Security Settings -> System Services. Найдите в списке служб Windows Firewall и измените тип запуск службы на автоматический (Define this policy setting -> Service startup mode Automatic). Убедитесь, что у пользователей нет прав на остановку службы.
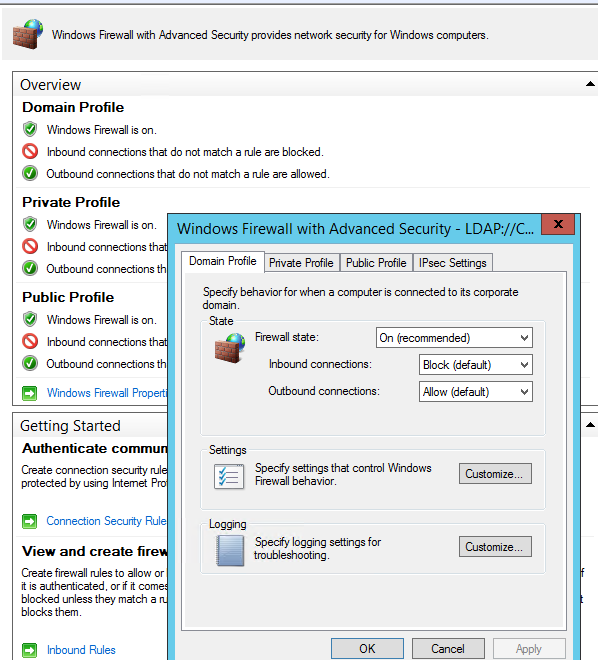
Перейдите в раздел консоли GPO Computer Configuration -> Windows Settings -> Security Settings. Щелкните ПКМ по Windows Firewall with Advanced Security и откройте свойства.
На всех трех вкладках Domain Profile, Private Profile и Public Profile (что такое профиль сети) измените состояние Firewall state на On (recommended). В зависимости от политик безопасности в вашей организации вы можете указать, что все входящие подключения по умолчанию запрещены(Inbound connections -> Block), а исходящие разрешены (Outbound connections -> Allow) и сохраните изменения.
Создаем правило файервола с помощью групповой политики
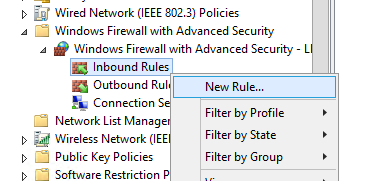
Теперь попробуем создать разрешающее входящее правило файервола для всех. Например, мы хотим разрешить подключение к компьютерам по RDP (порт TCP 3389). Щелкните ПКМ по разделу Inbound Rules и выберите пункт меню New Rule.
Мастер создания правила брандмауэра очень похож на интерфейс локального Windows Firewall на обычном компьютере.
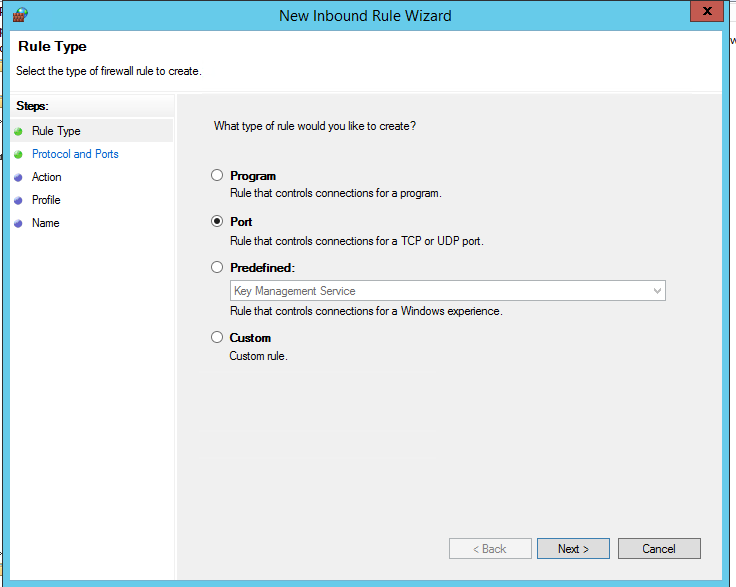
Выберите тип правила. Можно разрешить доступ для:
- Программы (Program) – можно выбрать исполняемый exe программы;
- Порта (Port) – выбрать TCP/UDP порт или диапазон портов;
- Преднастроенное правило (Predefined) – выбрать одно из стандартных правил Windows, в которых уже имеются правила доступа (описаны как исполняемые файлы, так и порты) к типовым службам (например, AD, Http, DFS, BranchCache, удаленная перезагрузка, SNMP, KMS и т.д.);
- Собственное правило (Custom) – здесь можно указать программу, протокол (другие протоколы помимо TCP и UDP, например, ICMP, GRE, L2TP, IGMP и т.д.), IP адреса клиентов или целые IP подсети.
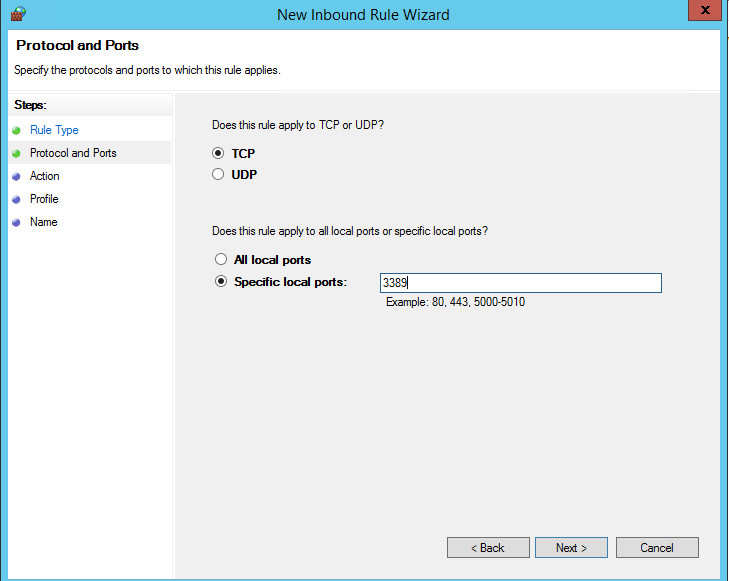
В нашем случае мы выберем правило Port. В качестве протокола укажем TCP, в качестве порта – порт 3389 (RDP порт по-умолчанию, можно изменить).
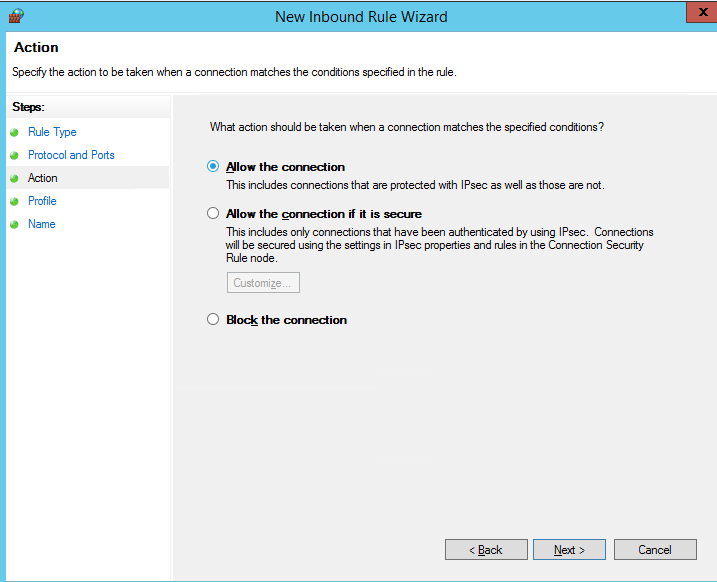
Далее нужно выбрать что нужно сделать с таким сетевым соединением: разрешить (Allow the connection), разрешить если оно безопасное или заблокировать (Block the connection).
Осталось выбрать профили файервола, которым нужно применить правило. Можно оставить все профили (Domain, Private и Public).
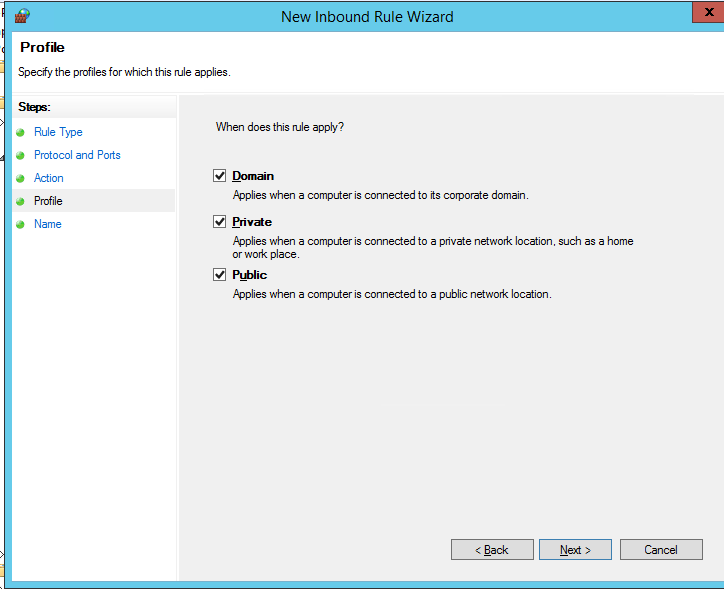
На последнем шаге нужно указать имя правило и его описание. Нажмите кнопку Finish и оно появится в списке правил брандмауэра.
Аналогичным образом вы можете настроить другие правила для входящего трафика, которые должны применятся к вашим клиентам Windows.

Не забываете, что нужно создать правила для входящего и исходящего трафика.
Теперь осталось назначить политику Firewall-Policy на OU с компьютерами пользователей
Проверка политик брандмаэера Windows на клиентах
Обновите политики на клиентах (gpupdate /force). Проверьте, что указанные вами порты доступны на компьютерах пользователей (можно использовать командлет Test-NetConnection или утилиту Portqry).
На ПК пользователя откройте Панель управления\Система и безопасность\Брандмауэр Защитника Windows и убедитесь, что появилась надпись: Для обеспечения безопасности, некоторые параметры управляются групповой политикой (For your security, some settings are controlled by Group Policy), и используются заданные вами настройки брандмаэера.
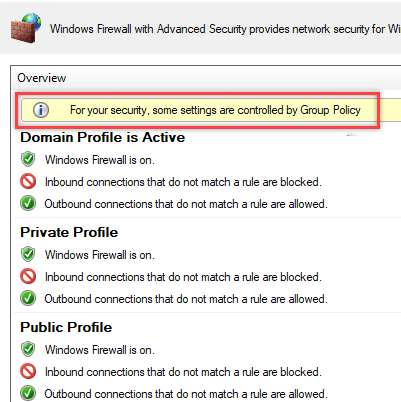
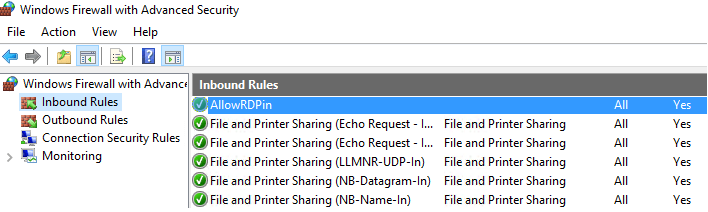
Пользователь теперь не может изменить настройки брандмауэра, а в списке Inbound Rules должны быть указаны все созданные вами правила.
Также вы можете вывести настройки файервола с помощью команды:
netsh firewall show state
Импорт / экспорт правил Брандмауэра Windows в GPO
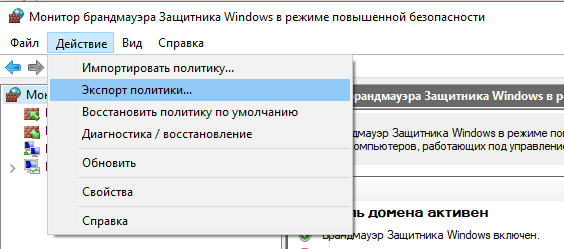
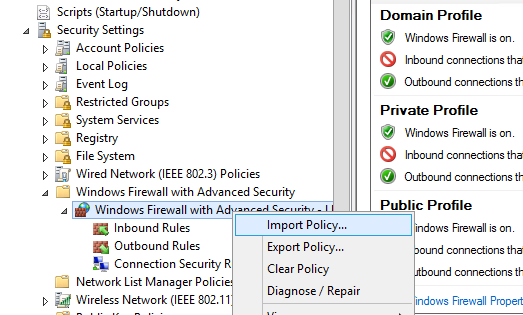
Конечно, процесс создания правил для брандмауэра Windows – очень кропотливое и долгое занятие (но результате того стоит). Для упрощения свое задачи можно воспользоваться возможностью импорт и экспорта настроек брандмауэра Windows. Для этого вам достаточно нужным образом настроить локальные правила брандмауэра на обычном рабочей станции. Затем встаньте на корень оснастки брандмауэра (Монитор Брандмауэра Защитника Windows в режиме повышенной безопасности) и выберите пункт Действие -> Экспорт политики.
Политика выгружается в WFW файл, который можно импортировать в редакторе Group Policy Management Editor, выбрав пункт Import Policy и указав путь к файлу wfw (текущие настройки будут перезаписаны).
Доменные и локальные правила брандмауэра
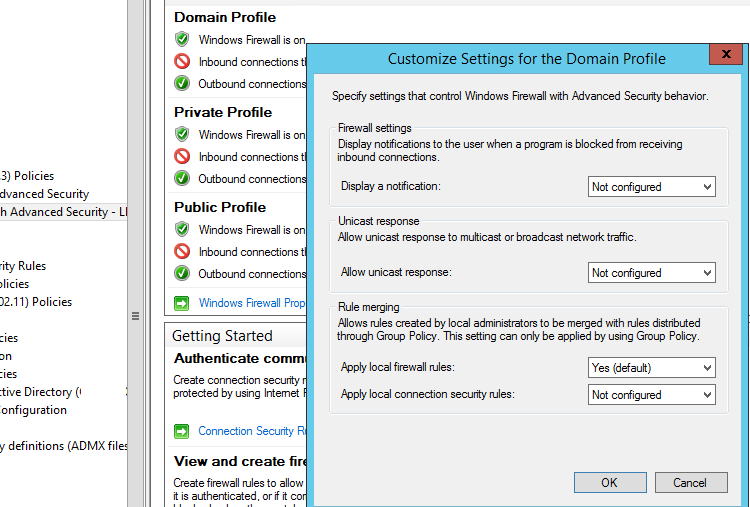
В зависимости от того, хотите ли вы, чтобы локальные администраторы могли создавать на своих компьютерах собственные правила брандмауэра и эти должны быть объединены с правилами, полученными с помощью групповой политики. в групповой политике вы можете выбрать режим объединения правил. Откройте свойства политики и обратите внимание на настройки в разделе Rule merging. По умолчанию режим объединения правил включен. Вы можете принудительно указать, что локальный администратор может создавать собственные правила брандмауэра: в параметре Apply local firewall rules выберите Yes (default).
Несколько советов об управлении брандмауэром Windows через GPO
Конечно, для серверов и рабочих станций нужно создавать отдельные политики управления правилами брандмауэра (для каждой группы одинаковых серверов возможно придется создать собственные политики в зависимости от их роли). Т.е. правила файервола для контроллера домена, почтового Exchange сервера и сервера SQL будут отличаться.
Какие порты нужно открыть для той или иной службы нужно искать в документации на сайте разработчика. Процесс довольно кропотливый и на первый взгляд сложный. Но постепенно вполне реальной придти к работоспособной конфигурации Windows файервола, который разрешает только одобренные подключения и блокирует все остальное. По опыту хочу отметить, что на ПО Microsoft можно довольно быстро найти список используемых TCP/UDP портов.
Best practices for configuring Windows Defender Firewall
Applies to
Windows operating systems including WindowsВ 10
Windows Server Operating Systems
Windows Defender Firewall with Advanced Security provides host-based, two-way network traffic filtering and blocks unauthorized network traffic flowing into or out of the local device. Configuring your Windows Firewall based on the following best practices can help you optimize protection for devices in your network. These recommendations cover a wide range of deployments including home networks and enterprise desktop/server systems.
To open Windows Firewall, go to theВ StartВ menu, selectВ Run, typeВ WF.msc, and then selectВ OK. See also Open Windows Firewall.
Keep default settings
When you open the Windows Defender Firewall for the first time, you can see the default settings applicable to the local computer. The Overview panel displays security settings for each type of network to which the device can connect.
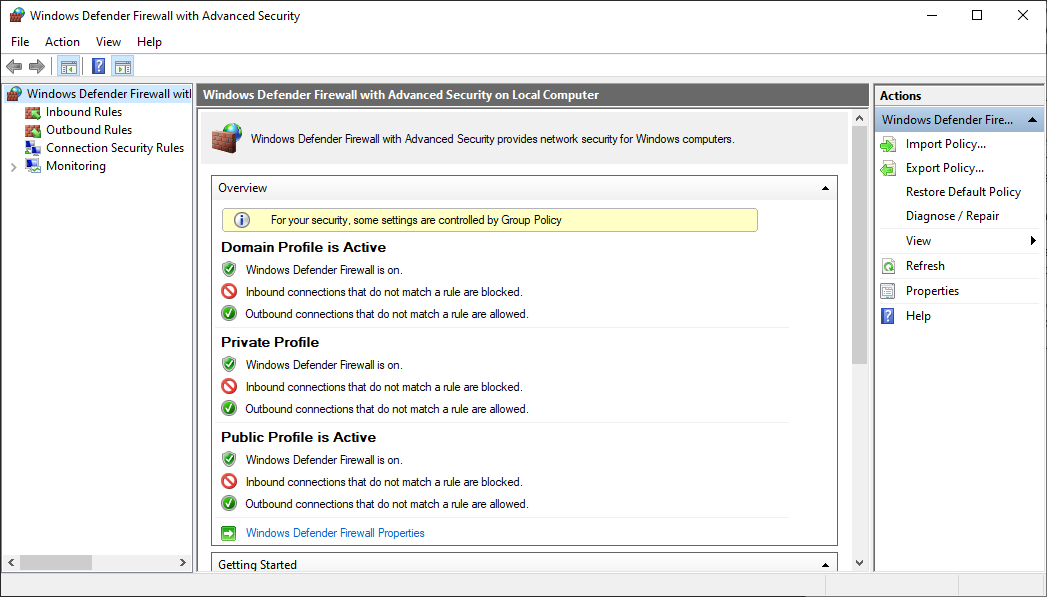
Figure 1: Windows Defender Firewall
Domain profile: Used for networks where there is a system of account authentication against a domain controller (DC), such as an Azure Active Directory DC
Private profile: Designed for and best used in private networks such as a home network
Public profile: Designed with higher security in mind for public networks like Wi-Fi hotspots, coffee shops, airports, hotels, or stores
View detailed settings for each profile by right-clicking the top-level Windows Defender Firewall with Advanced Security node in the left pane and then selecting Properties.
Maintain the default settings in Windows Defender Firewall whenever possible. These settings have been designed to secure your device for use in most network scenarios. One key example is the default Block behavior for Inbound connections.

Figure 2: Default inbound/outbound settings
To maintain maximum security, do not change the default Block setting for inbound connections.
Understand rule precedence for inbound rules
In many cases, a next step for administrators will be to customize these profiles using rules (sometimes called filters) so that they can work with user apps or other types of software. For example, an administrator or user may choose to add a rule to accommodate a program, open a port or protocol, or allow a predefined type of traffic.
This can be accomplished by right-clicking either Inbound Rules or Outbound Rules, and selecting New Rule. The interface for adding a new rule looks like this:
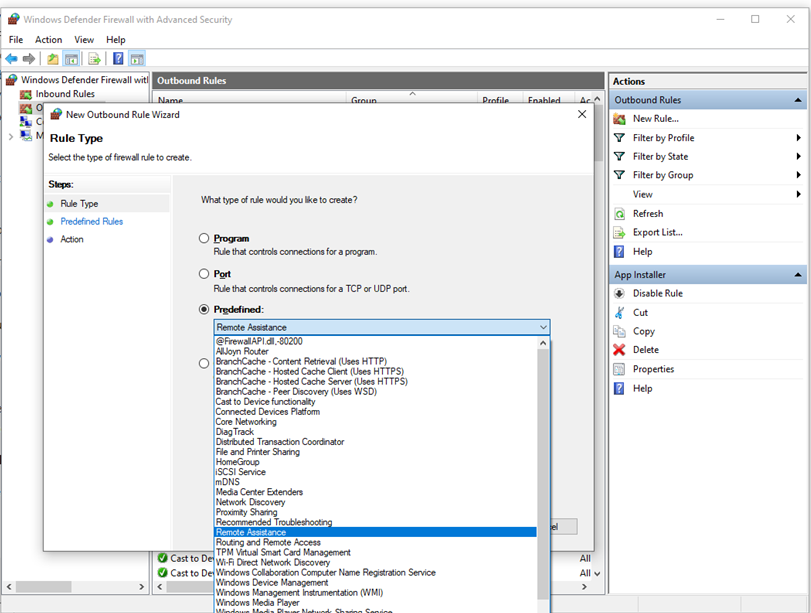
Figure 3: Rule Creation Wizard
This article does not cover step-by-step rule configuration. See the Windows Firewall with Advanced Security Deployment Guide for general guidance on policy creation.
In many cases, allowing specific types of inbound traffic will be required for applications to function in the network. Administrators should keep the following rule precedence behaviors in mind when allowing these inbound exceptions.
Explicitly defined allow rules will take precedence over the default block setting.
Explicit block rules will take precedence over any conflicting allow rules.
More specific rules will take precedence over less specific rules, except in the case of explicit block rules as mentioned in 2. (For example, if the parameters of rule 1 includes an IP address range, while the parameters of rule 2 include a single IP host address, rule 2 will take precedence.)
Because of 1 and 2, it is important that, when designing a set of policies, you make sure that there are no other explicit block rules in place that could inadvertently overlap, thus preventing the traffic flow you wish to allow.
A general security best practice when creating inbound rules is to be as specific as possible. However, when new rules must be made that use ports or IP addresses, consider using consecutive ranges or subnets instead of individual addresses or ports where possible. This avoids creation of multiple filters under the hood, reduces complexity, and helps to avoid performance degradation.
Windows Defender Firewall does not support traditional weighted, administrator-assigned rule ordering. An effective policy set with expected behaviors can be created by keeping in mind the few, consistent, and logical rule behaviors described above.
Create rules for new applications before first launch
Inbound allow rules
When first installed, networked applications and services issue a listen call specifying the protocol/port information required for them to function properly. As there is a default block action in Windows Defender Firewall, it is necessary to create inbound exception rules to allow this traffic. It is common for the app or the app installer itself to add this firewall rule. Otherwise, the user (or firewall admin on behalf of the user) needs to manually create a rule.
If there are no active application or administrator-defined allow rule(s), a dialog box will prompt the user to either allow or block an application’s packets the first time the app is launched or tries to communicate in the network.
If the user has admin permissions, they will be prompted. If they respond No or cancel the prompt, block rules will be created. Two rules are typically created, one each for TCP and UDP traffic.
If the user is not a local admin, they will not be prompted. In most cases, block rules will be created.
In either of the scenarios above, once these rules are added they must be deleted in order to generate the prompt again. If not, the traffic will continue to be blocked.
The firewall’s default settings are designed for security. Allowing all inbound connections by default introduces the network to various threats. Therefore, creating exceptions for inbound connections from third-party software should be determined by trusted app developers, the user, or the admin on behalf of the user.
Known issues with automatic rule creation
When designing a set of firewall policies for your network, it is a best practice to configure allow rules for any networked applications deployed on the host. Having these rules in place before the user first launches the application will help ensure a seamless experience.
The absence of these staged rules does not necessarily mean that in the end an application will be unable to communicate on the network. However, the behaviors involved in the automatic creation of application rules at runtime requires user interaction.
To determine why some applications are blocked from communicating in the network, check for the following:
A user with sufficient privileges receives a query notification advising them that the application needs to make a change to the firewall policy. Not fully understanding the prompt, the user cancels or dismisses the prompt.
A user lacks sufficient privileges and is therefore not prompted to allow the application to make the appropriate policy changes.
Local Policy Merge is disabled, preventing the application or network service from creating local rules.
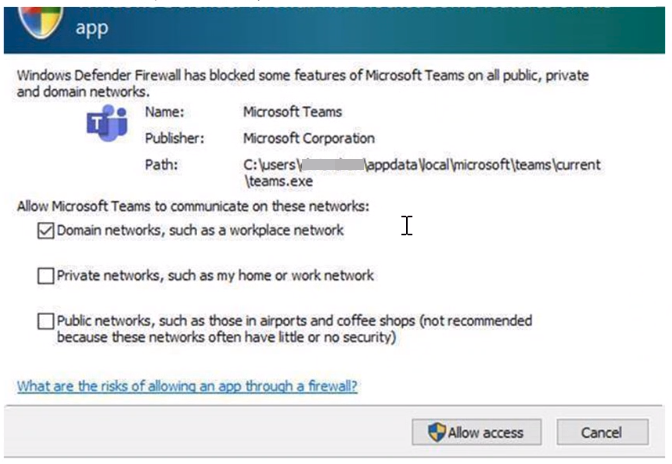
Figure 4: Dialog box to allow access
Establish local policy merge and application rules
Firewall rules can be deployed:
- Locally using the Firewall snap-in (WF.msc)
- Locally using PowerShell
- Remotely using Group Policy if the device is a member of an Active Directory Name, System Center Configuration Manager (SCCM), or Intune (using workplace join)
Rule merging settings control how rules from different policy sources can be combined. Administrators can configure different merge behaviors for Domain, Private, and Public profiles.
The rule merging settings either allow or prevent local admins from creating their own firewall rules in addition to those obtained from Group Policy.
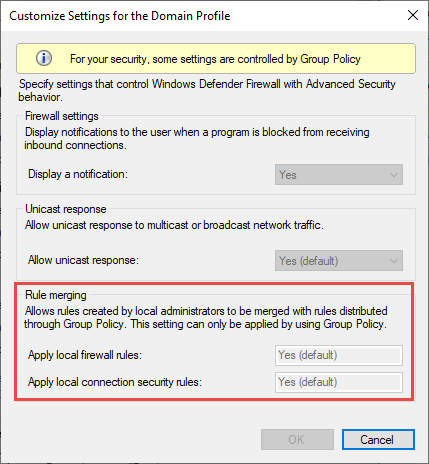
Figure 5: Rule merging setting
In the firewall configuration service provider, the equivalent setting is AllowLocalPolicyMerge. This setting can be found under each respective profile node, DomainProfile, PrivateProfile, and PublicProfile.
If merging of local policies is disabled, centralized deployment of rules is required for any app that needs inbound connectivity.
Admins may disable LocalPolicyMerge in high security environments to maintain tighter control over endpoints. This can impact some apps and services that automatically generate a local firewall policy upon installation as discussed above. For these types of apps and services to work, admins should push rules centrally via group policy (GP), Mobile Device Management (MDM), or both (for hybrid or co-management environments).
Firewall CSP and Policy CSP also have settings that can affect rule merging.
As a best practice, it is important to list and log such apps, including the network ports used for communications. Typically, you can find what ports must be open for a given service on the app’s website. For more complex or customer application deployments, a more thorough analysis may be needed using network packet capture tools.
In general, to maintain maximum security, admins should only push firewall exceptions for apps and services determined to serve legitimate purposes.
The use of wildcard patterns, such as C:*\teams.exe is not supported in application rules. We currently only support rules created using the full path to the application(s).
Know how to use «shields up» mode for active attacks
An important firewall feature you can use to mitigate damage during an active attack is the «shields up» mode. It is an informal term referring to an easy method a firewall administrator can use to temporarily increase security in the face of an active attack.
Shields up can be achieved by checking Block all incoming connections, including those in the list of allowed apps setting found in either the Windows Settings app or the legacy file firewall.cpl.
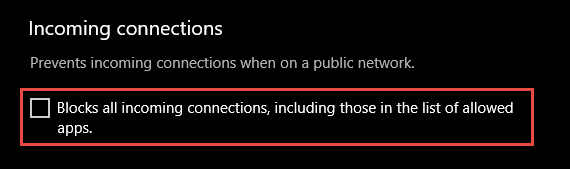
Figure 6: Windows settings App/Windows Security/Firewall Protection/Network Type

Figure 7: Legacy firewall.cpl
By default, the Windows Defender Firewall will block everything unless there is an exception rule created. This setting overrides the exceptions.
For example, the Remote Desktop feature automatically creates firewall rules when enabled. However, if there is an active exploit using multiple ports and services on a host, you can, instead of disabling individual rules, use the shields up mode to block all inbound connections, overriding previous exceptions, including the rules for Remote Desktop. The Remote Desktop rules remain intact but remote access will not work as long as shields up is activated.
Once the emergency is over, uncheck the setting to restore regular network traffic.
Create outbound rules
What follows are a few general guidelines for configuring outbound rules.
The default configuration of Blocked for Outbound rules can be considered for certain highly secure environments. However, the Inbound rule configuration should never be changed in a way that Allows traffic by default.
It is recommended to Allow Outbound by default for most deployments for the sake of simplification around app deployments, unless the enterprise prefers tight security controls over ease-of-use.
In high security environments, an inventory of all enterprise-spanning apps must be taken and logged by the administrator or administrators. Records must include whether an app used requires network connectivity. Administrators will need to create new rules specific to each app that needs network connectivity and push those rules centrally, via group policy (GP), Mobile Device Management (MDM), or both (for hybrid or co-management environments).
For tasks related to creating outbound rules, see Checklist: Creating Outbound Firewall Rules.
Document your changes
When creating an inbound or outbound rule, you should specify details about the app itself, the port range used, and important notes like creation date. Rules must be well-documented for ease of review both by you and other admins. We highly encourage taking the time to make the work of reviewing your firewall rules at a later date easier. AndВ neverВ create unnecessary holes in your firewall.


