- Параметры DNS брандмауэра Azure Azure Firewall DNS settings
- «Серверы DNS» DNS servers
- Настройка пользовательских DNS-серверов — портал Azure Configure custom DNS servers — Azure portal
- Настройка пользовательских DNS-серверов — Azure CLI Configure custom DNS servers — Azure CLI
- Настройка пользовательских DNS-серверов — Azure PowerShell Configure custom DNS servers — Azure PowerShell
- DNS-прокси DNS proxy
- Конфигурация прокси-сервера DNS DNS proxy configuration
- Настройка прокси-сервера DNS — портал Azure Configure DNS proxy — Azure portal
- Настройка прокси-сервера DNS — Azure CLI Configure DNS proxy — Azure CLI
- Настройка прокси-сервера DNS — Azure PowerShell Configure DNS proxy — Azure PowerShell
- Step 5. Configure DNS and firewall settings
- Configure DNS name resolution
- To add a host (A or AAAA) resource record to a zone
- Configure the Edge Firewall
- Configure the Internal Perimeter Network Firewall
- RADIUS Traffic Ports on the VPN Server and NPS Server
- Use the Same RADIUS Ports for the Internal Perimeter Network Firewall Configuration
- Next steps
Параметры DNS брандмауэра Azure Azure Firewall DNS settings
Вы можете настроить пользовательский DNS-сервер и включить DNS-прокси для брандмауэра Azure. You can configure a custom DNS server and enable DNS proxy for Azure Firewall. Настройте эти параметры при развертывании брандмауэра или настройте их позже на странице параметров DNS . Configure these settings when you deploy the firewall, or configure them later from the DNS settings page.
«Серверы DNS» DNS servers
DNS-сервер поддерживает и разрешает доменные имена IP-адресам. A DNS server maintains and resolves domain names to IP addresses. По умолчанию брандмауэр Azure использует Azure DNS для разрешения имен. By default, Azure Firewall uses Azure DNS for name resolution. Параметр DNS-сервера позволяет настроить собственные DNS-серверы для разрешения имен брандмауэра Azure. The DNS server setting lets you configure your own DNS servers for Azure Firewall name resolution. Можно настроить один сервер или несколько серверов. You can configure a single server or multiple servers.
Для экземпляров брандмауэра Azure, управляемых с помощью диспетчера брандмауэра Azure, параметры DNS настраиваются в соответствующей политике брандмауэра Azure. For instances of Azure Firewall that are managed by using Azure Firewall Manager, the DNS settings are configured in the associated Azure Firewall policy.
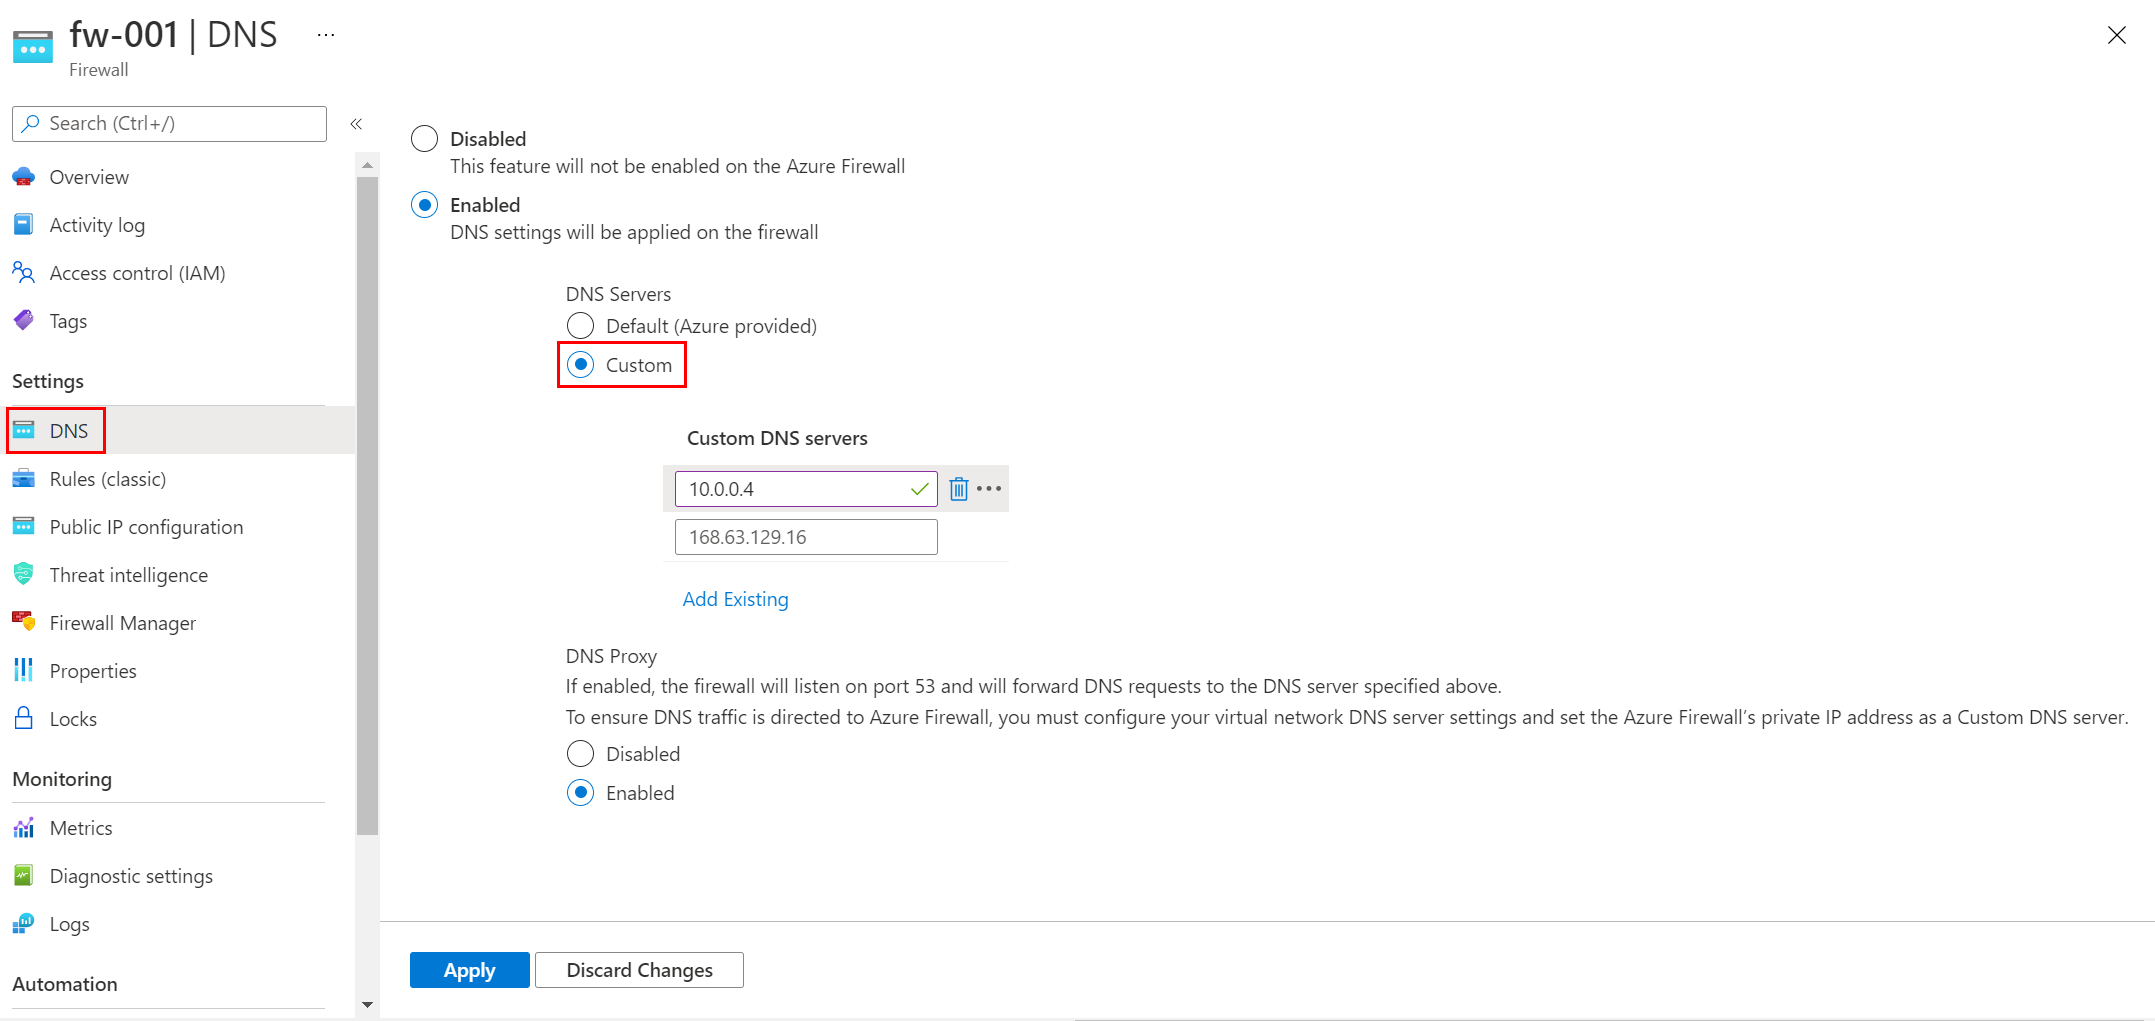
Настройка пользовательских DNS-серверов — портал Azure Configure custom DNS servers — Azure portal
- В разделе Параметры брандмауэра Azure выберите параметры DNS. Under Azure Firewall Settings, select DNS Settings.
- В разделе DNS-серверы можно ввести или добавить существующие DNS-серверы, которые ранее были указаны в виртуальной сети. Under DNS servers, you can type or add existing DNS servers that have been previously specified in your virtual network.
- Щелкните Сохранить. Select Save.
Теперь брандмауэр направляет трафик DNS на указанные DNS-серверы для разрешения имен. The firewall now directs DNS traffic to the specified DNS servers for name resolution.
Настройка пользовательских DNS-серверов — Azure CLI Configure custom DNS servers — Azure CLI
В следующем примере брандмауэр Azure обновляется с пользовательскими DNS-серверами с помощью Azure CLI. The following example updates Azure Firewall with custom DNS servers by using the Azure CLI.
Для команды az network firewall требуется установить расширение Azure CLI azure-firewall . The command az network firewall requires the Azure CLI extension azure-firewall to be installed. Его можно установить с помощью команды az extension add —name azure-firewall . You can install it by using the command az extension add —name azure-firewall .
Настройка пользовательских DNS-серверов — Azure PowerShell Configure custom DNS servers — Azure PowerShell
В следующем примере брандмауэр Azure обновляется с пользовательскими DNS-серверами с помощью Azure PowerShell. The following example updates Azure Firewall with custom DNS servers by using Azure PowerShell.
DNS-прокси DNS proxy
Вы можете настроить брандмауэр Azure так, чтобы он действовал в качестве DNS-прокси. You can configure Azure Firewall to act as a DNS proxy. DNS-прокси — это посредник для запросов DNS от клиентских виртуальных машин к DNS-серверу. A DNS proxy is an intermediary for DNS requests from client virtual machines to a DNS server. При настройке пользовательского DNS-сервера включите DNS-прокси, чтобы избежать несоответствия разрешений DNS, и включите фильтрацию FQDN (полное доменное имя) в правилах сети. If you configure a custom DNS server, then enable DNS proxy to avoid a DNS resolution mismatch, and enable FQDN (fully qualified domain name) filtering in the network rules.
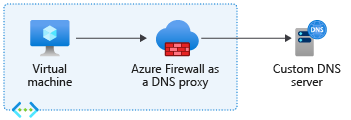
Если не включить DNS-прокси, запросы DNS от клиента могут передаваться на DNS-сервер в другое время или возвращать другой ответ, по сравнению с брандмауэром. If you don’t enable DNS proxy, then DNS requests from the client might travel to a DNS server at a different time or return a different response compared to that of the firewall. DNS-прокси помещает брандмауэр Azure в путь клиентских запросов, чтобы избежать несогласованности. DNS proxy puts Azure Firewall in the path of the client requests to avoid inconsistency.
Если брандмауэр Azure является DNS-прокси, возможны два типа функций кэширования: When Azure Firewall is a DNS proxy, two caching function types are possible:
Положительный кэш: разрешение DNS успешно выполнено. Positive cache: DNS resolution is successful. Брандмауэр использует TTL (срок жизни) пакета или объекта. The firewall uses the TTL (time to live) of the packet or object.
Отрицательный кэш: результаты разрешения DNS не отклика или разрешения отсутствуют. Negative cache: DNS resolution results in no response or no resolution. Брандмауэр кэширует эти сведения в течение одного часа. The firewall caches this information for one hour.
DNS-прокси сохраняет все разрешенные IP-адреса по полным доменным именам в правилах сети. The DNS proxy stores all resolved IP addresses from FQDNs in network rules. Рекомендуется использовать полные доменные имена, которые разрешаются в один IP-адрес. As a best practice, use FQDNs that resolve to one IP address.
Конфигурация прокси-сервера DNS DNS proxy configuration
Конфигурация прокси-сервера DNS требует трех шагов: DNS proxy configuration requires three steps:
- Включите DNS-прокси в параметрах DNS брандмауэра Azure. Enable the DNS proxy in Azure Firewall DNS settings.
- При необходимости настройте пользовательский DNS-сервер или используйте предоставленное значение по умолчанию. Optionally, configure your custom DNS server or use the provided default.
- Настройте частный IP-адрес брандмауэра Azure в качестве пользовательского DNS-адреса в параметрах DNS-сервера виртуальной сети. Configure the Azure Firewall private IP address as a custom DNS address in your virtual network DNS server settings. Этот параметр гарантирует, что трафик DNS будет перенаправлен в брандмауэр Azure. This setting ensures DNS traffic is directed to Azure Firewall.
Настройка прокси-сервера DNS — портал Azure Configure DNS proxy — Azure portal
Чтобы настроить DNS-прокси, необходимо настроить параметр DNS-серверов виртуальной сети для использования частного IP-адреса брандмауэра. To configure DNS proxy, you must configure your virtual network DNS servers setting to use the firewall private IP address. Затем включите DNS-прокси в параметрах DNS брандмауэра Azure. Then enable the DNS proxy in the Azure Firewall DNS settings.
Настройка DNS-серверов виртуальной сети Configure virtual network DNS servers
- Выберите виртуальную сеть, в которой трафик DNS будет маршрутизироваться через экземпляр брандмауэра Azure. Select the virtual network where the DNS traffic will be routed through the Azure Firewall instance.
- В разделе Параметры выберите DNS-серверы. Under Settings, select DNS servers.
- Для параметра DNS-серверы выберите значение Пользовательский. Under DNS servers, select Custom.
- Введите частный IP-адрес брандмауэра. Enter the firewall’s private IP address.
- Щелкните Сохранить. Select Save.
- Перезапустите виртуальные машины, подключенные к виртуальной сети, чтобы им были назначены новые параметры DNS-сервера. Restart the VMs that are connected to the virtual network so they’re assigned the new DNS server settings. Виртуальные машины продолжают использовать текущие параметры DNS, пока они не будут перезапущены. VMs continue to use their current DNS settings until they’re restarted.
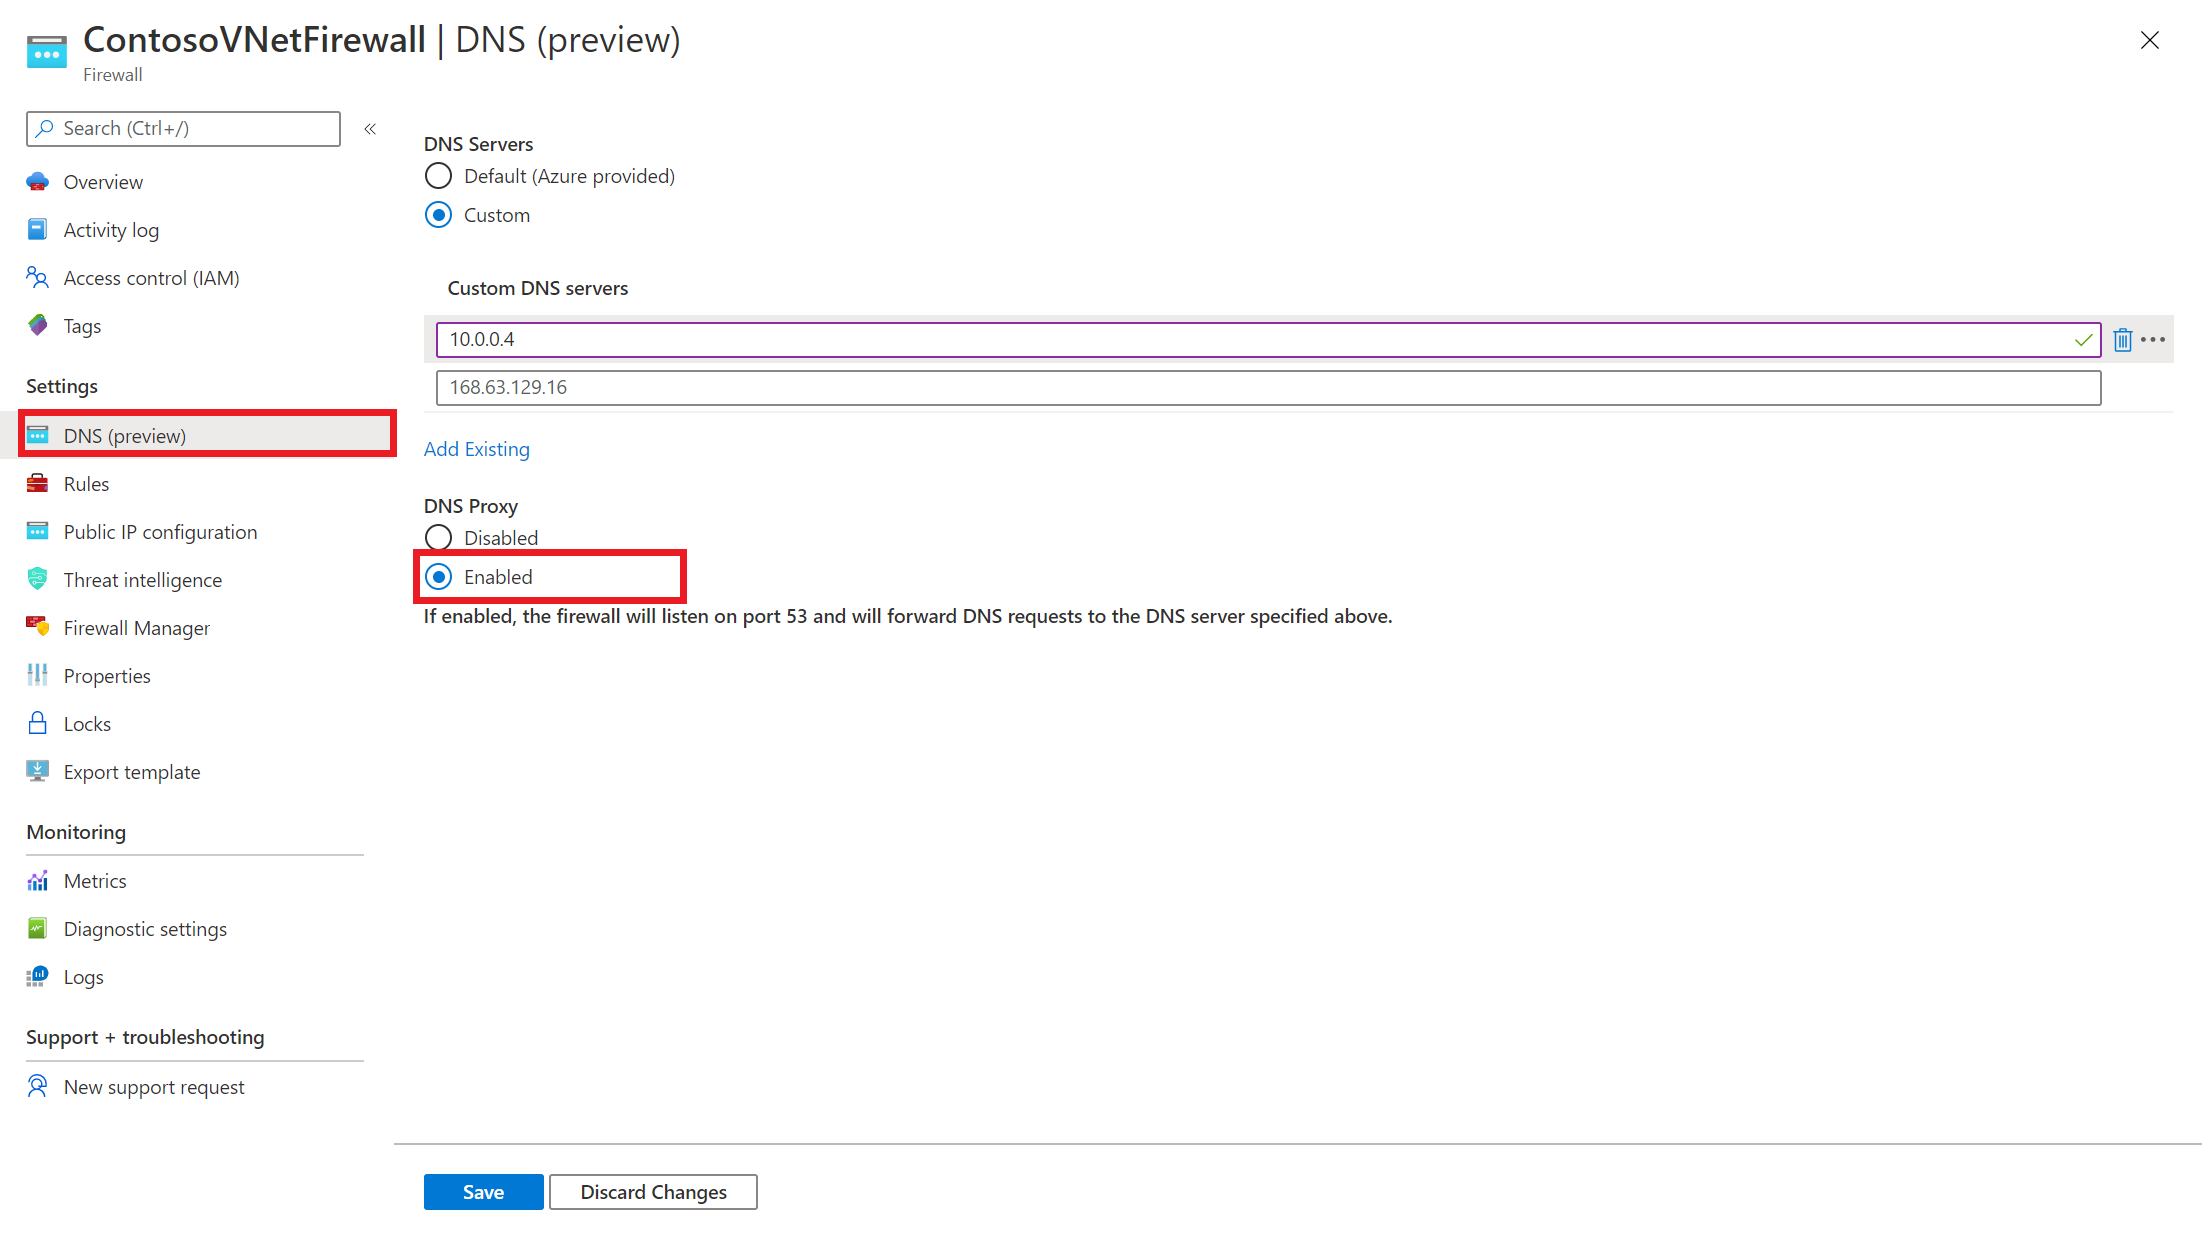
Включение DNS-прокси Enable DNS proxy
- Выберите экземпляр брандмауэра Azure. Select your Azure Firewall instance.
- В разделе Параметры выберите параметры DNS. Under Settings, select DNS settings.
- По умолчанию DNS-прокси отключен. By default, DNS Proxy is disabled. Если этот параметр включен, брандмауэр прослушивает порт 53 и перенаправляет запросы DNS на настроенные DNS-серверы. When this setting is enabled, the firewall listens on port 53 and forwards DNS requests to the configured DNS servers.
- Проверьте конфигурацию DNS-серверов и убедитесь, что параметры соответствуют вашей среде. Review the DNS servers configuration to make sure that the settings are appropriate for your environment.
- Щелкните Сохранить. Select Save.
Настройка прокси-сервера DNS — Azure CLI Configure DNS proxy — Azure CLI
Для настройки параметров прокси-сервера DNS в брандмауэре Azure можно использовать Azure CLI. You can use the Azure CLI to configure DNS proxy settings in Azure Firewall. Его также можно использовать для обновления виртуальных сетей, чтобы использовать брандмауэр Azure в качестве DNS-сервера. You can also use it to update virtual networks to use Azure Firewall as the DNS server.
Настройка DNS-серверов виртуальной сети Configure virtual network DNS servers
В следующем примере виртуальная сеть настраивается на использование брандмауэра Azure в качестве DNS-сервера. The following example configures the virtual network to use Azure Firewall as the DNS server.
Включение DNS-прокси Enable DNS proxy
В следующем примере включается функция прокси-сервера DNS в брандмауэре Azure. The following example enables the DNS proxy feature in Azure Firewall.
Настройка прокси-сервера DNS — Azure PowerShell Configure DNS proxy — Azure PowerShell
Для настройки параметров прокси-сервера DNS в брандмауэре Azure можно использовать Azure PowerShell. You can use Azure PowerShell to configure DNS proxy settings in Azure Firewall. Его также можно использовать для обновления виртуальных сетей, чтобы использовать брандмауэр Azure в качестве DNS-сервера. You can also use it to update virtual networks to use Azure Firewall as the DNS server.
Настройка DNS-серверов виртуальной сети Configure virtual network DNS servers
В следующем примере виртуальная сеть настраивается для использования брандмауэра Azure в качестве DNS-сервера. The following example configures the virtual network to use Azure Firewall as a DNS server.
Включение DNS-прокси Enable DNS proxy
В следующем примере включается функция прокси-сервера DNS в брандмауэре Azure. The following example enables the DNS proxy feature in Azure Firewall.
Step 5. Configure DNS and firewall settings
Applies to: Windows Server (Semi-Annual Channel), Windows Server 2016, Windows Server 2012 R2, Windows 10
In this step, you configure DNS and Firewall settings for VPN connectivity.
Configure DNS name resolution
When remote VPN clients connect, they use the same DNS servers that your internal clients use, which allows them to resolve names in the same manner as the rest of your internal workstations.
Because of this, you must ensure that the computer name that external clients use to connect to the VPN server matches the subject alternative name defined in certificates issued to the VPN server.
To ensure that remote clients can connect to your VPN server, you can create a DNS A (Host) record in your external DNS zone. The A record should use the certificate subject alternative name for the VPN server.
To add a host (A or AAAA) resource record to a zone
- On a DNS server, in Server Manager, select Tools, and then select DNS. DNS Manager opens.
- In the DNS Manager console tree, select the server that you want to manage.
- In the details pane, in Name, double-click Forward Lookup Zones to expand the view.
- In Forward Lookup Zones details, right-click the forward lookup zone to which you want to add a record, and then select New Host (A or AAAA). The New Host dialog box opens.
- In New Host, in Name, enter the certificate subject alternative name for the VPN server.
- In IP address, enter the IP address for the VPN server. You can enter the address in IP version 4 (IPv4) format to add a host (A) resource record, or IP version 6 (IPv6) format to add a host (AAAA) resource record.
- If you created a reverse lookup zone for a range of IP addresses, including the IP address that you entered, then select the Create associated pointer (PTR) record check box. Selecting this option creates an additional pointer (PTR) resource record in a reverse zone for this host, based on the information you entered in Name and IP address.
- Select Add Host.
Configure the Edge Firewall
The Edge Firewall separates the External Perimeter Network from the Public Internet. For a visual representation of this separation, see the illustration in the topic Always On VPN Technology Overview.
Your Edge Firewall must allow and forward specific ports to your VPN server. If you use Network Address Translation (NAT) on your edge firewall, you might need to enable port forwarding for User Datagram Protocol (UDP) portsВ 500 and 4500. Forward these ports to the IP address that is assigned to the external interface of your VPN server.
If you’re routing traffic inbound and performing NAT at or behind the VPN server, then you must open your firewall rules to allow UDP portsВ 500 and 4500 inbound to the external IP address applied to the public interface on the VPN server.
In either case, if your firewall supports deep packet inspection and you have difficulty establishing client connections, you should attempt to relax or disable deep packet inspection for IKE sessions.
For information on how to make these configuration changes, see your firewall documentation.
Configure the Internal Perimeter Network Firewall
The Internal Perimeter Network Firewall separates the Organization/Corporate Network from the Internal Perimeter Network. For a visual representation of this separation, see the illustration in the topic Always On VPN Technology Overview.
In this deployment, the Remote Access VPN server on the perimeter network is configured as a RADIUS client. The VPN server sends RADIUS traffic to the NPS on the corporate network and also receives RADIUS traffic from the NPS.
Configure the firewall to allow RADIUS traffic to flow in both directions.
The NPS server on the Organization/Corporate network functions as a RADIUS Server for the VPN Server, which is a RADIUS Client. For more information about the RADIUS infrastructure, see Network Policy Server (NPS).
RADIUS Traffic Ports on the VPN Server and NPS Server
By default, NPS and VPN listen for RADIUS traffic on ports 1812, 1813, 1645, and 1646 on all installed network adapters. If you enable Windows Firewall with Advanced Security when installing NPS, firewall exceptions for these ports get created automatically during the installation process for both IPv6 and IPv4 traffic.
If your network access servers are configured to send RADIUS traffic over ports other than these defaults, remove the exceptions created in Windows Firewall with Advanced Security during NPS installation, and create exceptions for the ports that you do use for RADIUS traffic.
Use the Same RADIUS Ports for the Internal Perimeter Network Firewall Configuration
If you use the default RADIUS port configuration on the VPN Server and the NPS Server, make sure that you open the following ports on the Internal Perimeter Network Firewall:
- Ports UDP1812, UDP1813, UDP1645, and UDP1646
If you are not using the default RADIUS ports in your NPS deployment, you must configure the firewall to allow RADIUS traffic on the ports that you are using. For more information, see Configure Firewalls for RADIUS Traffic.
Next steps
Step 6. Configure Windows 10 Client Always On VPN Connections: In this step, you configure the Windows 10 client computers to communicate with that infrastructure with a VPN connection. You can use several technologies to configure Windows 10 VPN clients, including Windows PowerShell, Microsoft Endpoint Configuration Manager, and Intune. All three require an XML VPN profile to configure the appropriate VPN settings.


