- How to enable or disable the Microsoft Windows Firewall
- Windows 8 and 10
- Disabling the Windows 8 or 10 firewall
- Enabling Windows 8 or 10 firewall
- Enable and disable the firewall in Windows Vista and Windows 7
- Disabling the Windows Vista and Windows 7 firewall
- Enabling Windows Vista and Windows 7 firewall
- Enable and disable the firewall in Windows XP
- Disabling the Windows XP firewall
- Enabling the Windows XP firewall
- Enable/disable firewall from command line
- Windows 10 / Windows 8/ Windows 7 / Server 2008 /Vista:
- Domain network
- Private network
- Public network
- Configure for all networks
- Older Windows versions – XP / Server 2003:
- Настройка правил брандмауэра Windows групповыми политиками
- Групповые политики, использующиеся для управления настройками Брандмауэра Защитника Windows
- Включаем Windows Firewall с помощью GPO
- Создаем правило файервола с помощью групповой политики
- Проверка политик брандмаэера Windows на клиентах
- Импорт / экспорт правил Брандмауэра Windows в GPO
- Доменные и локальные правила брандмауэра
- Несколько советов об управлении брандмауэром Windows через GPO
How to enable or disable the Microsoft Windows Firewall

Many users are interested in either enabling or disabling their Windows Firewall for various reasons. Some users want to utilize a different firewall, and some may have turned theirs off by accident. To proceed, select your version of Windows from the list below and follow the instructions.
Windows 8 and 10
If you’re looking to disable a firewall other than the one that comes with Windows, see: How do I disable the firewall program installed on my computer?
Disabling the Windows 8 or 10 firewall
Unless you are troubleshooting an issue or plan on installing another firewall, we recommend you don’t disable the Windows Firewall.
If you’re disabling the firewall because a program can’t access the Internet, see: How to open a port for program or game in Windows Firewall.
- Press the Windows key , type Windows Defender Firewall, and then press Enter .
- On the left side of the screen, under Control Panel Home, select Turn Windows Defender Firewall on or off.

- In the Customize Settingswindow, click the circle(s) next to Turn off Windows Defender Firewall for public networks, private networks, or both.

- When you’re finished, click the button.
Enabling Windows 8 or 10 firewall
Only one software firewall should be enabled at a time. If you have an antivirus or other security program installed with its own firewall, make sure it is disabled first.
- Press the Windows key , type Windows Defender Firewall, and then press Enter .
- On the left side of the screen, under Control Panel Home, select Turn Windows Defender Firewall on or off.
- In the Customize Settings window, click the circle(s) next to Turn on Windows Defender Firewall for public networks, private networks, or both.

- When you’re finished, click the button.
Enable and disable the firewall in Windows Vista and Windows 7
Microsoft Windows Vista and 7 come pre-installed with a firewall utility, although it may be disabled by default. Below are steps that can be followed to enable or disable the firewall in Windows. If you’re looking to disable a different firewall, see: How do I disable the firewall program installed on my computer?
Disabling the Windows Vista and Windows 7 firewall
Unless you are troubleshooting an issue or plan on installing another firewall, we recommend you don’t disable your Windows Firewall.
If you’re disabling the firewall because a program can’t access the Internet, see: How to open a port for program or game in Windows Firewall.
- Click Start and in the Search for Programs and Files text box, type firewall, and press Enter .
- In the search results, click Windows Firewall.
- If the Windows Firewall is enabled, the Windows Firewall state will be «on.» To turn it off, click Change settings or Turn Windows Firewall on or off in the left column.
- In the Firewall Settings window, select Off and click OK.
Enabling Windows Vista and Windows 7 firewall
Only one software firewall should be enabled at a time. If you have an antivirus or other security program installed with its own firewall, make sure it is disabled first.
- Click Start and in the Search for Programs and Files text box, type firewall, and press Enter .
- In the search results, click Windows Firewall.
- If the Windows Firewall is disabled, the Windows Firewall state will be off. If it is off, click Change settings or Turn Windows Firewall on or off in the left column.
- In the Firewall Settings window, select On and click OK.
Enable and disable the firewall in Windows XP
Although Microsoft Windows XP comes with a pre-installed firewall utility, by default, this feature is not enabled. Below are steps that can be followed to enable or disable this feature in Windows XP. If you’re looking for information about disabling a firewall other than that which comes with Windows, see: How do I disable the firewall program installed on my computer?
Disabling the Windows XP firewall
Unless you are troubleshooting an issue or plan on installing another firewall, we recommend you don’t disable your Windows Firewall.
If you’re disabling the firewall because a program can’t access the Internet, see: How to open a port for program or game in Windows Firewall.
- Open the Control Panel
- Open Network Connections.
- In the Network Connectionswindow, right-click the Local Area Connection and select Properties.
- In the Local Area Connection Properties window, click the Advancedtab.
- Finally, uncheck the Protect my computer and network by limiting or preventing access to this computer from the Internet option.
If you’re attempting to disable the Windows XP firewall, but this option is already unchecked, another developer’s firewall program may be installed on the computer.
Enabling the Windows XP firewall
Only one software firewall should be enabled at a time. If you have an antivirus or other security program installed with its own firewall, make sure it is disabled first.
Enable/disable firewall from command line
Windows firewall can be enabled/disabled from command line using netsh command.
Windows 10 / Windows 8/ Windows 7 / Server 2008 /Vista:
Let’s see the syntax of netsh advfirewall to configure firewall on these Windows versions. Firewall settings are different for each of the 3 networks(Domain, private, public). So based on which network firewall you want to enable/disable, the command would vary.
You can turn on firewall for the current network profile(does not matter if it’s domain/private/public network) using the below command.
Turn off firewall for the current profile:
These commands should be run from an elevated administrator command prompt. Otherwise you would get the below error.
To enable/disable firewall for a specific network profile, you can use the below commands.
Domain network
Turn on Domain network firewall:
Turn off domain network firewall:
Private network
Turn on private network firewall:
Turn off private network firewall:
Public network
Turn on public network firewall:
Turn off public network firewall:
Configure for all networks
Turn on firewall for all networks
Turn off firewall for all networks
Older Windows versions – XP / Server 2003:
Below is the command to turn on firewall.
The command to turn off firewall is:
Administrator privileges are required to configure firewall so above command can be run only from admin accounts.
netsh firewall is deprecated in new versions.
In Windows 10/ 8 / 7 / Vista/ Server 2008, ‘netsh firewall‘ command prints message like below.
running it from normal cmd give this error.
Open cmd as with ‘run as adminitrator’ option.
Awesome article, Thank you very much
Thank you very much
Thanks A lot for sharing knowledge
Wanna add note :
the old command netsh.exe firewall set opmode disable or enable this command was Used only with Public profile for windows to set it on Or off . But The new Command Specially this : Netsh.exe advfirewall set allprofiles state on (Perfect Command)
Really …… Thanks too much for sharing this I spent a long time in searching for such this this command because it’s Comprehensive for security issue .
Typo:
Turn on public network firewall:
netsh advfirewall set publicprofile state on
Turn on public network firewall:
__
netsh advfirewall set publicprofile state off
Just trying to help
Thank you very much
First article that solves all my issues with clear exampls
Настройка правил брандмауэра Windows групповыми политиками
Брандмауэр Windows позволяет ограничить исходящий / входящий сетевой трафик для определенного приложения или TCP/IP порта, и является популярным средством ограничения сетевого доступа к (от) рабочим станциям пользователей или серверам. Правила Windows Firewall можно настроить индивидуально на каждом компьютере, или, если компьютер пользователя включен в домен Windows, администратор может управлять настройками и правилами брандмауэра Windows с помощью групповых политик.
В крупных организация правила фильтрации портов обычно выносятся на уровень маршрутизатором, L3 коммутаторов или выделенных межсетевых экранах. Однако ничего не мешает вам распространить ваши правила ограничения сетевого доступа Windows Firewall к рабочим станциям или серверам Windows.
Групповые политики, использующиеся для управления настройками Брандмауэра Защитника Windows
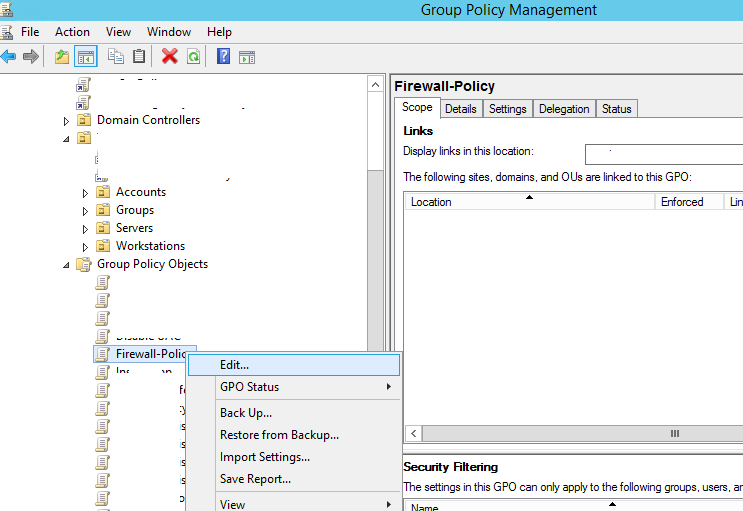
С помощью редактора доменной групповой политики (group Policy Management Console – gpmc.msc) создайте новую политику с именем Firewall-Policy и перейдите в режим редактирования (Edit).
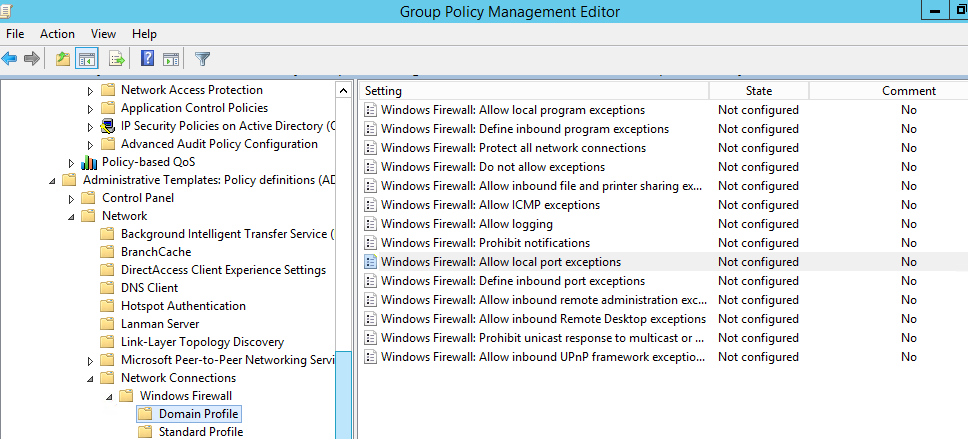
В консоли групповой политики есть две секции, в которых можно управлять настройками брандмауэра:
- Computer Configuration -> Administrative Templates -> Network -> Network Connections -> Windows Firewall – эта секция GPO использовалась для настройки правил брандмауэра для ОС Vista / Windows Server 2008 и ниже. Если у вас в домене нет компьютеров со старыми ОС, для настройки файервола используется следующая секция.
 Network -> Network Connections -> Windows Firewall » width=»609″ height=»276″ srcset=»https://winitpro.ru/wp-content/uploads/2018/12/administrative-templates-greater-network-greater-network-con.png 968w, https://winitpro.ru/wp-content/uploads/2018/12/administrative-templates-greater-network-greater-network-con-300×136.png 300w, https://winitpro.ru/wp-content/uploads/2018/12/administrative-templates-greater-network-greater-network-con-768×348.png 768w» sizes=»(max-width: 609px) 100vw, 609px»/>
 - Computer Configuration -> Windows Settings -> Security Settings -> Windows Firewall with Advanced Security – это актуальный раздел для настройки Брандмауэра Windows в современных версиях ОС и по интерфейсу он напоминает интерфейс локальной консоли управления Брандмауэра.
 Network -> Network Connections -> Windows Firewall » width=»609″ height=»276″ srcset=»https://winitpro.ru/wp-content/uploads/2018/12/administrative-templates-greater-network-greater-network-con.png 968w, https://winitpro.ru/wp-content/uploads/2018/12/administrative-templates-greater-network-greater-network-con-300×136.png 300w, https://winitpro.ru/wp-content/uploads/2018/12/administrative-templates-greater-network-greater-network-con-768×348.png 768w» sizes=»(max-width: 609px) 100vw, 609px»/>
Включаем Windows Firewall с помощью GPO
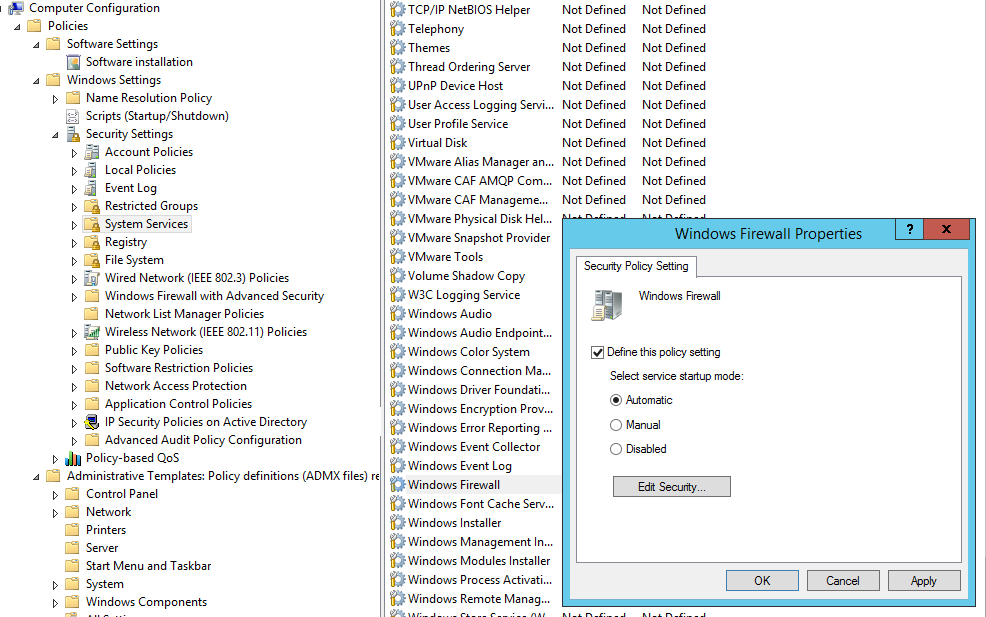
Чтобы пользователи (даже с правами локального админа) не могли выключить службу брандмауэра, желательно настроить автоматический запуск службы Windows Firewall через GPO. Для этого перейдите в раздел Computer Configuration- > Windows Settings -> Security Settings -> System Services. Найдите в списке служб Windows Firewall и измените тип запуск службы на автоматический (Define this policy setting -> Service startup mode Automatic). Убедитесь, что у пользователей нет прав на остановку службы.
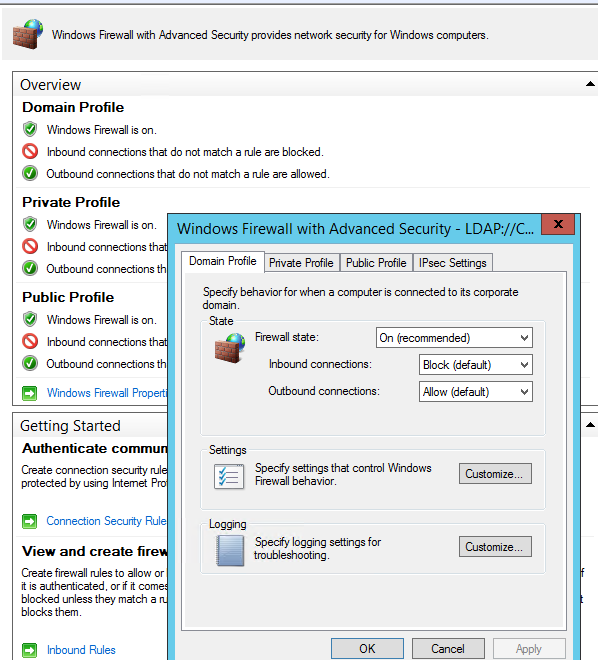
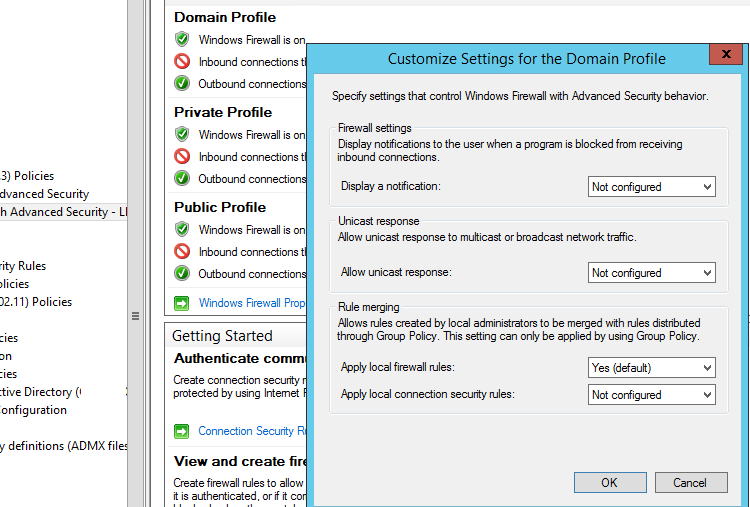
Перейдите в раздел консоли GPO Computer Configuration -> Windows Settings -> Security Settings. Щелкните ПКМ по Windows Firewall with Advanced Security и откройте свойства.
На всех трех вкладках Domain Profile, Private Profile и Public Profile (что такое профиль сети) измените состояние Firewall state на On (recommended). В зависимости от политик безопасности в вашей организации вы можете указать, что все входящие подключения по умолчанию запрещены(Inbound connections -> Block), а исходящие разрешены (Outbound connections -> Allow) и сохраните изменения.
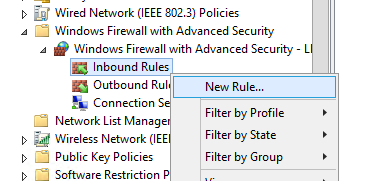
Создаем правило файервола с помощью групповой политики
Теперь попробуем создать разрешающее входящее правило файервола для всех. Например, мы хотим разрешить подключение к компьютерам по RDP (порт TCP 3389). Щелкните ПКМ по разделу Inbound Rules и выберите пункт меню New Rule.
Мастер создания правила брандмауэра очень похож на интерфейс локального Windows Firewall на обычном компьютере.
Выберите тип правила. Можно разрешить доступ для:
- Программы (Program) – можно выбрать исполняемый exe программы;
- Порта (Port) – выбрать TCP/UDP порт или диапазон портов;
- Преднастроенное правило (Predefined) – выбрать одно из стандартных правил Windows, в которых уже имеются правила доступа (описаны как исполняемые файлы, так и порты) к типовым службам (например, AD, Http, DFS, BranchCache, удаленная перезагрузка, SNMP, KMS и т.д.);
- Собственное правило (Custom) – здесь можно указать программу, протокол (другие протоколы помимо TCP и UDP, например, ICMP, GRE, L2TP, IGMP и т.д.), IP адреса клиентов или целые IP подсети.
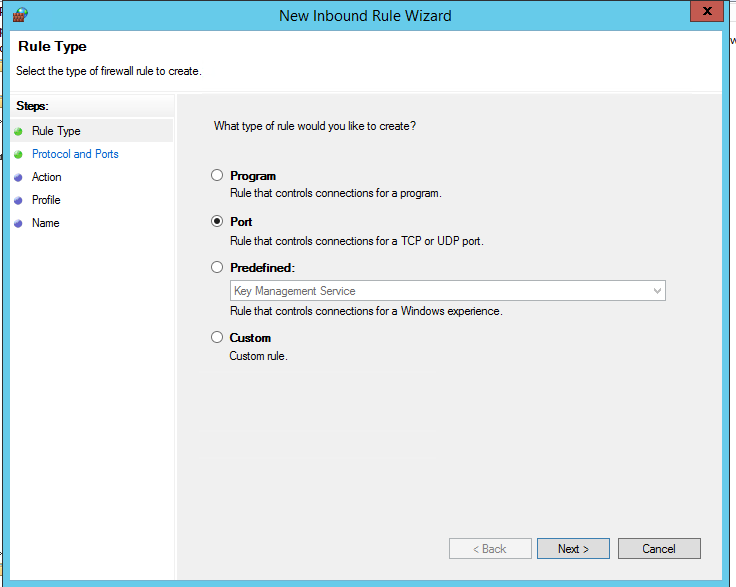
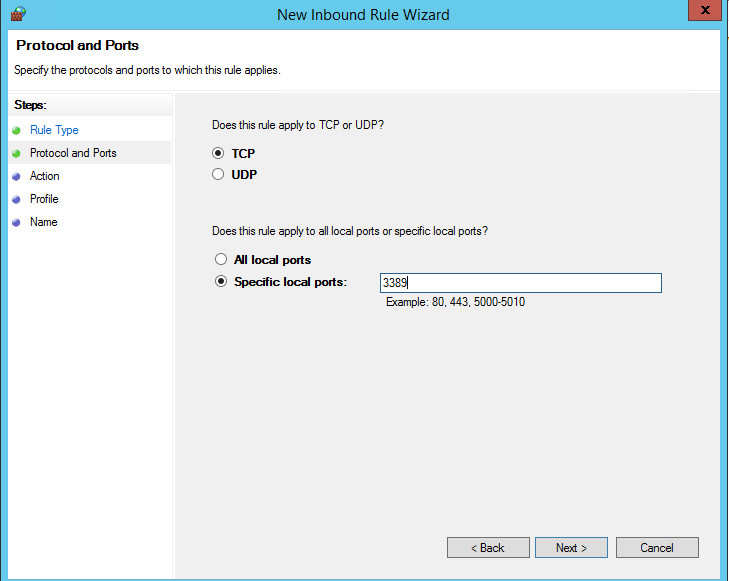
В нашем случае мы выберем правило Port. В качестве протокола укажем TCP, в качестве порта – порт 3389 (RDP порт по-умолчанию, можно изменить).
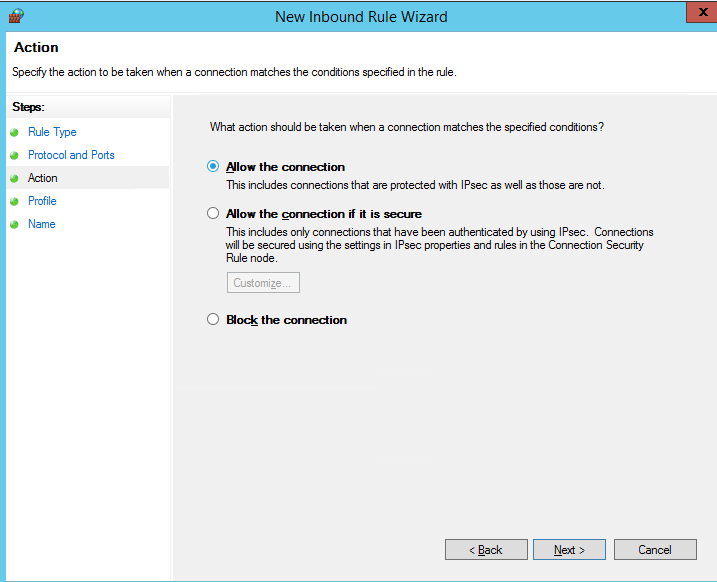
Далее нужно выбрать что нужно сделать с таким сетевым соединением: разрешить (Allow the connection), разрешить если оно безопасное или заблокировать (Block the connection).
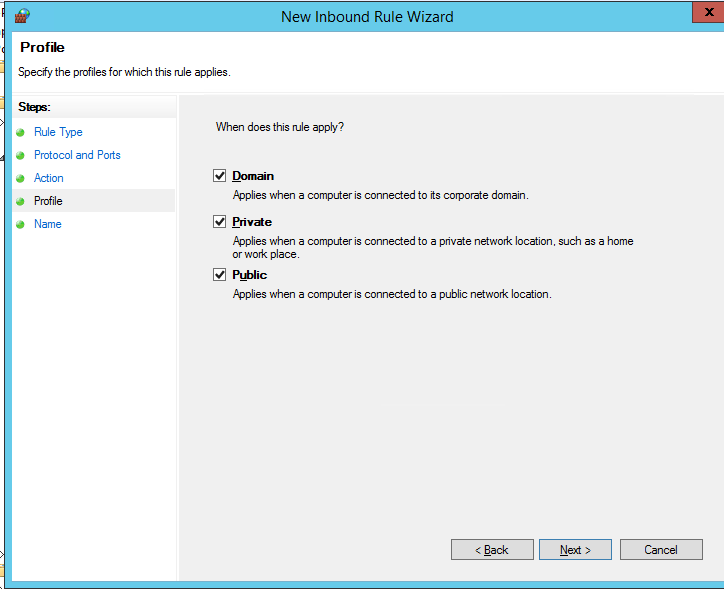
Осталось выбрать профили файервола, которым нужно применить правило. Можно оставить все профили (Domain, Private и Public).
На последнем шаге нужно указать имя правило и его описание. Нажмите кнопку Finish и оно появится в списке правил брандмауэра.
Аналогичным образом вы можете настроить другие правила для входящего трафика, которые должны применятся к вашим клиентам Windows.

Не забываете, что нужно создать правила для входящего и исходящего трафика.
Теперь осталось назначить политику Firewall-Policy на OU с компьютерами пользователей
Проверка политик брандмаэера Windows на клиентах
Обновите политики на клиентах (gpupdate /force). Проверьте, что указанные вами порты доступны на компьютерах пользователей (можно использовать командлет Test-NetConnection или утилиту Portqry).
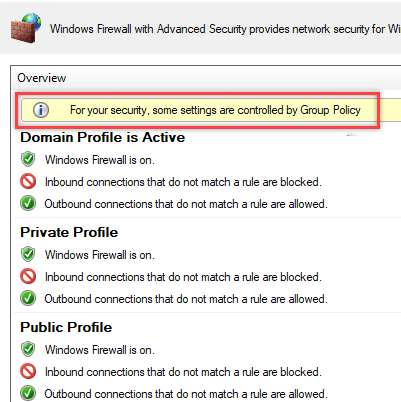
На ПК пользователя откройте Панель управления\Система и безопасность\Брандмауэр Защитника Windows и убедитесь, что появилась надпись: Для обеспечения безопасности, некоторые параметры управляются групповой политикой (For your security, some settings are controlled by Group Policy), и используются заданные вами настройки брандмаэера.
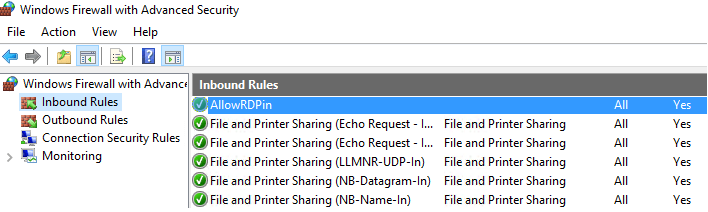
Пользователь теперь не может изменить настройки брандмауэра, а в списке Inbound Rules должны быть указаны все созданные вами правила.
Также вы можете вывести настройки файервола с помощью команды:
netsh firewall show state
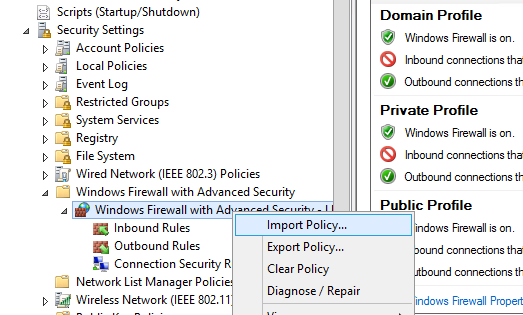
Импорт / экспорт правил Брандмауэра Windows в GPO
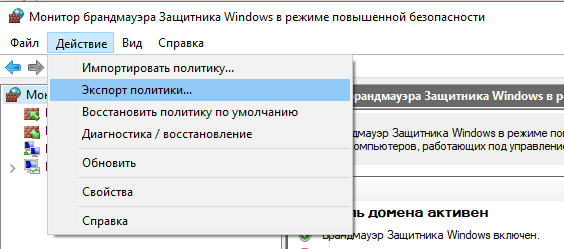
Конечно, процесс создания правил для брандмауэра Windows – очень кропотливое и долгое занятие (но результате того стоит). Для упрощения свое задачи можно воспользоваться возможностью импорт и экспорта настроек брандмауэра Windows. Для этого вам достаточно нужным образом настроить локальные правила брандмауэра на обычном рабочей станции. Затем встаньте на корень оснастки брандмауэра (Монитор Брандмауэра Защитника Windows в режиме повышенной безопасности) и выберите пункт Действие -> Экспорт политики.
Политика выгружается в WFW файл, который можно импортировать в редакторе Group Policy Management Editor, выбрав пункт Import Policy и указав путь к файлу wfw (текущие настройки будут перезаписаны).
Доменные и локальные правила брандмауэра
В зависимости от того, хотите ли вы, чтобы локальные администраторы могли создавать на своих компьютерах собственные правила брандмауэра и эти должны быть объединены с правилами, полученными с помощью групповой политики. в групповой политике вы можете выбрать режим объединения правил. Откройте свойства политики и обратите внимание на настройки в разделе Rule merging. По умолчанию режим объединения правил включен. Вы можете принудительно указать, что локальный администратор может создавать собственные правила брандмауэра: в параметре Apply local firewall rules выберите Yes (default).
Несколько советов об управлении брандмауэром Windows через GPO
Конечно, для серверов и рабочих станций нужно создавать отдельные политики управления правилами брандмауэра (для каждой группы одинаковых серверов возможно придется создать собственные политики в зависимости от их роли). Т.е. правила файервола для контроллера домена, почтового Exchange сервера и сервера SQL будут отличаться.
Какие порты нужно открыть для той или иной службы нужно искать в документации на сайте разработчика. Процесс довольно кропотливый и на первый взгляд сложный. Но постепенно вполне реальной придти к работоспособной конфигурации Windows файервола, который разрешает только одобренные подключения и блокирует все остальное. По опыту хочу отметить, что на ПО Microsoft можно довольно быстро найти список используемых TCP/UDP портов.


