- RootUsers
- Guides, tutorials, reviews and news for System Administrators.
- How To Enable Ping In Windows Server 2019 Firewall
- Allow ping through Windows Firewall
- Summary
- RootUsers
- Guides, tutorials, reviews and news for System Administrators.
- How To Enable Ping In Windows Server 2016 Firewall
- Allow ping through Windows Firewall
- Summary
- How to Allow Ping through the Firewall in Windows 10
- Allowing Ping through the Firewall in Windows 10
- Conclusion
- Создание правила ICMP для входящего трафика Create an Inbound ICMP Rule
RootUsers
Guides, tutorials, reviews and news for System Administrators.
How To Enable Ping In Windows Server 2019 Firewall
By default in Windows Server 2019 the Windows Firewall is configured to drop all inbound ICMP traffic. This includes echo requests which are used by the ping command, which can make network troubleshooting difficult.
In this guide we will cover how to allow ping through Windows Firewall in Windows Server 2019.
A common response is usually to simply disable Windows Firewall entirely, however this is not recommended as the Windows Firewall does a good job at providing a basic level of system protection. We will only be allowing the specific rules required to allow ping to succeed.
Allow ping through Windows Firewall
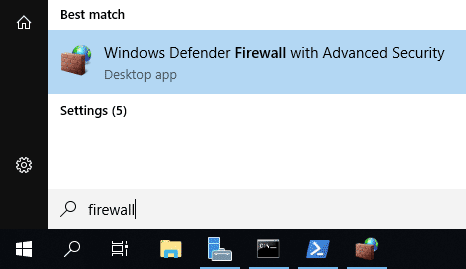
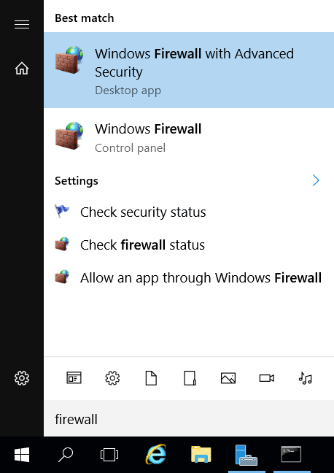
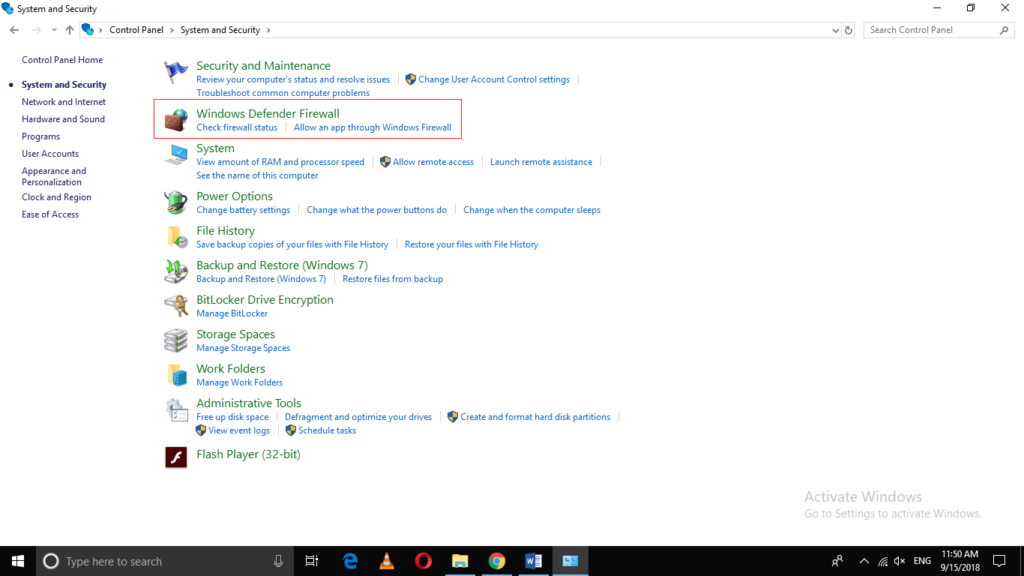
- First we need to open Windows Firewall, this can be done a few ways. My favourite method is to simply hit the Windows key to open start, then start typing firewall. As shown below Windows Firewall with Advanced Security should show, click this.

Alternatively you can simply type ‘firewall’ and press enter in PowerShell to open the basic firewall interface, then click “Advanced settings” on the left hand side – this will open the same interface listed in the start menu.
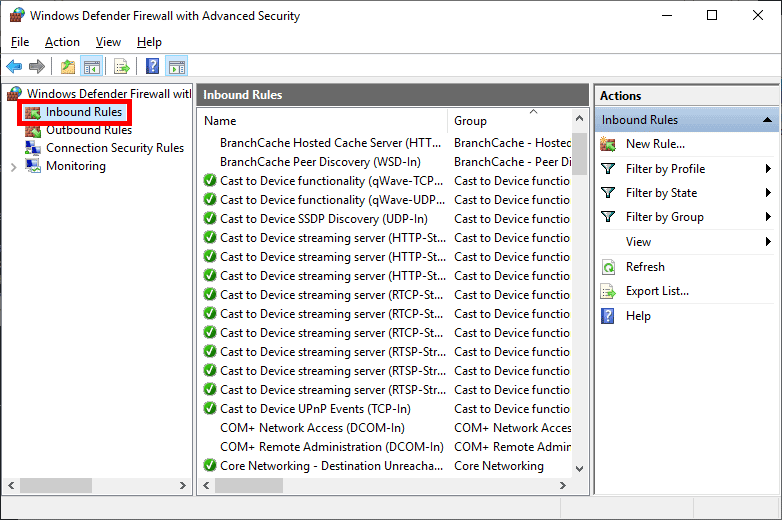
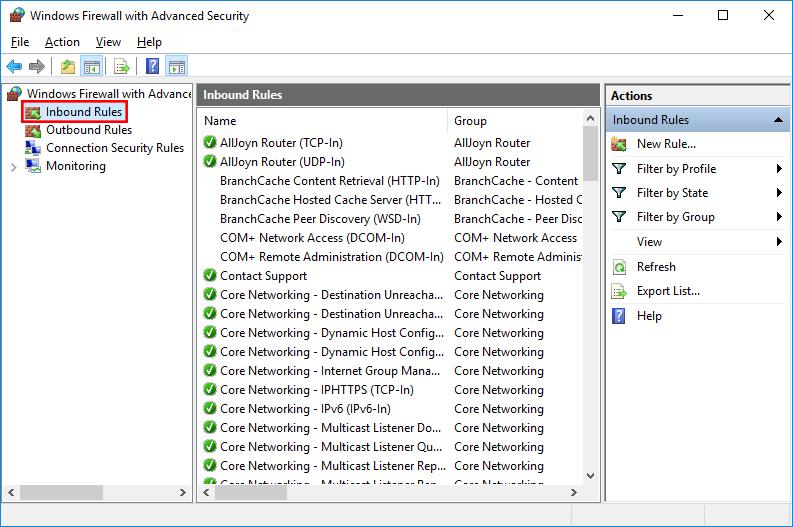
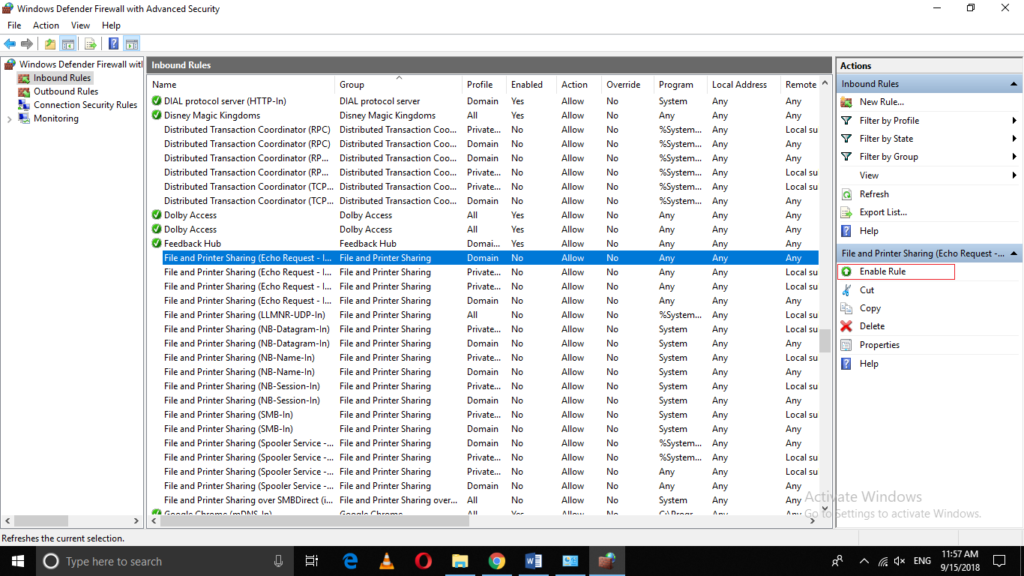
From the Windows Firewall with Advanced Security window that opens up, select Inbound Rules from the menu on the left.
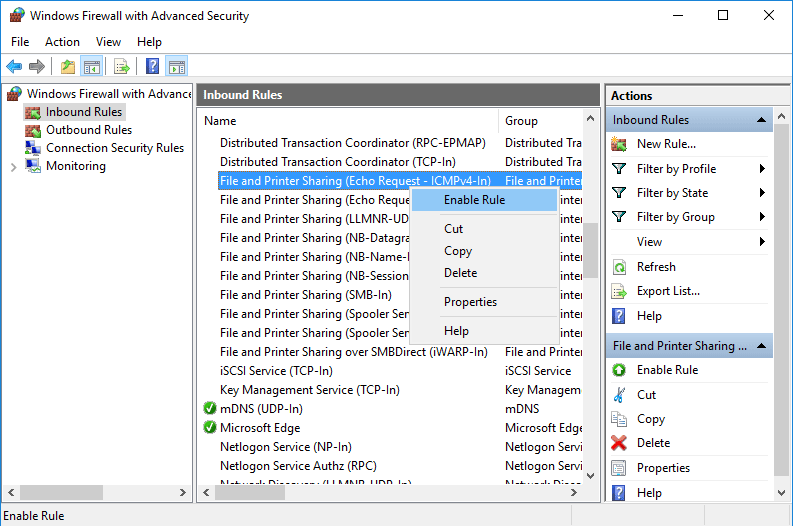
From the rules listed under Inbound Rules, select “File and printer Sharing (Echo Request – ICMPv4-In)” and enable the rule.
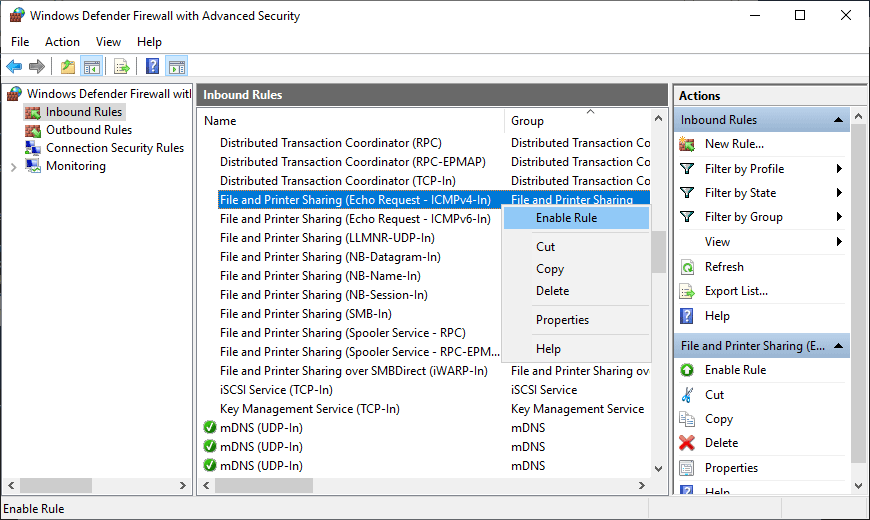
Note that this will only allow IPv4 requests in, if you need IPv6 then you will want to enable the “File and Printer Sharing (Echo Request – ICMPv6-In)” rule, listed just below.
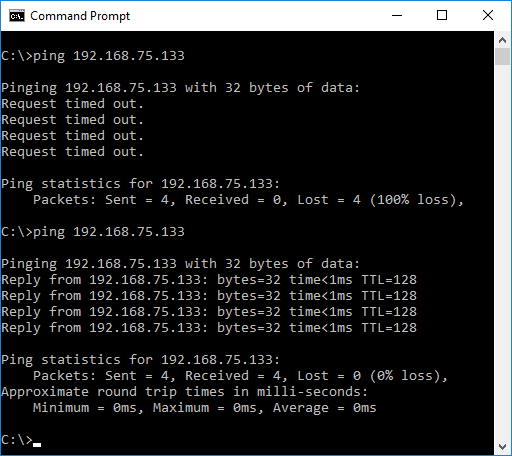
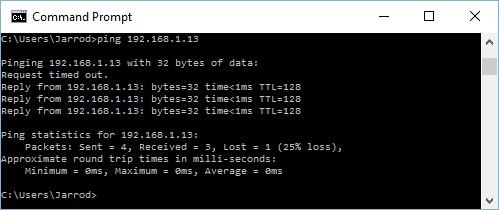
Once enabled the server should now respond to ping requests. From my desktop I begun to ping my Windows Server 2019 virtual machine at 192.168.75.133 before enabling the rule, and then again after enabling it. You can see below that the first requests timed out, as inbound ICMP requests were disabled by default in Windows Server 2019. After enabling the ICMP rule, the ping requests succeed, confirming that this is working as expected.
Summary
By Default Windows Firewall prevents ICMP echo requests, this results in the server not responding to ping. By enabling this firewall rule we have enabled ping in Windows Server 2019, which can help us with network troubleshooting.
RootUsers
Guides, tutorials, reviews and news for System Administrators.
How To Enable Ping In Windows Server 2016 Firewall
By default in Windows Server 2016 the Windows Firewall is configured to drop all inbound ICMP traffic. This includes echo requests which are common from ping, which can make network troubleshooting difficult.
Here we cover how to allow ping through Windows Firewall.
A common response is usually to simply disable the whole Windows Firewall, however this is not recommended as the Windows Firewall does a good job at providing a basic level of system protection. We will only be allowing the specific rules required to allow ping to succeed.
Allow ping through Windows Firewall
- First we need to open Windows Firewall, this can be done a few ways. My favourite method is to simply hit the Windows key to open start, then start typing firewall. As shown below Windows Firewall with Advanced Security should show, click this.
Alternatively you can simply type ‘firewall’ and press enter in PowerShell to open the same interface.
From the Windows Firewall with Advanced Security window that opens up, select Inbound Rules from the menu on the left.
From the rules listed under Inbound Rules, select “File and printer Sharing (Echo Request – ICMPv4-In)” and enable the rule.
Note that this will only allow IPv4 requests in, if you need IPv6 then you will want to enable the “File and Printer Sharing (Echo Request – ICMPv6-In)” rule.
Once enabled the server should now respond to ping requests. From my desktop I begun to ping my Windows Server 2016 virtual machine at 192.168.1.13 before enabling the rule. You can see the first request timed out. I then enabled the rule while the ping was running and the following requests succeeded, confirming that this is working as expected.
Summary
By Default Windows Firewall prevents ICMP echo requests, this results in the server not responding to ping. By enabling this firewall rule we have enabled ping, which can help us with network troubleshooting.
How to Allow Ping through the Firewall in Windows 10
Whenever Firewall is enabled on your computer system, no one can send ping requests to your system to know whether it is alive or not. You can stop this from happening by disabling the Firewall but this can prove to be very disastrous, as your PC will be exposed to external threats and malware. In this article, we will explain to you a method through which you can allow ping from the Firewall in Windows 10.
Allowing Ping through the Firewall in Windows 10
For allowing ping from the Firewall in Windows 10, you need to proceed as follows:
Type control panel in the search section of your taskbar and click on the search result to launch a new control panel window. The newly opened Control Panel window is shown in the following image:

Click on the System and Security tab located at the top left corner of the image shown above.
Now click on Windows Defender Firewall as highlighted in the image shown above.
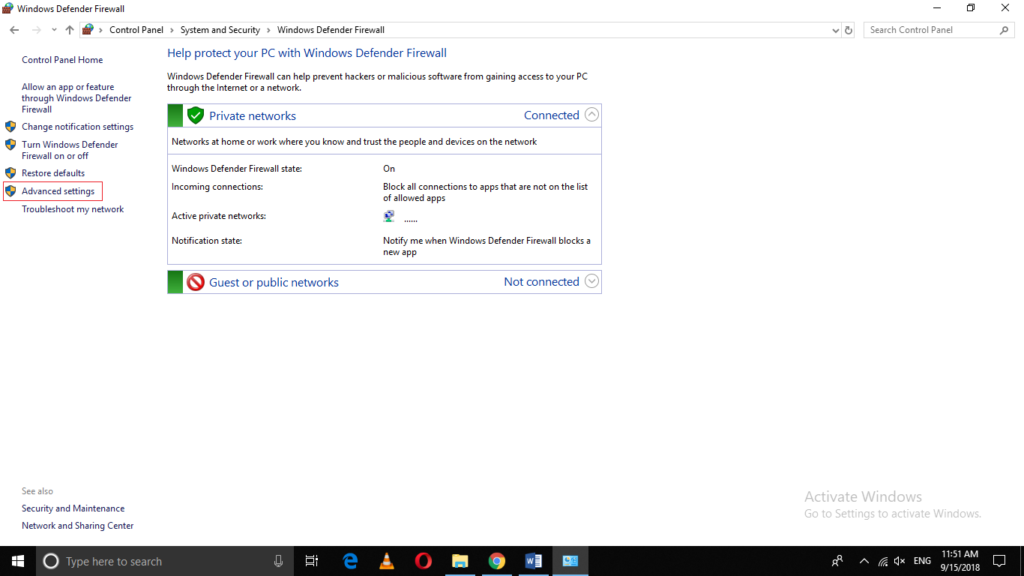
Click on Advanced Settings.
As soon as you will click on it, Windows Defender Firewall with Advanced Security window will appear as shown in the following image:
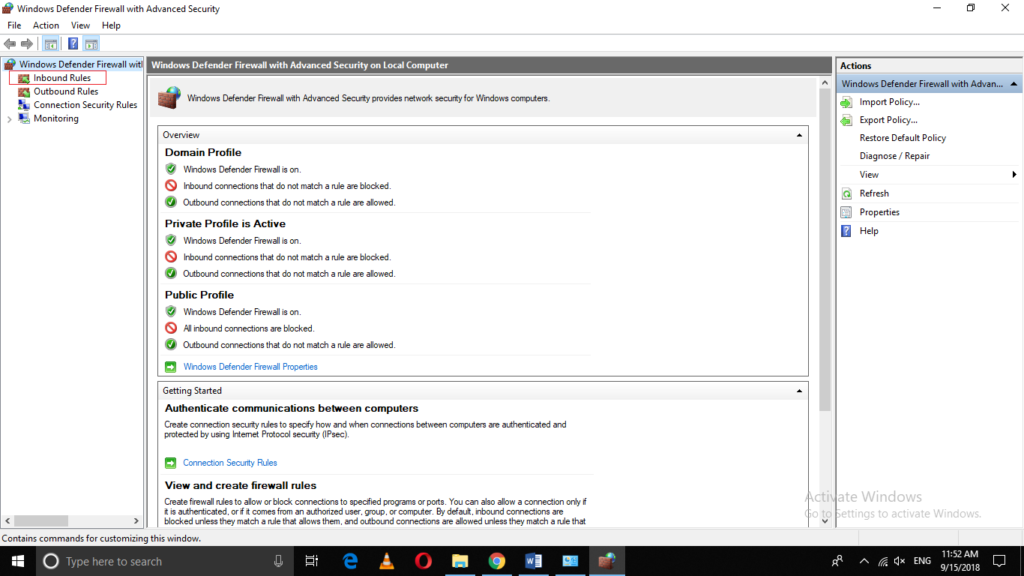
Now click on the Inbound Rules as highlighted in the image shown above.
Scroll down to locate “File and Printer Sharing (Echo Request – ICMPv4 – In)” as highlighted in the image shown below:
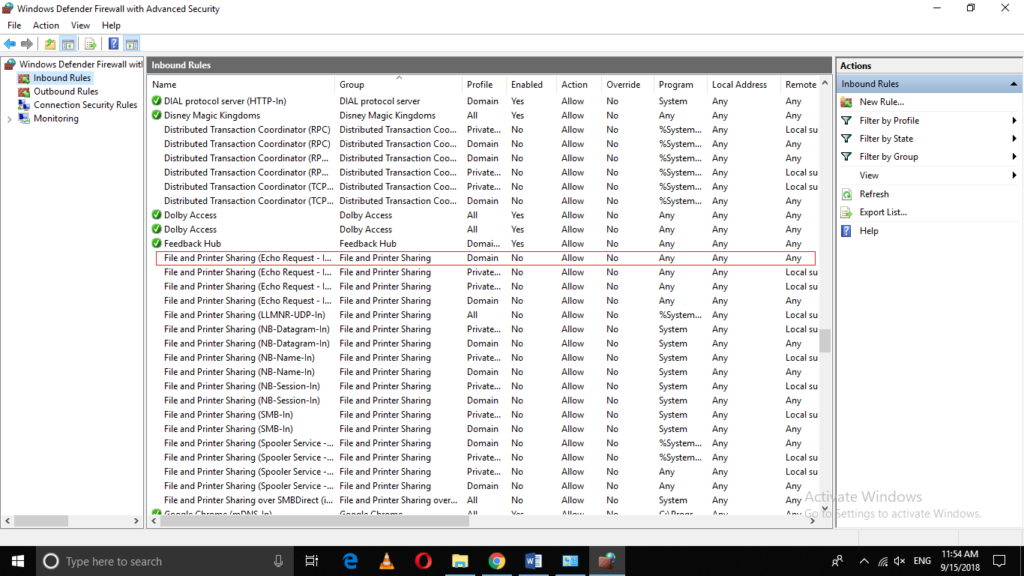
As soon as you manage to locate it, just click on it for once.
When you will click on it, some options will appear in the extreme right pane of the window as shown in the following image. Click on “Enable Rule” from these options in order to allow ping from the Firewall in Windows 10.
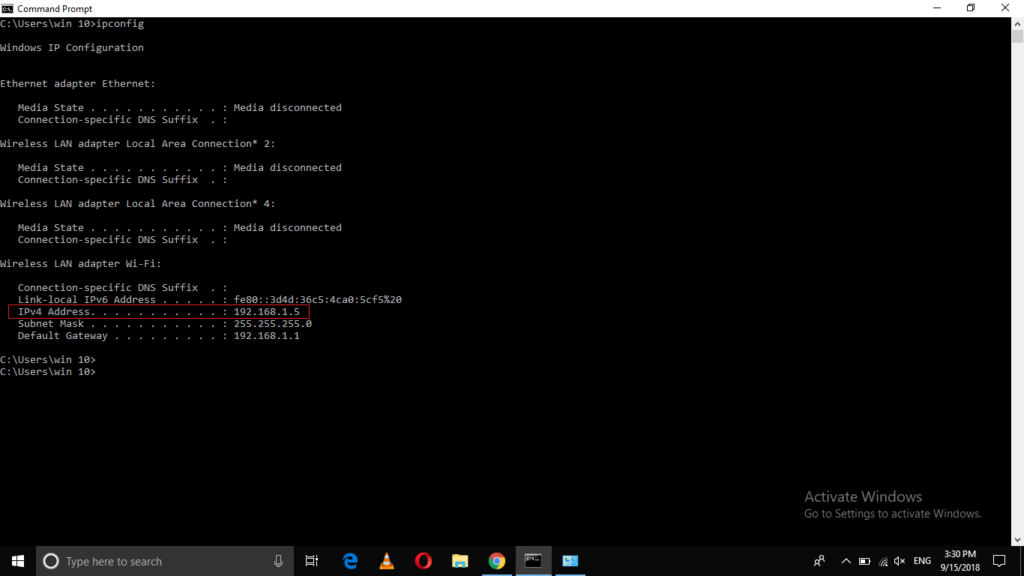
In this example, I have pinged my PC from another PC on the same network after enabling this rule. The IP address of my machine is highlighted in the following image:
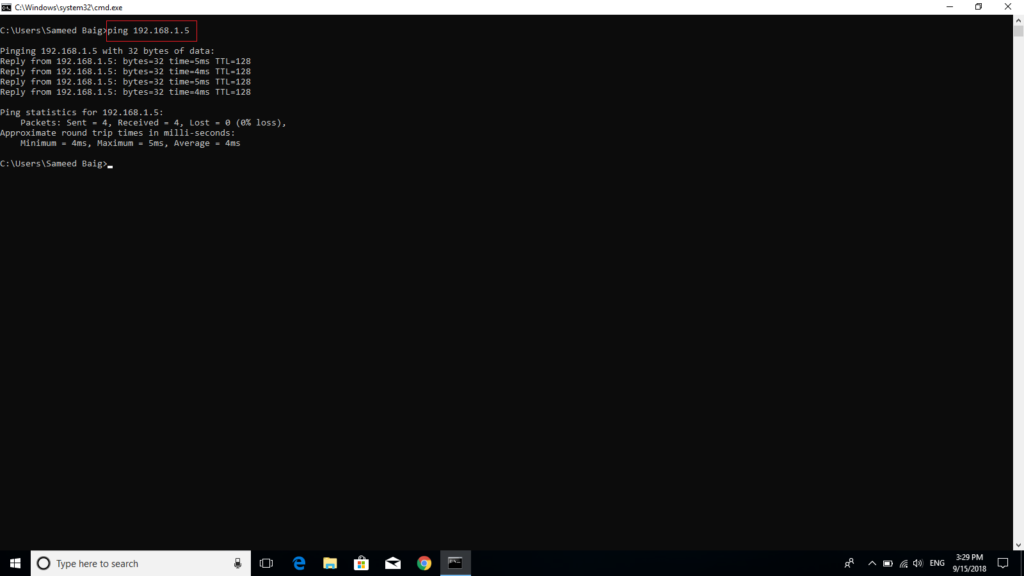
The image given below shows the success of ping from Firewall after enabling this rule.
Conclusion
By following the method discussed above, you can easily allow ping from the Firewall in Windows 10 without disabling your Firewall and exposing your system to external threats. Whenever you want to disable the ping requests from the Firewall, just follow the same steps and as soon as you will locate that rule, just click on it and then select “Disable Rule”.
Создание правила ICMP для входящего трафика Create an Inbound ICMP Rule
Область применения Applies to
- Windows 10 Windows 10
- Windows Server 2016 Windows Server 2016
Чтобы разрешить входящий сетевой трафик ICMP, создайте правила брандмауэра с помощью брандмауэра Защитник Windows с дополнительными службами безопасности в оснастке управления групповыми политиками MMC. To allow inbound Internet Control Message Protocol (ICMP) network traffic, use the Windows Defender Firewall with Advanced Security node in the Group Policy Management MMC snap-in to create firewall rules. Этот тип правила позволяет компьютерам в сети отправить и получить запросы и ответы ICMP. This type of rule allows ICMP requests and responses to be sent and received by computers on the network.
Учетные данные администратора Administrative credentials
Для выполнения этих процедур необходимо быть членом группы «Администраторы домена» или получить другие делегирование разрешений на изменение таких групп. To complete these procedures, you must be a member of the Domain Administrators group, or otherwise be delegated permissions to modify the GPOs.
В этом разделе описывается создание правила порта, которое разрешает входящий сетевой трафик ICMP. This topic describes how to create a port rule that allows inbound ICMP network traffic. Другие типы правил входящие порты см. в: For other inbound port rule types, see:
Создание правила ICMP для входящие ICMP To create an inbound ICMP rule
Откройте консоль управления групповыми политиками для Защитник Windows брандмауэра с расширенными мерами безопасности. Open the Group Policy Management Console to Windows Defender Firewall with Advanced Security.
В области навигации щелкните «Правила для входящие». In the navigation pane, click Inbound Rules.
Щелкните «Действие» и выберите «Новое правило». Click Action, and then click New rule.
На странице «Тип правила» мастера «Новые правила для входящие» щелкните «Настраиваемый» и нажмите кнопку «Далее». On the Rule Type page of the New Inbound Rule Wizard, click Custom, and then click Next.
На странице «Программа» щелкните «Все программы» и нажмите кнопку «Далее». On the Program page, click All programs, and then click Next.
На странице «Протокол и порты» выберите ICMPv4 или ICMPv6 в списке типов протокола. On the Protocol and Ports page, select ICMPv4 or ICMPv6 from the Protocol type list. Если в сети используются как IPv4, так и IPv6, необходимо создать отдельное правило ICMP для каждого из них. If you use both IPv4 and IPv6 on your network, you must create a separate ICMP rule for each.
Нажмите кнопку «Настроить». Click Customize.
В диалоговом окне «Настройка параметров ICMP» сделайте одно из следующих параметров: In the Customize ICMP Settings dialog box, do one of the following:
Чтобы разрешить весь сетевой трафик ICMP, щелкните «Все типы ICMP» и нажмите кнопку «ОК». To allow all ICMP network traffic, click All ICMP types, and then click OK.
Чтобы выбрать один из предварительно определенных типов ICMP, щелкните «Определенные типы ICMP», а затем выберите каждый тип в списке, который необходимо разрешить. To select one of the predefined ICMP types, click Specific ICMP types, and then select each type in the list that you want to allow. Нажмите кнопку ОК. Click OK.
Чтобы выбрать тип ICMP, который не будет отображаться в списке, щелкните «Определенные **** типы ICMP», выберите в списке номер типа, выберите в списке код, нажмите кнопку «Добавить» и выберите в списке только что созданную запись. **** **** To select an ICMP type that does not appear in the list, click Specific ICMP types, select the Type number from the list, select the Code number from the list, click Add, and then select the newly created entry from the list. Нажмите ОК Click OK
Нажмите кнопку Далее. Click Next.
На странице «Область» можно указать, что правило применяется только к сетевому трафику с IP-адресов, введенного на этой странице, или с них. On the Scope page, you can specify that the rule applies only to network traffic to or from the IP addresses entered on this page. Настройте его соответствующим образом и нажмите кнопку «Далее». Configure as appropriate for your design, and then click Next.
На странице действий выберите «Разрешить подключение» и нажмите кнопку «Далее». On the Action page, select Allow the connection, and then click Next.
На странице «Профиль» выберите типы сетевых расположений, к которым применяется это правило, и нажмите кнопку «Далее». On the Profile page, select the network location types to which this rule applies, and then click Next.
На странице «Имя» введите имя и описание правила и нажмите кнопку «Готово». On the Name page, type a name and description for your rule, and then click Finish.


