- How to Disable Windows Defender Firewall on Windows 10
- How to turn off Windows Defender Firewall using Control Panel:
- Disable Windows Defender Firewall using Command Prompt:
- How to Turn off Firewall in Windows 10
- Turn Off Windows 10 Firewall
- How to Disable the Windows Firewall in Windows 10, 8, 7, Vista and XP
- Steps on how to disable the firewall in any version of Windows
- Disable the Firewall in Windows 10, 8, and 7
- Disable the Firewall in Windows Vista
- Disable the Firewall in Windows XP
How to Disable Windows Defender Firewall on Windows 10

Windows Defender Firewall is a proprietary data screening feature that was introduced by Microsoft with Windows XP and has continued on to improve ever since. Each iteration packs new improvements that are tailored to protect you against malware and other security problems that the internet entails.
But it can also prevent you from making certain network changes or block the connection privileges of some apps on your Windows 10 PC. If you wish to disable Windows Defender Firewall on Windows 10 for whatever reasons (and are aware of the associated risks), here is how you can do it via Control Panel and Command Prompt.
How to turn off Windows Defender Firewall using Control Panel:
- Open the Start menu and type control panel in the search bar. Click on the Control Panel app to proceed.

- Select the System and Security tab in the Control Panel.
- Click on Windows Defender Firewall to open the menu and continue the disabling process.
- This menu would inform you whether private or public networks are connected to the Firewall. Click on the Turn Windows Defender Firewall on or off option that is present in the middle-left corner.
- Since the Firewall is active on the Public Network here, only the Public Network settings need to be changed or you can change both the settings if your network connections vary from time to time. Simply select Turn off Windows Defender Firewall and click OK.
- Windows will prompt you with a confirmation that the Firewall has been turned off for your PC.


Disable Windows Defender Firewall using Command Prompt:
You can also harness the potential of Command Prompt to turn off Windows Firewall on your Windows 10 PC:
- Open the Start menu and type cmd in the search bar. Click on the Command Prompt app to proceed.
- In order to check the current status of the Windows Firewall on your PC, type the command below and press Enter to generate a detailed status report of the Firewall.

Netsh Advfirewall show allprofiles

Now to turn off the Windows Firewall entirely, type the below command and press Enter to disable the Windows Firewall.
NetSh Advfirewall set allprofiles state off


If you wish to enable the Windows Firewall on your PC again, all you have to do is type the command below and press Enter to revert the changes that you had made previously:
NetSh Advfirewall set allprofiles state on

Please note that turning off the Windows Defender Firewall on Windows 10 can grant you command over the data packets sent and received, which allows you to monitor and customize the influx of data yourself. But there are security risks attached to it because your system is now vulnerable to malware and other kinds of threats. It is not recommended to disable your Firewall and even if you do then make sure you either have a backup or you turn it on after your task is completed.
How to Turn off Firewall in Windows 10
A firewall is used to keep unauthorized users from accessing files and resources on your computer. Unfortunately, the Windows firewall is not perfect and can cause harm to your computer. There is better firewall software available for windows, so you might want to turn it off and use some other software. Below are the steps to disable the Windows 10 firewall.
Turn Off Windows 10 Firewall
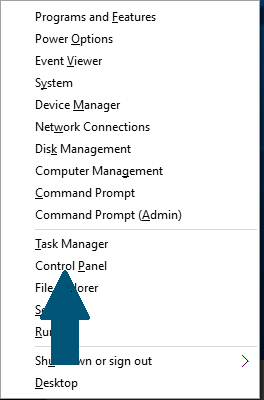
Step 1: Press and hold the Windows icon key and X. Scroll up the menu and click Control Panel
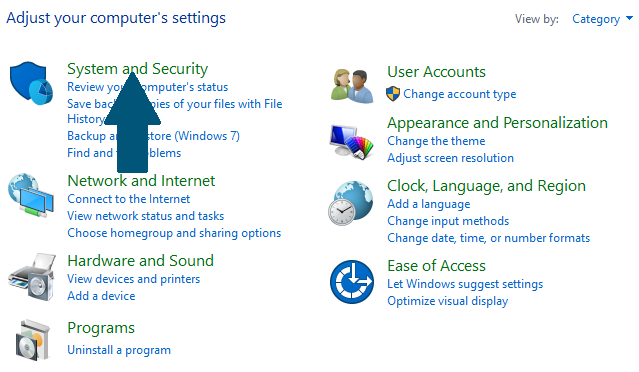
Step 2: Click System and Security
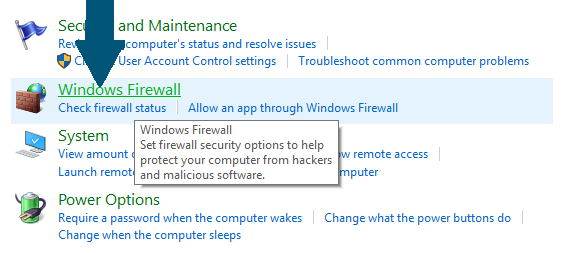
Step 3: Click Windows Firewall
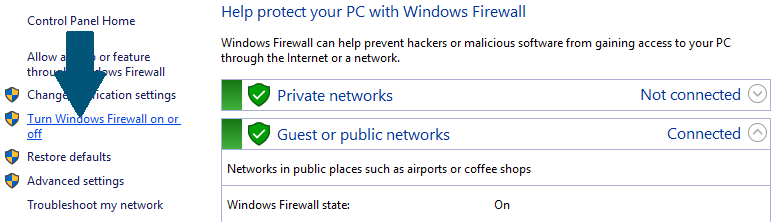
Step 4: Disable Firewall — Click Turn Windows Firewall on or off
Step 5: Choose to Turn off the Windows Firewall (not recommended) for both Private and Public network settings and then click OK
This tutorial showed you how to Disable the Windows 10 Firewall in 5 easy steps.
How to Disable the Windows Firewall in Windows 10, 8, 7, Vista and XP
Steps on how to disable the firewall in any version of Windows
:max_bytes(150000):strip_icc()/tim-fisher-5820c8345f9b581c0b5a63cf.jpg)
The Windows Firewall is designed to help keep unauthorized users from accessing files and resources on your computer. A firewall is a must-have if you’re concerned about your computer’s safety.
Unfortunately, the Windows Firewall is far from perfect and can sometimes cause more harm than good, especially if there’s another firewall program installed.
Don’t disable the Windows Firewall unless you have a good reason, but if you have another security program performing the same functions, feel free.
:max_bytes(150000):strip_icc()/how-to-disable-the-windows-firewall-2624505-488841cd557c4476860618743ff5eea5.png)
Time Required: Disabling the Windows Firewall is easy and usually takes less than 10 minutes
There are separate directions below for Windows 10, Windows 8, Windows 7, Windows Vista, and Windows XP. See What Version of Windows Do I Have? if you’re not sure which steps to follow along with.
Disable the Firewall in Windows 10, 8, and 7
The steps for turning off the Windows Firewall in Windows 7 and newer versions of Windows is basically identical.
The screenshots in this section apply to Windows 10 only. Your screen will look slightly different if you’re using Windows 8 or Windows 7.
You can do this a number of ways, but the easiest method is to search for it in Windows 10 and 8, or select it from the Start menu in Windows 7.
:max_bytes(150000):strip_icc()/001_2624505-5ba968f446e0fb00257b67e2.jpg)
Select System and Security.
:max_bytes(150000):strip_icc()/002_2624505-5ba96914c9e77c0050e6928a.jpg)
That link is only visible if you have the «View by:» option set to «Category.» If you’re viewing the Control Panel applets in icon view, just skip down to the next step.
Choose Windows Firewall.
:max_bytes(150000):strip_icc()/003_2624505-5ba9694cc9e77c0050e69cdb.jpg)
Depending on how your computer is set up, it might instead be called Windows Defender Firewall. If so, treat every instance of «Windows Firewall» below as if it read «Windows Defender Firewall.»
Select Turn Windows Firewall on or off on the left side of the screen.
:max_bytes(150000):strip_icc()/004_2624505-5ba9698546e0fb00257b858d.jpg)
A really quick way to get to this screen is via the control firewall.cpl command line command, which you can execute in Command Prompt or the Run dialog box.
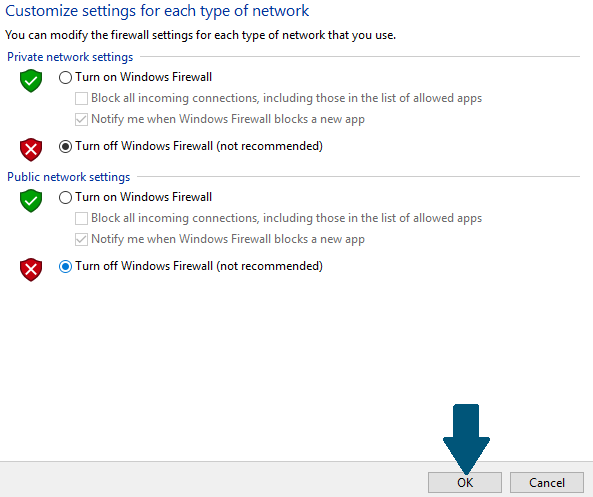
Select the bubble next to Turn off Windows Firewall (not recommended).
:max_bytes(150000):strip_icc()/005_2624505-5ba969ba46e0fb00257b8e9d.jpg)
You can disable the Windows Firewall for private networks only, just for public networks, or for both. To disable it for both network types, you have to make sure to select Turn off Windows Firewall (not recommended) in both the private and the public section.
Select OK to save the changes.
Now that the firewall is disabled, repeat whatever steps caused your problem to see if disabling this option has fixed the issue.
Disable the Firewall in Windows Vista
The Windows Firewall can be turned off in Windows Vista through Control Panel, similar to how it’s done in other versions of Windows.
Select Control Panel from the Start menu.
:max_bytes(150000):strip_icc()/001_how-to-disable-the-windows-firewall-2624505-5c47a8ca46e0fb0001c956ff.jpg)
Choose Security from the category list.
:max_bytes(150000):strip_icc()/002_how-to-disable-the-windows-firewall-2624505-5c47a8ffc9e77c0001d03e65.jpg)
If you’re in the «Classic View» of Control Panel, just skip down to the next step.
Select Windows Firewall.
:max_bytes(150000):strip_icc()/004_how-to-disable-the-windows-firewall-2624505-5c47a91a46e0fb0001c96754.jpg)
Choose Turn Windows Firewall on or off on the left side of the window.
:max_bytes(150000):strip_icc()/005_how-to-disable-the-windows-firewall-2624505-5c47a932c9e77c00013af8fc.jpg)
If a User Account Control window pops up, go ahead and click/tap through it by either entering an admin password or selecting Continue.
If you need to access this window again more quickly in the future, you can use the control firewall.cpl command in the Run dialog box.
Open the General tab and select the bubble next to Off (not recommended).
:max_bytes(150000):strip_icc()/006_how-to-disable-the-windows-firewall-2624505-5c47a951c9e77c00013b0081.jpg)
Select OK to apply the changes.
Disable the Firewall in Windows XP
Directions for turning off the Windows XP firewall is significantly different than it is in newer versions of Windows, but it’s still fairly simple.
Go to Start and then Control Panel.
:max_bytes(150000):strip_icc()/007_how-to-disable-the-windows-firewall-2624505-5c47a96a4cedfd0001eff674.jpg)
Select Network and Internet Connections.
:max_bytes(150000):strip_icc()/008_how-to-disable-the-windows-firewall-2624505-5c47a98446e0fb0001ec41dd.jpg)
If you’re viewing the «Classic View» of Control Panel, open Network Connections and skip to Step 4.
Choose Network Connections under the or pick a Control Panel icon section.
:max_bytes(150000):strip_icc()/009_how-to-disable-the-windows-firewall-2624505-5c47a9b246e0fb0001c98ab2.jpg)
Right-click or tap-and-hold your network connection and choose Properties.
:max_bytes(150000):strip_icc()/010_how-to-disable-the-windows-firewall-2624505-5c47a9cf4cedfd0001f01302.jpg)
If you have a «high speed» internet connection like Cable or DSL, or are on a network of some kind, your network connection will likely be titled Local Area Connection.
Open the Advanced tab and select Settings.
:max_bytes(150000):strip_icc()/011_how-to-disable-the-windows-firewall-2624505-5c47a9f7c9e77c0001d07a12.jpg)
Choose the Off (not recommended) radio button.
:max_bytes(150000):strip_icc()/012_how-to-disable-the-windows-firewall-2624505-5c47aa23c9e77c000189f3e1.jpg)
Windows Firewall settings can also be opened with a simple shortcut via the Run dialog box or Command Prompt. Just enter this command: control firewall.cpl.
Select OK in this window and then OK again in the Properties window of your network connection. You can also close the Network Connections window.


