- Was your VPN blocked by Windows Firewall? How to fix it
- 5 Best VPNs we recommend
- What can I do if my VPN got blocked by Windows Firewall?
- 1. Change your VPN
- Private Internet Access
- 2. Add an exclusion
- 3. Change Allow app settings
- 4. Change adapter settings
- 5. Create a new inbound rule
- 6. Enable rule for PPTP
- 7. Open ports
- 8. Turn off SSL monitoring
- Frequently Asked Questions
- Does a vpn block firewall?
- Can a firewall block a vpn?
- Does event log viewer show vpn failures or firewall block?
- Настройка Брандмауэра Windows для подключений из сети за VPN-сервером Keenetic
Was your VPN blocked by Windows Firewall? How to fix it

- Windows Firewall’s role is to protect you from incoming connections and the VPN to encrypt outgoing information.
- If the VPN is blocked by the firewall, its functionality will be compromised and your privacy put at risk.
- Oftentimes, the solution is simply restarting your PC or the VPN, but sometimes it’s more complicated.
- Check out our guide and learn how you can make your firewall and VPN get together for your privacy’s sake.
Millions of Internet users across the globe are using VPNs to encrypt and secure their data while keeping their browsing anonymous online.
VPNs also help users bypass geo-restrictions and unblock content from sites they otherwise wouldn’t be able to access, while anonymous.
However, many of these users face difficulties when trying to install and/or launch their VPN client on Windows, and usually, it is blocked by a firewall or other security software in place.
If you experience your VPN block issues by Windows Firewall, in most cases it is a default setting, but there are ways to get around it and get connected again. Use the solutions below to do this.
5 Best VPNs we recommend
| 79% Off + 2 free Months |  Check offer! Check offer! | |
| 83% Off (2.25$/Month) + 3 free Months | Check offer! | |
| 68% Off + 1, 12 or 24 free Months (random prize) | Check offer! | |
| 83% Off (2.21$/Month) + 3 free Months | Check offer! | |
| 76% (2.83$) on 2 Years plan | Check offer! |
What can I do if my VPN got blocked by Windows Firewall?
1. Change your VPN

You can change your VPN and see if it resolves the issue. Normally, an established VPN provider has a good client that will work great together with Windows Firewall.
A great VPN, recommended below, is owned by Kape Technologies and has servers located all around the world.
It supports high data speeds, which makes it a fast VPN for Windows operating system, besides its powerful features and performance.
It is a favorite among the best VPN software for laptops as it not only protects your privacy on a multi-platform privacy solution but also offers reliable connections.
Here are the top reasons we enjoy this VPN:
- Very efficient at encrypting data using strong protocols
- Easy to install and use
- Use it on 10 devices simultaneously so all family members can enjoy
- Good value and features for the money
Private Internet Access
PIA has no issues getting blocked by Windows 10’s Firewall. Get it now at a discount price for a limited time only!
2. Add an exclusion
- Open Windows Defender Security Center
- Go to Virus & Threat protection settings

- Select Exclusions
- Select Add or remove exclusions
- Select Add an exclusion and add your VPN client software
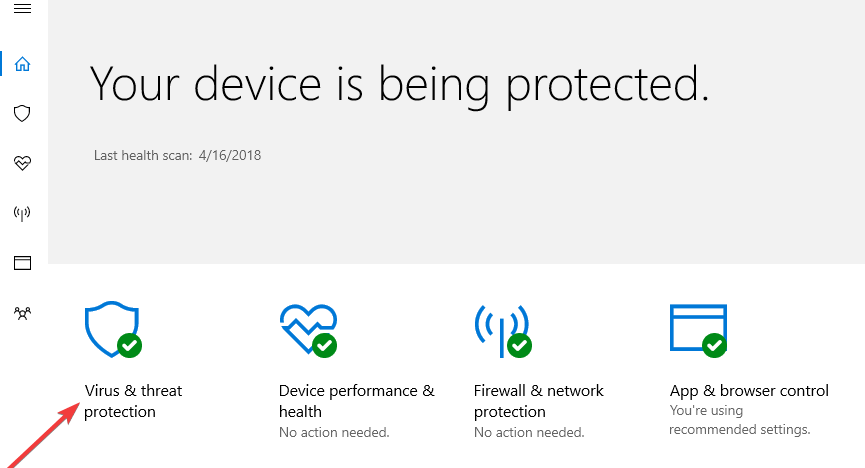
Note: Most VPN clients use ports 500 and 4500 UDP, and port 1723 for TCP. If these don’t work, add a new rule to allow them in Windows Firewall Advanced settings.
3. Change Allow app settings
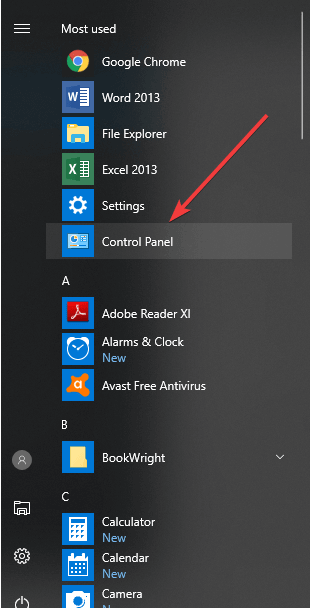
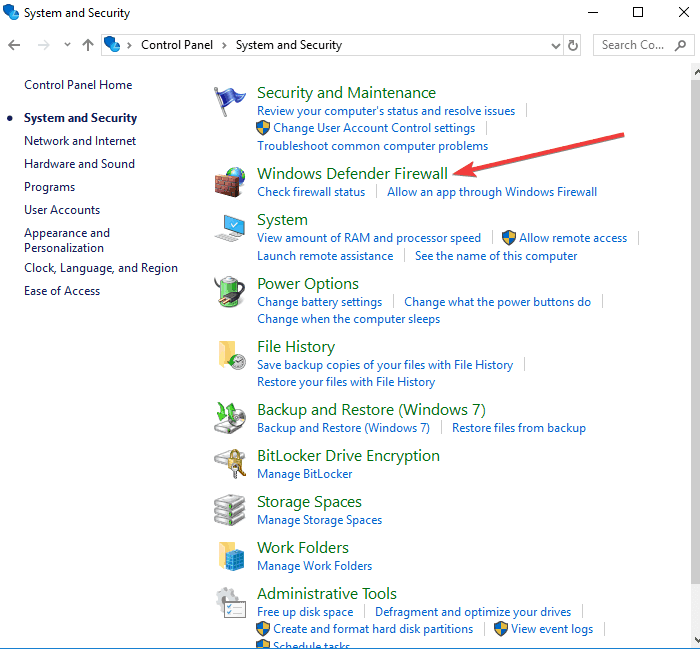
- Open Control Panel
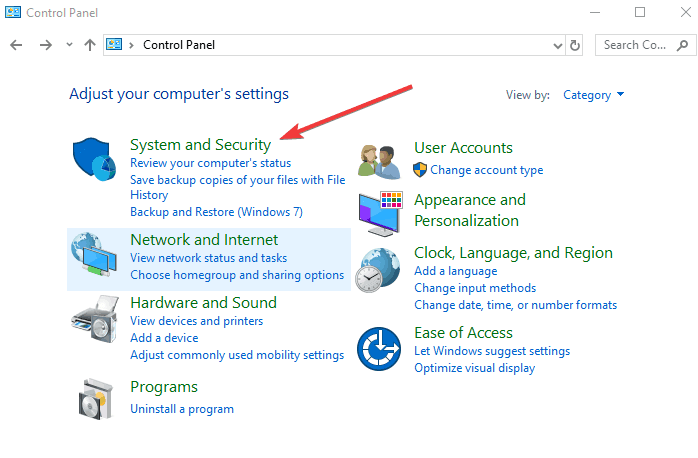
- Select System & Security
- Click Windows Defender Firewall
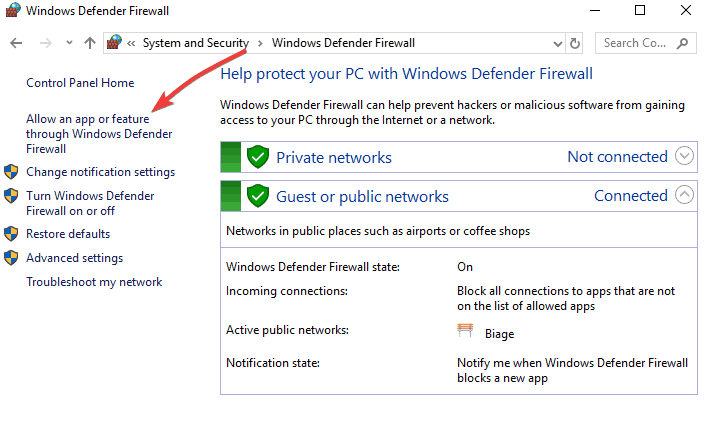
- On the left pane, click Allow an app or a feature through Windows Firewall. A window in which you can allow or prevent any app will display
- Click Change Settings
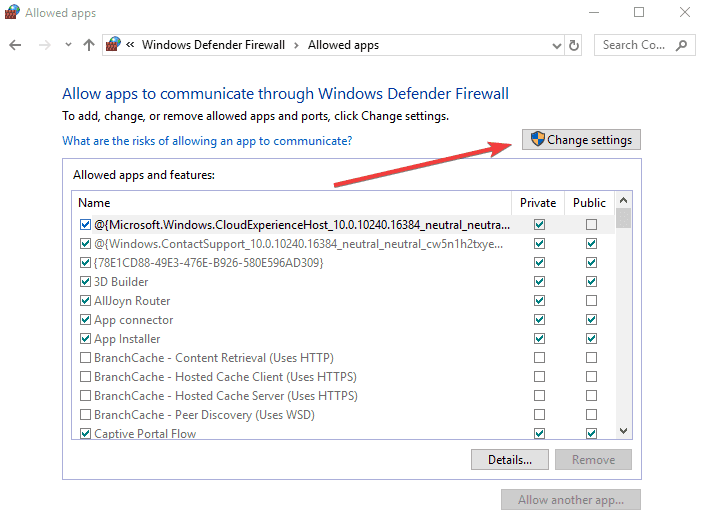
- Check for your VPN from the list of programs and apps you want to allow through your firewall
- Check Public or Private to select the network type on which you want the VPN to run
- If you cannot find your VPN, click Allow another app
- Select your VPN and then click Add, then click OK
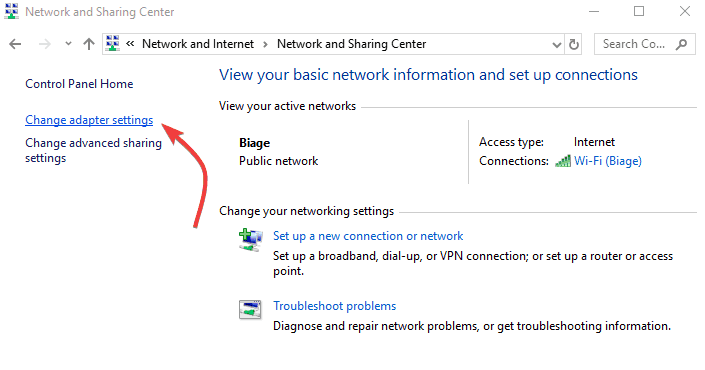
4. Change adapter settings
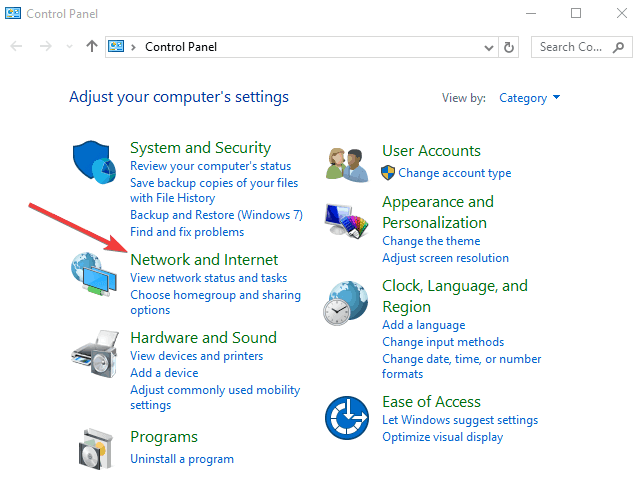
- Open Control Panel and select Network & Internet
- Select Network and Sharing Center
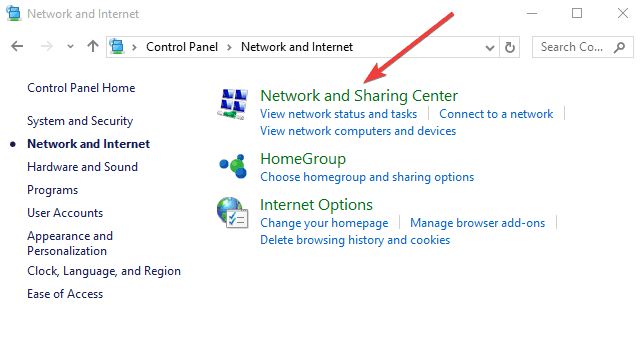
- On the left pane, click Change adapter settings
- Click File
- Select New incoming connection
- Select all users you want to access your VPN connection
- Check Through the Internet
- Click Next
- From the list of protocols, mark the Internet protocols you want your VPN to connect to
- Double click Internet Protocol Version 4 (TCP/IPv4)
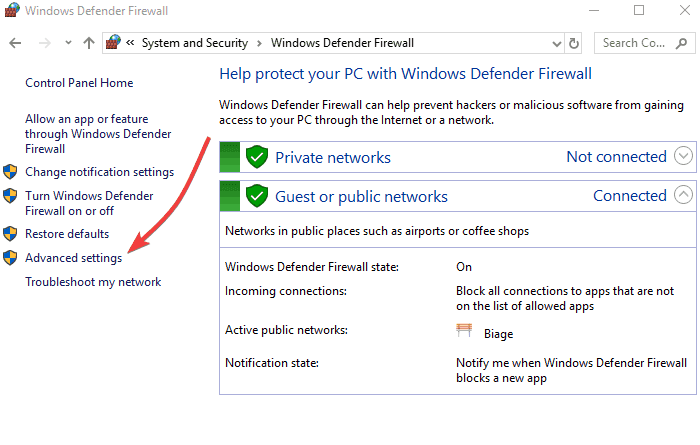
- Go to Control Panel again and select Windows Firewall
- Click Advanced Settings
- Click Inbound Rules>Actions
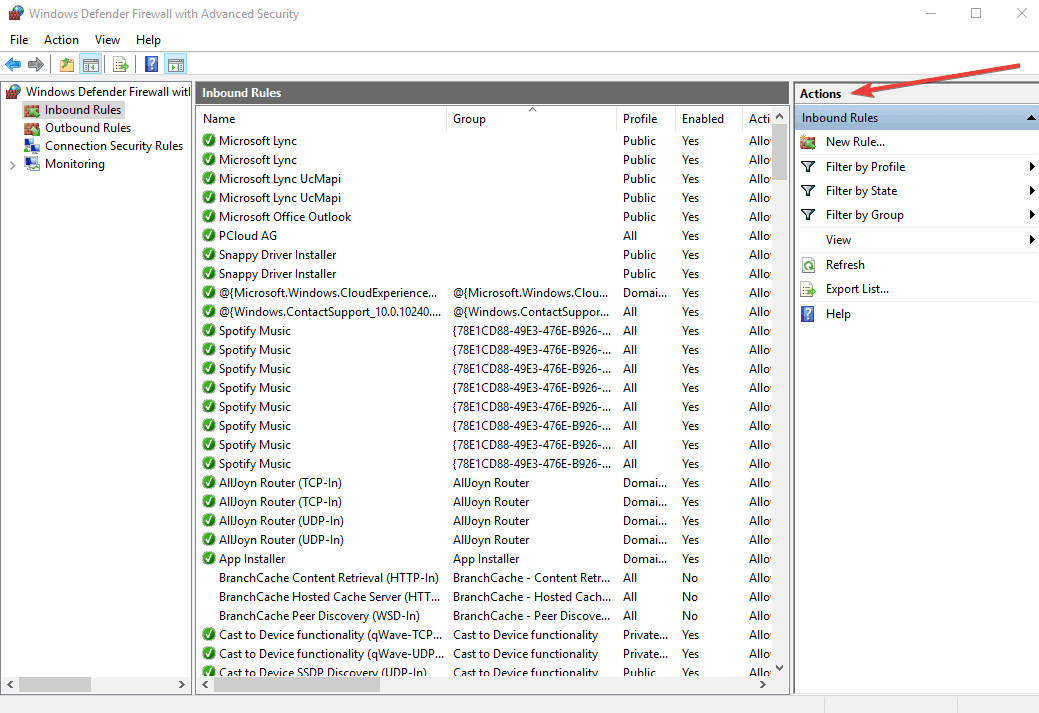
- In the Wizard, choose Port and click Next. Most VPN clients use ports 500 and 4500 UDP, and port 1723 for TCP. You can use TCP and insert 1723 in Specific remote ports field
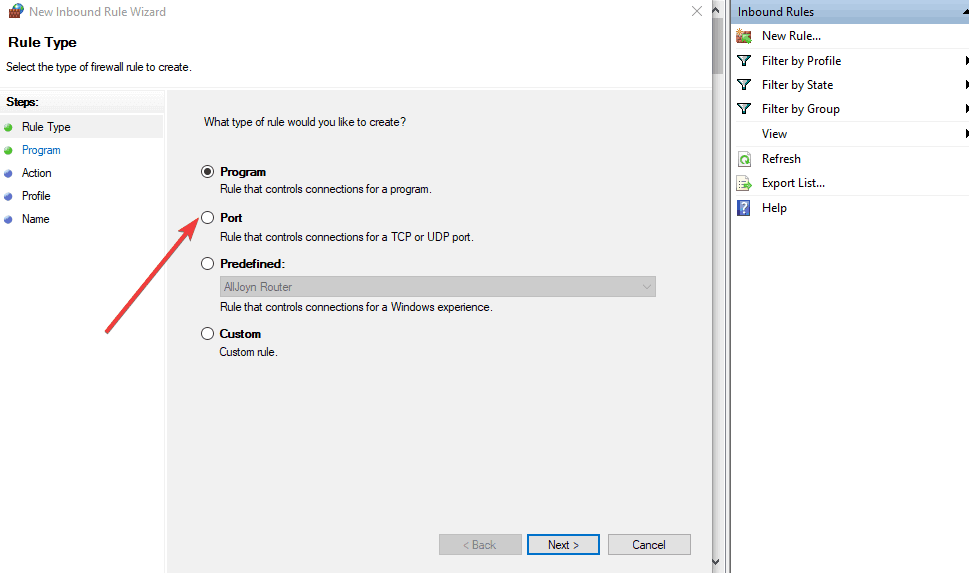
- Click Next
- Select Allow the connection and click Next

- When asked ‘When does this rule apply?’ select all options (Domain, Private, Public) and apply the rule to all
- Choose a name and description to fill the Name and Description
- Click Finish
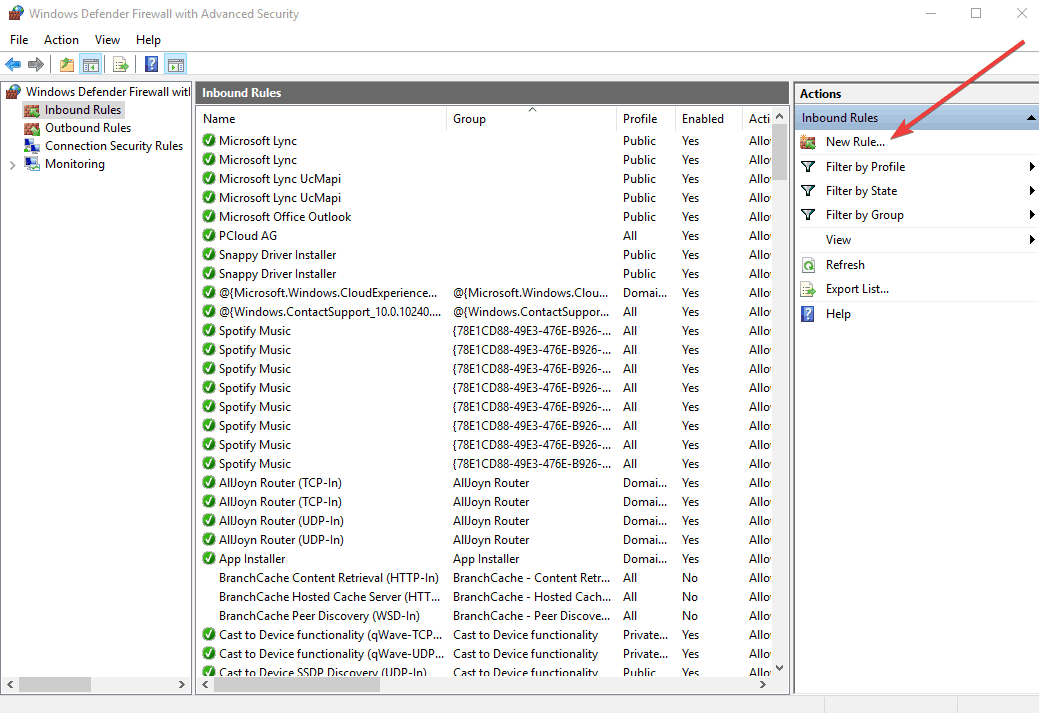
5. Create a new inbound rule
- Open Windows firewall with advanced security
- Click inbound rules on the left
- Click New rule on the right
- Click Custom rule
- Specify programs or leave as all programs
- Specify ports or leave as all ports
- Click “These IP addresses” under remote IP
- Click “This IP address range”
- Type From “10.8.0.1” To “10.8.0.254”
- Close and click Next, then leave as “Allow the connection”
- Apply to all profiles
- Name your profile and click Finish
You should then be able to connect to your home devices through your VPN
6. Enable rule for PPTP
If your VPN requires PPTP, do the following:
- Open Control Panel
- Select Windows Firewall
- Select Advanced Settings
- Search for the ‘Routing and Remote Access‘ under Inbound Rules and Outbound Rules. For Inbound Rules: right-click ‘Routing and Remote Access (PPTP-In)’, select Enable Rule. For Outbound Rules: right-click ‘Routing and Remote Access (PPTP-Out)’, select Enable Rule.
7. Open ports
In order to allow your VPN traffic to pass through the firewall, open the following ports:
- IP Protocol=TCP, TCP Port number=1723 – used by PPTP control path
- IP Protocol=GRE (value 47) – used by PPTP data path
- Make sure that these ports are allowed on Windows Firewall with corresponding network profile.
- DO NOT configure RRAS static filters if you are running on the same server RRAS based NAT router functionality. This is because RRAS static filters are stateless and NAT translation requires a stateful edge firewall like ISA firewall.
- In general, VPN error 807 indicates that the network connection between your computer and the VPN server was interrupted. This also can be caused by a problem in the VPN transmission and is commonly the result of internet latency or simply that your VPN server has reached capacity. Try to reconnect to the VPN server.
8. Turn off SSL monitoring
Depending on your firewall or security software, there are steps to take to fix VPN blocked by Windows firewall. Here’s what to do if you’re using NOD32 or Kaspersky:
NOD32:
- Select Setup
- Select Advanced Setup
- Select Antivirus and antispyware
- Select Web access protection
- Select HTTP, HTTPS > HTTP scanner setup, and set HTTPS filtering mode to Do not use HTTPS protocol checking.
Note: If HTTPS filtering mode is greyed out, you must first set Antivirus and antispyware > Protocol filtering > SSL to Always scan SSL protocol. Restore this to its previous setting after changing HTTPS filtering mode.
- Select Settings
- Select Traffic Monitoring panel
- Select Port Settingsorsettings
- Select Network
- Select Port Settingsand uncheck the box for port 443/SSL
Any luck fixing VPN blocked by Windows firewall using the solutions above? Share with us by leaving a comment in the section below.
Also, leave there any other suggestions or questions that you may have and we’ll be sure to check them out.
Frequently Asked Questions
Does a vpn block firewall?
A VPN can be unblocked by using a dedicated IP or changing the default port. High-quality services also offer a number of techniques to bypass blocks.
Can a firewall block a vpn?
A firewall can be used to block certain ports that are used by your VPN client and prevents it from successfully connecting.
Does event log viewer show vpn failures or firewall block?
Event Viewer will show VPN logs if you are using the built-in VPN client and have enabled them. Otherwise, you could check with the VPN you use to see any logs stored locally.
Настройка Брандмауэра Windows для подключений из сети за VPN-сервером Keenetic
Если вы настроили и установили VPN-туннель, но пинг проходит только до удаленного роутера и не проходит на компьютеры удаленной сети, то вероятнее всего на самих компьютерах блокирует трафик Брандмауэр Windows (Firewall).
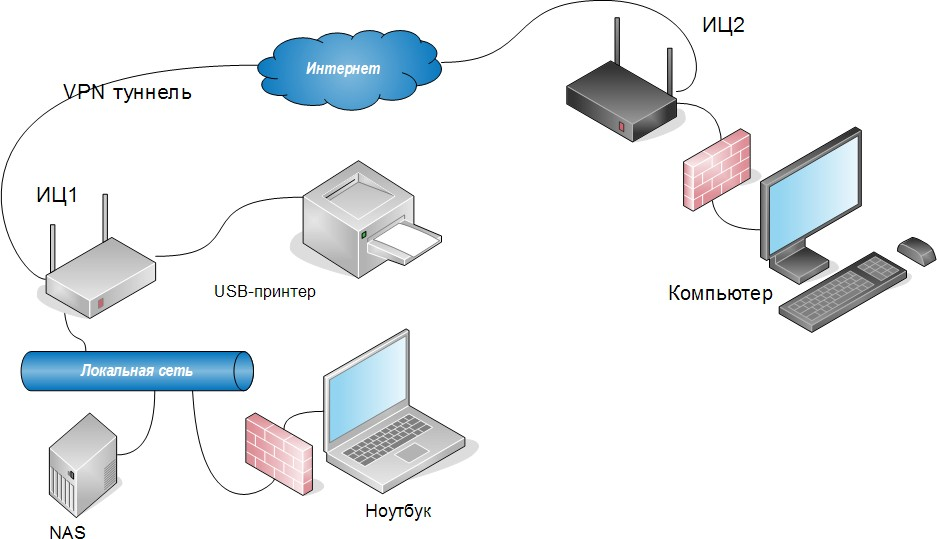
В операционной системе Windows по умолчанию блокируются входящие подключения (в том числе и ICMP-запросы), если адрес источника этого подключения не принадлежит к назначенной на интерфейсе компьютера сети. При доступе к хосту в удаленную подсеть запрос будет приходить от адреса другой подсети, и соответственно будет заблокирован брандмауэром Windows.
TIP: Примечание: При использовании сторонней программы контроля сетевых подключений, например Kaspersky Internet Security или другой, настройка разрешающего правила доступа для трафика из удаленной сети будет аналогична, по нижеприведенному сценарию.
Далее рассмотрим настройку Брандмауэра Windows, разрешающую подключения из удаленной сети к компьютерам в локальной сети. Для этого достаточно создать политику сетевого экрана, регулирующую входящие подключения.
Приведенные в нашем примере скриншоты выполнены в ОС Windows 7.
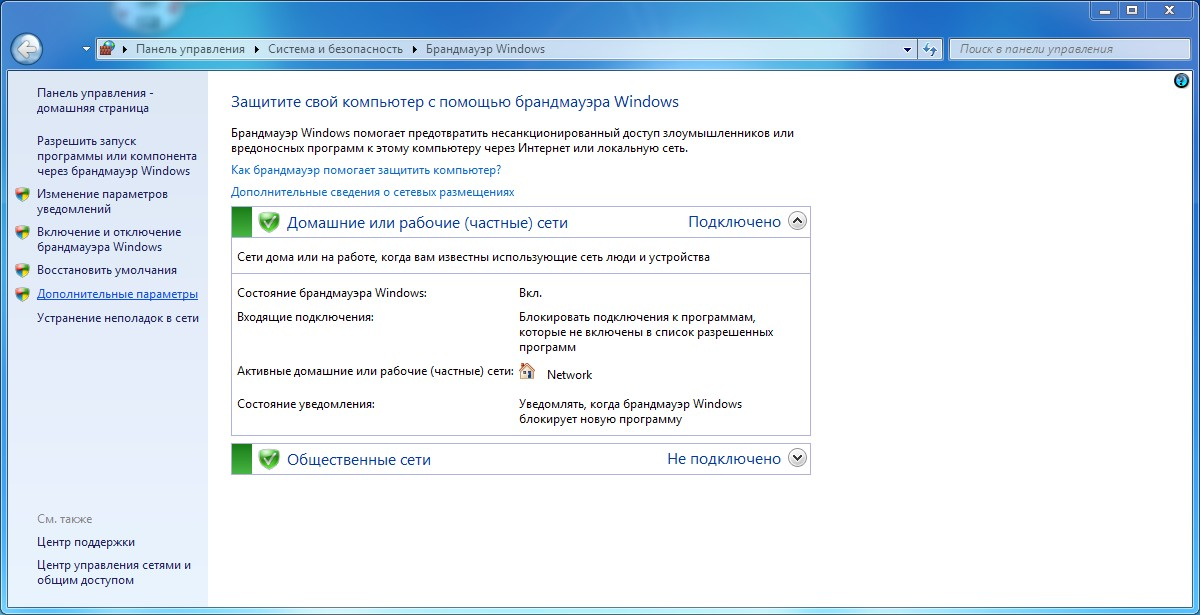
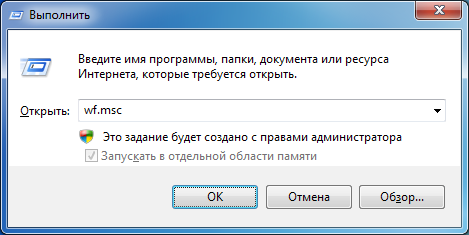
1. В окне «Выполнить» (Win+R) введите wf.msc
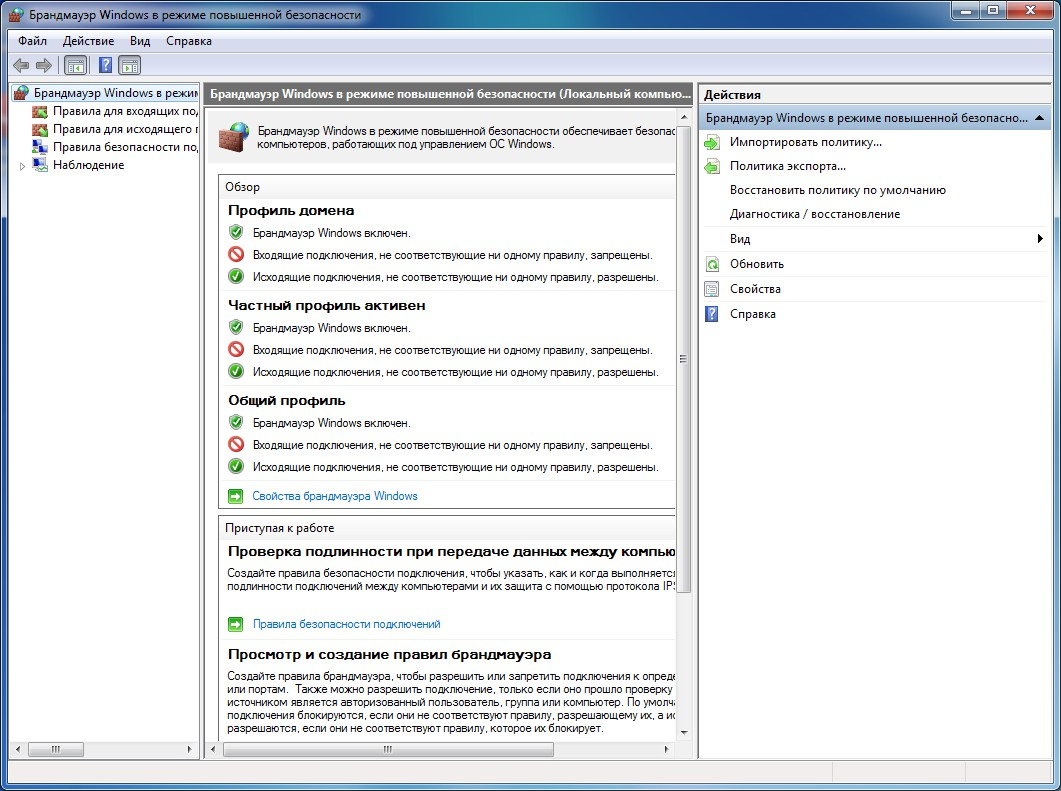
Откроется окно конфигурации «Брандмауэр Windows в режиме повышенной безопасности». Это же окно можно открыть через меню «Панель управления > Система и безопасность > Брандмауэр Windows» по кнопке «Дополнительные параметры».
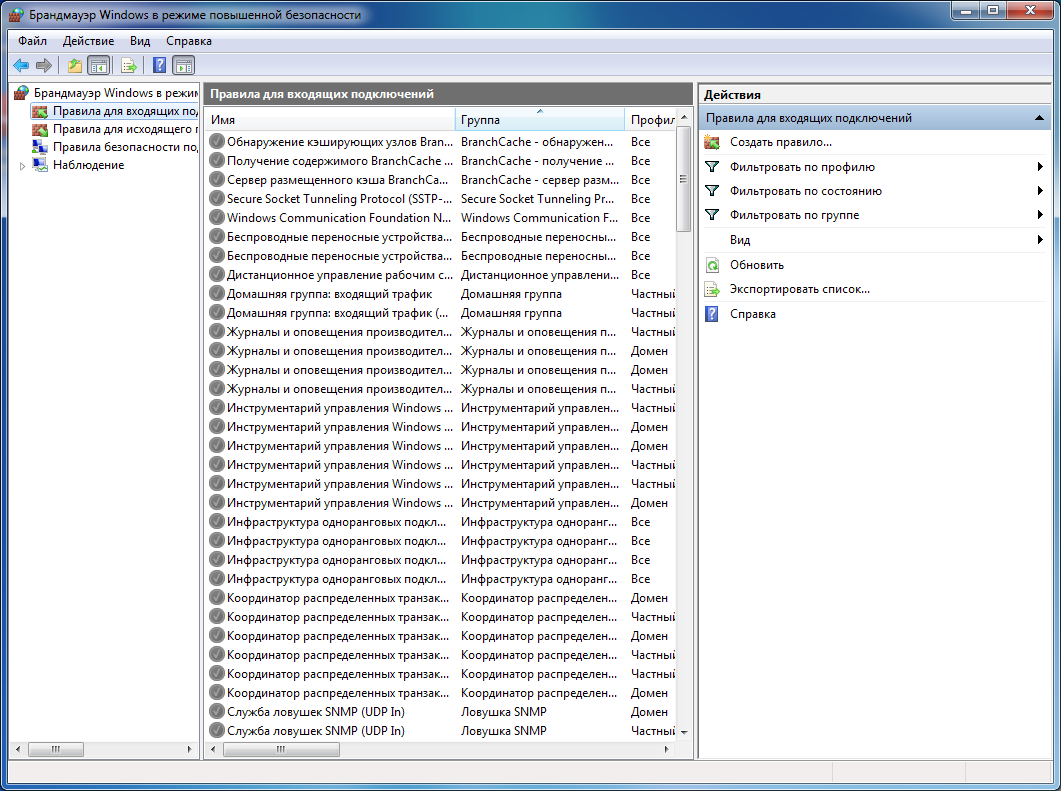
2. Выберите в в списке слева пункт «Правила для входящих подключений». Для добавления правила обработки трафика нужно нажать в правой панели «Создать правило. «
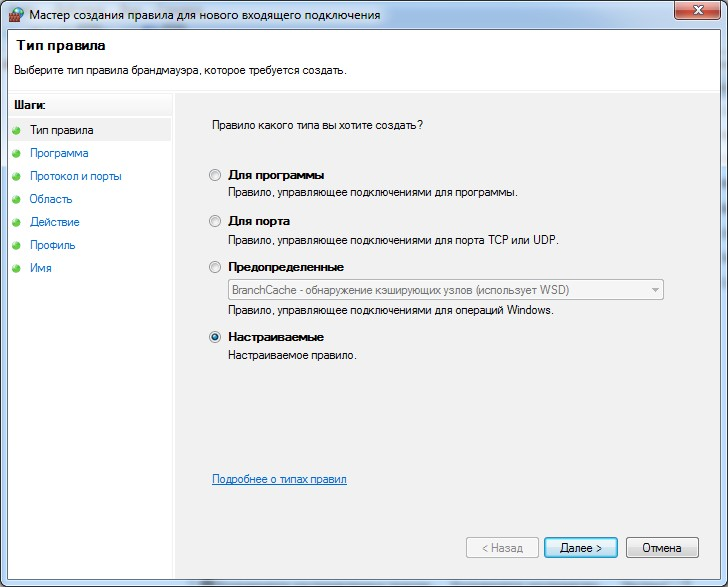
3. Откроется окно «Мастер создания правила для нового подключения». В нем нужно указать тип правила — «Настраиваемые» и перейти к следующему шагу по кнопке Далее.
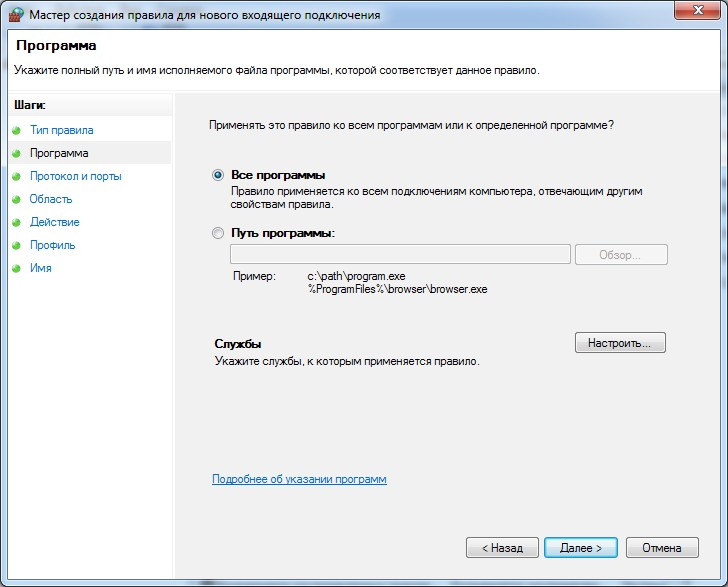
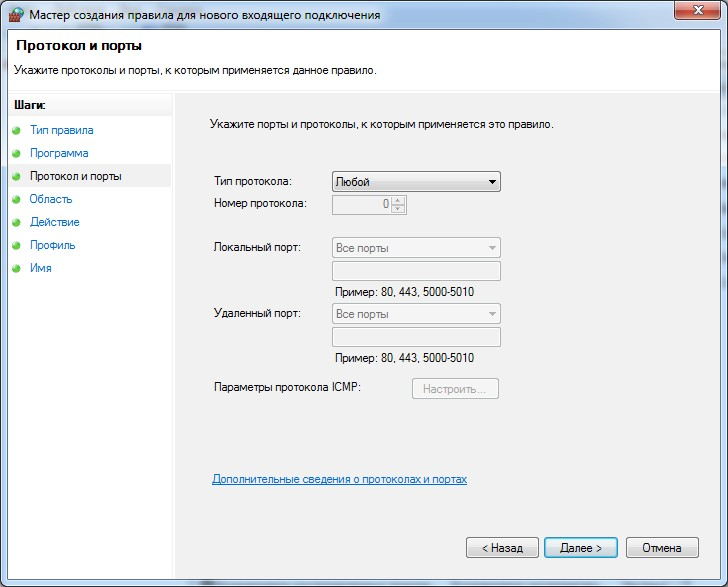
4. В пунктах «Программа» и «Протокол и порты» не требуется менять установки по умолчанию.
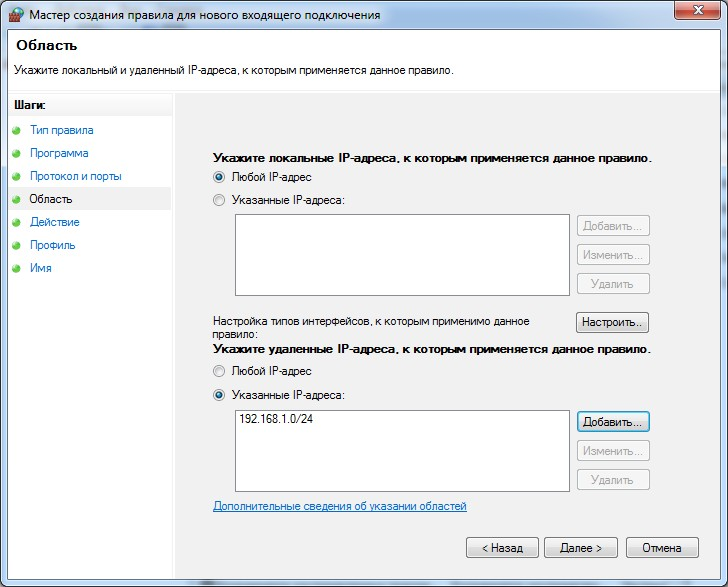
В разделе «Область» следует установить переключатель «Укажите удаленные IP-адреса» в положение «Указанные IP-адреса» и нажать на кнопку Добавить.
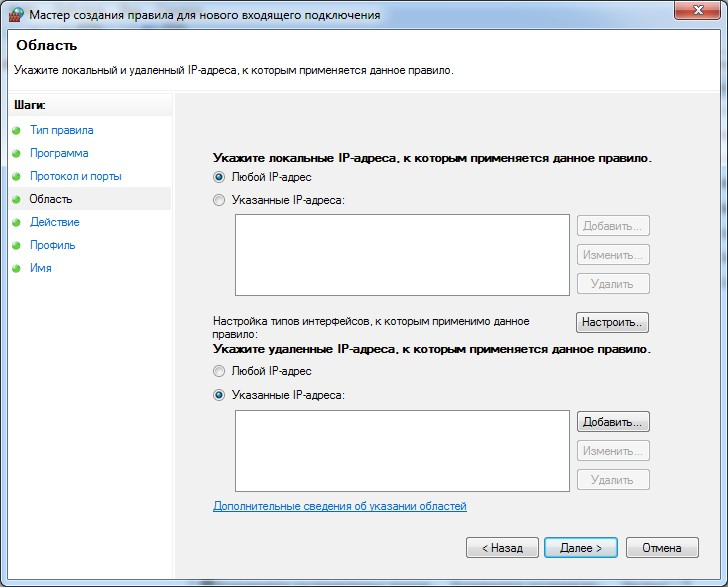
5. В открывшемся окне нужно указать «IP-адрес удаленной подсети» и нажать OK.
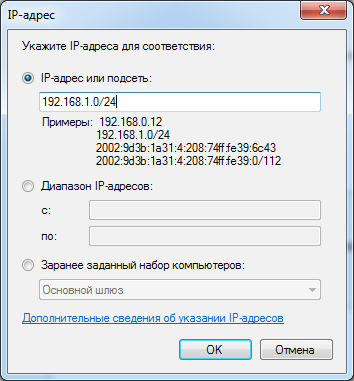
В случае если правилом требуется разрешить доступ с компьютера в локальной сети VPN- сервера (правило создается на компьютере в локальной сети VPN-клиента), указывается подсеть на Домашнем интерфейсе VPN-сервера.
Если правило создается на компьютере в локальной сети VPN-сервера (требуется для разрешения входящих подключений из сети за VPN-клиентом), нужно указать подсеть, включающую адрес выданный клиенту от сервера. Для VPN-сервера PPTP, SSTP, L2TP/IPsec по умолчанию на интернет-центре это подсеть 172.16.1.0/24. Для сервера IPSec VPN нужно указать удаленную подсеть.
Можно указать несколько подсетей если к компьютеру требуется выполнять подключения из различных удаленных расположений. После ввода требуемых значений, нужно нажать Далее.
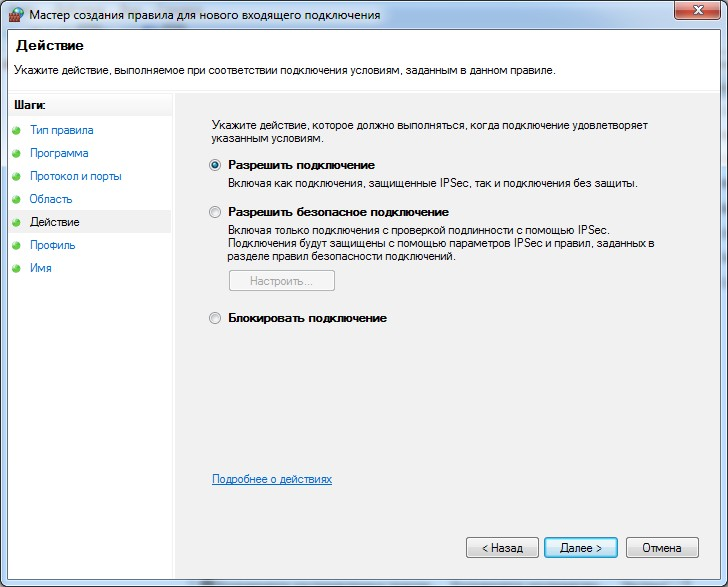
6. В разделе «Действие» оставьте предустановленное значение «Разрешить подключение» и нажмите Далее.
7. Раздел «Профиль» предоставляет возможность выбрать профиль, к которому будет относиться настроенное правило. Поскольку настройка выполняется для компьютера, подключенного в Домашней сети интернет-центра, достаточно оставить галочку напротив профиля «Частный» (Применяется при подключении компьютера к частной сети).

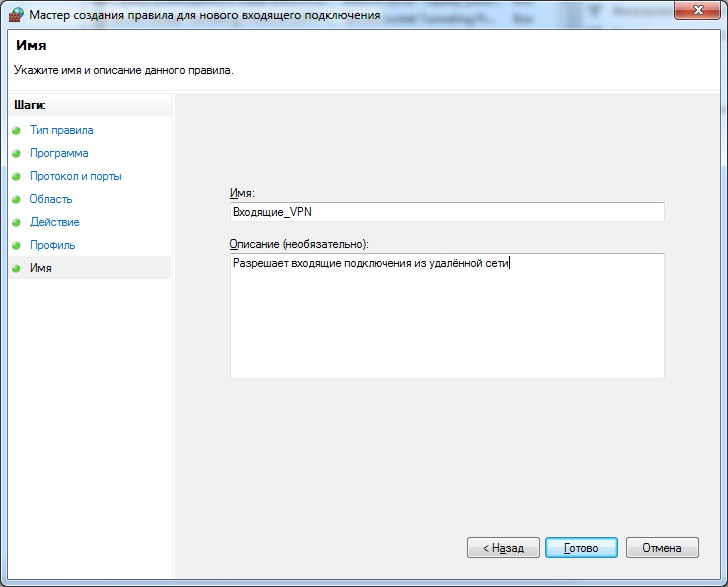
8. На завершающем шаге настройки нужно указать «Имя» правила и можно добавить поясняющее «Описание». Завершите работу мастера создания правила, нажав кнопку Готово.
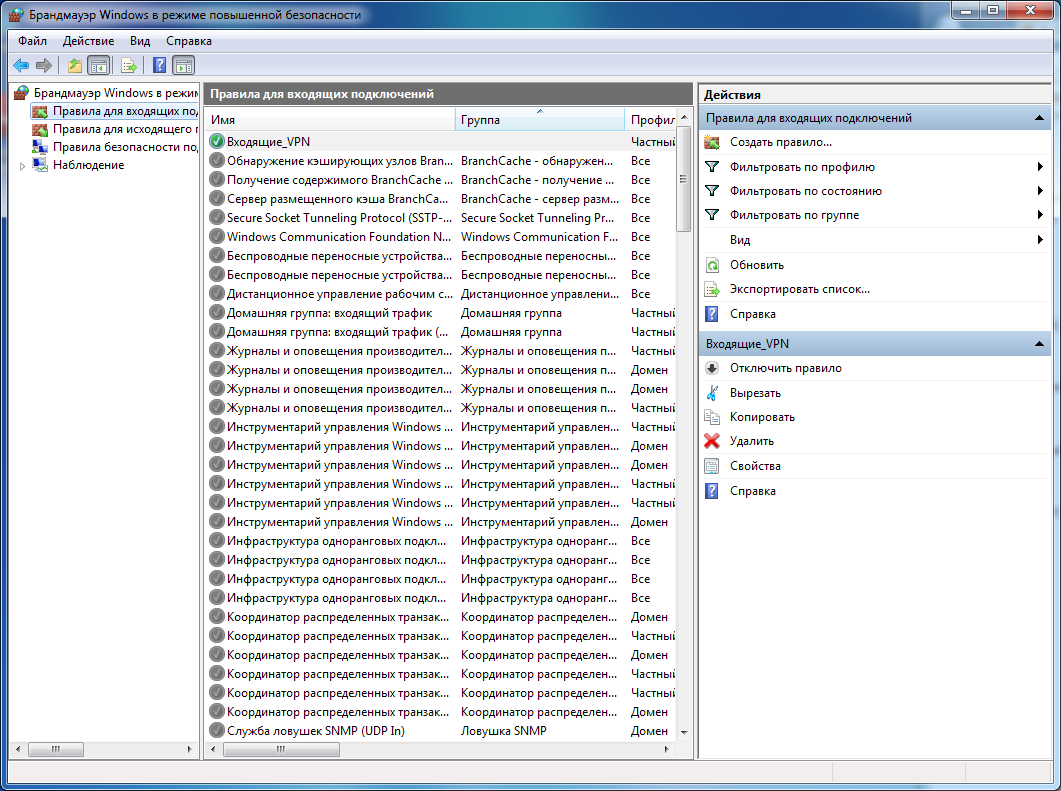
9. Теперь в окне представления «Правила для входящих подключений» отображается созданное правило. В последних версиях ОС Windows для применения настройки дополнительных действий не требуется.
В случае если компьютер с ОС Windows подключен к локальной сети роутера, являющегося VPN-сервером и к нему требуется выполнять подключения из удаленной сети (за клиентом), в разрешающем правиле сетевого экрана следует указать подсеть, из которой выдаются адреса VPN-клиентам на сервере. По умолчанию на интернет-центрах Keenetic, при подключении к VPN-серверам PPTP, SSTP, L2TP/IPsec выдаются адреса клиентам из подсети частного диапазона 172.16.1.0/24.
Если компьютер, к которому требуется установить удаленное подключение, расположен в сети интернет-центра, являющегося VPN-клиентом, в разрешающем правиле Брандмауэра Windows потребуется указать подсеть, адрес из которой установлен на интерфейсе подключающегося из-за VPN-сервера компьютера. Согласно схеме в статье «Маршрутизация сетей через VPN», это подсеть 192.168.2.0/24.
Пользователи, считающие этот материал полезным: 35 из 51


