- How Do I Repair Hard Drive Error with Windows 10 CHKDSK Utility? [Partition Magic]
- Summary :
- Quick Navigation :
- What Is CHKDSK Utility
- Method 1. Run Check Disk Windows 10 from Partition Property
- Method 2. CHKDSK Windows 10 with Elevated Command Prompt.
- Method 3. Windows 10 CHKDSK Repair with Third-party Software
- Method 4.Run Check Disk Windows 10 from Installation Disc/USB drive
- Wrapping Things Up
- Top 4 Hard Drive Repair Solutions to Fix Hard Drive Windows 10 [Partition Magic]
- Summary :
- Quick Navigation :
- Solution 1. Reinstall Your Hard Drive’s Driver
- Solution 2. Check and Fix Hard Drive Errors with Disk Repair Tool
- Solution 3. Repair Hard Disk Errors with CHKDSK Utility
- Solution 4. Format the Hard Drive
- Recover Data Before Formatting the Drive
- Format Hard Drive
- Conclusion
How Do I Repair Hard Drive Error with Windows 10 CHKDSK Utility? [Partition Magic]
By Irene | Follow | Last Updated November 30, 2020
Summary :
Hard drive errors caused by power outages, hardware failure, system crash, or human error can lead to drive inaccessible, data loss or subpar performance. How to free check and fix hard drive error Windows 10? This article tells how to scan and resolve hard drive problems to its utmost by running CHKDSK Windows 10 in 4 methods.
Quick Navigation :
Many Windows users check their hard drives regularly as disk error will slow down or damage a hard drive in an accumulated way. The best way to check and fix hard drive errors or bad sectors to keep it healthy is to use Windows built-in CHKDSK utility — a useful hard disk scanning and repair utility which helps to examine hard drives for errors and repair them.
What Is CHKDSK Utility
Some users may don’t know what CHKDSK is and how to run it. Actually, CHKDSK is the abbreviation of Check Disk, which is a system tool provided in Windows, OS/2 and DOS to check file system integrity of a partition and fix logical file errors.
CHKDSK can help you fix hard drive errors caused by bad sectors, improper or sudden shutdowns, corrupted software and meta data corruption. Whenever you have hard drive errors like you need to format the partition before you can use it caused by improper shutdown of the machine or abnormal removal of USB drives, you can use CHKDSK to find out errors and fix them.
Then how to repair hard drive windows 10 with CHKDSK utility? Here I will illustrate you 4 ways to run Windows 10 Check Disk utility and fix hard drive errors.
Method 1. Run Check Disk Windows 10 from Partition Property
You can run Windows 10 CHKDSK from Windows desktop and the detailed steps are as below.
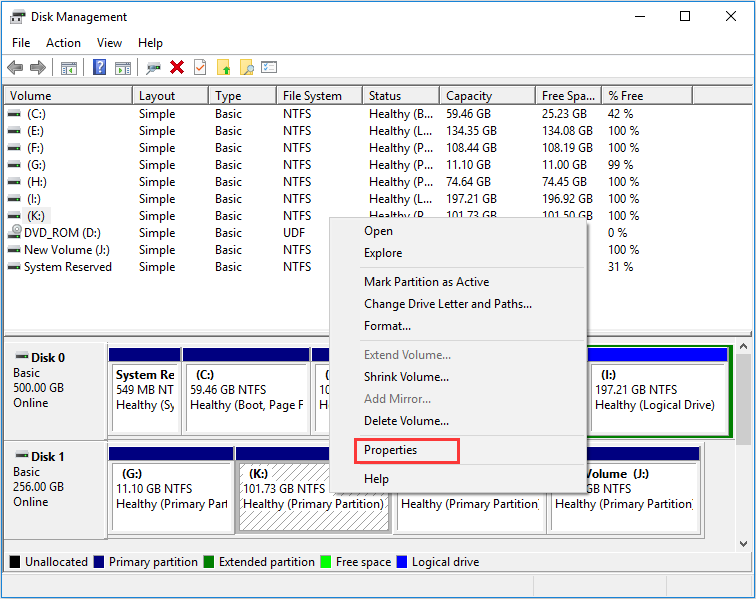
Step 1. Right-click Windows Start Menu and select Disk Management to open it.
Step 2. When you get the main interface of Disk Management, you can select the drive that you want to check and fix, then right-click it and choose Property.
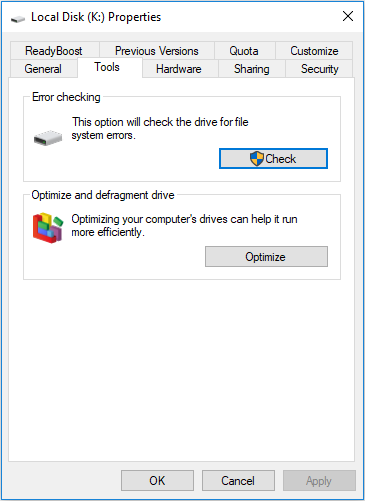
Step 3. On the Tools tab, click Check.
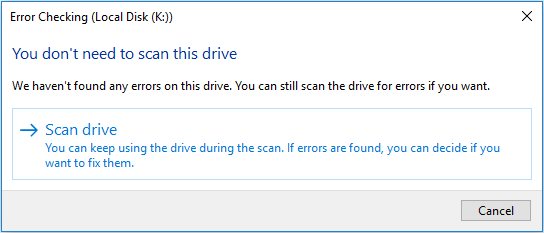
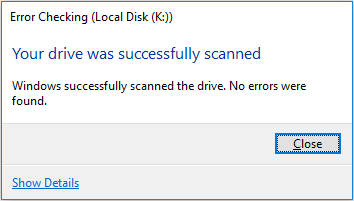
Step 4. If the system detects that there are errors, you will be asked to check the disk. If no errors are found, you will see a message as shown in the following picture. You can still choose to check the drive if you want to. Click on Scan drive.
Step 5. Windows will display a message as below after completion. If no errors are found, it will say no error found. Then click Close to exit it. If there are some errors found on the drive, Windows will ask for a restart to fix the errors.
Method 2. CHKDSK Windows 10 with Elevated Command Prompt.
CHKDSK Windows 10 with elevated Command Prompt performs a couple of functions. Although running it may take some time, it does prevent hard disk from being damaged and loss of data in the long term. It is recommended to run it whenever Windows has shut down abnormally or hard disk performs abnormally.
Step 1. Input cmd in the Windows 10 Cortana search box. Right-click the best match then select Run as administrator.
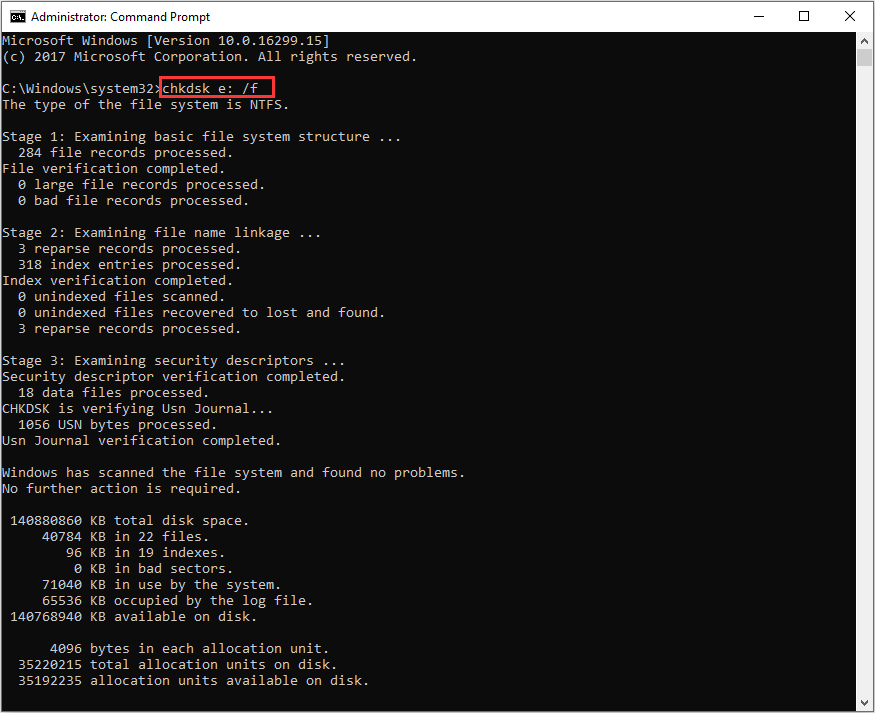
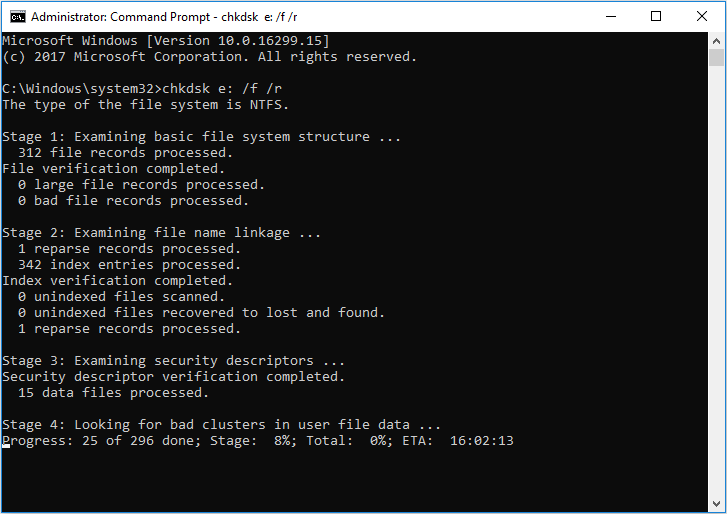
Step 2. In the elevated Command Prompt, type CHKDSK *: /f (* represents the drive letter of the specific drive that you want to scan and fix) and then press Enter. This CHKDSK Windows 10 command will scan your computer drive for errors and try to fix any that it finds.
Here I take CHKDSK e: /f as an example (e represent the drive letter that I want to scan). The bellowing picture shows there is no file system error with the partition. If there is any hard drive errors detected, CHKDSK will help you fix it automatically.
Step 3. Input exit to exit the Command Prompt Window after performing all operations.
/f – fix any errors it detected
/r – Locate bad sectors on the drive and try to recover any and all readable information from them
Apart from commonly used /f and /r, you can choose the following parameters valid for both FAT32 / NTFS partition when running the CHKDSK utility from an elevated Command Prompt.
- /v — Display list of every file in every directory on FAT32 partition. On NTFS, it displays the cleanup messages.
- /x — force the volume to dismount. Also invalidates all open file handles. This should be avoided in Desktop Editions of Windows, because it may cause data loss/corruption.
The following are valid for NTFS volumes only.
- /c — skip checking of cycles within the folder structure.
- /I — perform a less vigorous check of index entries.
- /L[:size] — change the size of the log file to specified number of kilobytes. If size is not specified, it will display current size.
- /b — re-evaluates bad clusters on the volume (implies /R)
Besides, CHKDSK cannot repair hard bad sectors, in which case, data can get lost and become unusable. If you have very important files and data stored on the drive, you’d better backup the hard drive as this occasion could happen sometimes.
If you cannot boot up your computer, you can run the tool from Command Prompt either by booting your computer into the Recovery Mode or by using the original installation disc to run Command Prompt (For detailed steps, please see Method 4). If you can, you may also run CHKDSK repair with third-party software, but be sure to choose a reliable one.
Method 3. Windows 10 CHKDSK Repair with Third-party Software
If you are not familiar with commands or find that using commands is error-prone as it requires you to input every command correctly, in this way, you can use a free CHKDSK repair alternative to repair hard drive Windows 10. It is recommended to use MiniTool Partition Wizard Free Edition, which makes CHKDSK Windows 10 as a breeze.
MiniTool Partition Wizard Free Edition is an easy-to-use partition manager. Its Check File System function can scan through your hard drive and fix all errors detected. It is not as complicated and time-consuming as running CHKDSK in Command Prompt. And it is simpler to operate with its intuitive interface.
Apart from Check file system function, it can also perform other operations like format partition, resize partition, extend partition, copy partition/disk, convert MBR to GPT without data loss, wipe disk, convert FAT to NTFS.
Next, let’s see detailed steps about how to run CHKDSK Windows 10 to fix hard drive error with third-party software.
Step 1. Download MiniTool Partition Wizard Free Edition by clicking the following button. Install it on your computer and launch it to get the main interface.
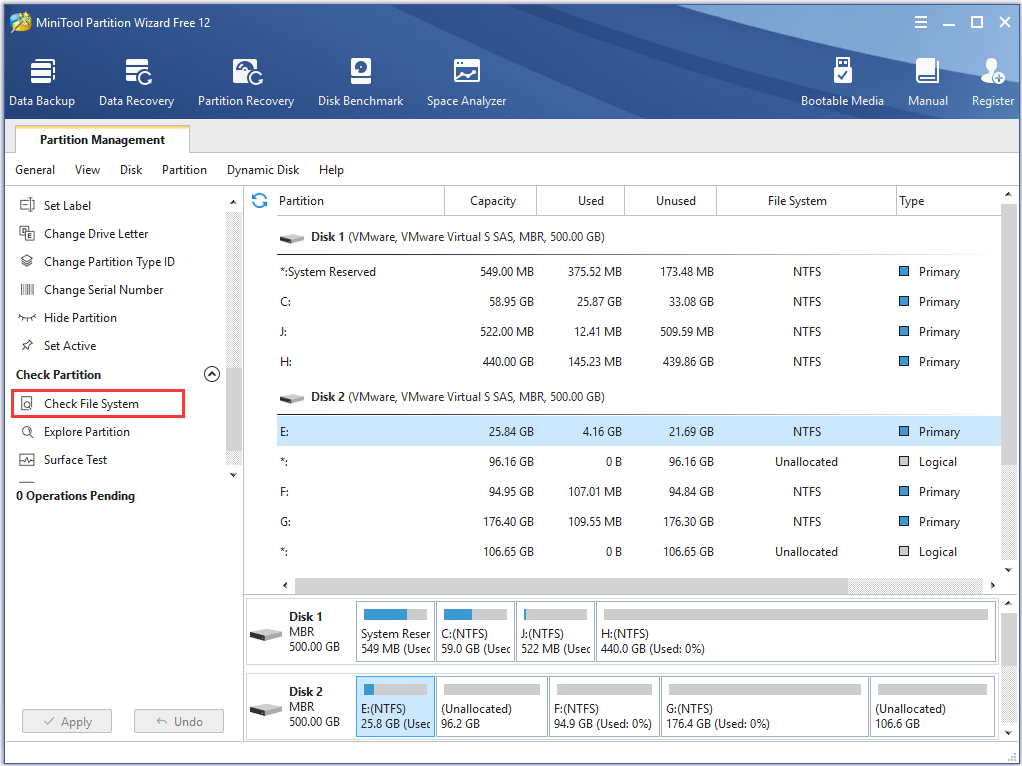
Then select the target partition, and choose «Check File System» from the Check Partition group or from Partition menu.
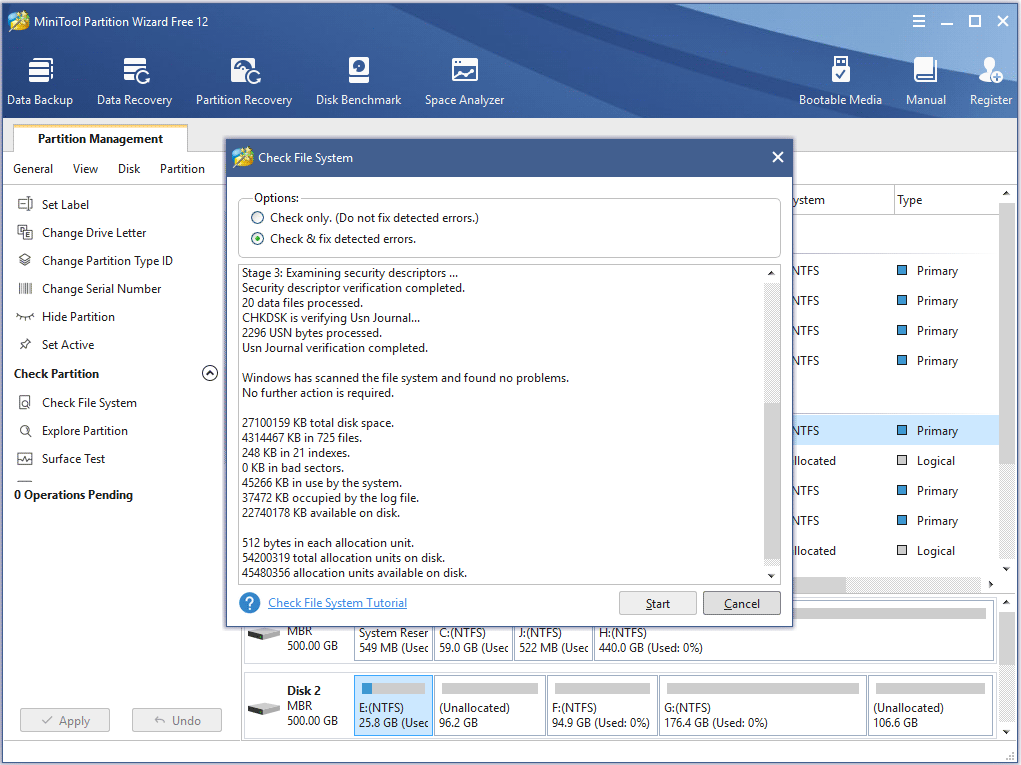
Step 2. You will see a new window with two options: Check only and Check & fix detected errors. If you only want to check, select Check only; if you want to recover mistakes during the checking process, select Check & fix detected errors. After that, click Start button. Once you click Start, MiniTool Partition Wizard will check/fix file system immediately.

This page shows that MiniTool found no problems. If there is an error detected by MiniTool Partition Wizard, just let Partition Wizard fix it.
Method 4.Run Check Disk Windows 10 from Installation Disc/USB drive
The above three methods show you how to run CHKDSK when your computer can boot up successfully. However, if Windows won’t start, how can you check disk Windows 10?
Well, in this case, you can run CHKDSK on boot and check the hard drive for errors via Windows installation disc or USB drive. By following the steps as below, CHKDSK utility can be accessed easily.
Step 1. Insert Windows 10 installation disc or USB flash drive with Windows.
Step 2. Change the BIOS boot sequence to boot from the disc or USB drive.
Step 3. Select your language performance and click Next.
Step 4. Click Repair your computer.
Step 5. Then choose Troubleshoot on this page.
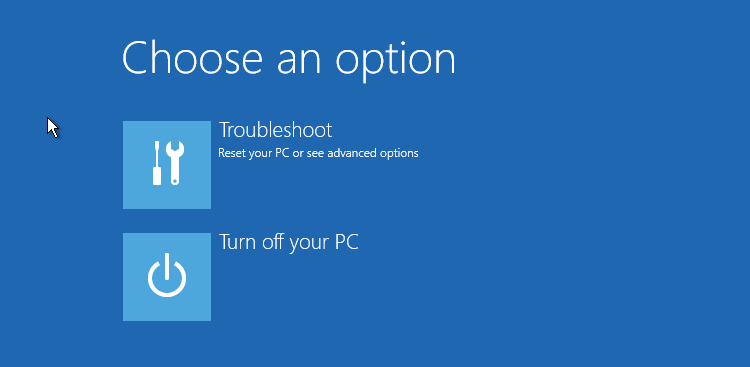
Step 6. On the Advanced options page, click Command Prompt to open it.
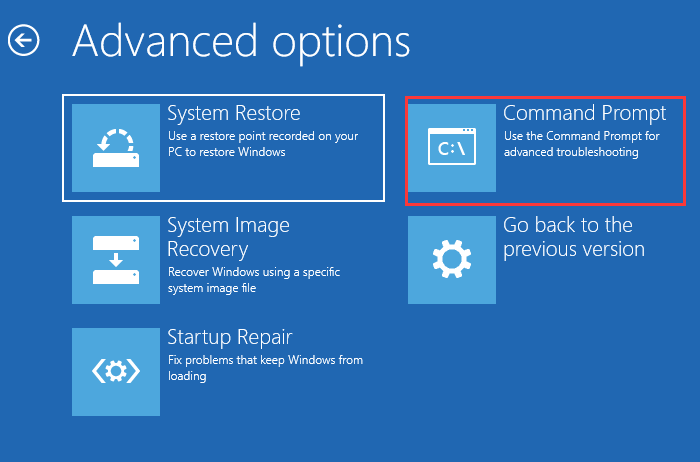
Step 6. When you successfully open the Command Prompt, you can follow the steps in Method 2 to execute CHKDSK commands.
After reading the 4 free methods in this post, I’m sure that you have learned how to use Windows 10 CHKDSK utility to repair hard drive errors. Now try one of them to complete hard drive repair by yourself.
Wrapping Things Up
Have you fixed your hard drive with CHKDSK utility? Hope CHKDSK will help you fix all kinds of hard drive problems, and you can go back using your computer normally.
If you have any question about how to repair hard drive error with Window 10 Check Disk utility or if you have other better solutions, you can leave a message in the following comment zone and we will reply as soon as possible. If you need any help when using MiniTool software, you may contact us via [email protected] .
Top 4 Hard Drive Repair Solutions to Fix Hard Drive Windows 10 [Partition Magic]
By Irene | Follow | Last Updated December 03, 2020
Summary :
Hard drives can run into problems sometimes. This article will show you how to make hard drive repair and recover data from a hard drive. When your hard drive needs to be repaired, you can try the top 4 solutions in this article to fix the hard drive.
Quick Navigation :
When your hard drive is corrupt or you encounter other hard drive errors, the data on the hard drive can be inaccessible and unreadable. How to make hard disk repair Windows 10? If you don’t know any solutions, this article can be a big help.
The following contents will show you some ways to make HDD repair. Before you try the following solutions, you can try some simple fixes to repair the disk errors. For example, try to unplug the internal drive and connect it again to see if Windows can read your storage device. You can also try another USB port on your computer if your hard drive is external.
If simple fixes cannot help you, then you can follow the methods in this post to make hard disk repair Windows 10 by yourself.
Solution 1. Reinstall Your Hard Drive’s Driver
If your computer cannot read your external hard drive, you can connect it to another PC to see if the drive can be read and work normally. If it works, you can make external hard drive repair by reinstalling the device drivers on your computer. Here are detailed steps for you to reinstall your hard drive’s drivers.
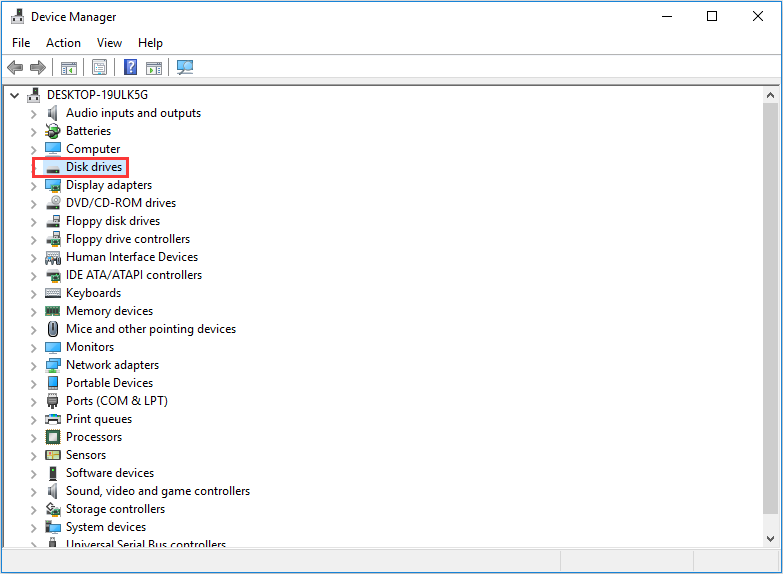
Step 1. Input Device Manager in the Windows 10 Cortana search box and click on the best match to open the device manager.
Step 2. Locate Disk drives and double click it.
Step 3. Then you will see all disks on your computer displayed here. Right-click the hard disk with hard drive failure and then click Uninstall device to uninstall the drive.
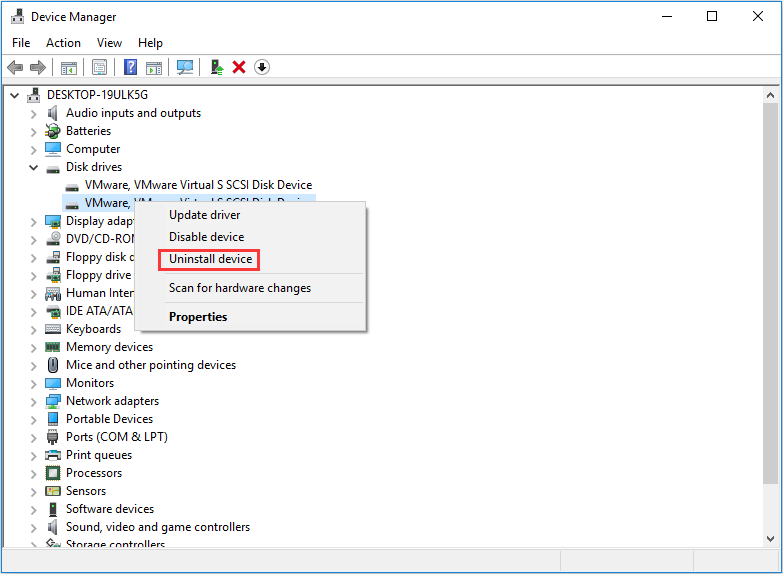
Step 4. Restart the computer and connect the hard drive. The drivers will start installing automatically in most cases.
After restarting, you can check if your external hard drive can be read. If this solution doesn’t work, you can try the next method.
Solution 2. Check and Fix Hard Drive Errors with Disk Repair Tool
You can use a professional HDD repair tool to fix hard drive issues. There are many wonderful third-party hard disk repair software that you can use to diagnose and fix hard drive issues. Be sure to choose a reliable one.
Here I recommend you to choose the third-party disk utility — MiniTool Partition Wizard Free Edition. It is the professional hard drive repair software & an all-in-one partition manager, which can help you check and fix hard drive errors in just a few clicks.
The MiniTool Partition Wizard Free Edition can also help you manage computer hard drives in a flexible way with its features like extend partition, resize partition, format partition, migrate OS to SSD/HD, copy disk, convert MBR to GPT and so on.
So the free hard disk repair tool is worth trying. Now let’s see the detailed steps.
Step 1. Download the disk utility MiniTool Partition Wizard Free Edition by clicking the following button. Install it on your computer and launch it to get the main interface.
Step 2. Then select the partition on a hard disk and choose Check File System on the left action panel.

Step 3. As you can see, here are two options for you to choose from. The option Check only will only scan your hard drive for errors but it will not fix detected file system errors automatically. The option Check and fix detected errors will scan the drive and fix any file system errors found. To make hard drive repair, please select Check & fix detected errors and click Start.

Step 4. After the hard drive repair is completed, you can close the program.
Solution 3. Repair Hard Disk Errors with CHKDSK Utility
If the above fixes cannot help you fix the errors, you can run the Windows CHKDSK utility with CMD (via admin mode) to perform hard drive repair on Windows 10. You can access the Windows 10 disk utility via command prompt. Here are detailed steps.
Step 1. To access the Windows built-in hard drive repair tool, type cmd in the Windows 10 Cortana search box. Then right-click the best match then choose Run as administrator.
Step 2. In the Command Prompt window, type CHKDSK *: /f /r (* represents the drive letter of the specific drive that you want to repair) and then hit Enter. With this command, the hard drive is analyzed track-by-track to detect and fix recoverable data on the defective areas. It will give you all the details here.
The commonly used parameters /f and /r have different meanings:
- /f – fix any errors it detected.
- /r – Locate bad sectors on the drive and try to recover any and all readable information from them.
Step 3. After the error checking is completed, you can type exit to close the command prompt window.
This way should help you fix hard drive errors effectively. If your hard drive is working properly, you can backup important files as soon as possible. Sometimes the dead drive just occurs without notice.
Solution 4. Format the Hard Drive
Another effective method to eliminate hard drive errors is to format the hard drive. As you know, a hard drive can become RAW due to virus attack, improper operations, bad sectors or power outage. In this case, you are unable to access the hard drive data. You can format the hard drive to fix the error.
However, if you just format the hard drive directly, all files will be deleted including important files in it. So the best way is to recover the data to another drive with a piece of professional hard drive recovery software firstly. Then format the drive with a professional drive formatting tool.
Recover Data Before Formatting the Drive
To make internal hard drive data recovery, my recommendation is to use reputable and reliable hard drive recovery software MiniTool Partition Wizard Pro Ultimate.
It can help you recover all kinds of files including photos, audio, music, videos, emails archives, documents from various storage media like HDD, SSD, SD card, USB drive, digital camera, memory stick and so on.
Step 1. Get the hard drive recovery software MiniTool Partition Wizard Pro Ultimate by clicking the following button. Install it on your computer and get it registered.
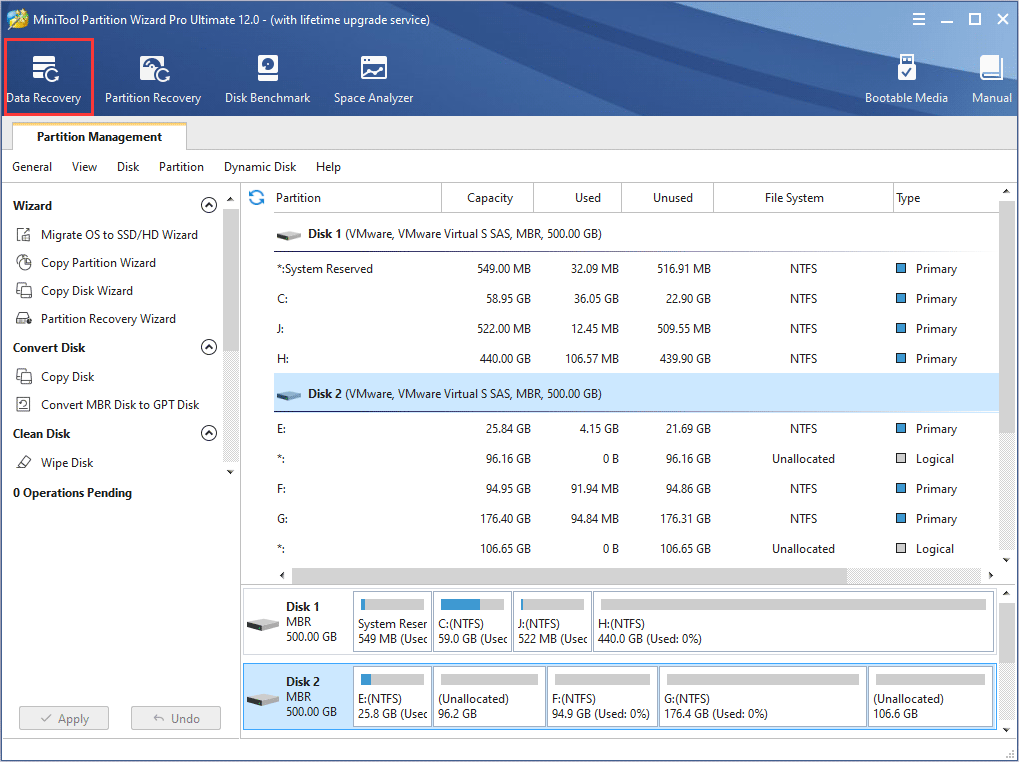
Step 2. After registration, you will get the main interface. Then launch Data Recovery on the top toolbar.
Step 3. Select the drive you want to recover data from and click Scan button on the lower right corner.
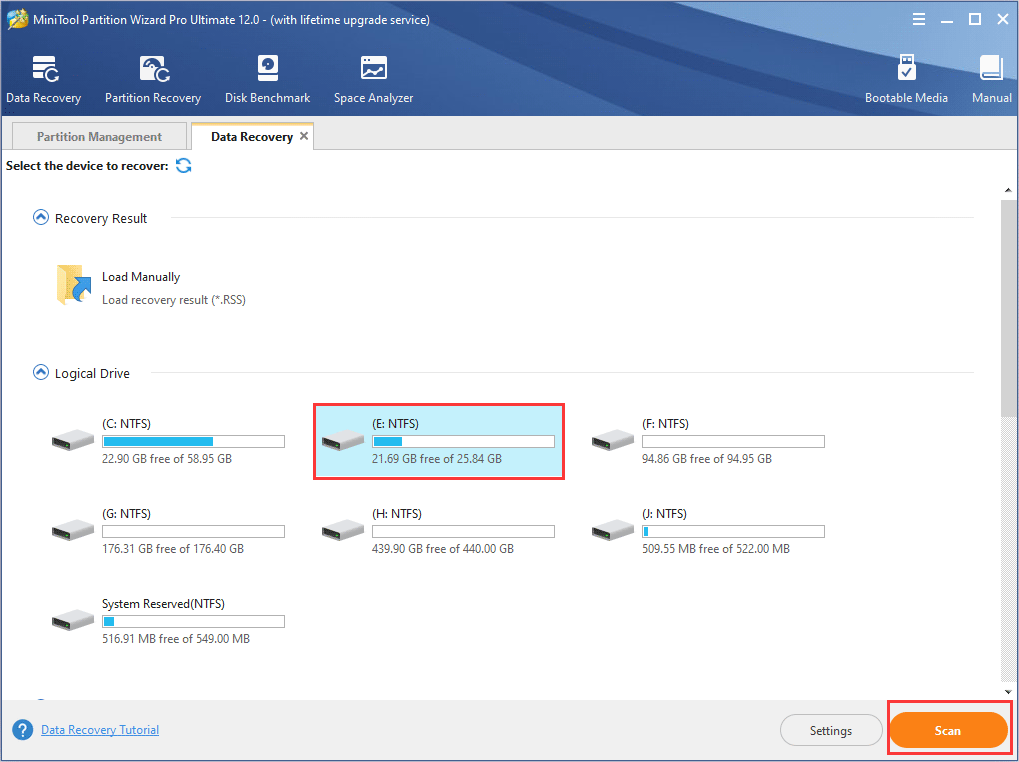
Here are three parts on the Data Recovery interface:
- Recovery Result:You will see the last scanning result record here and you can load recovery result by yourself to recover files directly.
- Logical Drive:All existing partitions on your computers will be listed here. If a partition does not have drive letters, it will be arranged at the end of the list.
- Hard Disk:All disks on your computer will be listed here, including external hard drive, SSD, USB drive, etc. You can also select a disk to scan directly.
Besides, if there are lost partitions or unallocated spaces on your hard drive, there will be Lost Partition or Unallocated Space parts.
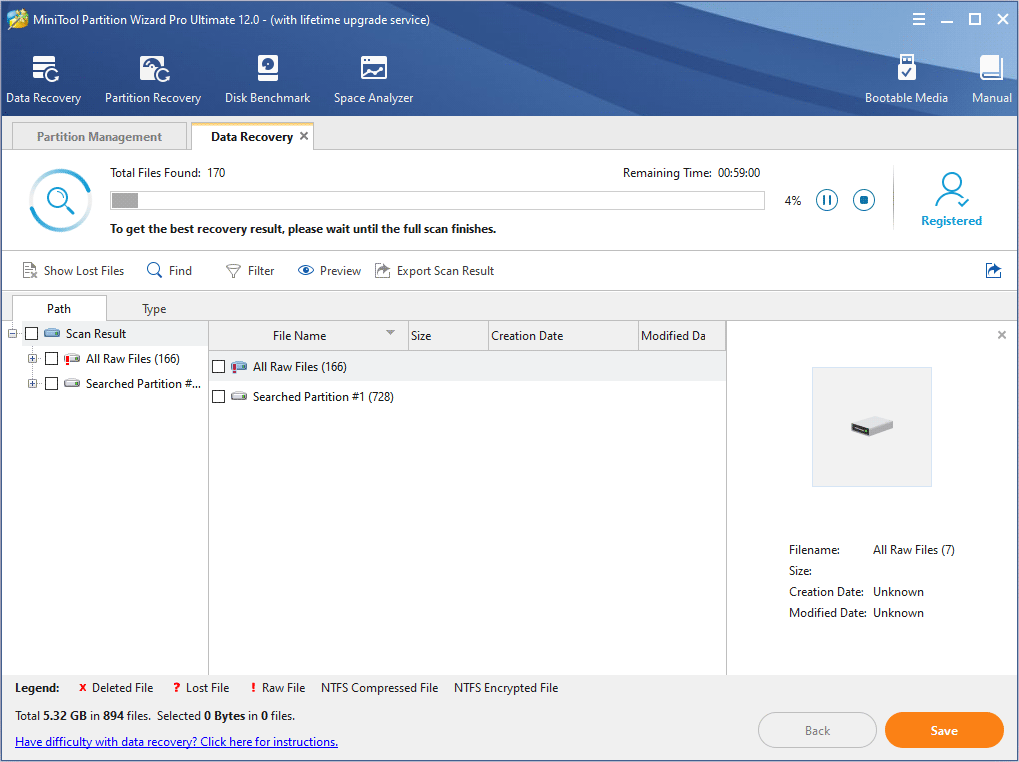
Step 4. The data recovery software is scanning your drive now. You can click Pause or Stop button near the progress bar to pause or stop the scanning process if you find what you want. You can wait for the scanning to complete.
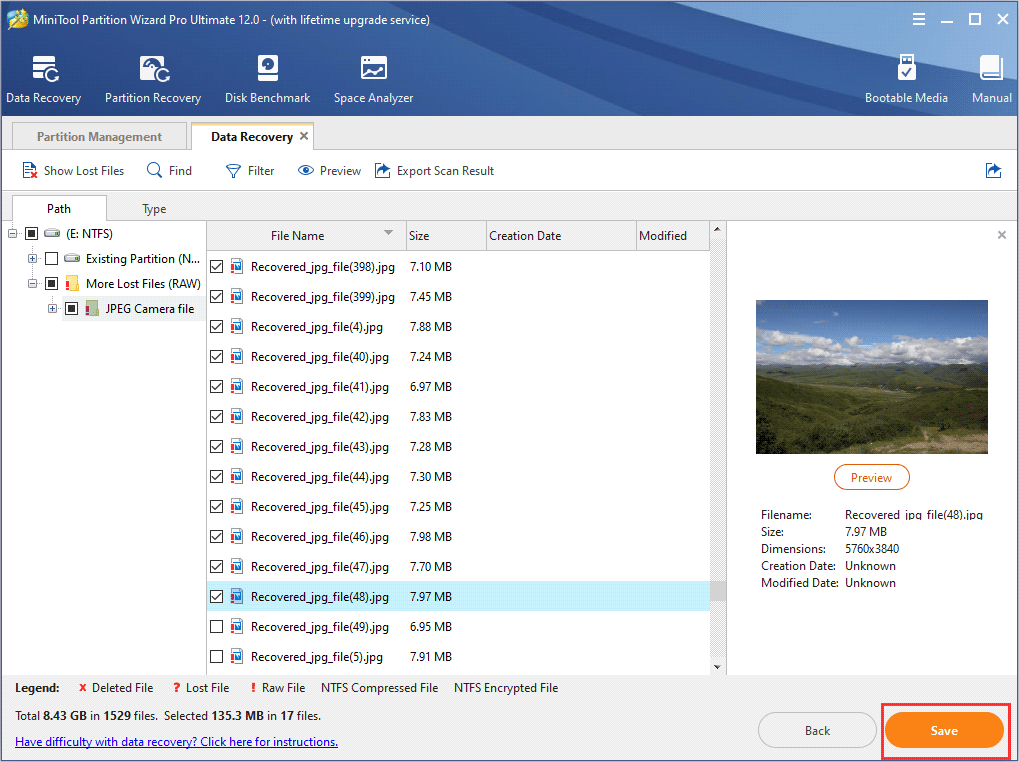
Step 5. Check needed files in the recovery result. You can preview a picture or .txt file which is smaller than 20MB. At last, click Save to save the recovered files.
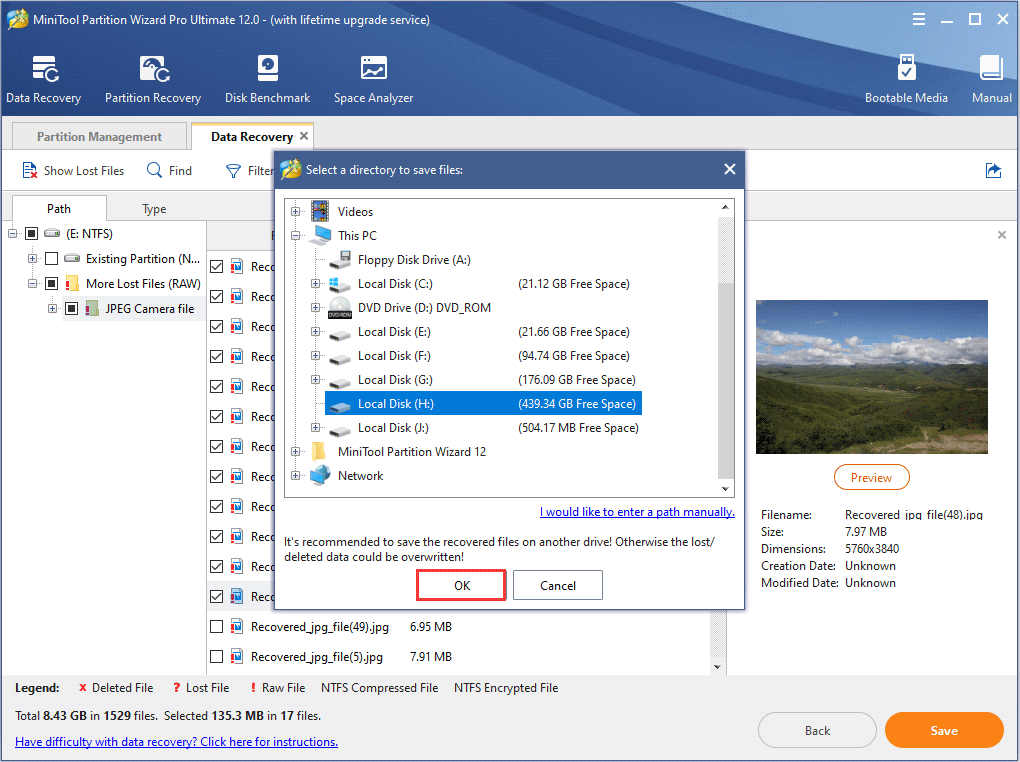
Step 7. Choose a directory to save the needed files. It is recommended to save the recovered files on another drive. Otherwise, the lost/deleted data could be overwritten. Make sure you save files to a safe place.
During the repair process, if the hard drive you’re trying to fix contains important files, then you can also use the above data recovery tool to extract the documents, photos, music, videos, emails and other files from the hard drive easily.
Format Hard Drive
Now, you can format a hard drive that’s not working properly to fix the disk failure. Here are detailed steps to tell you how to format hard drive Windows 10 with the free disk utility.
Step 1. Launch MiniTool Partition Wizard Pro Ultimate and get the main interface.
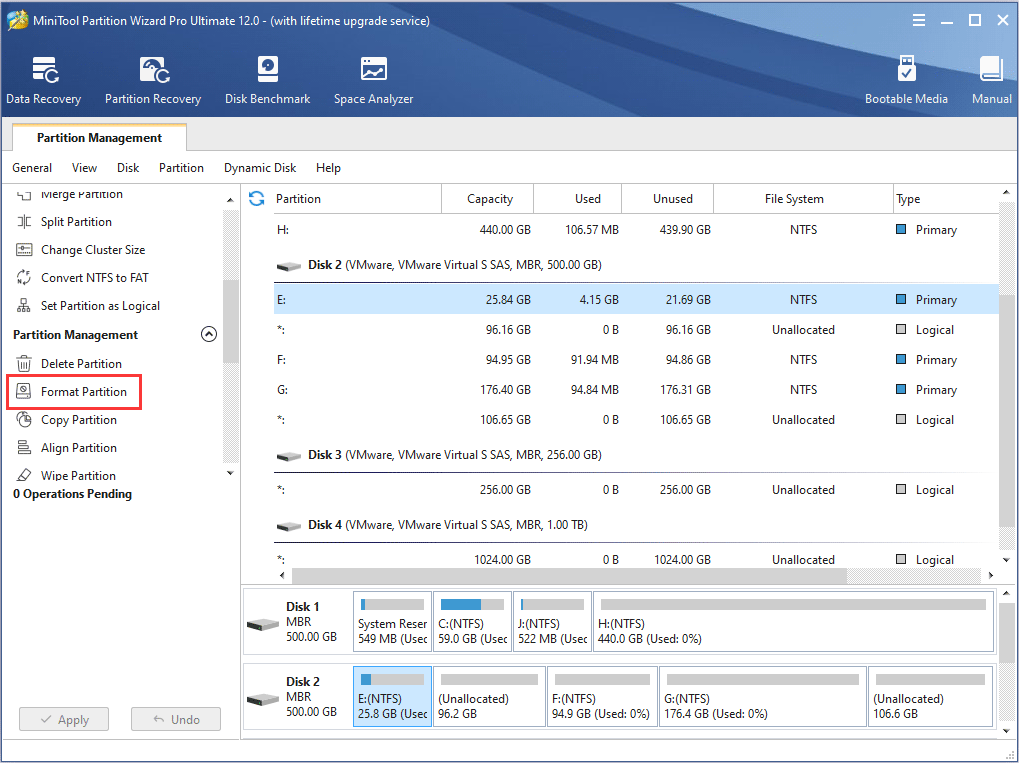
Step 2. Select the drive and choose Format Partition from the left action panel.
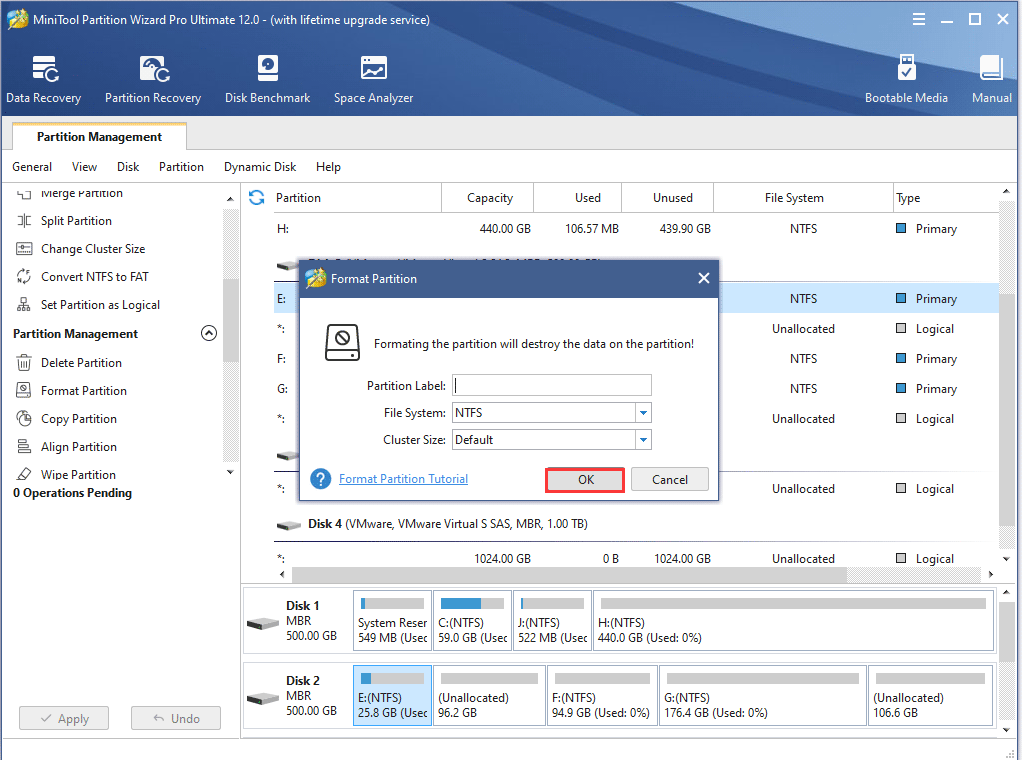
Step 3. Then specify the partition label, file system as well as cluster size on this page. Then click OK to continue.
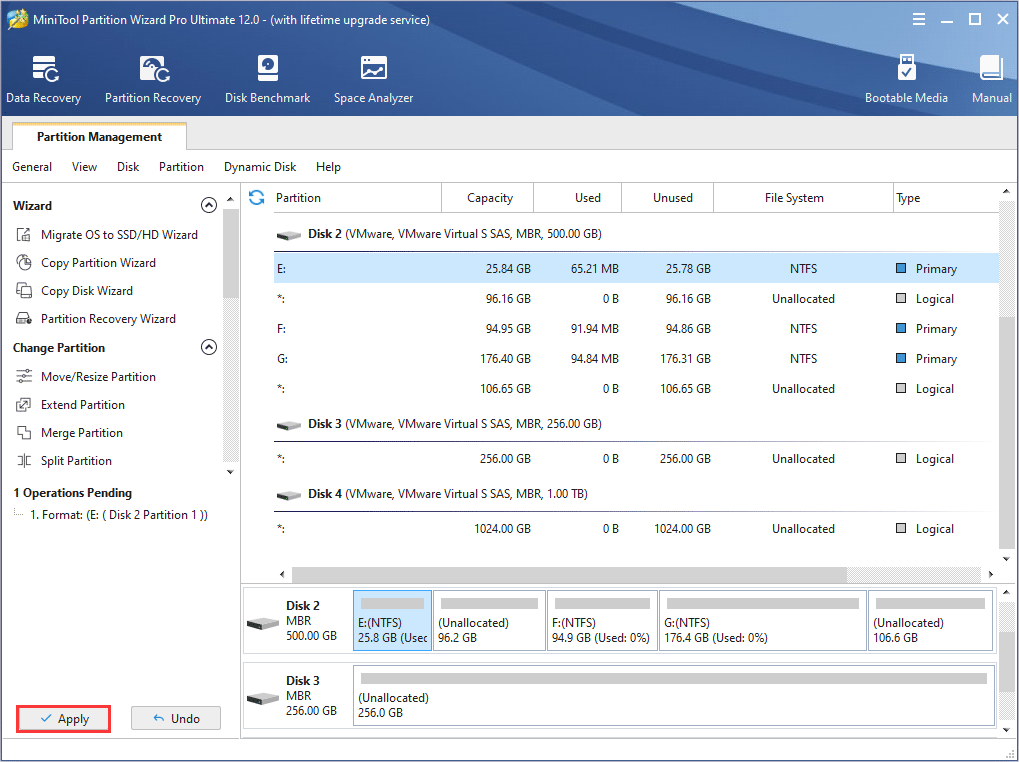
Step 4. Click Apply on the upper right corner to allow the pending operations.
After formatting, you can use your hard drive as normal.
Conclusion
Hard drive can become damaged or corrupted due to various hard drive errors like bad sectors on hard drive, file system corruptions. So you must learn these basic tips. After reading this article, you may find that hard drive repair is not so complicated.
If you have any question about how to make hard drive repair Windows 10 when there are hard drive errors, you can leave a message in the following comment zone and we will reply as soon as possible. If you have better solution, don’t hesitate to share it with us. If you need any help when using MiniTool software, you may contact us via [email protected] .


