- Description of the Windows Registry Checker Tool (Scanreg.exe)
- Summary
- More Information
- To Restore Individual Files
- Known Issues for Windows Registry Checker
- References
- Использование средства проверки системных файлов для восстановления отсутствующих или поврежденных системных файлов
- Запуск средства проверки системных файлов (SFC.exe)
- Дополнительная информация
- Scan And Fix Disk Drive Errors with CHKDSK in Windows 10
- Run chkdsk utility on windows 10
- Command Line Check Disk
- CHKDSK extra parameters
- Command to Check Disk Errors
Description of the Windows Registry Checker Tool (Scanreg.exe)
Summary
When you start your computer successfully, the Windows Registry Checker tool (Scanreg.exe) creates a backup of system files and registry configuration information (including user account information, protocol bindings, software program settings, and user preferences) once daily. Files that Windows Registry Checker backs up include System.dat, User.dat, System.ini, and Win.ini. This article describes the Windows Registry Checker tool.
More Information
Windows Registry Checker automatically scans the system registry for invalid entries and empty data blocks when it is started. If invalid registry entries are detected, Windows Registry Checker automatically restores a previous day’s backup. This is equivalent to running the scanreg /autorun command from a command prompt. If no backups are available, Windows Registry Checker tries to make repairs to the registry. This is equivalent to running the scanreg /fix command from a command prompt. If the registry contains more than 500 KB of empty data blocks, Windows Registry Checker automatically optimizes it.
Windows Setup runs the Windows Registry Checker tool to verify the integrity of the existing registry before it performs an upgrade. If it detects registry damage, it tries to fix it automatically.
The protected-mode version of the Windows Registry Checker tool (Scanregw.exe) can create a backup of the system files and scan the registry for invalid entries. If invalid entries are detected, it refers to the real-mode version of the Windows Registry Checker tool (Scanreg.exe) for a resolution.
You can configure Windows Registry Checker with a Scanreg.ini file. Settings that you can configure include:
Enabling or disabling the tool
The number of backups maintained (no more than five is recommended)
The location of the backup folder
Settings to add additional files to the backup set
For additional information about the Scanreg.ini file, click the article number below to view the article in the Microsoft Knowledge Base:
183603 How to Customize Registry Checker Tool Settings To start the Windows Registry Checker tool, click Start, click Run, type scanregw.exe in the Open box, and then click OK.
NOTE: To use the Windows Registry Checker tool with the /restore parameter, you must run the tool from a command prompt running outside of Windows. When you do so, you can choose up to five registry backup files listed for you to restore.
To Restore Individual Files
To restore individual files, follow these steps:
Click Start, point to Find, and then click Files Or Folders.
In the Named box, type rb0*.cab, and then click Find Now.
Double-click the cabinet file that contains the file that you want to restore.
Right-click the file that you want to restore, click Extract, and then choose the folder where the new file is to be placed. Microsoft recommends that you place the file in your Temp folder.
Restart your computer in MS-DOS mode (in Windows Millennium Edition, this requires that you restart with the Windows Millennium Edition Startup disk).
Copy the file that you extracted to the appropriate folder. Note that registry .dat files are typically marked as hidden and read-only, so you need to use both the attrib and copy commands to replace the existing file with the newly extracted one.
Known Issues for Windows Registry Checker
If your registry contains an entry that references a file (such as a .vxd file) that no longer exists, it is not repaired by Windows Registry Checker. Such errors are not typically damaging, and you can manually remove the entry.
The amount of conventional memory that is required by Windows Registry Checker is determined by the size of your registry. Windows Registry Checker may require 580 KB or more of free conventional memory to complete the repair process. If you encounter an «Out of Memory» error message, optimize your free conventional memory.
NOTE: Extended memory is required for Windows Registry Checker to operate properly, so it does not run when you start your computer with the Safe Mode Command Prompt Only option. The exception to this is the scanreg /restore command, which is the only Scanreg function that can run without extended memory memory.
References
For additional information about Registry Checker command line switches, click the article number below to view the article in the Microsoft Knowledge Base:
184023 Command-Line Switches for the Registry Checker Tool
Использование средства проверки системных файлов для восстановления отсутствующих или поврежденных системных файлов
Если некоторые функции Windows не работают или Windows завершает работу, используйте средство проверки системных файлов для сканирования Windows и восстановления файлов.
Несмотря на то, что приведенные ниже шаги могут показаться сложными на первом этапе, просто выполните их по порядку, и мы попробуем помочь вам.
Запуск средства проверки системных файлов (SFC.exe)
выполнив указанные ниже действия.
Откройте командную строку с повышенными привилегиями. Для этого выполните указанные ниже действия, в зависимости от версии операционной системы:
Пользователям Windows 10, Windows 8.1 или Windows 8 перед запуском средства проверки системных файлов нужно запустить систему обслуживания образов развертывания и управления ими (DISM). (Если на вашем компьютере установлена система Windows 7 или Windows Vista, перейдите сразу к шагу 3.)
Введите следующую команду и нажмите клавишу ВВОД. Выполнение команды может занять несколько минут.
DISM.exe /Online /Cleanup-image /Restorehealth
Важно! При запуске этой команды DISM обращается к Центру обновления Windows, чтобы получить файлы для устранения повреждений. Но если поврежден клиент Центра обновления Windows, используйте работающий экземпляр Windows в качестве источника восстановления либо параллельную папку Windows из сетевого расположения или со съемного носителя, например DVD-диска Windows, в качестве источника файлов. Для этого введите в командной строке такую команду:
DISM.exe /Online /Cleanup-Image /RestoreHealth /Source: C:\RepairSource\Windows /LimitAccess
Примечание. Вместо заполнителя C:\RepairSource\Windows укажите расположение вашего источника восстановления. Дополнительные сведения об использовании средства DISM для восстановления Windows см. в статье Восстановление образа Windows.
Введите в командной строке приведенную ниже команду и нажмите клавишу ВВОД:

Команда sfc /scannow проверит все защищенные системные файлы и заменит поврежденные файлы их кэшированной копией, расположенной в сжатой папке по адресу %WinDir%\System32\dllcache.
Заполнитель %WinDir% представляет собой папку операционной системы Windows. Например, C:\Windows.
Примечание. Не закрывайте это окно командной строки, пока проверка не завершится на 100 %. Результаты проверки будут показаны после завершения данного процесса.
После завершения процесса проверки на экране может появиться одно из приведенных ниже сообщений:
Защита ресурсов Windows не обнаружила нарушений целостности.
Это значит, что отсутствующие и поврежденные системные файлы не обнаружены.
Защита ресурсов Windows не может выполнить запрошенную операцию.
Для устранения этой проблемы выполните сканирование с помощью средства проверки системных файлов в безопасном режиме, убедитесь, что папки PendingDeletes и PendingRenames находятся в папке %WinDir%\WinSxS\Temp.
Защита ресурсов Windows обнаружила поврежденные файлы и успешно их восстановила. Сведения см. в журнале CBS.Log %WinDir%\Logs\CBS\CBS.log.
Для просмотра подробных сведений о сканировании и восстановлении системных файлов перейдите к разделу Как просмотреть подробные сведения процесса работы средства проверки системных файлов.
Защита ресурсов Windows обнаружила поврежденные файлы, но не может восстановить некоторые из них. Сведения см. в журнале CBS.Log %WinDir%\Logs\CBS\CBS.log.
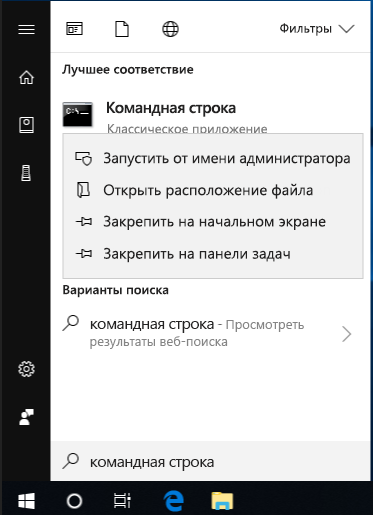
Проведите пальцем от правого края экрана к центру и коснитесь кнопки Поиск. Либо, если вы используете мышь, переместите указатель в правый нижний угол экрана и щелкните кнопку Поиск. Введите запрос Командная строка в поле Поиск, щелкните правой кнопкой мыши элемент Командная строка, затем выберите команду Запуск от имени администратора. Если система запросит пароль администратора или подтверждение, введите пароль или нажмите кнопку Разрешить.

Для этого нажмите кнопку Пуск, введите запрос Командная строка или cmd в поле Поиск, щелкните правой кнопкой мыши элемент Командная строка, а затем выберите команду Запуск от имени администратора. При получении запроса на ввод пароля администратора или подтверждения введите пароль или нажмите кнопку Разрешить.
Дополнительная информация
Чтобы ознакомиться с подробными сведениями, включенными в файл CBS.Log, вы можете скопировать сведения в файл Sfcdetails.txt с помощью команды Findstr, а затем просмотреть их в этом файле. Для этого выполните указанные ниже действия.
Откройте командную строку с повышенными привилегиями, как это описано на шаге 1.
Введите в командной строке приведенную ниже команду и нажмите клавишу ВВОД:
Примечание. В файле Sfcdetails.txt содержатся сведения о каждом запуске средства проверки системных файлов на компьютере. Он также содержит информацию о файлах, которые не были исправлены средством проверки системных файлов. Проверьте дату и время записей, чтобы определить проблемные файлы, обнаруженные при последнем запуске средства проверки системных файлов.
Откройте файл Sfcdetails.txt на рабочем столе.
В файле Sfcdetails.txt используется следующий формат:
Сведения о дате и времени SFC В следующем примере файла журнала содержится запись для одного файла, который не удалось исправить: 2007-01-12 12:10:42, Info CSI 00000008 [SR] Cannot repair member file [l:34<17>]»Accessibility.dll» of Accessibility, Version = 6.0.6000.16386, pA = PROCESSOR_ARCHITECTURE_MSIL (8), Culture neutral, VersionScope neutral, PublicKeyToken =
Как вручную заменить поврежденный системный файл гарантированно работоспособной копией файла.
После определения, какой системный файл поврежден и не может быть восстановлен, с помощью подробных сведений в файле Sfcdetails.txt, выясните расположение поврежденного файла, затем вручную замените поврежденный файл его гарантировано работоспособной копией. Для этого выполните указанные ниже действия.
Примечание. Гарантировано работоспособную копию системного файла можно взять с другого компьютера, на котором установлена такая же, как на вашем компьютере версия Windows. Чтобы убедиться в работоспособности системного файла, который вы планируете скопировать на другом компьютере, можно провести процесс проверки средством проверки системных файлов.
Распространите на поврежденный системный файл права собственности администратора. Для этого скопируйте, а затем вставьте (или введите) в командную строку с повышенными привилегиями приведенную ниже команду, затем нажмите клавишу ВВОД:
takeown /f Путь_и_имя_файла Примечание. Заполнитель Путь_и_имя_файла представляет собой путь и имя файла для поврежденного файла. Например, введите takeown /f C:\windows\system32\jscript.dll. 
Предоставьте администраторам полный доступ к поврежденному системному файлу. Для этого скопируйте и вставьте (или введите) приведенную ниже команду и нажмите клавишу ВВОД:
icacls Путь_и_имя_файла /GRANT ADMINISTRATORS:F Примечание. Заполнитель Путь_и_имя_файла представляет собой путь и имя файла для поврежденного файла. Например, введите icacls C:\windows\system32\jscript.dll /grant administrators:F.
Замените поврежденный системный файл гарантировано работоспособной копией файла. Для этого скопируйте и вставьте (или введите) приведенную ниже команду и нажмите клавишу ВВОД:
Copy Исходный_файл Расположение Примечание. Заполнитель Исходный_файл представляет собой путь и имя гарантировано работоспособной копии файла на вашем компьютере, а заполнитель Расположение представляет собой путь и имя поврежденного файла. Например, введите copy E:\temp\jscript.dll C:\windows\system32\jscript.dll.
Если описанные выше действия не помогли, возможно, потребуется переустановить Windows. Дополнительные сведения см . в разделе Варианты восстановления Windows10.
Scan And Fix Disk Drive Errors with CHKDSK in Windows 10
CHKDSK or Check Disk is a built-in Windows utility checks the state of the hard drive and correct any errors it finds, if possible. It can be useful for troubleshooting read errors, Bad sectors and other storage-related problems. Whenever we need to detect and fix file system or disk corruption, we run the built-in Windows Check Disk tool. The Check Disk utility or ChkDsk.exe checks file system errors, bad sectors, lost clusters, and so on. Here how to run chkdsk utility on windows 10 and Fix Disk Drive Errors.
Run chkdsk utility on windows 10
You can Run the Check disk Tool From disk Drive properties or through the command line. To Run Disk Check Utility first open This PC -> Here select and right click on System Drive -> Properties > Tools tab > Check. But Running Chkdsk Tool from Command is very Effective.
Command Line Check Disk
For this first open Command prompt as administrator, You Can do this by click on start menu search type cmd, then right click on Command prompt from search results and select run as administrator. Here on the Command Prompt, type the command “chkdsk” followed by a space, then the letter of the drive you wish to examine or repair. In our case, it’s internal drive “C.”
chkdsk

Simply running the CHKDSK command in Windows 10 will only display the disk’s status, and won’t fix any errors present on the volume. This will run Chkdsk in a Read-Only mode and display the status of the current drive. To tell CHKDSK to fix the drive, we need to give some Extra parameters.
CHKDSK extra parameters
Typing chkdsk /? and hitting Enter will give you its parameters or switches.
/f Fixes errors detected.
/r Identifies Bad Sectors and attempts recovery of information.
/v Displays list of every file in every directory, on FAT32. On NTFS, is displays the cleanup messages.
The following are valid on NTFS volumes only.
/c Skips the checking of cycles within the folder structure.
/I Performs a simpler check of index entries.
/x Forces the volume to dismount. Also invalidates all open file handles. This should be avoided in Desktop Editions of Windows, because of possibility of data loss/corruption.
/l[:size] It changes the size of the file that logs NTFS transactions. This option too, like the above one, is intended for server administrators ONLY.
Do note that, when you boot to the Windows Recovery Environment, Only two switches may be available.
/p It performs an exhaustive check of the current disk
/r It repairs possible damage on the current disk.
The following switches work in Windows 10, Windows 8 on NTFS volumes only:
/scan Run online scan
/forceofflinefix Bypass online repair and queue defects for offline repair. Needs to be used along with /scan.
/perf Perform the scan as fast as possible.
/spotfix Perform spot repair in offline mode.
/offlinescanandfix Run offline scan and perform fixes.
/sdcclean Garbage collection.
These switches are supported by Windows 10 on FAT/FAT32/exFAT volumes only:
/freeorphanedchains Free up any orphaned cluster chains
/markclean Mark the volume clean if no corruption is detected.

To tell CHKDSK to fix the drive, we need to give it parameters. After your drive letter, type the following parameters separated by a space each: “/f /r /x”.
The “/f” parameter tells CHKDSK to fix any errors it finds; “/r” tells it to locate the bad sectors on the drive and recover readable information; “/x” forces the drive to dismount before the process starts.
Command to Check Disk Errors
To summarize, the full command that should be typed into the Command Prompt is:
In our example, it’s:

Note that CHKDSK needs to be able to lock the drive, meaning that it cannot be used to examine the system’s boot drive if the computer is in use. If your target drive is an external or non-boot internal disk, the CHKDSK process will begin as soon as we enter the command above. If, however, the target drive is a boot disk, the system will ask you if you’d like to run the command before the next boot. Type “yes” (or “y”), restart the computer, and the command will run before the operating system loads. This will scan the drive for Errors, Bad sectors if found any this will repair the same for you.

This scanning and repair process can take a long time, especially when performed on larger drives. Once it’s done, however, it will present a summary of results including total disk space, byte allocation, and, most importantly, any errors that were found and corrected.
Conclusion :
One word: You can use Command chkdsk c: /f /r /x to Scan And Fix Hard Drive Errors in Windows 10. I hope after reading this post you clear about CHKDSK Command, And how To use extra parameters to scan and repair disk Errors. Also Read


