- 3 Ways to Keep a Window Always on Top on Windows 10
- 1. Use a Keyboard Shortcut with an Always on Top AutoHotkey Script
- 2. Use Your Mouse with DeskPins
- 3. Use a System Tray Menu with TurboTop
- Bring the Always-on-Top Feature to All Windows
- Maximized window leaves blank space on top of screen [FULL FIX]
- How can I fix Windows 10 maximize window bug?
- 1. Update your Windows 10 operating system
- 2. Update video card drivers using Device Manager
- Need to update your graphics card drivers? It’s simpler than you think!
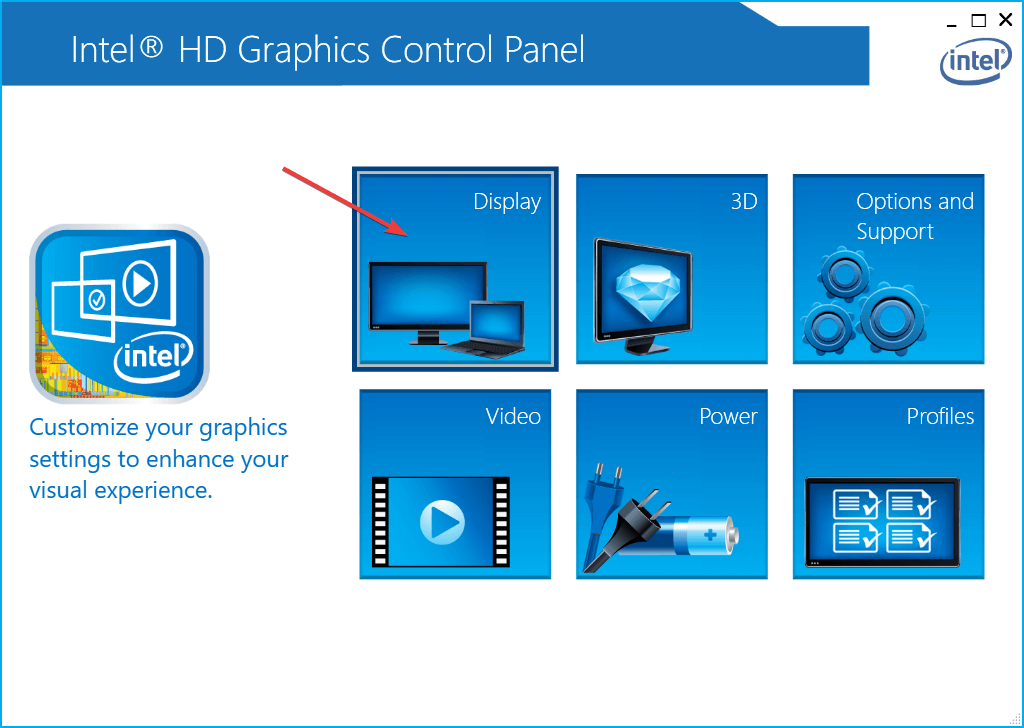
- 3. Activate ‘Scale full screen’ option inside Intel HD Graphics
- 4. Reload Graphics driver with this keyboard shortcut
- Top 9 Fixes for Solving Windows 10 Taskbar Not Hiding in Fullscreen
- Gaurav Bidasaria
- 1. Update and Restart Windows
- 2. Try Autohide
- 3. Use F11 Keyboard Shortcut
- 4. Notification Badges
- 5. Restart Windows Explorer
- 6. Chrome: Uncheck Hardware Acceleration
- 7. Chrome: Use Canary or Other Browser
- 8. Reset Chrome
- 9. Keyboard Shortcut — Quick Fix
- Watch Peacefully
- Read Next
- 7 Best Ways to Fix Kindle for PC Desktop App Won’t Open on Windows
- What Is Microsoft Power Automate Desktop and Why Do You Need It
- 6 Best Ways to Fix Action Center Greyed Out on Windows 10
- 8 Best Ways to Fix Google Chrome Security Certification Error
- How to Use Paint 3D to Edit Photos
- 7 Top Ways to Fix OneNote Notebook Disappearing Error on Windows
- 6 Best Ways to Fix Store Data Structure Corruption on Windows 10
- 7 Best Ways to Fix Hibernate Goes to Lock Screen Error on Windows 10
3 Ways to Keep a Window Always on Top on Windows 10


When you are working in Windows with limited screen space, it’s useful to have certain windows stay on top of others. Some programs in Windows automatically incorporate this “always on top” feature, but most programs don’t, and Windows doesn’t include this feature either.
Today we’ll cover three ways to easily add the “always on top” feature to every single program in Windows.
1. Use a Keyboard Shortcut with an Always on Top AutoHotkey Script
AutoHotkey is a free program that allows you to create scripts to perform multiple actions with a single keyboard shortcut. It runs in the background and sits in the system tray.
We’re going to use AutoHotkey to create a script that will keep a selected window on top of all others when you press Ctrl + Spacebar when that window is active. We’ll show you the script and explain how it works. But we’ll also provide a downloadable AutoHotkey script file you can use.
Download and install AutoHotkey and then run it.
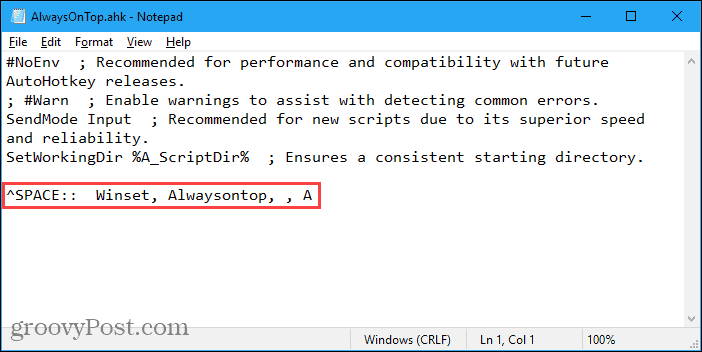
Download the AlwaysOnTop.ahk script file, extract the .zip file, and put the script in a folder on your hard drive that won’t be moved or deleted.
The script contains some comments and then the following command:
This command sets the currently active window to always be on top when you press Ctrl + Spacebar. If you’d rather use a different key combination, you can change the first part of the command, “^SPACE“. The “^” character represents the Ctrl key. You’ll find the symbols to use for other hotkeys in the Hotkey Modifier Symbols section on this AutoHotkey help page.
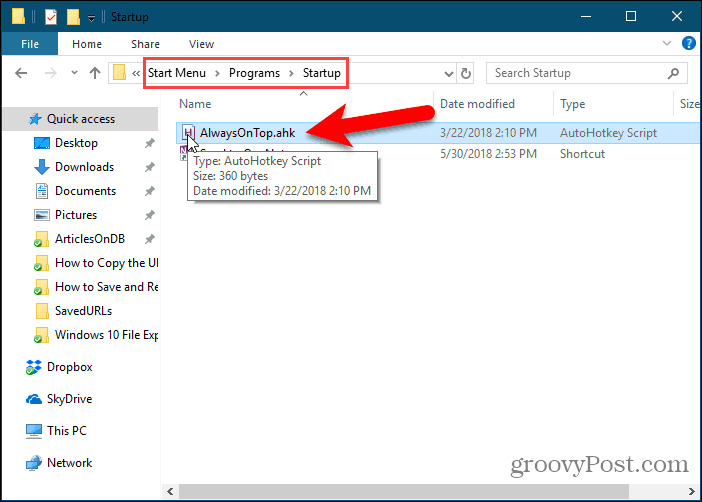
You can put the script in the Windows startup folder (%AppData%\Microsoft\Windows\Start Menu\Programs\Startup), so it starts automatically when Windows starts.
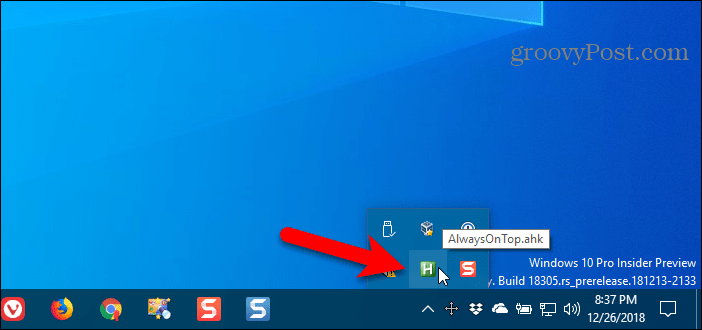
The AutoHotkey script stays in the system tray.
To make the active window always on top, press Ctrl + Spacebar (or the keyboard shortcut you assigned). Press the keyboard shortcut again to disable “always on top” for the active window.
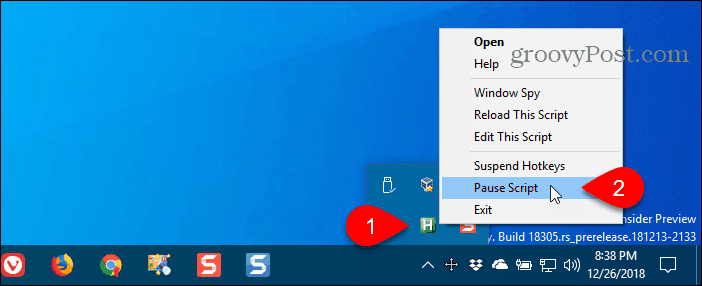
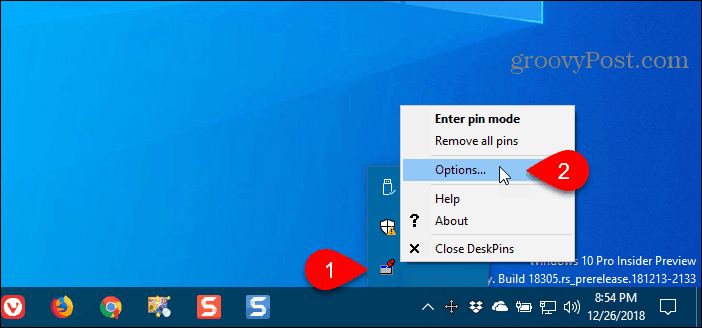
For script options, right-click on the AutoHotkey icon in the system tray.
2. Use Your Mouse with DeskPins
DeskPins provides pins you can grab and use to keep any window on top of all other windows. The program sits in the system tray and uses minimal resources.
Download and install DeskPins. Run the program, right-click the icon in the system tray, and select Options to change the Pins, Autopin, and Hotkeys settings.
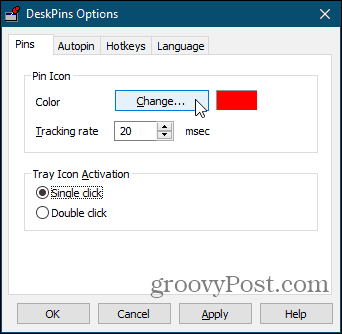
On the Pins tab, you can change the color of the pins. The Tracking rate controls how often each pin checks the pinned window’s position and state. Lower values make the pins more responsive. You can enter any number from 10 to 1000 msec (milliseonds).
If you have an older computer, you may want to increase the Tracking rate number to avoid slowing down your computer.
You can also choose Single click or Double click under Tray Icon Activation to indicate how you get pins from the DeskPins system tray icon. The default is Single click.
You can have DeskPins automatically pin certain types of windows using rules on the Autopin tab.
Check the Enable box and then click Add to add a new rule. Use the check boxes next to the rules to enable and disable individual rules.
Click Help to access the DeskPins help file for more information about automatically pinning windows.

DeskPins provides default shortcuts for entering pin mode and toggling the active window pin. You can change these shortcuts on the Hotkeys tab.

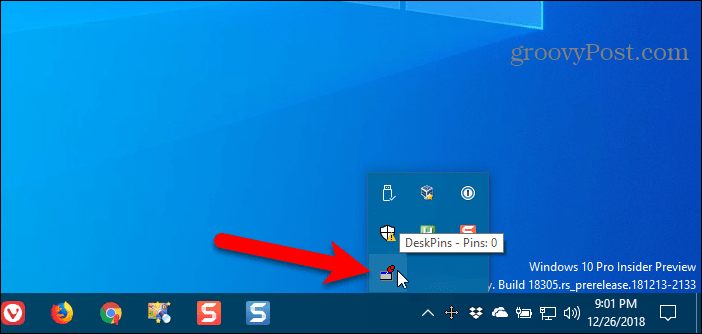
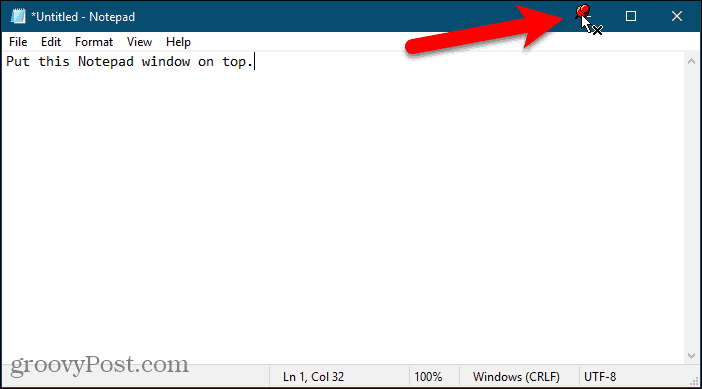
To pin a window on top, click (or double-click, depending on the setting) the DeskPins icon in the system tray.
Then, click the title bar on the window you want to keep always on top.
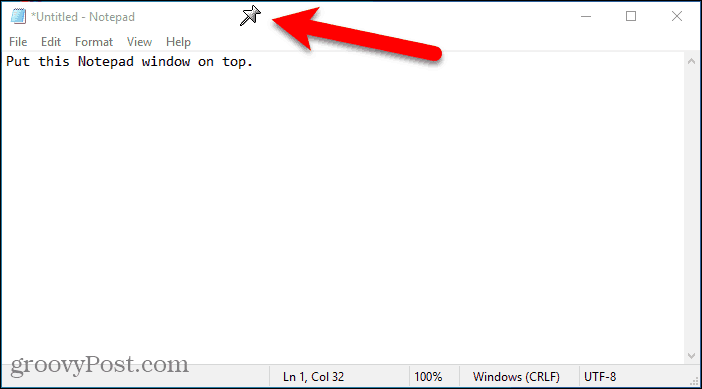
A pin displays on the title bar of the chosen window in the color you specified, or in the default color red.
Click the pin again to disable always on top for the window.
3. Use a System Tray Menu with TurboTop
TurboTop also sits in your system tray like DeskPins. But it operates differently.
Download and install TurboTop. Then, run the program.
To keep a window always on top, click the TurboTop icon in the system tray. A list of all open windows displays. Select the title of the window you want.
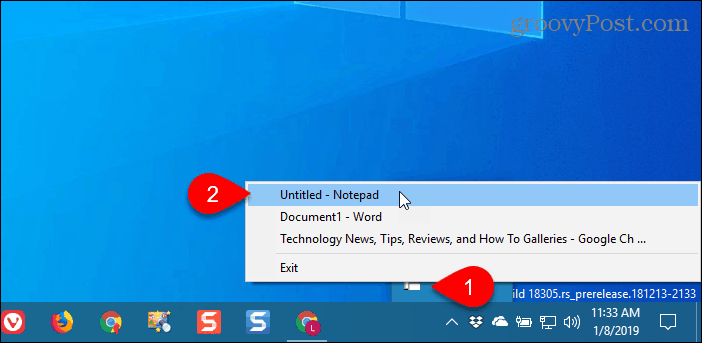
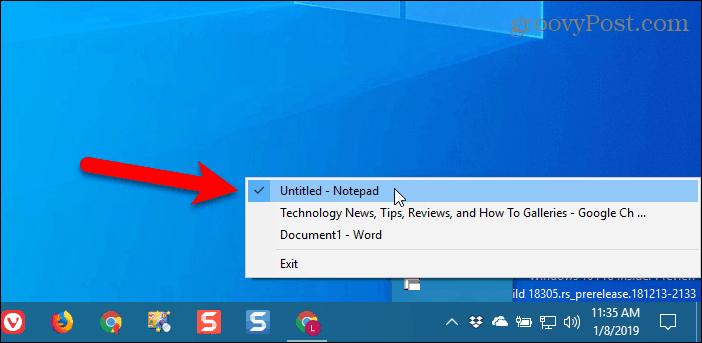
Any windows you choose to be always on top are indicated with a check mark on the TurboTop menu.
To stop keeping a window always on top, click the TurboTop icon in the system tray and select that window again, so there’s no check mark next to the window name on the menu.
Bring the Always-on-Top Feature to All Windows
Whether you like using keyboard shortcuts or prefer using the mouse, there’s an easy solution for keeping windows always on top. If you’ve found other options for keeping windows always on top, let us know in the comments.
Maximized window leaves blank space on top of screen [FULL FIX]

![]()
A big number of Windows 10 users have reported that maximized windows leave a blank space on top of the screen. This error causes the top of the screen to be unusable, and if you right-click on it, it reacts the same way it would if you would right-click on the desktop. This can be a big problem, so let’s see how to fix it.
How can I fix Windows 10 maximize window bug?
1. Update your Windows 10 operating system
- Click on Start button -> Settings (cog wheel).
- Inside the Settings window, scroll down and select Update and Security.
- Click the Check for updates button and wait for the process to complete.
2. Update video card drivers using Device Manager
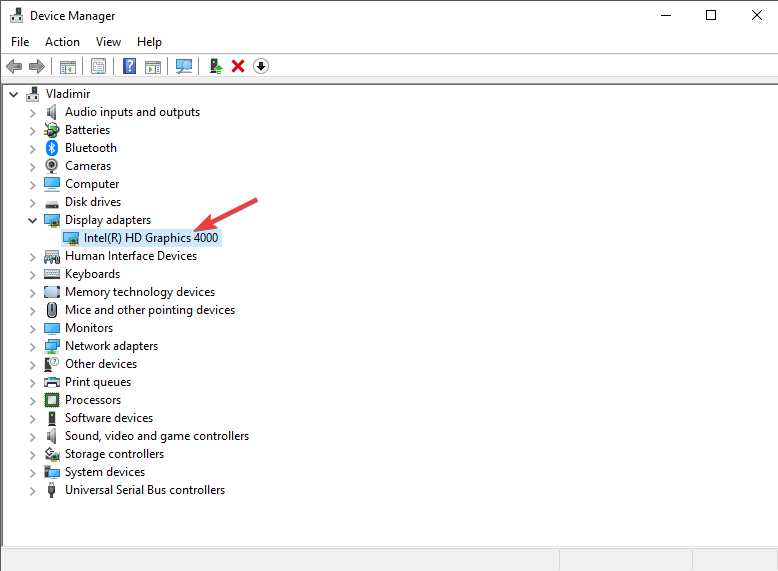
- Press Win + X keys on your keyboard -> select Device Manager.
- Inside the Device Manager-> select Display Adapters -> select your video card.

- Right-click on your video card, and select Update Driver.
- In the newly opened window, select ‘Search automatically for updated driver software’.
Need to update your graphics card drivers? It’s simpler than you think!
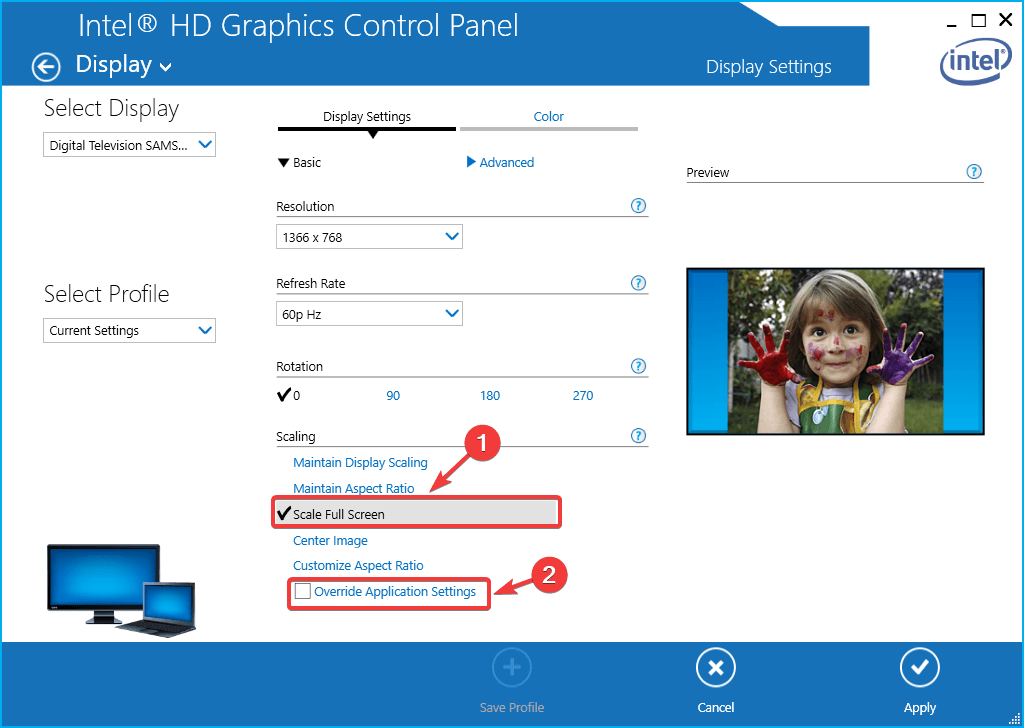
3. Activate ‘Scale full screen’ option inside Intel HD Graphics
- Right-click on your Desktop -> Graphics Properties.
- Inside the Intel application, click on ‘Display’.
- Select the option ‘Scale full screen’, and tick the box next to ‘Override Applications Settings.
- Select Apply.
4. Reload Graphics driver with this keyboard shortcut
- Press ‘Ctrl + Shift + Win Key + B’ on your keyboard to reload graphics driver.
- The screen will flicker, and you will hear a sound that confirms the reload is completed. After this process is done, please try and see if the issue persists.
In this article, we explored some of the best proven troubleshooting methods for having an issue with a blank area at the top of your screen. This issue is caused by an incompatibility between the display settings found in your Windows 10 device, and the way your dual-display reacts.
Please make sure to follow the steps we provided in this guide in the order that they were written, to avoid any other issues. Also, don’t forget to let us know if this guide helped you solve your issue, by using the comment section below.
Top 9 Fixes for Solving Windows 10 Taskbar Not Hiding in Fullscreen
Gaurav Bidasaria
18 Jan 2019
Using fullscreen mode in Windows 10 is simple. You don’t want any distractions and want to focus on the thing in front of you. People usually go for fullscreen mode while playing games or watching videos. You can do both the activities inside your favorite browser like Chrome, or some video player like VLC on your PC. However, it is a sore sight for the eyes when Taskbar is not hiding in fullscreen, especially when you are streaming content or gaming.

Several users are facing this issue where the taskbar is not hiding in fullscreen mode. That ruins the experience, especially when you can see all those icons with constant notifications that make them blink. In either case, we don’t want that.
Let’s see how we can resolve the Windows 10 taskbar not hiding in fullscreen error.
1. Update and Restart Windows
Make sure your PC is running the latest version of Windows. Press Windows Key+I to open Settings and click on Update & Security.

If there is an update, you should see it there or you can fetch it manually by clicking on Check for updates button. If there are any, I suggest you to install the updates immediately and then try the fullscreen mode again to see if the taskbar hides or not.
2. Try Autohide
Windows 10 provides a lot of ways to personalize your PC, and one of them is the ability to hide the taskbar automatically when you are not using it. This means the taskbar will only reveal itself when you hover the mouse pointer at the bottom of the screen. Here’s how the desktop appears when the taskbar is hidden.

To do this, open Settings by pressing Windows Key+I and click on Personalization.

Select Taskbar in the left windowpane and toggle the Automatically hide the taskbar in desktop mode option on. Now, hover your mouse at the bottom of the screen to reveal it on any window. If you are using the tablet mode, there is a separate option for that.

Check if you can still see the taskbar in fullscreen mode while watching videos or playing games on your computer. You can also access the taskbar settings quickly by right-clicking on the taskbar and selecting Taskbar Settings.

Also on Guiding Tech

How to Connect PSP Street to Desktop and Laptop to Play Games in Full Screen
3. Use F11 Keyboard Shortcut
If you are looking for a quick solution, here is a simple trick. Simply press the F11 key on your keyboard, and the window of the app you’re using will go into fullscreen mode immediately.

The F11 shortcut works on all Windows versions. So if you have VLC and File Explorer open, both will go fullscreen hiding the taskbar. On some keyboards (especially laptops), you will have to press Fn+F11 keys. It depends on your keyboard layout and the make and model of your PC.
4. Notification Badges
When you receive a notification, a badge appears on the respective app’s icon. Ideally, this shouldn’t affect the fullscreen mode. But sometimes, it unhides the taskbar. Quite often, if you check the notification and close it, the taskbar will hide again in fullscreen mode, but that is not always the case.

Windows 10 has solved the said problem with the Action Center, but the error still pops up often. You can also try restarting the app that sent the notification to check if that works. If you find a particular app that is frequently causing this problem, try reinstalling it to see if the problem goes away. Or, you can turn off notifications for the said app.
5. Restart Windows Explorer
Restarting Windows Explorer is a lot faster than restarting Windows 10. It takes a few moments but can solve the taskbar not hiding error in Windows 10. Right-click on the taskbar and select Task Manager. You can also try the CTRL+SHIFT+ESC shortcut.

Scroll a little to find Windows Explorer under the Apps column. Right-click on it and select Restart. When you do that, your windows will disappear momentarily, and some apps will shut down. That’s fine. Windows Explorer provides a GUI (graphical user interface) to help us navigate and interact with the filesystem of Windows.

Another way to do that without entering the Task Manager is to press and hold the CTRL+SHIFT keys and right-clicking on the taskbar. You should now see a new option at the bottom named Exit Explorer.

Also on Guiding Tech

19 Best Windows 10 Tips and Tricks You Should Know
6. Chrome: Uncheck Hardware Acceleration
The taskbar seems to be giving trouble to the Chrome users too. While watching a YouTube video in fullscreen, do you see the taskbar? If yes, here are a few solutions. Open Chrome’s menu and click on Settings.

Scroll to the bottom of the screen and click on Advanced.

Under the System heading, uncheck ‘Use hardware acceleration when available’ option. You will be asked to relaunch Chrome.

Check if Taskbar is hiding in fullscreen now on your Windows computer.
7. Chrome: Use Canary or Other Browser
Chrome is an excellent browser but not without flaws. If the problem persists and you realize it to be Chrome specific, maybe it is time to check out alternatives. Canary is a browser by Google meant for developers and early adopters. It is known to pack a few bugs but it works fine most of the time.
If you can do away with Chrome, there are some compelling alternatives like Firefox, Safari, and Opera. Do give them a shot.
8. Reset Chrome
In a last attempt to hide the taskbar on Chrome browser in fullscreen mode, you may reset your browser to restore it to the original settings. Open Settings on Chrome again and click on Advanced at the bottom like you did in the 6th step. Under Reset and clean up, select Restore settings to their original defaults.

Click on Reset settings in the next pop-up. That will reset all settings that you may have changed after installing Chrome. You can always set them back.

9. Keyboard Shortcut — Quick Fix
Have you tried the F11 keyboard shortcut? This is a temporary solution that will hide the Taskbar on Windows 10 OS. Pressing it again will bring it back, but that means you won’t see the Taskbar even when you switch to browser or File Explorer view. Sometimes, while gaming, we use other apps like Discord or YouTube. You won’t view the Taskbar even then, but it should give you worry-free gaming and streaming experience.
Watch Peacefully
Distractions can be annoying and not being able to do something about it can be even more frustrating. Thankfully, there are ways to solve the taskbar not hiding issue in Windows 10. Let us know which one worked or if you found a new solution.
Next up: Is your Windows 10 PC running too slow? Here are 4 ways to make it run faster.
Last updated on 11 Jan, 2021
The above article may contain affiliate links which help support Guiding Tech. However, it does not affect our editorial integrity. The content remains unbiased and authentic.
Read Next

7 Best Ways to Fix Kindle for PC Desktop App Won’t Open on Windows
Can’t open the Amazon # Kindle app on your # desktop PC? Here are some solutions to fix that issue so you can get back to reading your books in peace in your free time.

What Is Microsoft Power Automate Desktop and Why Do You Need It
Everything you need to know about # Microsoft # Power Automate Desktop. Where to get it, how to use it, how to create your first workflow, and who should use it. Complete guide.

6 Best Ways to Fix Action Center Greyed Out on Windows 10
Is the Action Center greyed out on your # Windows 10 computer? Here is an in-depth look at all the solutions that can help you fix this issue promptly.

8 Best Ways to Fix Google Chrome Security Certification Error
Learn how to fix the # Google # Chrome # Security certification error by following the post below.

How to Use Paint 3D to Edit Photos
Wondering how to edit pictures using Paint 3D in # Windows 10? Check our detailed guide on how to use various tools in Paint 3D to edit images.

7 Top Ways to Fix OneNote Notebook Disappearing Error on Windows
Can’t find # OneNote Notebook? Here are a few ways to find missing OneNote notebooks and notes on # Windows 10 computers. Most probably, they are missing and not lost.

6 Best Ways to Fix Store Data Structure Corruption on Windows 10
Facing the BSOD or blue screen of death with the ‘store data structure corruption’ error on your # Windows computer screen? Here are some solutions with explanations to fix it.

7 Best Ways to Fix Hibernate Goes to Lock Screen Error on Windows 10
Activating hibernate mode leads to the lock or login # screen on # Windows 10? Here are a few solutions that will help you fix the issue so you don’t have to worry about battery juice again.


