- How permissions are handled when you copy and move files and folders
- Summary
- More information
- Give permissions to files and folders in Windows 10
- Replies (24)
- Default permissions for the MachineKeys folders
- Summary
- Default permissions for MachineKeys folder
- Permissions for Everyone group
- Set the folder permissions for Everyone on Windows-7 (10, 8.1), how to?
- The solution is simple to Set the folder permissions for Everyone on Windows 10, 8.1, 7, .. and MS Server 2016, 2019!
- 1.) . Set the folder permissions for Everyone! (Image 1 to 3) 2.) . File and Folder Permissions!
- 1.) Set the folder permissions for Everyone!
- Set or change permissions for a public folder
- More about permissions and Outlook folders
How permissions are handled when you copy and move files and folders
This article describes how Windows Explorer handles file and folder permissions in different situations.
Original product version: В Windows 10 — all editions, Windows Server 2012 R2
Original KB number: В 310316
Summary
In Microsoft Windows 2000, in Windows Server 2003, and in Windows XP, you have the option of using either the FAT32 file system or the NTFS file system. When you use NTFS, you can grant permissions to your folders and files to control access to those objects. When you copy or move a file or folder on an NTFS volume, how Windows Explorer handles the permissions on the object varies, depending on whether the object is copied or moved within the same NTFS volume or to a different volume.
More information
By default, an object inherits permissions from its parent object, either at the time of creation or when it is copied or moved to its parent folder. The only exception to this rule occurs when you move an object to a different folder on the same volume. In this case, the original permissions are retained.
Additionally, note the following rules:
The Everyone group is granted Allow Full Control permissions to the root of each NTFS drive.
Deny permissions always take precedence over Allow permissions.
Explicit permissions take precedence over inherited permissions.
If NTFS permissions conflict, for example, if group and user permissions are contradictory, the most liberal permissions take precedence.
Permissions are cumulative.
To preserve permissions when files and folders are copied or moved, use the Xcopy.exe utility with the /O or the /X switch.
The object’s original permissions will be added to inheritable permissions in the new location.
To add an object’s original permissions to inheritable permissions when you copy or move an object, use the Xcopy.exe utility with the -O and -X switches.
To preserve existing permissions without adding inheritable permissions from the parent folder, use the Robocopy.exe utility, which is available in the Windows 2000 Resource Kit.
You can modify how Windows Explorer handles permissions when objects are copied or moved to another NTFS volume. When you copy or move an object to another volume, the object inherits the permissions of its new folder. However, if you want to modify this behavior to preserve the original permissions, modify the registry as follows.
This section, method, or task contains steps that tell you how to modify the registry. However, serious problems might occur if you modify the registry incorrectly. Therefore, make sure that you follow these steps carefully. For added protection, back up the registry before you modify it. Then, you can restore the registry if a problem occurs. For more information about how to back up and restore the registry, see How to back up and restore the registry in Windows.
Click Start, click Run, type regedit in the Open box, and then press ENTER.
Locate and then click the registry key: HKEY_CURRENT_USER\SOFTWARE\Microsoft\Windows\CurrentVersion\Policies\Explorer .
On the Edit menu, click Add Value, and then add the following registry value:
- Value name: ForceCopyAclwithFile
- Data type: DWORD
- Value data: 1
Exit Registry Editor.
You can modify how Windows Explorer handles permissions when objects are moved in the same NTFS volume. As mentioned, when an object is moved within the same volume, the object preserves its permissions by default. However, if you want to modify this behavior so that the object inherits the permissions from the parent folder, modify the registry as follows:
Click Start, click Run, type regedit, and then press ENTER.
Locate and then click the registry subkey: HKEY_LOCAL_MACHINE\SOFTWARE\Microsoft\Windows\CurrentVersion\Explorer .
On the Edit menu, click Add Value, and then add the following registry value:
- Value name: MoveSecurityAttributes
- Data type: DWORD
- Value data: 0
Exit Registry Editor.
Make sure that the user account that is used to move the object has the Change Permissions permission set. If the permission is not set, grant the Change Permissions permission to the user account.
The MoveSecurityAttributes registry value only applies to Windows XP and to Windows Server 2003. The value does not affect Windows 2000.
Give permissions to files and folders in Windows 10
Original title: REad only
Windows 10 has set all my files and folders to read only. I am not able to turn this off. Is there a trick to this as right clicking and unchecking read only I get you need admin rights message and it doesn’t work. This is causing some games and programs I have to not work correctly.
Replies (24)
* Please try a lower page number.
* Please enter only numbers.
* Please try a lower page number.
* Please enter only numbers.
![]()
Thank you for posting in Microsoft Community. I understand your concern and I’ll be glad to assist you.
Please follow through.
- In Windows Explorer, right-click the file or folder you want to work with.
From the pop-up menu, select Properties, and then in the Properties dialog box click the Security tab.
In the Name list box, select the user, contact, computer, or group whose permissions you want to view. If the permissions are dimmed, it means the permissions are inherited from a parent object.
Turn off UAC (User Account Control)
Before you can do anything, you must turn off the UAC, or you will be locked out of the following steps.
1) Start -> Settings -> Control Panel -> User Accounts
2) Click «Change User Account Control Settings»
3) Move slider all the way down to «Never Notify»
4) Reboot
2) Take Ownership
Yes take ownership. Even though you are logged on as an Administrator, you can’t change files that don’t belong to you. The Program Files folder is set to the Trusted Installer group and the Administrator doesn’t have the rights to change anything. So now we have to claim all the files and folders.
1) Open Windows Explorer
2) R-Click on Program Files -> Properties -> Security Tab
3) Click Advanced -> Owner
4) Click Edit
5) Select Administrators -> Put a checkmark in Replace owner on subcontainers & objects -> Apply
6) Wait a while.
7) When it finishes, Click OK on all boxes to close everything
3) Fix Permissions
Now that you own the files, you have to give yourself permission to modify them
1) R-Click on Program Files -> Properties -> Security Tab
2) Click Advanced -> Change Permission
3) Select Administrators (any entry) -> Edit
4) Change the Apply To drop down box to This Folder, Subfolder & Files
5) Put check in Full Control under Allow column -> OK -> Apply
6) Wait some more.
7) When it finishes, the dialog boxes may hide behind the Explorer window. Minimize it and click OK on all the the dialog boxes
Hope this post helps. Get back to us for further queries. We are happy to help.
Default permissions for the MachineKeys folders
This article describes default permissions for the MachineKeys folders.
Original product version: В Windows Server 2003
Original KB number: В 278381
Summary
The MachineKeys folder stores certificate pair keys for both the computer and users. Both Certificate services and Internet Explorer use this folder. The default permissions on the folder may be misleading when you attempt to determine the minimum permissions that are necessary for proper installation and the accessing of certificates.
Default permissions for MachineKeys folder
The MachineKeys folder is located under the All Users Profile\Application Data\Microsoft\Crypto\RSA folder. If the administrator didn’t set the folder to the minimum level, a user may receive the following errors when generating a server certificate by using Internet Information Server (IIS).:
- Failed to Generate Certificate Request
- Internal Server Error (The Private Key that you are importing might require a cryptographic service provider that is not installed on your system)
The following settings are the default permissions for the MachineKeys folder:
- Administrators (Full Control) This folder only
- Everyone (Special) This folder only
Permissions for Everyone group
To view the special permissions for the Everyone group, right-click the MachineKeys folder, select Advanced on the Security tab, and then select View/Edit. The permissions consist of the following permissions:
- List Folder/Read Data
- Read Attributes
- Read Extended Attributes
- Create Files/Write Data
- Create Folders/Append Data
- Write Attributes
- Write Extended Attributes
- Read Permissions
Select the Reset Permissions on all Child objects and enable propagation of inheritable permissions check box. The administrator doesn’t have full control on child objects to protect a user’s private part of the key pair. But the administrator can still delete certificates for a user.
For more information, see the following article:
Set the folder permissions for Everyone on Windows-7 (10, 8.1), how to?
The solution is simple to Set the folder permissions for Everyone on Windows 10, 8.1, 7, .. and MS Server 2016, 2019!
1.) . Set the folder permissions for Everyone! (Image 1 to 3)
2.) . File and Folder Permissions!
1.) Set the folder permissions for Everyone!
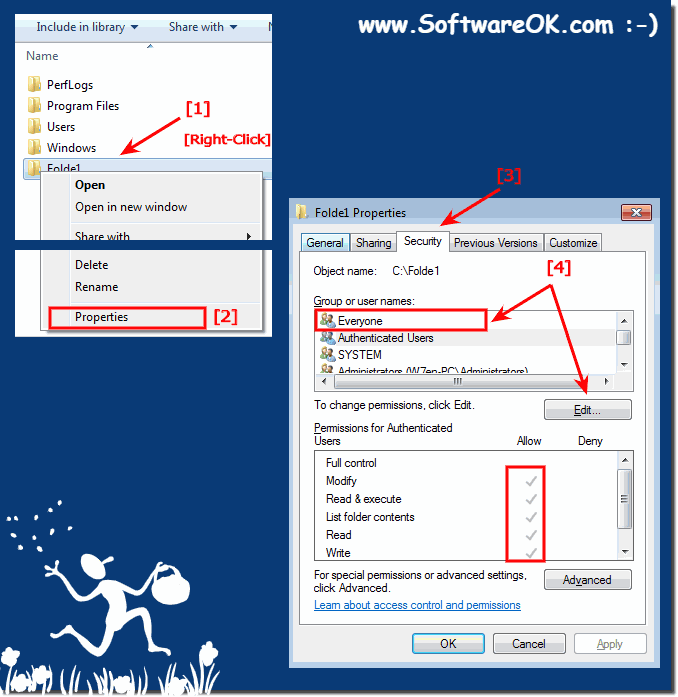
1. Please Start the MS-Explorer for example via [Windows-Logo]+[E] keyboard shortcut.
2, Browse to Folder and select via right mouse click!
3, In Context-Menu go to (select) Properties and select the Tab Security
(. see Image-1 Point 1 to 3)
| (Image-1) Windows-7 — Set the folder permissions for Everyone on! |
 |
In order to secure a windows (7, 8.1, 10, ie 11) computer and its resources, you must consider the rights that users will have. You can safely a computer or multiple computers by imparting users or groups specific user rights. You can help secure an object, such as a file or folder, by assigning permissions to allow users or groups to perform specific actions on that object. (permission rights for users on windows)

| (Image-2) Folder permissions for User on Windows-7! |
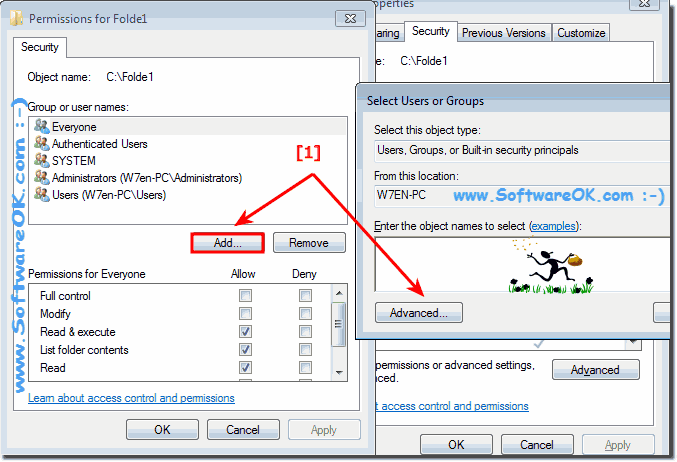 |
The windows permissions for Folders include Full Control, Modify, Read & Execute, List Folder Contents, Read, and Write access. For information about these permissions, see File and Folder Permissions. Each of these permissions consists of a logical group of special permissions, which are listed and defined below. Not all of the special permissions will apply to all objects
Please click Find Now and select Everyone (. see Image-3 Arrow-1,2,3)! and «OK»
Set or change permissions for a public folder
If you’ve created a public folder, or you want to grant or restrict access to a folder to specific users or groups, here’s how to set permissions for public folders.
Important: You need a Microsoft Exchange Server and an Exchange email account to use public folders with Outlook. Most home and personal email accounts don’t use Exchange Server.
In the Folder Pane, right-click the public folder to set permissions, and then click Properties.
Note: If you can’t see Public Folders in the Folder Pane, press Ctrl+6.
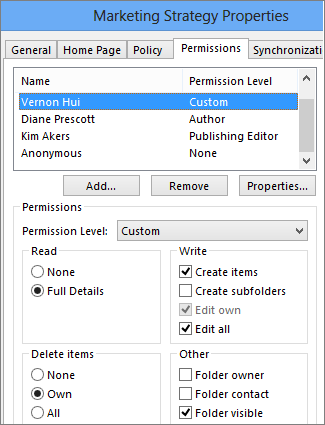
On the Permissions tab, under Permissions, choose a permissions level from the list.
Permissions descend from Owner, with all the rights, to Contributor, with the fewest rights.
After you choose a permissions level, you can fine-tune the permissions by selecting buttons or checking and unchecking boxes. If you do that, the Permission Level for the user or group will change to Custom.
In the example shown here, Diane and Kim have the built-in Author and Publishing Editor permission levels. Vernon was assigned to the Editor level, which was then customized to allow him to delete his own items.
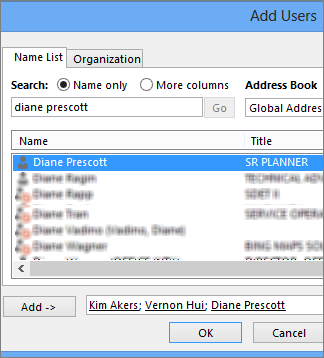
To find the users or contact groups you want to assign to that permissions level, click Add.
In the Global Address List, select the users and contact groups you want, clicking Add after selecting each one. As you add users or groups, they appear in the box to the right of the Add button.
Set different permissions for other users or groups by repeating steps 2 through 5.
More about permissions and Outlook folders
To learn more about setting permissions and how they work, read the «Do I have to apply permissions to share my files with other users on my computer?» section in the What to know before applying permissions to a file or folder article.


