- Объект Folder — работа с папками Windows
- Свойства объекта Folder – работа с папками Windows
- Методы объекта Folder – работа с Windows папками
- Коллекция Folders
- Folder Shows Empty but Files Are There Windows 10/8/7
- The Folder Shows Empty but Has Size Overview
- Why Would a Folder Shows Empty but Files Are There
- Solutions to Solve This Folder Is Empty Issue and Recover Missing Files
- 1. Show Hidden/Lost Files in an Empty Folder in File Explorer
- 2. Show Missing Files in an Empty Folder From Command Prompt
- 3. Recover Hidden Files in an Empty Folder With Data Recovery Software
- How to show File Extensions in Windows 10
- What are File Extensions & how are they useful
- Show File Extensions in Windows 10
- 1] Through Folder or File Explorer Options
- 2] Via Windows File Explorer
- 3] Using the Registry Editor
Объект Folder — работа с папками Windows
Доброго дня всем читателям блога scriptcoding.ru. Сегодня мы затронем такую тему как работа с папками Windows. Прежде всего, мы рассмотрим программные методы для управления каталогами и напишем несколько примеров программного кода.

Работа с папками средствами Windows Script Host осуществляется с помощью встроенного объекта Folder и коллекции Folders. Прежде чем начать работать с директориями, надо получить доступ к классу Folder, это можно сделать с помощью свойства RootFolder класса Drive или методов GetFolder, GetParentFolder и GetSpecialFolder объекта FileSystemObject . Прежде чем переходить к практическим примерам, давайте рассмотрим теорию.
Свойства объекта Folder – работа с папками Windows
Attributes – Позволяет при работе с папками просмотреть или установить для нее атрибуты. Доступные атрибуты можно просмотреть в статье «Объект File: работа с файлами».
DateCreated – Дата и время создания. Только чтение.
DateLastAccessed — Дату и время последнего обращения к каталогу. Только чтение.
DateLastModified — Дату и время последней модификации директории. Только чтение.
Drive – Возвращает букву диска, на котором размещена папка. Только чтение.
Files – Данное свойство позволяет получить доступ к коллекции Files
IsRootFolder – Если указан корневой каталога, то свойство вернет TRUE — 1, иначе, FALSE — 0.
Name – При работе с папками позволяет изменить их имя. Чтение и запись.
ParentFolder – Возвращает родительскую директорию (C:\, D:\ и так далее). Только чтение.
Path — Путь к каталогу.
ShortName — Короткое имя директории (например, 233_6E
ShortPath – Короткий путь (например, C:\work\233_6E
Size – Общий размер в байтах всех файлов и подкаталогов, что входят в данную папку.
SubFolders — Данное свойство позволяет получить доступ к коллекции Folders.
Type — Тип каталога
Методы объекта Folder – работа с Windows папками

Сору (destination [,overwrite]) – При работе с папкой позволяет произвести ее копирование вместе с подкаталогами и файлами в заданное место, destination задает директорию, в которой будет производиться копирование, нельзя использовать подстановочные символы (*,? и так далее), overwrite : значение TRUE – произвести замену, FALSE – нет.
CreateTextFile (filename[,overwrite [,format]]) – Позволяет создать новый текстовый файл с именем filename и возвращает указывающий на этот файл класс Textstream (этот метод аналогичен методу CreateTextFile класса FileSystemObject ), format – задает кодировку (ASCII – значение 0 или Unicode – значение 1).
Delete ([force]) – При работе с папками позволяет удалить заданный каталог. Если параметр force равен false или отсутствует, то нельзя удалить директорию с атрибутом «только для чтения» (read-only), значение true решит эту задачу. Вместо метода Delete можно использовать метод DeleteFolder класса FileSystemObject .
Move (destination) — Перемещает каталог в другое место, destination определяет куда будет производиться перемещение; подстановочные знаки в имени недопустимы. Вместо метода Move можно использовать метод MoveFolder объекта FileSystemObject .
Коллекция Folders
Add (FolderName) – Данные метод при работе с папками позволяет создавать новый каталог. Аналогично, можно использовать метод CreateFolder объекта FileSystemObject .
Ниже я привожу два по работе с папками, первый на VBScript, а второй на JScript.

Пример на языке vbscript:
Пример на языке jscript:
И так, с программированием мы закончили, теперь давайте разберем примеры. В самом начале мы создаем переменные, которые будут хранить ссылку на нужные классы. Эти классы нужны для доступа к файловой системе и создания новой директории (метод CreateFolder) в текущем каталоге. Последующая работа с папками заключается в создании нескольких подпапок, в самом конце с помощью цикла происходит перебор всех подпапок и вывод полного пути к ним.
Спасибо за внимание. Автор блога Владимир Баталий
Folder Shows Empty but Files Are There Windows 10/8/7
If you meet folder shows empty but files are there on Windows 10/8/7 due to virus infection, hard drive corruption, or other reasons, you can fix the issue and recover missing files by changing view settings in File Explorer, command prompt, or using EaseUS file recovery software for help.
Table of Contents
About the Author
Reviews and Awards
There are three ways in all to fix the issue that folder shows empty but files are there on Windows 10/8/7. The table below is an overview of the solution, read detailed content for full steps.
| Workable Solutions | Step-by-step Troubleshooting |
|---|---|
| Fix 1. Show files in File Explorer | In the search box, type folder option, click «View». Select «Show hidden files, folders, and drives». Full steps |
| Fix 2. Show files using CMD | Press Windows + R keys together and input cmd in the search box. Open the command prompt. Full steps |
| Fix 3. Recover files with software | The most effective way to show hidden and recover lost/missing files is using a data recovery tool. Full steps |
The Folder Shows Empty but Has Size Overview
«How strange! The folder shows empty but the files are there. I transferred all of my pictures the other day from my Canon camera to PC and kept them in a folder on drive D. Today I click on the folder, but nothing is there! I am sure that all files have been successfully transferred, while I lost them due to unknown reasons. What’s worse is that I didn’t keep a copy on my camera storage. So how can I recover files when the folder wrongly shows empty?»
Are you seeing an empty folder that should have contained files in it? The folder shows empty as the picture.
![]()
But in fact, the folder has size.
![]()
Imagine this. You’ve created a folder to store some specific files, like downloaded apps, photos, documents, or video files. One day when you try to open the folder to view the contents inside, nothing is there, nor does it allow you to move to another storage location. What causes this issue? What we can do to fix «This folder is empty»? Read on and find the solutions.В
Why Would a Folder Shows Empty but Files Are There
Most cases ofВ files/folders not showing up though they still exist suggest a hidden attribute, which means that you have hidden the files and cannot see them in the folder. As a result, the folder is empty but has size.В
The possible causes of the folder show empty but files are there is virus or malware infection. The virus hides the files and make the folder shows empty but has size. Other probable reasons are improper removal of theВ external hard drive/USB flash drive/memory card, system update, or hard driveВ corruption that prevents from proper viewing. If your storageВ devices get corrupted, repairВ the corrupted external hard drive/USB/SD card first, then follow the three solutions below to get data back in time.В
Solutions to Solve This Folder Is Empty Issue and Recover Missing Files
You have three options in all to solve a folder shows empty but files are sure to be there on Windows 10, 8 and 7. The methods are showing hidden files from Windows Explorer, using command prompt line and third-party data recovery software.В
1. Show Hidden/Lost Files in an Empty Folder in File Explorer
Microsoft gives a detailed guide to help on how to display hidden files in all its Windows’ versions 10/8.1/8/7.В Despite a small difference in performing this action for each version, the basic operation is the same. That is finding the unhiding option inside the File Explorer. In Windows 10, you can unhide all files with these two steps.
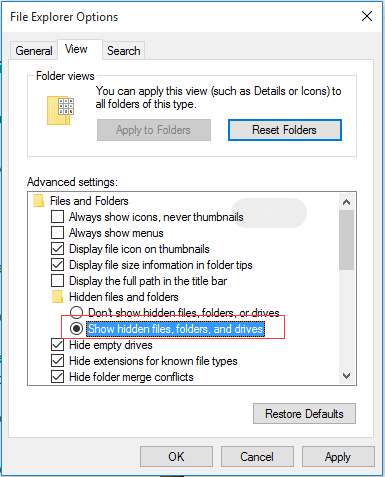
Step 1. In the search box on the taskbar, type folder option, click «View».В
Step 2. Select «Show hidden files, folders, and drives» beneath «Hide files and folder». And then select «OK».
2. Show Missing Files in an Empty Folder From Command Prompt
A high-level way to see hidden files is using the command lines. See the steps below.
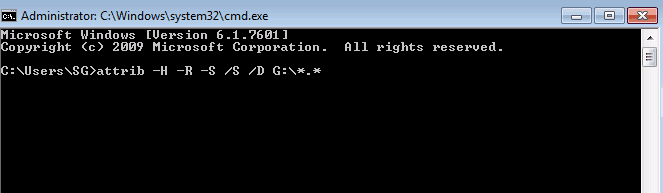
Step 1. Press Windows + R keys together and input cmd in the search box.В Open the command prompt as an administrator.
Step 2. Make sure in which drive the folder shows empty, for example, drive G, then type the command attrib -h -r -s /s /d g:\*.* and press Enter. Refresh the folder and check if the files appear now.В
Manual input of the command line is suitable for computer professionals since wrong commands can cause more severe problems. Therefore, for security and usability, we strongly recommend you try an automatic command line alternative. EaseUS Tools M is a practical tool that enables you to check and fix files system error, enable/disable write protection and system update with one-click instead of typing intricate command lines.
Follow the simple steps below to show hidden files with this 1-click-fix software.В
Step 1.В оњљ DOWNLOAD EaseUS Tools M for Free.
Step 2. Start EaseUS Tools M, choose «File Showing» on the left pane. Next, choose the target drive for scanning.
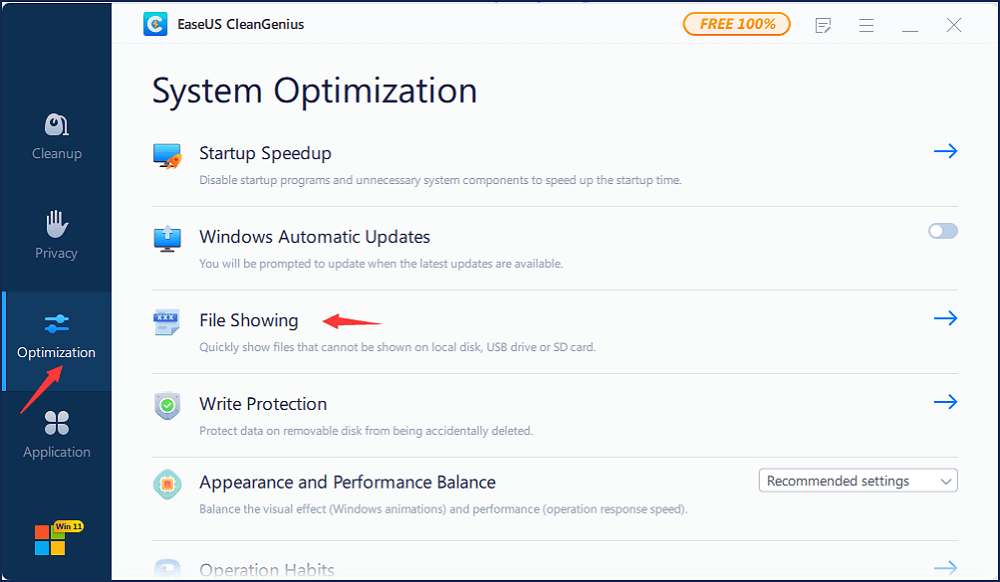
Step 3. After the operation completes, click the View button to check the hidden files.В

3. Recover Hidden Files in an Empty Folder With Data Recovery Software
The last and the most effective way to show hidden and recover lost/missing files is using a third-party data recovery software. Here, we highly recommend you try EaseUSВ file recovery softwareВ to retrieve all kinds of files that were deleted, hidden or disappeared for no reason. It requires no computer skills, and the recovery procedure is effortless. Follow the three steps below and find your lost files.
Step 1. Select a location to scan.
Launch EaseUS Data Recovery Wizard, hover on the partition, external hard drive, USB, or memory card on which you want to show hidden files, and then click «Scan».

Step 2. Select the hidden files.
Wait until the scanning completes. Afterward, select the hidden files. If you need, double-click the file to preview its content.

Step 3. Show hidden files.
After choosing the files, click «Recover» and choose a location on another drive to save the recovered files. By doing so, you can make the hidden files show up again.

In conclusion, don’t easily give up when a folder that should have contained files shows up empty. By applying the above quick methods, you can undoubtedly retrieve all of your missing folder contents.
How to show File Extensions in Windows 10
File Extension is that which identifies the file type. If you are a regular Windows user, then it is not at all a problem to identify the file type. For it is very important to see file extension to identify the type of file you are trying to open from a security point of view. So in this post, we will see how to hide or show File Extensions in Windows 10/8/7 and why you should show them.
Since file names allow you to use multiple full stops, the real name of a malware file could be realword .docx.exe . But because you have not set Windows to show file extensions, you would see only realword .docx . Thinking its a Word document, you could well end up clicking on it and infecting your computer. If you had, on the other hand, set your PC to show file extensions, you would see its full name – realword .docx.exe , which would help you to identify that it was actually an executable file and in all probability a malware file.
What are File Extensions & how are they useful
Different file types have different extensions. Audio files have .mp3, .wav, .wma, and more based on the program used to open that file. File extensions also help the operating system to identify the corresponding program to open that particular file. So, you should be able to see file extensions to be at the safer side, and we will let you know how to enable options to see file extensions in Windows.
As mentioned earlier, by default Windows does not show file extensions and they are hidden. But, you can toggle the option to see them.
Show File Extensions in Windows 10
There are five ways how you can go about accessing this setting:
- Through the File Explorer Options
- Through Windows Explorer Ribbon
- Using the Registry
- Using Command Prompt
- Using Group Policy Editor.
1] Through Folder or File Explorer Options
Open Control Panel > Appearance and Personalization. Now, click on Folder Options or File Explorer Option, as it is now called > View tab.
In this tab, under Advanced Settings, you will see the option Hide extensions for known file types. Uncheck this option and click on Apply and OK.
Windows 10 users may also search for File Explorer Options in Start search box and open this box.
Now, you can see file extensions for all files anywhere on your Windows system.
In Windows 10/8.1 Explorer, you can access File Explorer Options via Explorer.
Click View > Options > Change folder and search options.
Once here, you can do the needful as explained above.
In Windows 7, open Explorer, press Alt on your keyboard to make the Classic bar appear. Next, click on Tools > Folder Options. Now follow the steps mentioned above.
These are very simple steps to follow, and you do not need any third-party software to view file extensions. Windows provides us with everything which can be easily achieved, and the point lies in knowing and implementing them. This is the first way to see file extensions in Windows 7.
2] Via Windows File Explorer
Open Explorer and click on the View tab. Simply select the File name extensions checkbox, and you are all set.
3] Using the Registry Editor
Hit the WINKEY + R button combination to launch the Run utility, type in regedit and hit Enter. Once Registry Editor opens, navigate to the following key-
Look up for a DWORD entry labeled as HideFileExt.
Double click on the mentioned DWORD entry and set its value as 0. This will show up the hidden file extensions.
A value of 0 will hide the file extensions.
Exit the Registry Editor and then reboot your computer for the changes to take effect.
4] Use Windows Command Prompt
This fix can be used in both the scenarios mentioned above. Insert a bootable drive of Windows 10 installer.
Start by hitting the WINKEY + X combinations and select Command Prompt (Admin) to launch Command Prompt with Administrator Privileges.
Navigate to the root location of that bootable device inside the Command Prompt command line. Once you get there, type in the following to show the file extensions-
And then hit Enter.
You can also enter the following command to hide the file extensions,
5] Using Group Policy Editor
You can also use the Group Policy Editor and change the setting here:
User Configuration > Preferences > Control Panel Settings > Folder Options.
Set “Show hidden files and folders” and uncheck “Hide extensions for known file types”.
Thus, you can set your Windows to show file extensions in Windows 10/8. If you have anything to add, please do share it with us through comments.
Date: March 22, 2020 Tags: Explorer, Features


