- Some of my Library folders are hidden in Windows 7
- What is ‘windows apps’ hidden folder and why can’t I access it?
- Replies (4)
- How to Show Hidden Files and Folders in Windows 10
- 2 ways to show hidden files and folders in Windows 10:
- Windows: how to show hidden files and folders
- How do you deal with hidden files and folders?
- Showing hidden files in Windows 10 and 8
- Hidden files in Windows 7
- Showing hidden files using Command Prompt
- How to hide files and folders in Windows yourself
- Windows blue screen (BSOD): How to cure the error
- How to change startup programs in Windows 10
- The Windows shortcuts you should know
- How to format hard drives on Windows
- Windows AppData folder: Show and manage application data
Some of my Library folders are hidden in Windows 7
Some of my library folders are hidden for some reason, like pictures, documents, music. My Downloads folder isn’t. I know they’re there; I went Organise — folder and search options — show hidden files and folders and they appear, but foggy like they’re hidden. So I checked the folders they point to, they were attributed ‘hidden’ so I un-hid them, folder shortcuts still foggy and hidden. I can’t select an attribute for the shortcut when I right-click on say, Pictures from the left pane.
What is wrong? Can someone please tell me where to change this so I can fix it.
Did you make any changes on the computer before the problem started?
By default, the folders under the Library (pictures, music, documents and videos) are unhidden and you cannot hide them.
Follow these steps and check if it fixes the problem:
Step 1 : Reset folder view settings.
a. Click Tools menu on the menu bar of Windows Explorer window and choose Folder Options.
b. In the Folder Options window select View tab and click Reset Folders button.
c. You will be asked to confirm whether to reset all folders of this type to the default view setup, click Yes.
Step 2 : Download and run the fixit tool from the link below:
Diagnose and repair Windows File and Folder Problems automatically
Step 3 : Perform a system restore to restore the computer to an earlier point in time before the problem started.
Regards,
Afzal Taher — Microsoft Support.
Visit our Microsoft Answers Feedback Forum and let us know what you think.
What is ‘windows apps’ hidden folder and why can’t I access it?
For some reason my ‘WindowsApps folder is on my D drive with all my data. I was accessing my ‘User’ folder & somehow managed to move it into ‘WindowsApps’ folder. (don’t ask). I can see the ‘Users’ folder there but am denied access. Have tried accessing the ‘WindowsApps’ folder as per ‘Gain access to to the folder C:\Program Files\WindowsApps query, (with appropriate modification) but to no avail. Cmd prompt gives
‘D:\WindowsApps\Users: Bad Data.
Successfully processed 1files; Failed processing 1 files.
All my data, photos & audio is in the ‘User’ folder so badly need access.
Replies (4)
WindowsApp folder is where modern apps sandboxed from everything in the system which makes them rather secure compared to other desktop programs. To get access to the WindowsApps folder, follow the steps below:
- Right-click on the folder and then select Properties.
- Select Security tab and click on the Advanced button.
- Once on Advanced Security Settings, click on the Change link. You will receive a UAC (User Access Control) prompt. Click Yes to continue.
- Now the window will show you all the permissions of the WindowsApps folder. As you can see, this folder belongs to the system, thus you are not able to access it. To change it, click Change link appearing next to TustedInstaller.
- The above action will open the Select User or Group window. Here enter your administrator username and click on Check Names. This action will automatically fill in the object name. Now, click on OK to continue.
- Here in the main window, you can see the that the owner of the folder has been changed to your specified administrator account. Before applying the change, make sure that the Replace owner on sub containers and objects checkbox is selected. Otherwise, you won’t be able to interact with other files and folders inside the WindowsApps folder.
- After you’ve done everything, click OK to save the changes.
- As soon as you click on the OK button, Windows starts to change the file and folder permissions. This process may take some time, so sit back and wait until the process is completed.
- Once the file and folder permissions have been changed, you can easily access it like any other folder in the Program Files folder as long as you are an administrator or have administrator rights.
Let us know how it goes.
334 people found this reply helpful
Was this reply helpful?
Sorry this didn’t help.
Great! Thanks for your feedback.
How satisfied are you with this reply?
Thanks for your feedback, it helps us improve the site.
How to Show Hidden Files and Folders in Windows 10
To show the files and folders automatically hidden in your Windows 10 computer, you can use one of the two methods introduced in this text.
Video guide on how to show hidden files and folders in Windows 10:
2 ways to show hidden files and folders in Windows 10:
Way 1: Show hidden files and folders in the View menu.
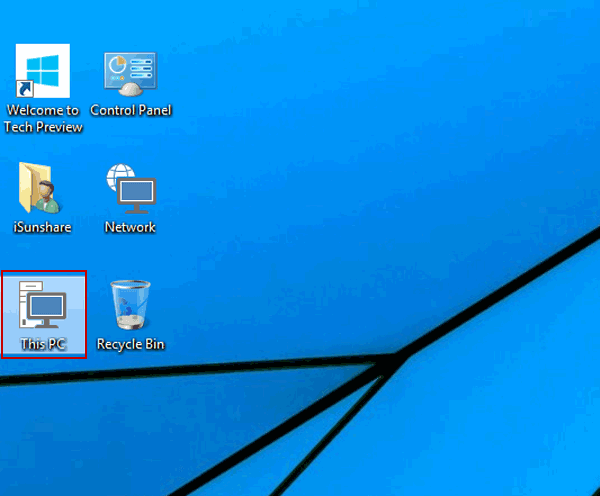
Step 1: Open This PC.
Double-click This PC on the desktop to open it.
Tips:
1. If you have no idea how to add This PC to the desktop, please refer to How to Add Desktop Icons on Windows 10.
2. You can also open another folder such as Network, File Explorer, Recycle Bin, etc.
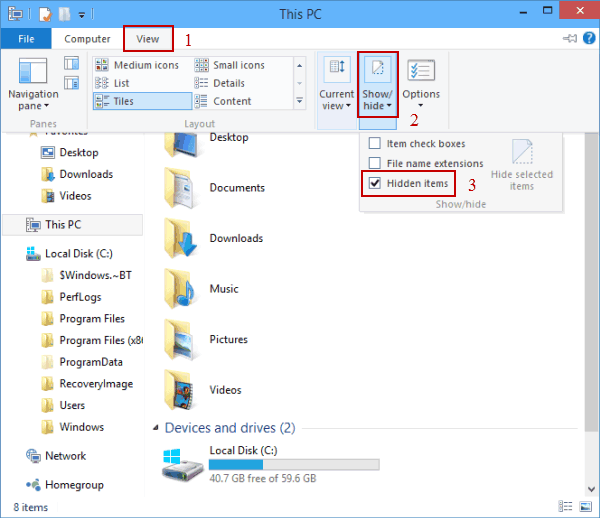
Step 2: Show the hidden files and folders in the View menu.
Click View, tap Show/hide in the menu, and check the small box before Hidden items in the sub-list.
Way 2: Show hidden files and folders in the Folder Options.
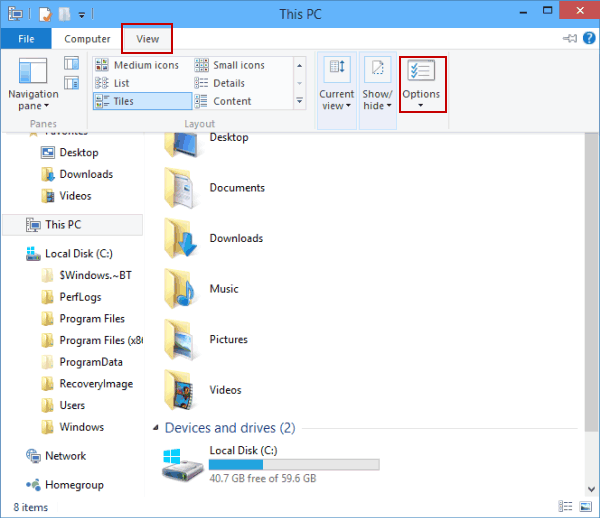
Open This PC, click View and select Options.
Step 2: Show the hidden files and folders in the View settings.
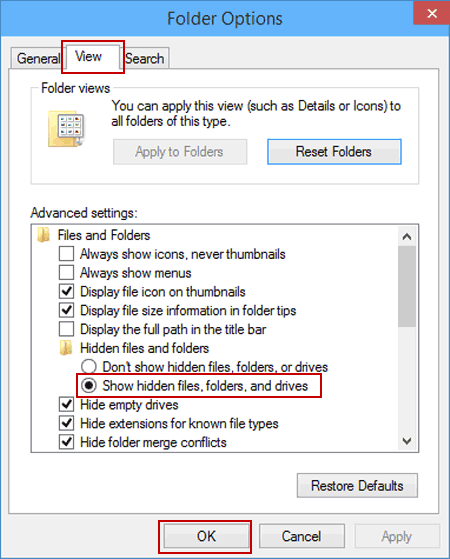
In the Folder Options window, choose View, select Show hidden files, folders, and drives, and then click OK.
Now, go ahead to put them into practice, and you can show the hidden files and folders on your PC.
Windows: how to show hidden files and folders
In addition to the folders in which Windows stores programs and documents, there are also numerous areas in the operating system that are not that easy to access at first glance. Most of the time, these folders contain system-related data, configuration files or device drivers.
One example is the AppData folder, which contains program settings, user profiles and temporary files. This folder and the files in it are hidden by default because they are not normally needed for everyday tasks. Their purpose is to ensure that the operating system runs smoothly in the background.
How do you deal with hidden files and folders?
There’s usually no reason to edit or change these hidden files, nor is it advisable. If you move, rename or accidentally delete these items, certain applications may stop working or the Windows installation may be damaged. In the worst-case scenario, changing these files can cause a total system failure.
Therefore, never make any changes to hidden system files unless you know exactly what you’re doing. When in doubt, you should consult with your system administrator. It’s also advisable to create a system backup beforehand so you can restore your system in the event of an emergency.
Sometimes you still might need to access these hidden files, for example if you want to clean up the Windows.old folder, which contains a backup of the system files of your previous Windows installation. In this case, you have the option of viewing the hidden files. The procedure differs slightly depending on the version of the Windows operating system you’re using.
Showing hidden files in Windows 10 and 8
To show hidden folders and files in Windows 8 and Windows 10, proceed as follows:
- Open the File Explorer using the Windows shortcutWindows + E.
- Then select the ‘View’ tab in the ribbon at the top and click the ‘Show/Hide’ box.
- Select the ‘Hidden items’ checkbox to show the hidden files.

In the File Explorer, you can easily show all hidden files and folders with a click of the mouse.
Once you’ve shown the hidden items, hidden folders in Windows appear slightly transparent.

Once you’ve shown the hidden files, Windows makes them appear slightly transparent.
Alternatively, you can show hidden files via the Folder Options in Windows. To do this, follow these five steps:
- Open the File Explorer as described above.
- Choose View and then the Options box.
- In the Folder Options dialogue box, go to View.
- Scroll down in the menu until you reach the Hidden files and folders heading.
- Select the Show hidden files, folders, and drives option and choose OK to confirm.

You can also show hidden files via the Folder Options in Windows 10.
If you need to hide the files again, remove the checkmark in the ‘Show/hide’ menu or change the setting in the Folder Options.
Hidden files in Windows 7
The procedure for showing hidden files and folders is similar in Windows 7. However, there are minor differences in menu navigation. Proceed as follows to show hidden files in Windows 7:
- Open the File Explorer using the keyboard shortcut Windows + E.
- Then click Organise in the toolbar at the top and select Folder and search options from the drop-down menu.
- In the dialogue box that appears, select the View tab.
- Scroll down to Hidden files and folders in the menu and select the Show hidden files, folders and drives option.
- Finally, click OK again to confirm and save the setting.

In Windows 7, you can show hidden files and folders via the folder and search options.
Microsoft officially stopped supporting Windows 7 at the beginning of 2020. Security updates are no longer released for the operating system. See our article on end of support for Windows 7 to find out what this means for you and what your current options are.
Showing hidden files using Command Prompt
Another method of showing hidden files in Windows 7 and later versions of Windows is to use Command Prompt. To do this, proceed as follows:
- To open the command line, click Start, type the command cmd in the search box and then open Command Prompt.
- Note the drive where the hidden files are saved, for example the C:\ drive.
- Then enter the following command to display the hidden files (in this case, c stands for the drive C:\): attrib -s -h -r /s /c *.*

You can also use the Windows command line to show hidden files.
How to hide files and folders in Windows yourself
You may also want to hide specific files or entire folders yourself, for example, if you’re using a computer with multiple users. The easiest way to do this is to create a folder, right-click the properties and then select the Hidden option under Attributes. The procedure is the same for individual files, such as Office documents.

You can also hide files yourself by changing the properties of folders and files.
The problem with the above methods for viewing hidden files is that the hidden folders can be easily unhidden by other users. However, you can use a different method to avoid this problem:
- Create a new folder, right-click it and then select the ‘Properties’ option from the menu.
- Click the ‘Customize’ tab and change the folder icon by clicking ‘Change icon’.
- Select a blank icon from the list displayed (see screenshot below) so that the folder has no icon.
- Then rename the folder by right-clicking it and selecting ‘Rename’.
- Press the space bar once (or several times). Save the name change by pressing the Enter key.

To make a folder invisible, you can also change the icon and replace it with a blank icon.
This way, you create a folder that has no name and no icon and cannot be made visible by changing the folder options. To open the folder, simply click on its location. Be sure to remember the location because the folder is now invisible.
Are you a Mac user? Follow our step-by-step guide to find out how to show hidden files and folders on a Mac.

Windows blue screen (BSOD): How to cure the error
The infamous blue screen of death usually shows up without any warning. It’s an important indicator of internal problems with hardware, software, or drivers. If Windows can no longer be run as a result of such a problem, then the forced shutdown takes place in the form of a blue screen containing an error message. This may cause unsaved files and documents to be lost. The most important thing with.

How to change startup programs in Windows 10
Like all modern Microsoft operating systems, Windows 10 has a built-in feature that allows you to automatically run system programs, user-defined programs, service applications and processes. In this tutorial, you’ll learn how the startup folder works in Windows 10 and how to add or remove specific applications.

The Windows shortcuts you should know
Windows shortcuts can help you save a lot of time when working on a computer. With a simple hand gesture, you can use shortcuts to perform recurring tasks. In this article, you will find a practical overview of the most important Windows keyboard shortcuts which will make your everyday life easier and working with Windows more convenient.

How to format hard drives on Windows
Formatting a hard drive prepares a disk for use with Windows. It can subsequently be used for file storage or as a backup medium, for example. Formatting is not a major problem with Windows as all the required functions are available as on-board tools. Find out how to format a hard drive and when it is useful to do so.

Windows AppData folder: Show and manage application data
The AppData folder is a hidden system folder on Windows operating systems. If you unhide the AppData folder, you can remove the temporarily stored data inside that is not required to maintain the Windows system. This short guide shows you how to find and manage the Windows AppData folder.


