- Fix: Windows 10 forgets network credentials
- Windows 10 keeps forgetting your Network credentials? Here’s what to do
- 1: Forget and re-establish network
- 2: Install proper Network adapter drivers
- 3: Check your router
- 4: Inspect Credential Manager
- 5: Restart wireless service
- 6: Disable Secure Boot and third-party antivirus tools
- Wrap-up
- How to Forget a Network on Windows 10
- What to do when you need to clean your Wi-Fi network list
- How to Forget a Network on Windows 10
- Alternate Ways to Open Network & Internet Settings on Windows 10
- Why People Clear Their Networks on Windows 10
Fix: Windows 10 forgets network credentials


- Generates strong random passwords for you
- Synchronize the login data between your devices
- Store your passwords and login data in a personal encrypted vault
Auto-pilot for all your passwords
Manage your passwords
Windows 10 and Wi-Fi seem to have a dispute of their own. Firstly, users reported a bag of issues concerning Wi-Fi after a major update, and now, once the issue is dealt with, some of them can’t force Windows 10 to preserve the network credentials. It seems that Windows 10 forgets network credentials every time users reboot the system.
This sounds like a minor annoyance but it’s actually quite hard to address and it requires an in-depth troubleshooting approach. Luckily, we found some viable solutions and presented them below.
In case you’re having a hard time with Windows 10 remembering network credentials, make sure to check them out.
Windows 10 keeps forgetting your Network credentials? Here’s what to do
1: Forget and re-establish network
Let’s start with the simplest solution for the issue at hand. Reset your router in order to clear the possible halt. If you’re frequently switching networks, your system is freshly installed, or you changed your SSID name and security measures lately, there’s a good chance that the system isn’t able to preserve your credentials.
This can be resolved in a simple manner, by simply forgetting the established network and re-establish it later.
This, of course, applies to Wireless network and the dedicated password appointed to it. Here’s how to reset the troubling Wi-Fi network and resolve the issue at hand:
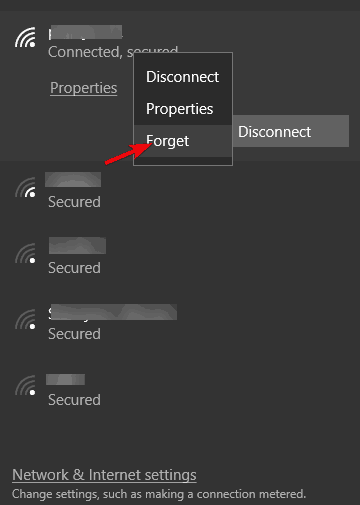
- Click on the Wireless icon in the Taskbar’s Notification area.
- Right-click on your Wi-Fi network and click Forget.

- Restart your PC.
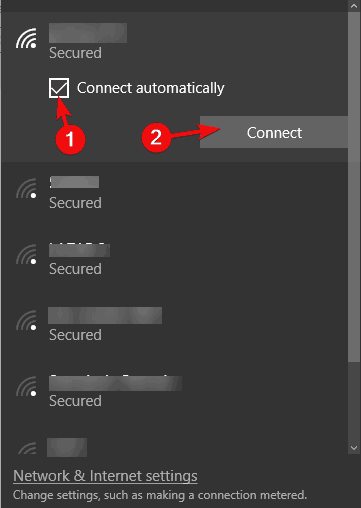
- Open the list of available Wi-Fi networks and click on your network.
- Check the ”Connect automatically” box and click Connect.
- Restart your PC again and look for improvements.
On the other hand, if Windows 10 won’t preserve your Wi-Fi password after some time, we advise you to continue with the below-enlisted alternatives.
2: Install proper Network adapter drivers
We all know how much issues Windows 10 users experienced due to faulty drivers. Windows 10 will provide you with the latest generic drivers suiting your Network adapter.
However, they might not suffice, taking into consideration that the older Wi-Fi protocols won’t work as intended with the latest routers and their protection protocols. So, you’ll need to obtain drivers which are, preferably, provided by the OEM.
If you’re not sure how to download, install and configure proper network drivers on Windows 10, follow these instructions closely:
- Right-click on the Start menu and open Device Manager.
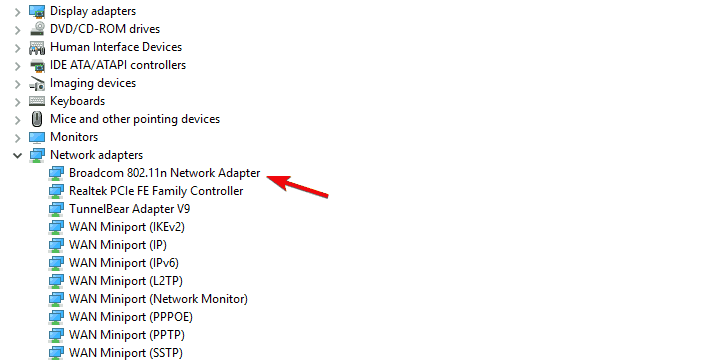
- Navigate to Network adapters and expand this section.
- Right-click on your WLAN (Wireless) adapter and Uninstall it.
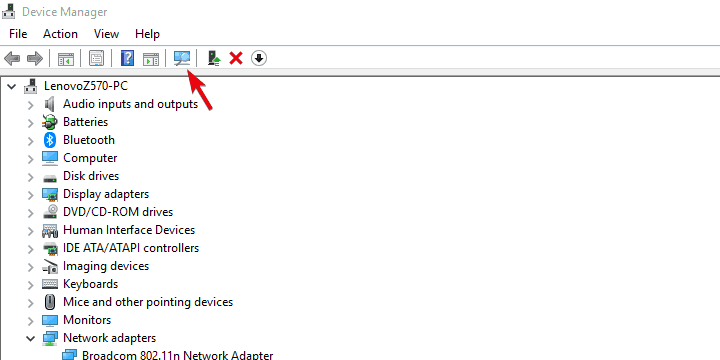
- Restart your PC and open Device Manager again.
- The drivers should install automatically or, if they won’t, click on the ”Scan for hardware changes” at the Toolbar.
Instead of that, you can also navigate to the official support site and download the proper WLAN drivers.
3: Check your router
Now, let’s move from the system settings and inspect the router settings. There are various things which can inflict constant prompts, asking for your credentials. But, the main suspects are security protocols and SSID’s name.
Namely, certain media access wireless sets support only certain security protocols. This implies that you won’t be able to use, say, 802.1 set with the WPA2 encryption.
A mere accessing your router settings opens the opportunity for a few troubleshooting steps:
- Switch between the security protocols: from WPA/WPA2 to WEP and vice versa.
- Change your SSID name. Don’t use scarce Unicode letters.
- Update your firmware.
- Eventually, reset your router to factory settings.
If you’re not sure how to access your router, make sure to google it. There are various IP access and passwords which allow you to enter the advanced router settings. And they’re always distinguished one from the other.
4: Inspect Credential Manager
All your Windows credentials, including the Wi-Fi ones, are stored in the secure place called Credential manager. In there, you can manage them and delete. And that’s just what we’ll need to do while troubleshooting the ”Windows 10 forgets network credentials” error. Also, make sure that, in case you’re using a server, your domain name is properly inserted.
Now, in order to access Credential manager, you’ll need the administrative permission. Once you’re there, you can delete your credentials and re-establish them again.
Follow these instructions to delete Windows 10 Wi-Fi credentials in the Credential Manager:
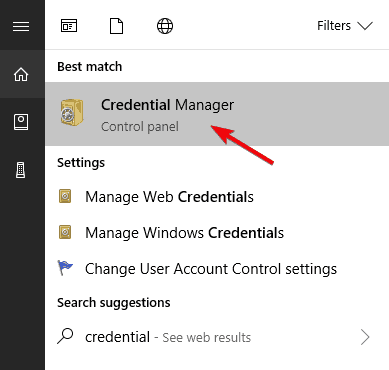
- In the Windows search bar, type Credential and open Credential Manager from the list of results.
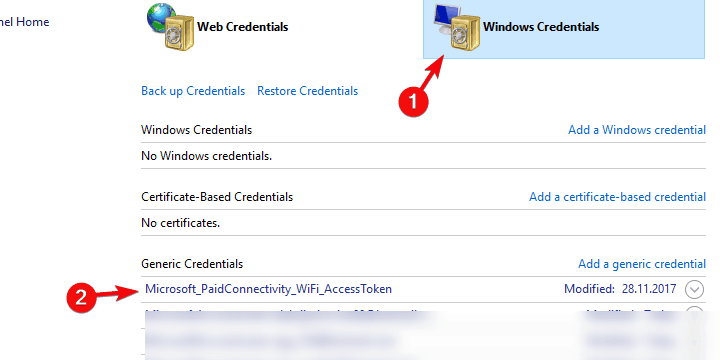
- Select Windows Credentials.
- Select Wi-Fi-related credential input and expand it.
- Click Remove underneath it and restart your PC.
- Configure Wi-Fi connection again and look for changes.

5: Restart wireless service
Beside the password itself and related credentials, there might be the problem with the dedicated service, too. the WLAN configuration service is the one we rely on to auto-configure and preserve Wi-Fi related options.
As every other major service, this service is also prone to malfunctions, meaning that it can bump into a halt. Also, due to some kind of misuse or virus infection, it can stop working as intended.
Besides that, you can delete all preserved settings stored in the system partition. By doing so, you should be able to overcome the halt usually imposed by the configuration failure or a faulty update.
Here’s what you’ll need to do:
-
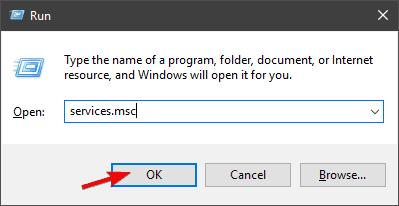
- Press Windows key + R to summon the Run elevated command-line.
- In the dialog box, type services.msc and press Enter.
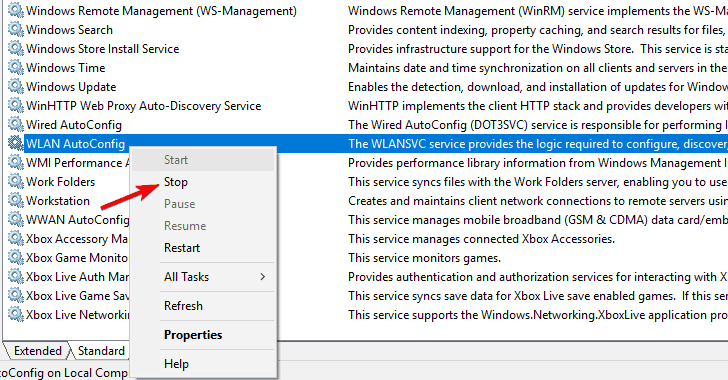
- Navigate to WLAN AutoConfig and Wi-Fi Direct Services Connection Management services and stop both of them.
- Now, don’t close the Services window and navigate to the system partition. Most of the time is C: so this is the exact path
- C:\ProgramData\Microsoft\Wlansvc
- If you can’t see ProgramData, make sure to enable Hidden items by selecting View from the Toolbar and checking the ”Hidden items” box.
- Once you’re there, delete all content from the Wlansvc folder with the Profiles as an only exception.
- Navigate to Service again and start both WLAN AutoConfig and Wi-Fi Direct Services Connection Management services.
- Restart your PC and look for improvements.
6: Disable Secure Boot and third-party antivirus tools
Finally, if none of the previous steps worked for you, we see only 3 options remaining (a clean reinstallation is not one of them for obvious reasons):
- Disable Secure Boot in the BIOS/UEFI settings.
- If your antivirus has a security tool which oversees Wi-Fi connection, disable it.
- Update your Windows 10 and hope the resolution is provided.
The Secure Boot is a safety measure which prevents a computer from loading untrusted files. On the first look, this doesn’t have anything to do with the system’s inability to preserve the Wi-Fi network credentials.
However, certain users managed to resolve the issue by disabling it. It should be found in the BIOS settings menu, somewhere within the Security section. It’s worth a try, even though we can’t confirm Secure Boot affect the error or something else is at hand.
If you’re not sure how to disable it, follow the steps we provided below:
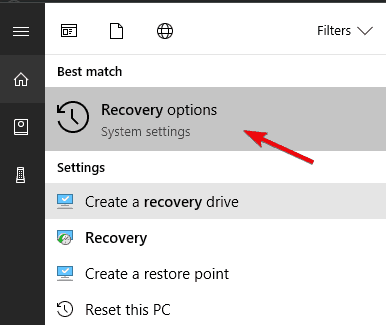
- In the Windows Search bar, type Recovery and open Recovery options.
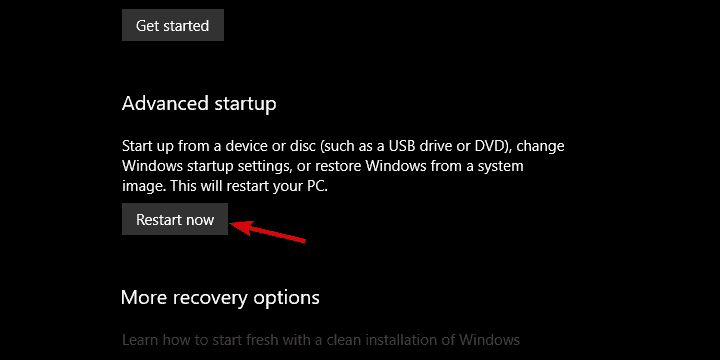
- Under the Advanced Startup, click Restart now.
- Select Troubleshoot and then Advanced Options.
- Choose UEFI Firmware settings and click Restart.
- Now, you should roam around until you find Secure Boot and disable it.
- Start your PC and the error should be gone.
Wrap-up
That should be it. In case you’re still unable to fix your issue, we advise you to send a ticket to Microsoft and present your problem to them. It’s a long shot, but a step forward towards the resolution, nonetheless.
In case you have questions or suggestions regarding the ”Windows 10 forgets network credentials” error, make sure to post them in the comments section below.
RELATED STORIES YOU SHOULD CHECK OUT:
How to Forget a Network on Windows 10
What to do when you need to clean your Wi-Fi network list
:max_bytes(150000):strip_icc()/BradStephenson-a18540497ccd4321b78479c77490faa4.jpg)
If Wi-Fi network conflicts are making it difficult to connect your Windows 10 computer, laptop, or tablet to the internet, manually forcing your device to forget a few of them may fix the problem and get you online. Here’s everything you need to know about removing previous internet connection information from a Windows 10 device.
Instructions in this article apply to Windows 10.
:max_bytes(150000):strip_icc()/laptopcafeforgetnetwork-5c45986f46e0fb00013c1a3c.jpg)
How to Forget a Network on Windows 10
When you make a Windows 10 device forget a network, it essentially removes any previous history you had with that connection and makes your device treat it as a completely new network that it’s never used before.
Forgetting an internet connection will delete any basic login information associated with it such as a Wi-Fi username and password.
Clearing a network connection won’t delete any downloads, web history, search history, browser extensions, or bookmarks. That type of information should be deleted from within Microsoft Edge, Mozilla Firefox, Google Chrome, Brave, or any other internet browser you use.
Select the Windows key or Start to bring up the Start Menu.
:max_bytes(150000):strip_icc()/001-how-to-forget-a-network-on-windows-10-0cdc4d9b07904bedbc5d0355c4569ac5.jpg)
Select the Settings gear icon to open Settings.
You can also open Settings by swiping in from the right side of the screen on a touch-enabled device and tapping on All settings from the Action Center.
:max_bytes(150000):strip_icc()/002-how-to-forget-a-network-on-windows-10-a15724c4b8e443cb920908c1eb75f030.jpg)
Select Network & Internet in Windows Settings.
:max_bytes(150000):strip_icc()/003-how-to-forget-a-network-on-windows-10-6e10bd06b5b3485d8bac81bac6206eb6.jpg)
Select Wi-Fi in the left pane of the Network & Internet window.
:max_bytes(150000):strip_icc()/004-how-to-forget-a-network-on-windows-10-0b47541c81ba4ca88d2250500d539a63.jpg)
Select Manage known networks.
:max_bytes(150000):strip_icc()/005-how-to-forget-a-network-on-windows-10-84b5092418c94276ac6983686ba7e44b.jpg)
From the list of networks, select the one you want to remove.
:max_bytes(150000):strip_icc()/006-how-to-forget-a-network-on-windows-10-63d346003331494fbbcb2a00dfc8f68c.jpg)
Select Forget.
There is no confirmation step when removing an internet connection. As soon as you click on Forget, the network will be immediately removed.
:max_bytes(150000):strip_icc()/007-how-to-forget-a-network-on-windows-10-b0072d83ef8042eab5a8bfac29d37e3f.jpg)
That network connection will be removed from your Windows 10 device.
Alternate Ways to Open Network & Internet Settings on Windows 10
While the final steps involved in removing a network from a Windows 10 device are the same no matter which method you use, there are alternative ways to get to the Network & Internet and Wi-Fi settings steps mentioned above.
- Alternate Method 1: From the Windows 10 taskbar, the horizontal bar of icons that runs along the bottom of the screen, locate the Wi-Fi internet icon and right-click on it with your mouse. A shortcut to the Network & Internet settings will appear. Click that to jump straight to that page within the Settings app.
- Alternate Method 2: Click on the Notification icon in the lower-right corner of the screen to open the Action Center and right-click on the Wi-Fi internet connection icon. Click Go to Settings to jump directly to the Windows 10 Wi-Fi settings page.
- Alternate Method 3: If your Windows 10 device has a touchscreen like the Surface line of products, swipe in from the right side of the screen to open the Action Center and perform a long press on the Wi-Fi icon. This will activate the same Go to Settings shortcut mentioned in the previous method. Tap it to jump to your device’s Wi-Fi settings.
Why People Clear Their Networks on Windows 10
While there aren’t any major reasons to clear your list of wireless networks on a Windows 10 device, there are a couple of situations that can prompt people to remove a network or two.


