- Сделать простую авторизацию
- Решение
- Практическое руководство. Создание текстового поля для ввода пароля с помощью элемента управления TextBox в Windows Forms How to: Create a Password Text Box with the Windows Forms TextBox Control
- Создание текстового поля пароля To create a password text box
- Create a secure ASP.NET Web Forms app with user registration, email confirmation and password reset (C#)
- Introduction
- Tutorial Tasks and Information:
- Create an ASP.NET Web Forms App
- Email Confirmation
- Hook up SendGrid
- Enable Email Confirmation
- Require Email Confirmation Before Log In
- Run the Application
- Password Recovery and Reset
- Resend Email Confirmation Link
- Troubleshooting the App
Сделать простую авторизацию
Как сделать простую авторизацию?
Нужна самая простая авторизация, т.е. чтобы вводимый пароль задавался в программном коде.
Как сделать авторизацию
Здравствуйте, не подскажите, как сделать авторизацию на си шарп для входа и как можно вставить в си.
Сделать авторизацию пользователя
Здравствуйте, всем! Нужно сделать авторизацию пользователя (двух). Как это сделать без БД? Нa Form1.
Как сделать авторизацию на сайте?
Как сделать авторизацию на сайте? Прошу помогите
Решение
Вложения
 | Reg.rar (43.7 Кб, 1357 просмотров) |
Как это нигде не обьявили?
Как это нигде не обьявили?
сорри, я во вторую форму и не смотрел)))
Добавлено через 36 секунд
А вот еще вопрос =) Мне нужно что бы не создавало каждый раз нового пользователя, а добавляло в уже имеющийся файл нового. Попробовал Append но оно ничего не добавляет.
Eji, скажи как работает LoadUsers? Я вставил код в пустую программу, создал users.cs, и копирнул из твоей программы users.dat в Debug своей, но у меня вылетает 5 ошибок. Что делать?
Вот код главной формы и сама программа:
Вложения
| Программа тестирования.rar (100.7 Кб, 121 просмотров) |
Вложения
| Программа тестирования.rar (209.6 Кб, 191 просмотров) |
Да как угодно можно, хоть с использованием X509 сертификатов делайте.
Добавлено через 1 минуту
| Тематические курсы и обучение профессиям онлайн Профессия С#-разработчик (Skillbox) Архитектор ПО (Skillbox) Профессия Тестировщик (Skillbox) |
Заказываю контрольные, курсовые, дипломные и любые другие студенческие работы здесь или здесь.
Как сделать многопоточную авторизацию?
здравствуйте, скажите как в своей программе авторизоваться одновременно с нескольких.
Как сделать авторизацию на сайте
Написал бота для игры, хочу начать продавать методом подписок. У бота есть возможность управлять.
Как сделать авторизацию на web-ресурсе
Хочу сделать программу для просмотра состояния счета, кто подскажет как это можно выполнить.
Как сделать авторизацию
Есть сайт на PHP но он почему то не принимает include, как с помощью джаваскрипта сделать форму.
Практическое руководство. Создание текстового поля для ввода пароля с помощью элемента управления TextBox в Windows Forms How to: Create a Password Text Box with the Windows Forms TextBox Control
Поле пароля — это Windows Forms текстовое поле, которое отображает символы-заместители, когда пользователь вводит строку. A password box is a Windows Forms text box that displays placeholder characters while a user types a string.
Создание текстового поля пароля To create a password text box
Задайте PasswordChar TextBox для свойства элемента управления конкретный символ. Set the PasswordChar property of the TextBox control to a specific character.
PasswordCharСвойство определяет символ, отображаемый в текстовом поле. The PasswordChar property specifies the character displayed in the text box. Например, если вы хотите, чтобы в поле пароль отображались звездочки, укажите * для PasswordChar свойства в окно свойств. For example, if you want asterisks displayed in the password box, specify * for the PasswordChar property in the Properties window. Затем, независимо от того, какой символ пользователь вводит в текстовое поле, отображается звездочка. Then, regardless of what character a user types in the text box, an asterisk is displayed.
Используемых Задайте MaxLength свойство. (Optional) Set the MaxLength property. Свойство определяет, сколько символов можно ввести в текстовое поле. The property determines how many characters can be typed in the text box. Если превышена максимальная длина, система выдает звуковой сигнал, и текстовое поле не принимает больше символов. If the maximum length is exceeded, the system emits a beep and the text box does not accept any more characters. Обратите внимание, что это может быть нежелательно, так как максимальная длина пароля может быть использована хакерами, пытающимися угадать пароль. Note that you may not wish to do this as the maximum length of a password may be of use to hackers who are trying to guess the password.
В следующем примере кода показано, как инициализировать текстовое поле, которое будет принимать строку длиной до 14 символов и отображать звездочки вместо строки. The following code example shows how to initialize a text box that will accept a string up to 14 characters long and display asterisks in place of the string. InitializeMyControl Процедура не будет выполнена автоматически; ее необходимо вызвать. The InitializeMyControl procedure will not execute automatically; it must be called.
Использование PasswordChar свойства в текстовом поле позволяет гарантировать, что другие пользователи не смогут определить пароль пользователя, если он следит за его вводом. Using the PasswordChar property on a text box can help ensure that other people will not be able to determine a user’s password if they observe the user entering it. Эта мера безопасности не охватывает никаких операций хранения или передачи пароля, которые могут возникать из-за логики приложения. This security measure does not cover any sort of storage or transmission of the password that can occur due to your application logic. Поскольку введенный текст не шифруется каким-либо образом, его следует обрабатывать так же, как любые другие конфиденциальные данные. Because the text entered is not encrypted in any way, you should treat it as you would any other confidential data. Несмотря на то, что он не отображается, пароль по-прежнему обрабатывается как обычный текст (если не была реализована дополнительная мера безопасности). Even though it does not appear as such, the password is still being treated as a plain-text string (unless you have implemented some additional security measure).
Create a secure ASP.NET Web Forms app with user registration, email confirmation and password reset (C#)
This tutorial shows you how to build an ASP.NET Web Forms app with user registration, email confirmation and password reset using the ASP.NET Identity membership system. This tutorial was based on Rick Anderson’s MVC tutorial.
Introduction
This tutorial guides you through the steps required to create an ASP.NET Web Forms application using Visual Studio and ASP.NET 4.5 to create a secure Web Forms app with user registration, email confirmation and password reset.
Tutorial Tasks and Information:
Create an ASP.NET Web Forms App
Warning: You must install Visual Studio 2013 Update 3 or higher to complete this tutorial.
Create a new project (File -> New Project) and select the ASP.NET Web Application template and the latest .NET Framework version from the New Project dialog box.
From the New ASP.NET Project dialog box, select the Web Forms template. Leave the default authentication as Individual User Accounts. If you’d like to host the app in Azure, leave the Host in the cloud check box checked.
Then, click OK to create the new project. 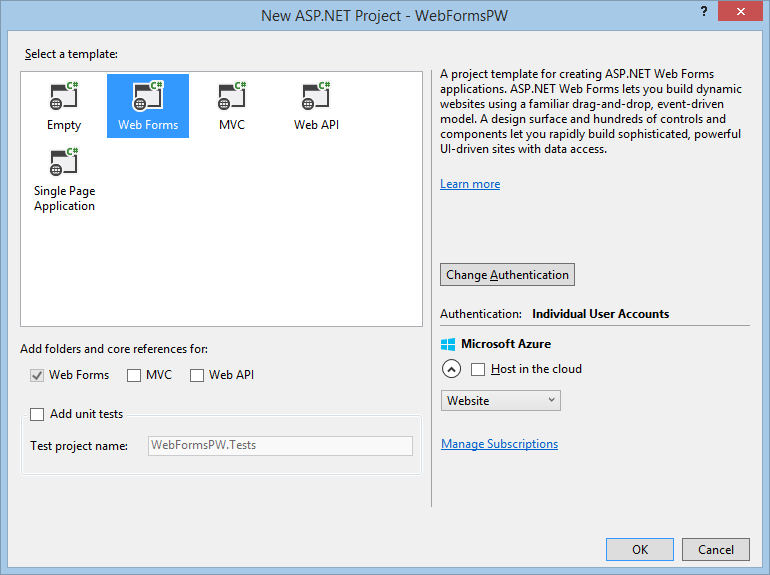
Enable Secure Sockets Layer (SSL) for the project. Follow the steps available in the Enable SSL for the Project section of the Getting Started with Web Forms tutorial series.
Run the app, click the Register link and register a new user. At this point, the only validation on the email is based on the [EmailAddress] attribute to ensure the email address is well-formed. You will modify the code to add email confirmation. Close the browser window.
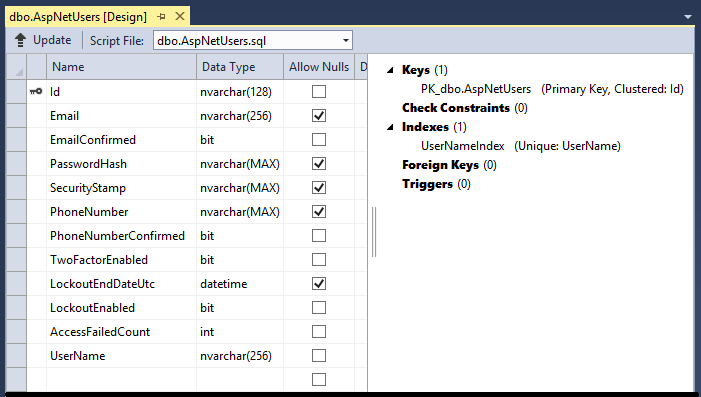
In Server Explorer of Visual Studio (View -> Server Explorer), navigate to Data Connections\DefaultConnection\Tables\AspNetUsers, right click and select Open table definition.
The following image shows the AspNetUsers table schema:
In Server Explorer, right-click on the AspNetUsers table and select Show Table Data.
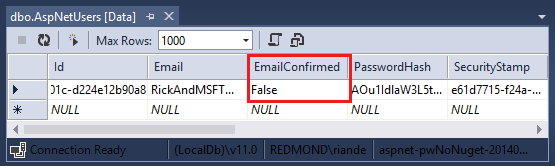
At this point the email for the registered user has not been confirmed.
Click on the row and select delete to delete the user. You’ll add this email again in the next step and send a confirmation message to the email address.
Email Confirmation
It’s a best practice to confirm the email during the registration of a new user to verify they are not impersonating someone else (that is, they haven’t registered with someone else’s email). Suppose you had a discussion forum, you would want to prevent «bob@cpandl.com» from registering as «joe@contoso.com» . Without email confirmation, «joe@contoso.com» could get unwanted email from your app. Suppose Bob accidentally registered as «bib@cpandl.com» and hadn’t noticed it, he wouldn’t be able to use password recovery because the app doesn’t have his correct email. Email confirmation provides only limited protection from bots and doesn’t provide protection from determined spammers.
You generally want to prevent new users from posting any data to your website before they have been confirmed by either email, an SMS text message or another mechanism. In the sections below, we will enable email confirmation and modify the code to prevent newly registered users from logging in until their email has been confirmed. You’ll use the email service SendGrid in this tutorial.
Hook up SendGrid
SendGrid has changed it’s API since this tutorial was written. For current SendGrid instructions, see SendGrid or Enable account confirmation and password recovery.
Although this tutorial only shows how to add email notification through SendGrid, you can send email using SMTP and other mechanisms (see additional resources).
In Visual Studio, open the Package Manager Console (Tools -> NuGet Package Manger -> Package Manager Console), and enter the following command:
Install-Package SendGrid
Go to the Azure SendGrid sign-up page and register for free SendGrid account. You can also sign-up for a free SendGrid account directly on SendGrid’s site.
From Solution Explorer open the IdentityConfig.cs file in the App_Start folder and add the following code highlighted in yellow to the EmailService class to configure SendGrid:
Also, add the following using statements to the beginning of the IdentityConfig.cs file:
To keep this sample simple, you’ll store the email service account values in the appSettings section of the web.config file. Add the following XML highlighted in yellow to the web.config file at the root of your project:
Security — Never store sensitive data in your source code. In this example, the account and credentials are stored in the appSetting section of the Web.config file. On Azure, you can securely store these values on the Configure tab in the Azure portal. For related information see Rick Anderson’s topic titled Best practices for deploying passwords and other sensitive data to ASP.NET and Azure.
Add the email service values to reflect your SendGrid authentication values (User Name and Password) so that you can successful send email from your app. Be sure to use your SendGrid account name rather than the email address you provided SendGrid.
Enable Email Confirmation
To enable email confirmation, you’ll modify the registration code using the following steps.
In the Account folder, open the Register.aspx.cs code-behind and update the CreateUser_Click method to enable the following highlighted changes:
In Solution Explorer, right-click Default.aspx and select Set As Start Page.
Run the app by pressing F5. After the page is displayed, click the Register link to display the Register page.
Enter your email and password, then click the Register button to send an email message via SendGrid.
The current state of your project and code will allow the user to log in once they complete the registration form, even though they haven’t confirmed their account.
Check your email account and click on the link to confirm your email.
Once you submit the registration form, you will be logged in. 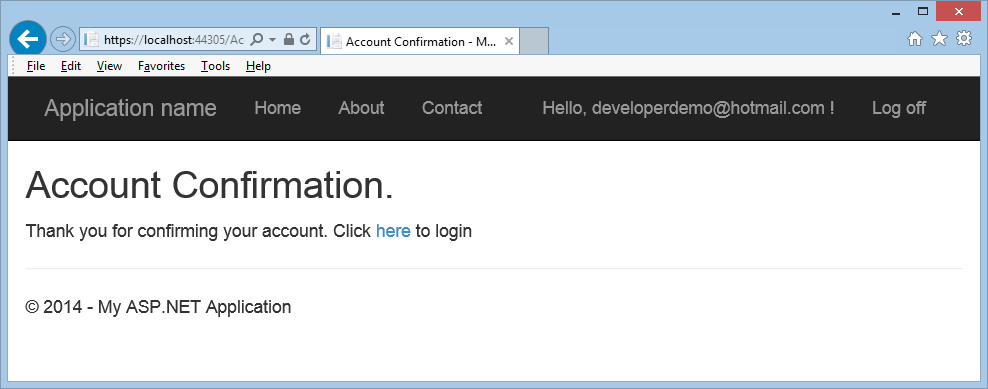
Require Email Confirmation Before Log In
Although you have confirmed the email account, at this point you would not need to click on the link contained in the verification email to be fully signed-in. In the following section, you will modify the code requiring new users to have a confirmed email before they are logged in (authenticated).
In Solution Explorer of Visual Studio, update the CreateUser_Click event in the Register.aspx.cs code-behind contained in the Accounts folder with the following highlighted changes:
Update the LogIn method in the Login.aspx.cs code-behind with the following highlighted changes:
Run the Application
Now that you have implemented the code to check whether a user’s email address has been confirmed, you can check the functionality on both the Register and Login pages.
- Delete any accounts in the AspNetUsers table that contain the email alias you wish to test.
- Run the app (F5) and verify you cannot register as a user until you have confirmed your email address.
- Before confirming your new account via the email that was just sent, attempt to log in with the new account.
You’ll see that you are unable to log in and that you must have a confirmed email account. - Once you confirm your email address, log in to the app.
Password Recovery and Reset
In Visual Studio, remove the comment characters from the Forgot method in the Forgot.aspx.cs code-behind contained in the Account folder, so that the method appears as follows:
Open the Login.aspx page. Replace the markup near the end of the loginForm section as highlighted below:
Open the Login.aspx.cs code-behind and uncomment the following line of code highlighted in yellow from the Page_Load event handler:
Run the app by pressing F5. After the page is displayed, click the Log in link.
Click the Forgot your password? link to display the Forgot Password page.
Enter your email address and click the Submit button to send an email to your address which will allow you to reset your password.
Check your email account and click on the link to display the Reset Password page.
On the Reset Password page, enter your email, password, and confirmed password. Then, press the Reset button.
When you successfully reset your password, the Password Changed page will be displayed. Now you can log in with your new password.
Resend Email Confirmation Link
Once a user creates a new local account, they are emailed a confirmation link they are required to use before they can log on. If the user accidentally deletes the confirmation email, or the email never arrives, they will need the confirmation link sent again. The following code changes show how to enable this.
In Visual Studio, open the Login.aspx.cs code-behind and add the following event handler after the LogIn event handler:
Modify the LogIn event handler in the Login.aspx.cs code-behind by changing the code highlighted in yellow as follows:
Update the Login.aspx page by adding the code highlighted in yellow as follows:
Delete any accounts in the AspNetUsers table that contain the email alias you wish to test.
Run the app (F5) and register your email address.
Before confirming your new account via the email that was just sent, attempt to log in with the new account.
You’ll see that you are unable to log in and that you must have a confirmed email account. In addition, you can now resend a confirmation message to your email account.
Enter your email address and password, then press the Resend confirmation button.
Once you confirm your email address based on the newly sent email message, log in to the app.
Troubleshooting the App
If you don’t receive an email containing the link to verify your credentials:


