- UEFI/GPT-based hard drive partitions
- Partition Requirements
- System partition
- Microsoft reserved partition (MSR)
- Other utility partitions
- To set partitions as utility partitions
- To verify that system and utility partitions exist
- Windows partition
- Recovery tools partition
- Data partitions
- Partition layout
- Sample files: configure drive partitions by using WindowsВ PE and DiskPart scripts
- To partition hard drives and prepare to apply images
- Next steps
- How to Delete EFI (System) Partition in Windows 10/8/7 [2 Ways]
- Can I delete the EFI system partition?
- Part 1. What Is EFI System Partition (ESP)
- Part 2. WhatВ Happens If You DeleteВ EFI System Partition (ESP)
- Part 3. How to Delete EFI (System) Partition in Windows 10/8/7В [2 Methods]
- Method 1. Delete EFI System Partition with Diskpart
- Method 2. Delete EFIВ Partition UsingВ EaseUSВ Partition Manager
- Final Word
UEFI/GPT-based hard drive partitions
Create custom partition layouts for your hard disk drives (HDDs), solid-state drives (SSDs), and other drives when deploying Windows to Unified Extensible Firmware Interface (UEFI)–based devices.
If you use a custom partition layout on WindowsВ 10 for desktop editions (Home, Pro, Enterprise, and Education), update the push-button recovery script so the recovery tools can recreate the custom partition layout when needed.
Partition Requirements
When you deploy Windows to a UEFI-based device, you must format the hard drive that includes the Windows partition by using a GUID partition table (GPT) file system. Additional drives may use either the GPT or the master boot record (MBR) file format.
A GPT drive may have up to 128 partitions.
Each partition can have a maximum of 18 exabytes (
18.8 million terabytes) of space.
System partition
The device must contain a system partition. On GPT drives, this is known as the EFI System Partition, or the ESP. This partition is usually stored on the primary hard drive. The device boots to this partition.
The minimum size of this partition is 100 MB, and must be formatted using the FAT32 file format.
This partition is managed by the operating system, and should not contain any other files, including Windows RE tools.
For Advanced Format 4K Native drives (4-KB-per-sector) drives, the minimum size is 260 MB, due to a limitation of the FAT32 file format. The minimum partition size of FAT32 drives is calculated as sector size (4KB) x 65527 = 256 MB.
Advanced Format 512e drives are not affected by this limitation, because their emulated sector size is 512 bytes. 512 bytes x 65527 = 32 MB, which is less than the 100 MB minimum size for this partition.
Microsoft reserved partition (MSR)
In WindowsВ 10, the size of the MSR is 16 MB.
Add an MSR to each GPT drive to help with partition management. The MSR is a reserved partition that does not receive a partition ID. It cannot store user data.
Other utility partitions
Any other utility partitions not managed by Windows must be located before the Windows, data, and recovery image partitions. This allows end users to perform actions such as resizing the Windows partition without affecting system utilities.
Protect end users from accidentally modifying utility partitions by identifying them using a GPT attribute. This prevents these partitions from appearing in File Explorer.
To set partitions as utility partitions
- When you’re deploying Windows by using DiskPart, use the attributes volume set GPT_ATTRIBUTE_PLATFORM_REQUIRED command after you create the partition to identify the partition as a utility partition. For more information, see the MSDN topic: PARTITION_INFORMATION_GPT structure.
To verify that system and utility partitions exist
- Click Start, right-click This PC, and then click Manage. The Computer Management window opens.
- Click Disk Management. The list of available drives and partitions appears.
- In the list of drives and partitions, confirm that the system and utility partitions are present and are not assigned a drive letter.
Windows partition
- The partition must have at least 20 gigabytes (GB) of drive space for 64-bit versions, or 16 GB for 32-bit versions.
- The Windows partition must be formatted using the NTFS file format.
- The Windows partition must have 16 GB of free space after the user has completed the Out Of Box Experience (OOBE) and Automatic Maintenance has completed.
Recovery tools partition
This partition must be at least 300 MB.
The Windows Recovery Environment (Windows RE) tools require additional free space:
- A minimum of 52 MB is required but 250 MB is recommended, to accomodate future updates, especially with custom partition layouts.
When calculating free space, note:
- The recovery image, winre.wim, is typically between 250-300MB, depending on what drivers, languages, and customizations you add.
- The file system itself can take up additional space. For example, NTFS may reserve 5-15MB or more on a 750MB partition.
This partition must use the Type ID: DE94BBA4-06D1-4D40-A16A-BFD50179D6AC.
The recovery tools should be in a separate partition than the Windows partition to support automatic failover and to support booting partitions encrypted with WindowsВ BitLocker Drive Encryption.
We recommend that you place this partition immediately after the Windows partition. This allows Windows to modify and recreate the partition later if future updates require a larger recovery image.
Data partitions
The recommended partition layout for WindowsВ 10 does not include data partitions. However, if data partitions are required, they should be placed after the Windows RE partition. This allows future updates to Windows RE to grow the Windows RE partition by shrinking the Windows partition.
This layout makes it more difficult for end users to remove the data partition and merge the space with the Windows partition. To do so, the Windows RE partition must be moved to the end of the unused space reclaimed from the data partition, so that the Windows partition can be extended.
WindowsВ 10 does not include functionality or utility to facilitate this process. However, manufacturers can develop and provide such a utility if PCs are shipped with data partitions.
Partition layout
The default partition layout for UEFI-based PCs is: a system partition, an MSR, a Windows partition, and a recovery tools partition.

This layout lets you use WindowsВ BitLocker Drive Encryption through both Windows and through the Windows Recovery Environment.
Sample files: configure drive partitions by using WindowsВ PE and DiskPart scripts
For image-based deployment, boot the PC to Windows PE, and then use the DiskPart tool to create the partition structures on your destination PCs.
In these DiskPart examples, the partitions are assigned the letters: System=S, Windows=W, and Recovery=R. The MSR partition does not receive a drive letter.
Change the Windows drive letter to a letter that’s near the end of the alphabet, such as W, to avoid drive letter conflicts. Do not use X, because this drive letter is reserved for Windows PE. After the device reboots, the Windows partition is assigned the letter C, and the other partitions don’t receive drive letters.
If you reboot, WindowsВ PE reassigns disk letters alphabetically, starting with the letter C, without regard to the configuration in Windows Setup. This configuration can change based on the presence of different drives, such as USB flash drives.
The following steps describe how to partition your hard drives and prepare to apply images. You can use the code in the sections that follow to complete these steps.
To partition hard drives and prepare to apply images
Copy and save the CreatePartitions-UEFI.txt file to a USB flash drive.
Use WindowsВ PE to boot the destination PC.
Clean and partition the drive. In this example, F is the letter of the USB flash drive.
- If you use a custom partition layout on WindowsВ 10 for desktop editions, update the push-button recovery script so the recovery tools can recreate the custom partition layout when needed.
To avoid bare metal recovery boot issues due to partition size, manufacturers should allow the bare metal recovery feature’s auto generation script to create the partition used for the recovery WIM. If manufacturer’s want to use a custom DISKPART script to create partitions, the recommended minimum partition size is 990MB with a minimum of 250MB of free space.
Next steps
Use a deployment script to apply the Windows images on the newly created partitions. For more information, see Capture and Apply Windows, System, and Recovery Partitions.
How to Delete EFI (System) Partition in Windows 10/8/7 [2 Ways]
Can I delete the EFI system partition?
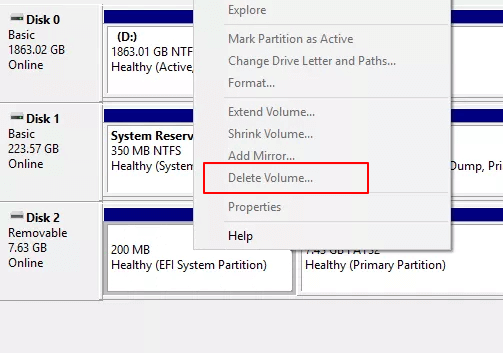
Usually, you can easily delete a partition in Disk Management. But you can’t delete EFI system partition in WindowsВ because the «Delete Volume» feature is grayed out.
The «Delete Volume» may also gray out when you try to delete the OEM partition, recovery, or system reserved partition.В This page will talk about how to deleteВ the EFI system partition on Windows, as well as the must-know information about the EFI system partition, including what EFI is and what happens when the partition is deleted. Keep reading and learn more details.
Part 1. What Is EFI System Partition (ESP)
EFI partition, also known as EFI system partition, short for ESP, is automatically generatedВ when you successfully install Windows OS on a GPT disk inВ your computer. It takes about 100M or 200MB or so with no drive letter. Normally,В you may see more EFI system partitionВ on Windows 10.
According to Wikipedia, «EFI system partition (ESP) is a partition on a data storage device which is used computers adhering to UEFI (Unified Extensible Firmware Interface). When a computer is booted, UEFI firmware loads files stored on the ESP(EFI system partition) to start installed operating system and various utilities.»
It includes 4 main components:
- Boot loaders
- Device drivers
- System utilities
- Data files

Part 2. WhatВ Happens If You DeleteВ EFI System Partition (ESP)
According to Part 1, the EFI partition is like an interface for the computer to boot Windows off. It’s a pre-step that must be taken before running the Windows partition. Without the EFI partition, your computer won’t be able to boot into Windows.
In a word,В EFI system partition deletion will cause the installed system unbootable. Therefore, EFI system partition is usually protected and locked by the Windows operating systems to prevent and avoid accidental deletion. That’s why you can’t see the EFI partitionВ in Windows File Explorer nor delete it using Windows Disk Management.
Part 3. How to Delete EFI (System) Partition in Windows 10/8/7В [2 Methods]
For users who want to delete the EFI system, there are two methods available. One is to delete with the Windows built-in tool — Diskpart and the other is to apply a simple third-party tool — EaseUS Partition Master. To avoid unnecessary file loss, make sure you have backed up the ESP files in advance.
Method 1. Delete EFI System Partition with Diskpart
As a command-line utility, DiskPart is sort of complex for average users to apply. Please be very careful while following the below command lines to delete EFI partition:
Step 1.В Open DiskPart on your PC.
- 1. Hit «Windows Key + R» to open the run dialogue box.
- 2. Enter diskpartВ and click «OK» to open a black command prompt window.
Step 2. Change EFI system partition ID and set it as a data partition.
Type the below command lines and hit Enter each time:
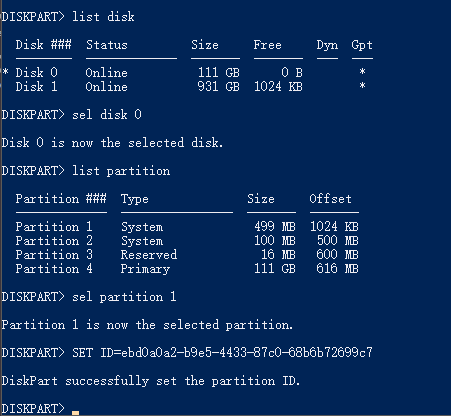
- «list disk» (It displays all the disks of your computer. )
- «sel disk 0» (It identifies which disk you need to work with. Here 0 stands for the disk letter.)
- «list partition» (It displays all partitions and EFI system partitions on the selected disk.)
- «sel partition 1» (Select the EFI partition that you want to delete. Here, 1 stands for the volume number of EFI.)
- «SET >

By doing so, it will make the EFI system partition deletable. Continue with the following steps to remove this partition on your hard drive.
Step 3. Delete the EFI partition with the command line.
Type the below command lines and hit Enter each time:
- «list partition» (It displays all the volumes on the hard drive.)
- «sel partition 1» (It identifies which partition you want to remove. Here 1 stands for the volume letter.)
- «delete partition override» (It removes the EFI partition from Windows disk.)В
Step 4. Complete EFI deleting process.
Finally, type «exit» to close the windows when you receive the message that says, ‘DiskPart successfully deleted the selected partition’.
Method 2. Delete EFIВ Partition UsingВ EaseUSВ Partition Manager
Besides DiskPart, third-party partition manager software works more flexibly and reliable in dealing with this issue. ProfessionalВ partition manager software — EaseUS Partition Master simplifies the process of deleting EFI partition in Windows as easy as 1-2-3.
Now download EaseUS Partition Master and learn the detailed guide.
Step 1. To delete a system involved partition like the EFI system partition, you’ll be asked to operate in a WinPE environment. So first of all, use the feature of «WinPE Creator» in EaseUS Partition Master to create a bootable USB drive to start. Click to get the full guide on how to create and access EaseUS WinPE bootable disk.
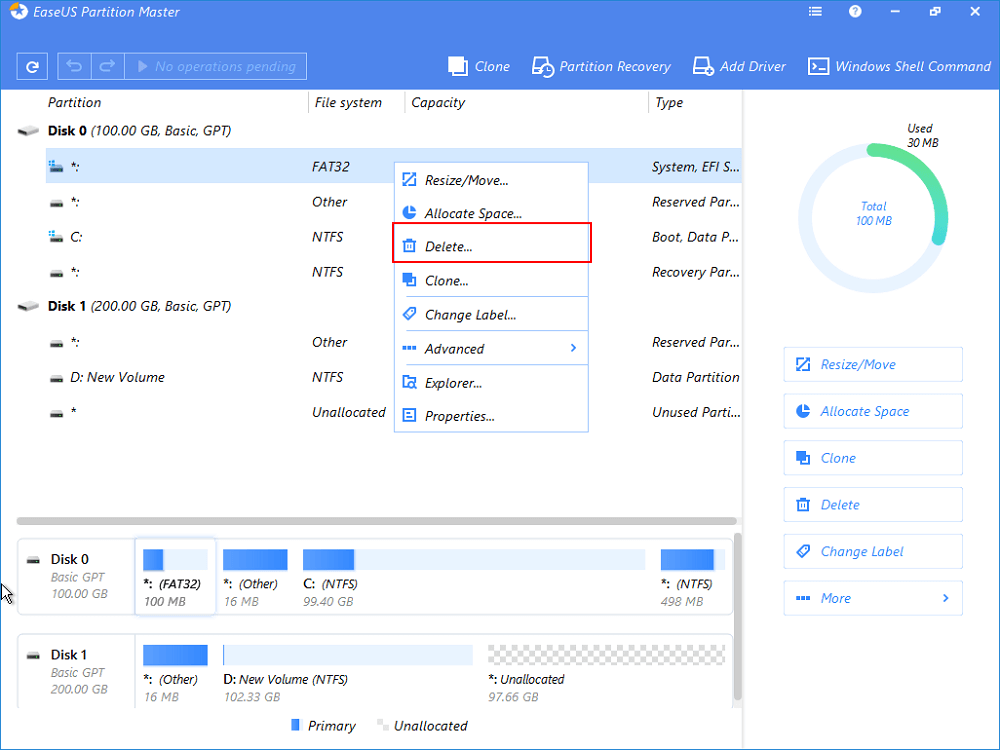
Step 2. Open EaseuS Partition Master WinPE edition. Right-click on the EFI system partition and choose «Delete«.
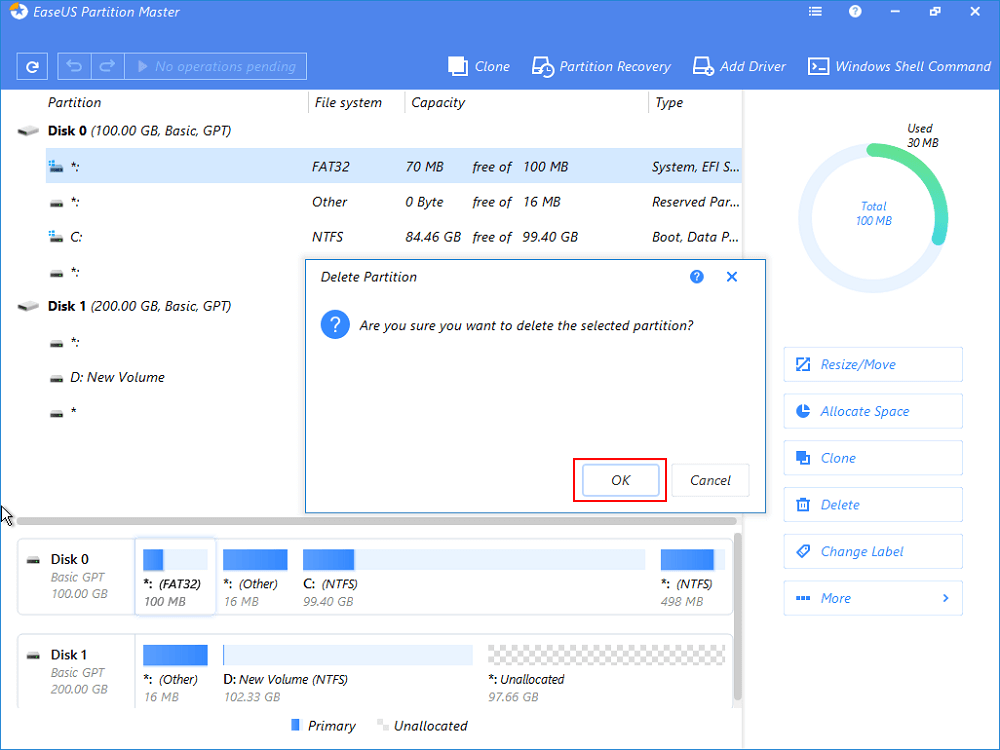
Step 3. Click «OK» to confirm the message «Are you sure you want to delete the selected partition?».
Step 4. Click «Execute 1 Operation» on the left top menu and then «Apply» in the new window to completely removeВ the EFI system partition.

Final Word
When you’ve successfully deleted the EFI partition on your PC, you can create a new partition with the unallocated space to use as a data partition or add the free space to other existing partitions.
The following video tutorial shows how to partition a hard drive with EaseUS Partition Master. You can learn how to resize a partition, create a partition, and delete the partition.
If you are having some more questions about EFI partitions, you may refer to the below links for help:


