- How do I format a USB Flash Drive to NTFS file system?
- Windows Was Unable To Complete The Format/ Please Insert a Disk Into USB Drive Error.
- About
- Как отформатировать USB-флешку в NTFS
- Зачем форматировать флешку в NTFS
- Меры предосторожности
- Стандартный способ
- С помощью командной строки
- Особенности форматирования USB-флешек в Windows XP
- Альтернативное ПО
- Проблемы
- How to Format Your USB Drives in Windows 10
- Which File System Should You Use?
- Method 1: Format USB Drive from File Explorer
- Method 2: Format USB Drive from the Device Manager
- Method 3: Format USB Drive from the Command Prompt
- Format with Modern PowerShell Tools
- The Retro Way
How do I format a USB Flash Drive to NTFS file system?
Formatting a USB drive is an easy and straightforward process. However, there are some settings one needs to check before formatting it.
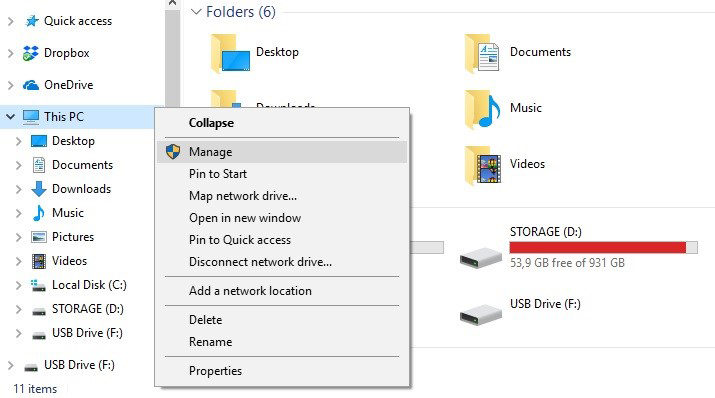
To enable NTFS on your USB Flash Drive drive (USB Flash Memory) click on My Computer (This PC) and select Manage.
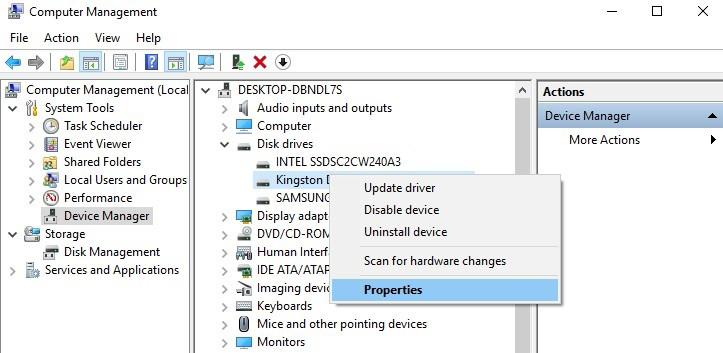
Open the Device Manager and find your USB drive under the Disk Drives heading. Right-click the drive and select Properties.
Here’s what we are looking for. By default, the setting for formatting your drive is set to Quick Removal. With Quick Removal, you can remove your USB at any time without damaging your files on it. As long as you are not moving any data from or to it of course.
Better performance setting enables write caching in Windows. This means that you will have to use Safely Remove Hardware notification to disconnect your device safely.
Choose the setting you think it will suit your needs best and click OK.

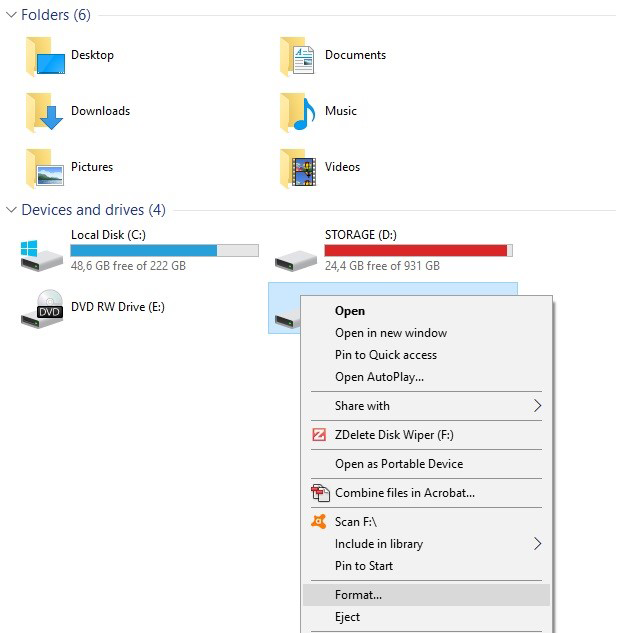
Open My Computer > Select Format on the flash drive.
Choose NTFS in the File System drop-down box.
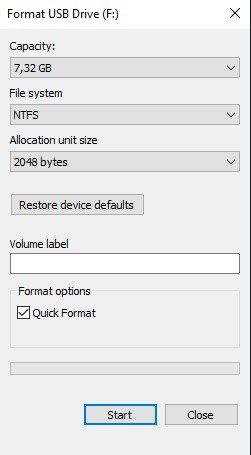
Click the Start button and wait until finished.
If you have formatted your USB using Better Performance policy to remove a device safely without data loss use a «safely remove hardware» procedure or Eject function from Windows Explorer.
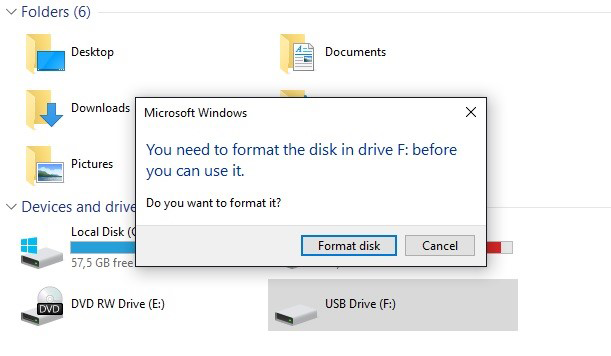
Windows Was Unable To Complete The Format/ Please Insert a Disk Into USB Drive Error.
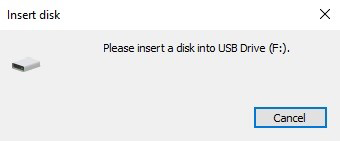

If you have encountered this error while trying to format your USB have no worries we got you covered. The problem is that your USB device needs to be initialized which can be done quite easily with LSoft’s Boot Disk Creator which comes embedded within Active@ BootDisk.
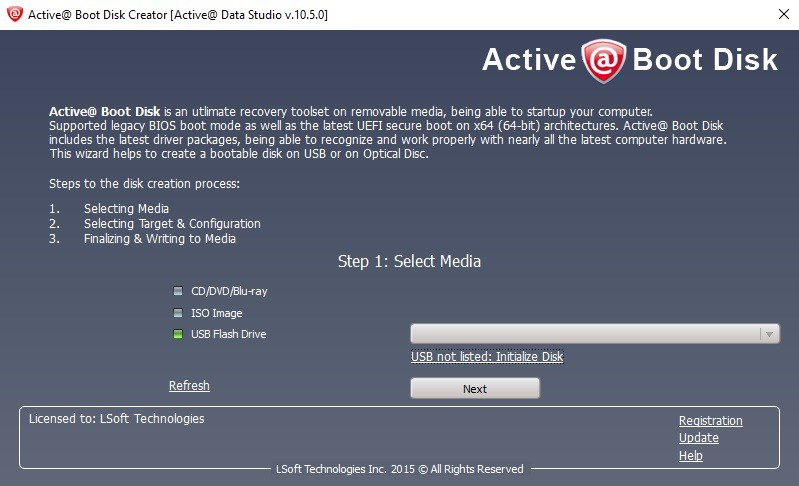
Download and install Active@ BootDisk. After that, run Boot Disk Creator.
As you can see from our example Boot Disk Creator doesn’t see the USB drive. But fear not, click on Initialize Disk.
Bear in mind that performing disk initialization will delete all of the data on your drive!
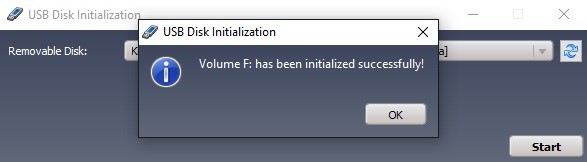
A new small window should appear where you can see your previously invisible USB. Click on Start.

In a few moments, your USB should be Initialised.
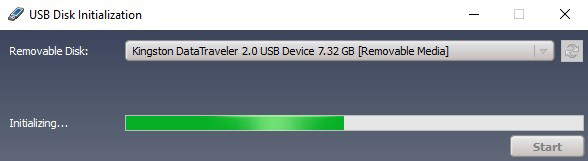
Voilà ! Boot Disk Creator has initialized and formatted your USB to NTFS format and it’s ready for use.
About
LSoft Technologies Inc. is a privately owned North American software company. Our goal is to create world’s leading data recovery, security and backup solutions by providing rock solid performance, innovation, and unparalleled customer service.
Как отформатировать USB-флешку в NTFS
Когда возникает необходимость форматирования флешки в NTFS? Зайдем издалека. NTFS — это файловая система, которая позволяет работать с объектами объемом 4 ГБ и больше. Кроме того, она создает так называемую «разметку» накопителя для более быстрого поиска данных на нем. На компьютере под управлением Windows флешка, отформатированная в NTFS, работает быстрее, чем в других файловых системах. Это особенно заметно при работе с большим количеством мелких объектов — документов, изображений и прочих файлов.
Максимальный же размер файла, который поддерживает система NTFS, – около 2 эксабайт, т.е. 2 миллиона терабайт.
Зачем форматировать флешку в NTFS
NTFS — файловая система, которую поддерживают все последние версии Windows, начиная с Windows XP и заканчивая Windows 10. Целесообразность ее использования обусловлена размерами файлов, с которыми работают современные юзеры. Например, объем среднего фильма в FullHD-качестве, перекодированном с помощью «матрешки» (формат *.MKV), составляет 8-10 ГБ. На флешку, отформатированную в файловой системе FAT32, он просто не поместится — размер великоват. А вот в NTFS — легко. Просто FAT32 не умеет распознавать файлы объемом более 4 ГБ.
Далее мы расскажем о самых доступных домашнему пользователю способах заменить устаревшую разметку FAT32 на современную NTFS. Это делается просто и быстро — в течение 3-5 минут.
Меры предосторожности
Обратите внимание! При форматировании накопителя с него удаляются абсолютно все данные. Если на флешке хранится важная для вас информация, настоятельно рекомендуем скопировать ее на жесткий диск компьютера или другой свободный носитель.
Можно ли восстановить файлы после форматирования? Чаще всего да, но при условии, что после этого на флешку больше ничего не записывалось.
Стандартный способ
Современные средства Windows, а разбирать мы их будем на примере Windows 10, позволяют выполнить операцию без сторонних программ. В предыдущих версиях этой ОС, включая XP, порядок действий выглядит абсолютно так же с поправкой на особенности интерфейса системы
- подключите USB-накопитель к ПК;
- зайдите в раздел «Компьютер»;
- найдите флешку в списке «Устройства и диски» (в нашем примере она называется «Тест»);

- выделите флешку одиночным левым кликом мыши, затем вызовите правой кнопкой ее контекстное меню;
- найдите пункт «Форматировать…», расположенный в нижней трети списка;


На скриншоте ниже видно, что по умолчанию для этой флешки выбрана файловая система FAT32. Нам же требуется изменить ее на NTFS.
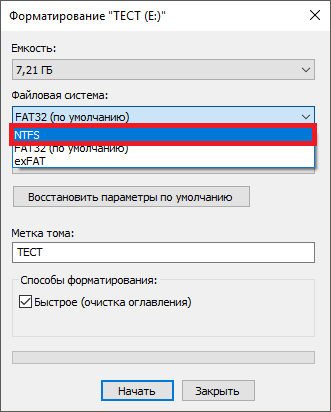
Помимо того, вы можете присвоить флешке имя — задать «Метку тома» (метка может быть любой на ваше усмотрение), и включить/отключить опцию быстрого форматирования. Если опция включена, процесс преобразования пройдет быстрее, плюс появится возможность легко восстановить информацию в случае острой необходимости. При снятии этой галочки форматирование идет медленнее и восстановить данные будет сложнее. Конечно, если вы пока не успели ничего записать на флешку.
После установки нужных настроек нажмите кнопку «Начать».

На экране покажется уведомление о том, что все данные с накопителя будут удалены. Если вы до сих пор не сохранили их на другой носитель, сделайте это сейчас.

Процесс форматирования длится от 1 до 10 минут в зависимости от мощности ПК, объема флешки и скорости USB-порта. По завершении вы увидите вот такое окно:

Чтобы проверить результат и убедиться, что все получилось, снова зайдите в папку «Компьютер», нажмите правой кнопкой мыши на иконку флешки и выберите пункт «Свойства» из контекстного меню.
Далее откройте вкладку «Общие» и в разделе «Файловая система» наблюдайте результаты своих трудов. В случае успеха там отобразится NTFS.

Таким же образом накопители преобразуют в NTFS из EXFAT (еще одного формата, универсального для Windows, Linux и MacOS) и других файловых систем.
Вы наверняка заметили, что на только что отформатированной флешке часть пространства уже чем-то занята. Это те самые файлы разметки, о которых мы говорили ранее. Иными словами, это набор инструментов, благодаря которому вы сможете в дальнейшем восстановить удаленную информацию и более оперативно работать с данными.
С помощью командной строки
Наверняка среди читателей есть любители работать с командной строкой. Они могут взять на вооружение альтернативный способ форматирования USB-носителей — с помощью консольных команд.
Итак, для открытия командной строки нажмите сочетание клавиш Win+R и введите команду CMD (в Windows 8 и 8.1 также можно нажать комбинацию Win+X, а в Windows XP и Windows 7 — открыть «Пуск», перейти в «Стандартные программы» и найти там «Командную строку»). Все действия следует выполнять от имени администратора ПК, иначе будет появляться ошибка.

После того как вы зашли в основную консоль, пропишите такую команду:
format /FS:NTFS X: /q (где X — буква флешки в проводнике).
Далее нажмите Enter.
Система может попросить повторно нажать Enter, если вы не хотите сохранять метку тома (название флешки).
В конце форматирования вы получите следующий результат. 
На этом операция завершена.
Особенности форматирования USB-флешек в Windows XP
Процесс форматирования в Виндовс XP отличается от Windows 10 минимально. Порядок действий здесь следующий:
- зайдите в «Мой компьютер»;
- нажмите на иконку флешки правой клавишей мышки;
- вызовите пункт «Свойства»;
- перейдите в подраздел «Оборудование».

Найдите нужную флешку, выделите ее левой кнопкой мыши, а затем нажмите «Свойства». Вы окажетесь в меню, где следует выбрать режим «Оптимизировать для выполнения».

Дальнейшая процедура аналогична действиям, описанным для Windows 10 и других операционных систем этого семейства (Windows 7, Windows 8).
Альтернативное ПО
Если по каким-то причинам вы не доверяете стандартным средствам Виндовс и предпочитаете сторонние программы, предлагаем использовать для форматирования флешки бесплатную утилиту USB Disk Storage Format Tool.
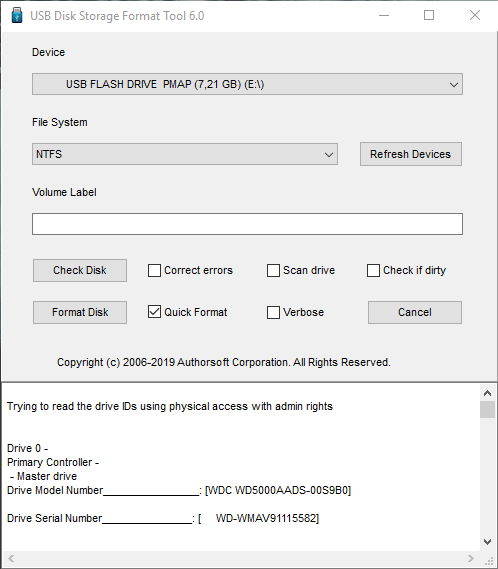
Утилита USB Disk Storage Format Tool — простой инструмент с расширенным функционалом для форматирования и последующего исправления ошибок флеш-накопителей. Интерфейс у этой программы хоть и английский, но совершенно понятный. Пользоваться ею очень легко:
- в разделе Device выберите накопитель;
- затем — файловую систему (File System);
- установите галочку напротив Quick Format (быстрая очистка);
- нажмите кнопку Format Disk и дождитесь окончания операции.
Проблемы
Иногда вместо того чтобы «молча» отформатировать флешку, система выбрасывает сообщение «Windows не удалось…». Причины подобного могут заключаться в следующем:
- одно или несколько приложений используют файлы USB-накопителя;
- возникли проблемы с разъемом, к которому подключена флешка (питание, передача данных);
- накопитель был изъят в процессе форматирования;
- некая программа или устройство создали собственный набор разделов, что затрудняет процесс перевода флешки в NTFS (ПК хочет создать свою разметку, телефон — свою и т. д.).
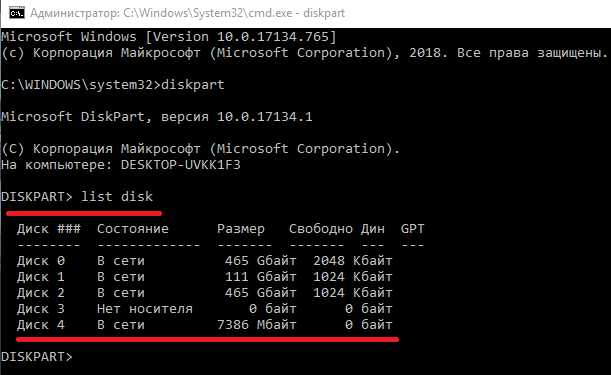
В последней ситуации решить проблему поможет системная утилита DISKPART. Она вызывается из командной строки в режиме администратора как показано на скриншоте ниже:

После изменения строки ввода на DISKPART> пропишите в консоли команду list disk для просмотра всех разделов и дисков компьютера. Это нужно, чтобы узнать, каким по счету разделом является флешка, которую предстоит форматировать. Она определяется по размеру.
В нашем случае флешка — это диск 4.
Далее последовательно пропишите еще несколько команд:
- select disk 4 (в вашем случае может быть другой);
- clean;
- create partition primary;
- format fs=ntfs.

На этом операция завершена.
Форматирование флешки в NTFS выполняется всего за пару минут. Если у вас возникают сложности, внимательно читайте инструкцию и следуйте советам по устранению ошибок.
How to Format Your USB Drives in Windows 10

If you have a malfunctioning or corrupted USB drive, formatting it may be the best way to get it back to its original working state. Even if your drive is healthy, you may still want to format it as a quick and easy way to erase its contents.
This article looks at some ways you can format a USB drive on Windows. If you know some other ways of achieving the same result, let us know about them in the comments section below.
Which File System Should You Use?
Before you format your USB drive, you need to think about which file system to use. File Systems are simply ways of organizing data on a storage device (such as hard drives or SD Cards). Support for various file systems varies depending on your operating system.
Windows 10 offers three file system options when formatting a USB drive: FAT32, NTFS, and exFAT. Here is the breakdown of the pros and cons of each filesystem.
| Pros | Cons | Best Used For | |
|---|---|---|---|
| Fat 32 | * Compatible with all major operating systems * Less memory usage | * Cannot handle single files larger than 4GB *Limited partition size (up to 32GB) | * Removable storage devices such as USB Flash Drives * Devices that need to be plugged into a variety of operating systems |
| NTFS | * Can create partitions larger than 32GB * Can read/write files larger than 4GB * Supports on-the-fly file encryption | * Limited cross-platform compatibility | * Internal hard drives * Windows system drives |
| exFAT | * Provides an unlimited file and partition size | * You may need to install drivers to get exFAT compatibility on Linux | * External hard drives * Flash drives if you want to work with files larger than 4GB |
Next, let’s take a look at some ways you can format your USB drive on Windows 10.
Method 1: Format USB Drive from File Explorer
The most popular way to format a storage device, and arguably one of the easiest, is directly through Windows File Explorer. The process is the same for both internal and external storage devices.
To format a USB drive this way:
1. Right-click on it in a File Explorer window and choose “Format … ” from the menu that pops up.

2. Choose the filesystem you’ve decided to use on the device.

3. Choose the allocation unit size you’d like to use. Higher values are better if you’re planning to store large files, giving a small boost to performance and reducing fragmentation. However, they also waste some space. Keep in mind that most devices have an optimal allocation unit size, so we suggest choosing the default value. It’s also worth noting that most storage media today are tuned for the 4096 value.

4. Enter a name for your USB drive in the field under the Volume label.
5. Leave “Quick Format” enabled if you didn’t keep sensitive data that you’d want to erase and if you’re sure your USB drive works properly. A Quick Format marks the device as empty but doesn’t actually erase its contents. It’s the equivalent of flipping a switch from “not empty” to “empty.” A full format takes more time, and in the case of large multi-terabyte external hard disk drives, it can even take days. However, it goes over the full storage area, bit by bit, ensuring there are no bad sectors and everything works correctly.
6. Click on Start to format your USB drive.
Method 2: Format USB Drive from the Device Manager
If, for some reason, Windows didn’t assign a letter to your USB drive, or its filesystem was corrupted, it may not show up in File Explorer. Thankfully, it’s similarly easy to format it from the Disk Management app.
1. Press Win + X to access Windows 10’s administrative quick menu. Choose Disk Management. Alternatively, you can locate and run it from the Start menu by pressing the Win Key and then typing its name.

2. Disk Management will present you with a list of all storage devices and their partitions. If your drive works properly, you will see one or more partitions listed inside it. You can format them individually. Alternatively, if you’d prefer to remove them and use all of the space on your drive as one contiguous block, click on each of them and choose “Remove Volume” until none remain.
3. If your USB drive’s space is presented as unallocated, right-click on it and create a new volume. Windows 10 offers multiple options, but in 99 percent of the cases, you want to go with a Simple Volume.

4. Follow the New Simple Volume Wizard steps to create a partition and then format it.

5. If you want to create more than one partition in your USB drive, you can input a smaller volume size for the one you are currently making. This will leave empty space on your drive, allowing you to repeat the process to create more partitions later.

6. You will have the option to assign a drive letter to the partition you are creating directly from this wizard. You can also map it to an empty NTFS folder instead or skip assigning a drive letter altogether.

7. As when formatting from File Explorer, you’ll be able to choose a file system, the allocation unit size, enter a volume label, and decide if you’ll go for a quick format.

8. Before the actual format, the New Simple Volume Wizard will present a summary of your choices. Click on Finish to accept them and format your USB drive.

9. However, if your drive already contains one or more partitions that you want to format without applying any changes to them, the process is even more straightforward. While in the Disk Management app, right-click on the partition you want to format and choose that option (Format …) from the menu that pops up.

10. Enter a name for the partition in the volume label field. As with the previous approaches, choose a file system, allocation unit size, and whether you want to perform a quick format. Click on OK to format your USB drive.

Method 3: Format USB Drive from the Command Prompt
If you prefer the command line, you can format a USB drive with the diskpart command in Powershell.
This tool is basically the command-line equivalent of the Disk Management application used in the previous section.
1. Press Win + X and choose Windows PowerShell (Admin). There, type diskpart and press Enter.

2. Type the following command to view the active drives on your machine:

3. Use the select command to choose your USB drive by stating its disk number from the previous command. Replace “disk 1” in the following with the one that matches your own USB drive.

4. Remove your USB drive’s contents to start fresh with:

5. Create and activate a partition with the following two commands:

6. To perform a quick format on the partition you just created using the NTFS file system and the label “MTE,” use:

7. Lastly, assign a letter to your drive with:
Format with Modern PowerShell Tools
The modern command-line warrior will probably prefer PowerShell’s specialized commands for the job at hand.
1. Fire up PowerShell with administrative privileges. There, type the following to see a list of your connected storage devices:

2. In our case, Get-Disk reported our USB Flash Drive as the Number 1 drive. Replace that number with the one that matches your own drive in the command that follows to fully erase its contents:
![]()
3. Answer positively (by typing “Y” and pressing enter) when asked if you’re sure you want to perform this action.
![]()
4. Proceed by creating a new partition, setting it as active, and assigning it a drive letter with:

5. Finally, format your partition with the filesystem and label of your choice using the command Format-Volume. Formatting the one mapped to letter F with the FAT32 filesystem and the label FlashDrive would look like:

The Retro Way
As with many other things in life, when formatting a USB drive, sometimes the old way is also the easiest and the best.
Note that this only works in existing partitions by erasing their contents, which, in the process, allows you to choose a different filesystem and set a volume label. Like with all other methods, you can also go for a full or quick format.
To erase everything in partition F formatted with the FAT32 filesystem, assign it the label FlashDrive and do a quick format. The command would be:

The command will ask you to insert a new disk and press Enter. Ignore the “inserting disk” part, press Enter, and enjoy your newly formatted drive.
As described, there are many ways to format USB drives under Windows 10. If instea, you have an unformattable and unusable USB drive, check out the various ways to fix it.
Related:
OK’s real life started at around 10, when he got his first computer — a Commodore 128. Since then, he’s been melting keycaps by typing 24/7, trying to spread The Word Of Tech to anyone interested enough to listen. Or, rather, read.


