- How to Format Your USB Drives in Windows 10
- Which File System Should You Use?
- Method 1: Format USB Drive from File Explorer
- Method 2: Format USB Drive from the Device Manager
- Method 3: Format USB Drive from the Command Prompt
- Format with Modern PowerShell Tools
- The Retro Way
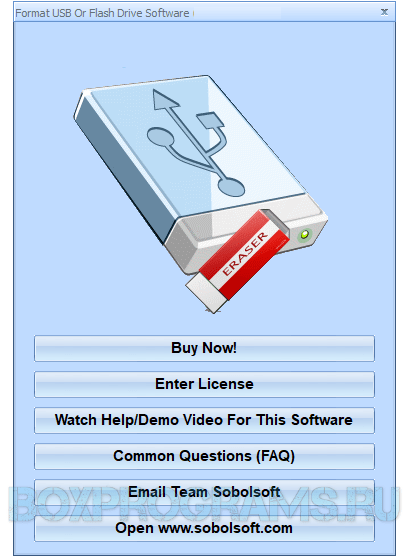
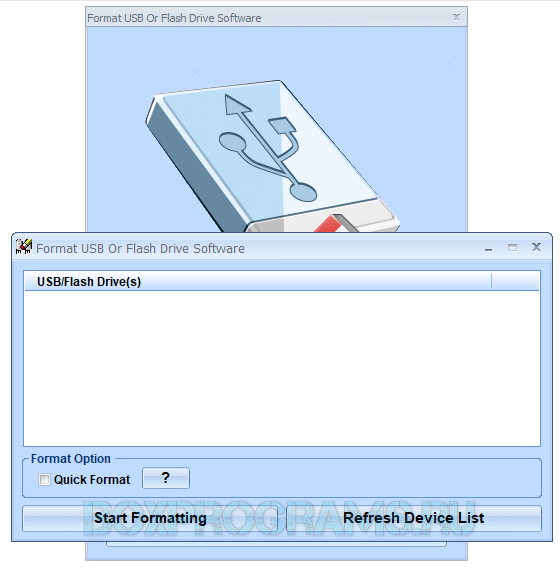
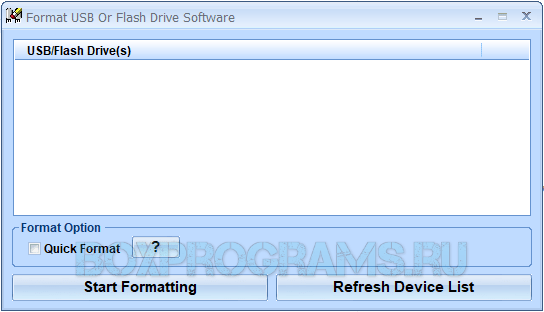
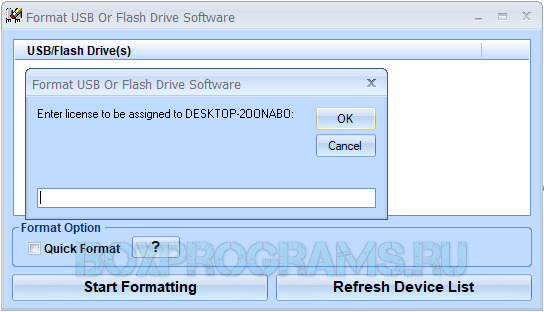
- Format USB Or Flash Drive Software скачать бесплатно на компьютер
- Возможности:
- Format USB Or Flash Drive Software как пользоваться
- How to Format Bootable USB Flash Drive to Normal in Windows 7, 8, 10?
- Why Need to Format Bootable USB Drive?
- Can We Format Bootable USB Drive in Windows 10/8/7/XP?
- How to Format Bootable USB Drive via AOMEI Partition Assistant?
How to Format Your USB Drives in Windows 10

If you have a malfunctioning or corrupted USB drive, formatting it may be the best way to get it back to its original working state. Even if your drive is healthy, you may still want to format it as a quick and easy way to erase its contents.
This article looks at some ways you can format a USB drive on Windows. If you know some other ways of achieving the same result, let us know about them in the comments section below.
Which File System Should You Use?
Before you format your USB drive, you need to think about which file system to use. File Systems are simply ways of organizing data on a storage device (such as hard drives or SD Cards). Support for various file systems varies depending on your operating system.
Windows 10 offers three file system options when formatting a USB drive: FAT32, NTFS, and exFAT. Here is the breakdown of the pros and cons of each filesystem.
| Pros | Cons | Best Used For | |
|---|---|---|---|
| Fat 32 | * Compatible with all major operating systems * Less memory usage | * Cannot handle single files larger than 4GB *Limited partition size (up to 32GB) | * Removable storage devices such as USB Flash Drives * Devices that need to be plugged into a variety of operating systems |
| NTFS | * Can create partitions larger than 32GB * Can read/write files larger than 4GB * Supports on-the-fly file encryption | * Limited cross-platform compatibility | * Internal hard drives * Windows system drives |
| exFAT | * Provides an unlimited file and partition size | * You may need to install drivers to get exFAT compatibility on Linux | * External hard drives * Flash drives if you want to work with files larger than 4GB |
Next, let’s take a look at some ways you can format your USB drive on Windows 10.
Method 1: Format USB Drive from File Explorer
The most popular way to format a storage device, and arguably one of the easiest, is directly through Windows File Explorer. The process is the same for both internal and external storage devices.
To format a USB drive this way:
1. Right-click on it in a File Explorer window and choose “Format … ” from the menu that pops up.

2. Choose the filesystem you’ve decided to use on the device.

3. Choose the allocation unit size you’d like to use. Higher values are better if you’re planning to store large files, giving a small boost to performance and reducing fragmentation. However, they also waste some space. Keep in mind that most devices have an optimal allocation unit size, so we suggest choosing the default value. It’s also worth noting that most storage media today are tuned for the 4096 value.

4. Enter a name for your USB drive in the field under the Volume label.
5. Leave “Quick Format” enabled if you didn’t keep sensitive data that you’d want to erase and if you’re sure your USB drive works properly. A Quick Format marks the device as empty but doesn’t actually erase its contents. It’s the equivalent of flipping a switch from “not empty” to “empty.” A full format takes more time, and in the case of large multi-terabyte external hard disk drives, it can even take days. However, it goes over the full storage area, bit by bit, ensuring there are no bad sectors and everything works correctly.
6. Click on Start to format your USB drive.
Method 2: Format USB Drive from the Device Manager
If, for some reason, Windows didn’t assign a letter to your USB drive, or its filesystem was corrupted, it may not show up in File Explorer. Thankfully, it’s similarly easy to format it from the Disk Management app.
1. Press Win + X to access Windows 10’s administrative quick menu. Choose Disk Management. Alternatively, you can locate and run it from the Start menu by pressing the Win Key and then typing its name.

2. Disk Management will present you with a list of all storage devices and their partitions. If your drive works properly, you will see one or more partitions listed inside it. You can format them individually. Alternatively, if you’d prefer to remove them and use all of the space on your drive as one contiguous block, click on each of them and choose “Remove Volume” until none remain.
3. If your USB drive’s space is presented as unallocated, right-click on it and create a new volume. Windows 10 offers multiple options, but in 99 percent of the cases, you want to go with a Simple Volume.

4. Follow the New Simple Volume Wizard steps to create a partition and then format it.

5. If you want to create more than one partition in your USB drive, you can input a smaller volume size for the one you are currently making. This will leave empty space on your drive, allowing you to repeat the process to create more partitions later.

6. You will have the option to assign a drive letter to the partition you are creating directly from this wizard. You can also map it to an empty NTFS folder instead or skip assigning a drive letter altogether.

7. As when formatting from File Explorer, you’ll be able to choose a file system, the allocation unit size, enter a volume label, and decide if you’ll go for a quick format.

8. Before the actual format, the New Simple Volume Wizard will present a summary of your choices. Click on Finish to accept them and format your USB drive.

9. However, if your drive already contains one or more partitions that you want to format without applying any changes to them, the process is even more straightforward. While in the Disk Management app, right-click on the partition you want to format and choose that option (Format …) from the menu that pops up.

10. Enter a name for the partition in the volume label field. As with the previous approaches, choose a file system, allocation unit size, and whether you want to perform a quick format. Click on OK to format your USB drive.

Method 3: Format USB Drive from the Command Prompt
If you prefer the command line, you can format a USB drive with the diskpart command in Powershell.
This tool is basically the command-line equivalent of the Disk Management application used in the previous section.
1. Press Win + X and choose Windows PowerShell (Admin). There, type diskpart and press Enter.

2. Type the following command to view the active drives on your machine:

3. Use the select command to choose your USB drive by stating its disk number from the previous command. Replace “disk 1” in the following with the one that matches your own USB drive.

4. Remove your USB drive’s contents to start fresh with:

5. Create and activate a partition with the following two commands:

6. To perform a quick format on the partition you just created using the NTFS file system and the label “MTE,” use:

7. Lastly, assign a letter to your drive with:
Format with Modern PowerShell Tools
The modern command-line warrior will probably prefer PowerShell’s specialized commands for the job at hand.
1. Fire up PowerShell with administrative privileges. There, type the following to see a list of your connected storage devices:

2. In our case, Get-Disk reported our USB Flash Drive as the Number 1 drive. Replace that number with the one that matches your own drive in the command that follows to fully erase its contents:
![]()
3. Answer positively (by typing “Y” and pressing enter) when asked if you’re sure you want to perform this action.
![]()
4. Proceed by creating a new partition, setting it as active, and assigning it a drive letter with:

5. Finally, format your partition with the filesystem and label of your choice using the command Format-Volume. Formatting the one mapped to letter F with the FAT32 filesystem and the label FlashDrive would look like:

The Retro Way
As with many other things in life, when formatting a USB drive, sometimes the old way is also the easiest and the best.
Note that this only works in existing partitions by erasing their contents, which, in the process, allows you to choose a different filesystem and set a volume label. Like with all other methods, you can also go for a full or quick format.
To erase everything in partition F formatted with the FAT32 filesystem, assign it the label FlashDrive and do a quick format. The command would be:

The command will ask you to insert a new disk and press Enter. Ignore the “inserting disk” part, press Enter, and enjoy your newly formatted drive.
As described, there are many ways to format USB drives under Windows 10. If instea, you have an unformattable and unusable USB drive, check out the various ways to fix it.
Related:
OK’s real life started at around 10, when he got his first computer — a Commodore 128. Since then, he’s been melting keycaps by typing 24/7, trying to spread The Word Of Tech to anyone interested enough to listen. Or, rather, read.
Format USB Or Flash Drive Software скачать бесплатно на компьютер
Format USB Or Flash Drive Software – небольшое приложение для работы с флешками, их определения в системе и форматирования.

Удобный софт позволит вам легко форматнуть любой USB-накопитель, выбрать текущий диск в системе и провести быструю или полную очистку. Благодаря простому ненагруженному интерфейсу пользователь может легко выбирать нужные диски и работать с ними.
Утилита поддерживает разные файловые системы, работает с флеш-дисками и USB, совместима с 8-й и 7-й версиями Windows, имеет невысокие требования к системе и не перегружает ресурсы компьютера. Имеет меню на английском языке.
Возможности:
- быстрая очистка накопителей;
- автоопределение подключенного устройства;
- поддержка FAT32, NTFS, eXFAT и FAT;
- выбор устройства;
- ускоренное и быстрое форматирование;
- определение недоступного в проводнике устройства;
- легкое удаление всех данных с носителя;
- интегрирование в контекстное меню виндовс;
- легкое управление.
Предлагаем format usb or flash drive software скачать бесплатно и оценить это программное обеспечение, легко проводящее форматирование ваших накопителей.
Format USB Or Flash Drive Software как пользоваться
How to Format Bootable USB Flash Drive to Normal in Windows 7, 8, 10?
This article illustrates how to format bootable USB stick to normal flash drive with NTFS or FAT32-based file system using reliable bootable USB drive format tool in Windows 7, 8, 10.
![]()
By Teresa  / Last Updated February 21, 2021
Why Need to Format Bootable USB Drive?
Bootable USB drive is a kind of helpful assistant in many situations. If you cannot access Windows, the bootable USB drive you created before can help you enter into Windows PE or Linux environment for further operations. Sometimes, to backup hard drive or system, the bootable USB stick helps backup hard drive without booting Windows. What’s more, USB drives are easy to carry and easy to save. One bootable USB stick can apply to different computers.
Well, with so many conveniences it brings to us, why would we want to format bootable USB stick? As we know, USB flash drive comes with larger capacity and reasonable price in recent years. As time goes by, current bootable USB may not meet your computing requirements anymore. In that case, you can choose to copy bootable USB drive to another USB or to format bootable USB drive in Windows 7 and create another new bootable device. Also, when you no longer need the bootable USB, it is not a bad choice to reformat it to FAT32 for new files. Surely, other conditions might result in bootable USB drive formatting as well. The key point is to find out how to format bootable USB to normal.
Can We Format Bootable USB Drive in Windows 10/8/7/XP?
Obviously, the answer is positive. Bootable USB drive is no different than normal USB drive except for the starting programs and Windows pre-installed environment. Therefore, you can format bootable flash drive as usual in some cases. On Windows alone, there are two bootable USB drive format utilities: Disk Management and Diskpart in Command Prompt.
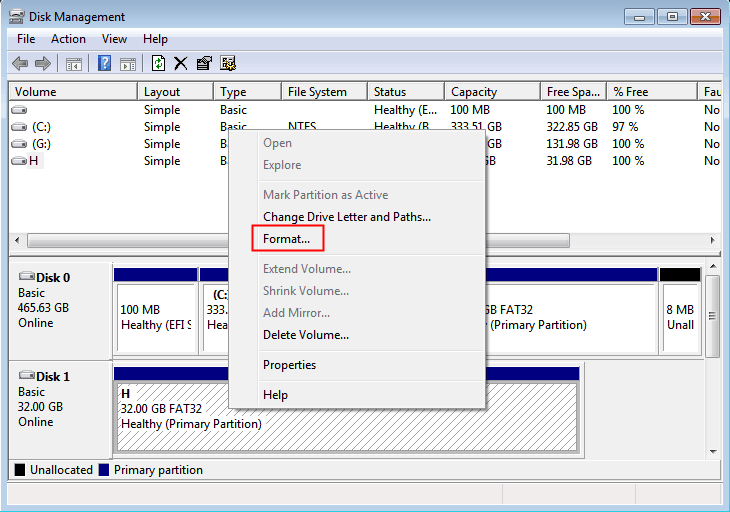
Plug in the bootable USB drive when you running Windows and then type “diskmgmt.msc” in Run box to start Disk Management. Right-click the bootable drive and select “Format”. Then follow the wizard to complete the formatting.
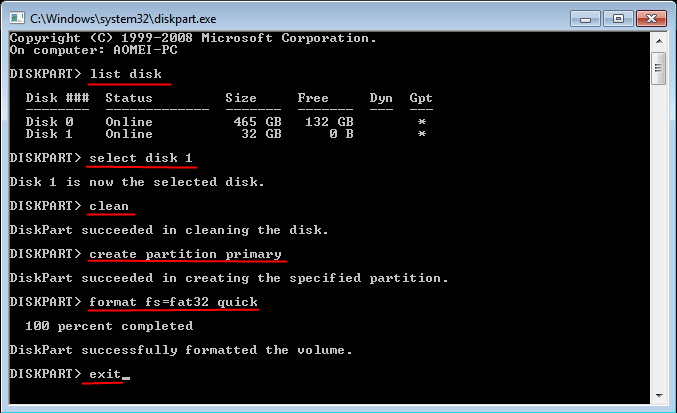
One can not only create bootable USB using Diskpart but also format bootable USB stick with this application. Steps are quite easy as well. First, type “diskpart” in Run box to start Command Prompt. Second, input following commands in turn and remember to press Enter after each move.
select disk X (X stands for the disk number of your bootable USB drive)
create partition primary
format fs=fat32 quick or format fs=ntfs quick (select one file system based on your own needs)
No cumbersome steps required can you format the bootable USB flash drive. Nevertheless, sometimes you cannot complete formatting using both methods. Besides, all operations take place immediately so that you cannot step back. No matter from which side, finding another powerful bootable USB drive formatter is recommendable.
How to Format Bootable USB Drive via AOMEI Partition Assistant?
AOMEI Partition Assistant Professional is reliable and well-known disk partition manager that allows you to, for example, format SD card for 3DS in Windows 10, 8.1, 8, 7, XP, and Vista. This bootable flash drive format utility can assist you format USB drive to NTFS, FAT32, Ext 2 or Ext3 for different uses. During the format process, you are allowed to change cluster size of the file system. If you just want to wipe data on the USB drive like erasing files on SanDisk USB, it supports wipe partition up to 100 times. It has user-friendly interface and provides demo version. You can download the demo version of AOMEI Partition Assistant Professional to have a try.
1. Plug in the bootable USB drive when you running Windows. Install and launch AOMEI Partition Assistant.
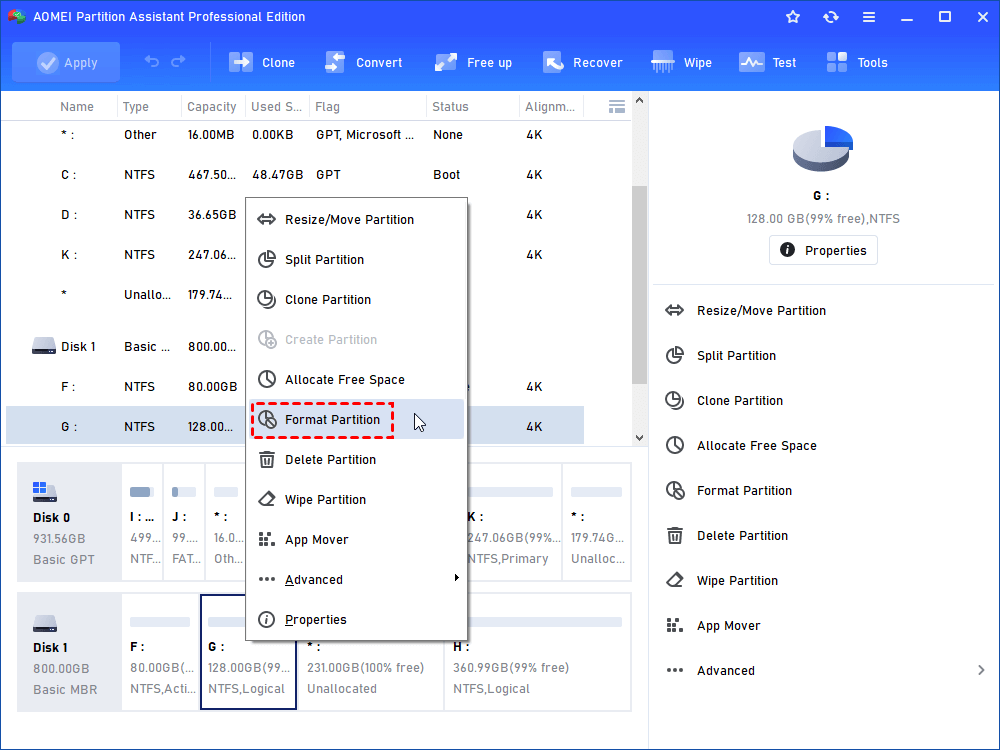
2. Right-click the bootable flash drive and select “Format Partition”.
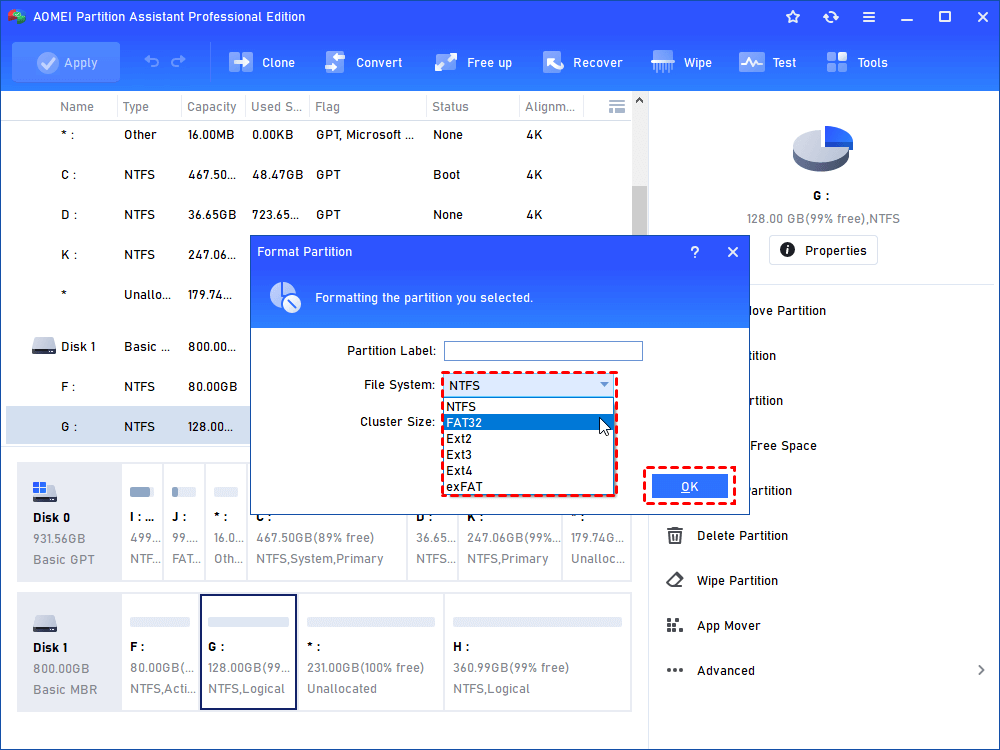
3. Set file system and cluster size and then click “OK”.
4. This is the virtual result. Click “Apply” to make it real.
Tips: If you want the USB drive to bootable again, try “Make Bootable Media” in this software to create a bootable device with Windows PE, and you can use this bootable USB to format hard drive in WinPE mode without booting Windows.
Except for formatting bootable USB drive, AOMEI Partition Assistant is also an Intenso USB format tool, HP USB format tool and Lexar USB format utility. In addition, you are able to migrate OS from HDD to SSD while keeping files on HDD if the need ever arises.


