- C# Windows Forms tutorial
- Windows Forms
- Building Windows Forms applications
- Windows Forms simple example
- Windows Forms tooltips
- Windows Forms Quit button
- Windows Forms Label
- Windows Forms CheckBox
- Windows Forms simple menu
- Windows Forms painting rectangles
- BestProg
- Создание приложения типа Windows Forms Application в MS Visual Studio — C++ . Обзор основных файлов проекта
- Выполнение
- Шаг 1. Создание проекта приложения Windows Forms Step 1: Create a Windows Forms App project
- Откройте Visual Studio 2017. Open Visual Studio 2017
- Запустите Visual Studio 2019. Open Visual Studio 2019
- Сведения о проекте приложения Windows Forms About the Windows Forms App project
- Дальнейшие действия Next steps
C# Windows Forms tutorial
last modified November 3, 2020
C# Windows Forms tutorial teaches the basics of GUI programming with C# & Windows Forms. In our tutorial, we will build our applications manually; we will not use Form designers.
Windows Forms
Windows Forms, sometimes abbreviated as Winforms, is a graphical user interface application programming interface (API) included as a part of Microsoft’s .NET Framework.
Windows Forms allows to create graphically rich applications that are easy to deploy and update. The applications are more secure than traditional Windows-based applications.
In December 2018, Microsoft announced releasing Windows Forms as open source project on GitHub. It is released under the MIT License. With this release, Windows Forms has become available on the .NET Core framework. Windows Forms is available on Windows only.
Building Windows Forms applications
We will be using .NET Core to create Windows Forms applications.
A new template for the Windows Forms application is created with the dotnet new winforms command.
The application is run with the dotnet run command.
Windows Forms simple example
In the first example, we display a simple window on the screen.
We create the template of the Windows Forms application. The command also generates Form1.Designer.cs and Form1.cs files. We will not use them and they can be safely deleted.
The example displays a main window on the screen. The window is centered.
We use the Windows Forms and Drawing namespaces.
In Windows Forms, any window or a dialog is a Form. This control is a basic container whose purpose is to display other child controls. The MyForm inherits from a form. This way it becomes a form itself.
As a good programming practice, the form initialization is delegated to the InitComponents method.
Text and Size are properties of a form. Changing these properties, we modify our form control. The first line displays text «First application» in the titlebar of the form control. The second line sets the size of the client area of the form. The CenterToScreen method centers the form on the screen.
The Main method is an entry point to the application. Windows Forms applications must declare the [STAThread] attribute; otherwise, the controls might not work correctly. This tells to use single-threaded apartment model instead of multi-threaded.
With the SetHighDpiMode method, we ensure that our application looks good on any display resolution.
The EnableVisualStyles method enables visual styles. The application will use the built-in Windows theming to style controls instead of the classic Windows look and feel.
The Run method starts the application. It begins running a standard application message loop on the current thread, and makes the specified form visible.
Windows Forms tooltips
A tooltip is a small rectangular pop-up window that displays a brief description of a control’s purpose when the user rests the pointer on the control.
The code example creates a tooltip for two controls: one Button control and the Form control.
We place two buttons on the FlowLayoutPanel . It dynamically lays out its contents horizontally or vertically. (The default dimension is vertical.)
We create a new tooltip. With the SetToolTip , we assign the tooltip to the FlowLayoutPanel control.
The FlowLayoutPanel fills the entire area of the form control.
A new Button control is created. We set its text with the Text property and size it automatically to fit the text size.
A tooltip is added to the first Button control.
The buttons are added to the flow panel and the flow panel is added to the form.
Windows Forms Quit button
Button control represents a Windows button control. It can be clicked by using the mouse, Enter key, or Spacebar if the button has focus.
The example creates a Quit button control; the application terminates when we click on the button.
The button has some margin around its borders. We add some space to the left and above the button control.
We plug an event handler to the Click event. When we click on the button, the application is closed with the Close method. Since we do not work with the sender object and event arguments, we use discards.
Windows Forms Label
Label is a simple control for displaying text or images. It does not receive focus.
The example displays lyrics using the Label control.
We use this font to display the text.
The label control is created. It is located at the x=10, y=10 coordinate on the form.
The main window is automatically sized to fit the lyrics.
Windows Forms CheckBox
CheckBox is a control that has two states: on and off. It is a box with a label or an image. If the CheckBox is checked, it is represented by a tick in a box.
The code example shows or hides the title of the window depending on its state.
When the application starts, we show the title. And we set the CheckBox control to checked state.
When we click on the CheckBox control, the CheckedChanged event is triggered.
Depending on the value of the Checked property, we toggle the title of the window.
Windows Forms simple menu
A menubar is a collection of menus. A menu groups commands of an application.
In our example, we have a menubar and one menu. Inside a menu there is one menu item. If we select the menu item, application is closed.
The application can be closed also by using the Ctrl + X shorcut or by pressing Alt , F , E keys.
MenuStrip creates a menu system for our form. We add ToolStripMenuItem objects to the MenuStrip that represent the individual menu commands in the menu structure. Each ToolStripMenuItem can be a command for your application or a parent menu for other submenu items.
Here we create a menu with the ToolStripMenuItem .
This line creates the exit menu item.
We provide a shortcut for the exit menu item.
The exit menu item is added to the drop down items of the menu object.
Here we add the menu object into the menu strip.
The MenuStrip is plugged into the form. In other words, the menubar is added to the main window of the application.
Windows Forms painting rectangles
Painting is done with the painting API provided by the Windows Forms. The painting is done within a method, that we plug into the Paint event.
We draw nine rectangles with nine different colours.
Paint events are delivered to the OnPaint method.
This is the signature of the OnPaint method.
In order to paint on the form, we must get the Graphics object. Painting on a form is actually calling various methods of the Graphics object.
The FillRectagle method fills a specified rectangle with a brush. A brush can be a colour or a pattern. There are some predefined colours available. We can get them from the Brushes enumeration. The last four values are the x, y values of the topleft point and the width and height of the rectangle.
In this tutorial, we have created simple GUI applications in C# and Windows Forms.
BestProg
Создание приложения типа Windows Forms Application в MS Visual Studio — C++ . Обзор основных файлов проекта
В данной теме рассмотрены особенности создания приложения типа Windows Forms Application с поддержкой языка C++ . Такой тип приложения поддерживает все преимущества технологии .NET Framework .
Выполнение
1. Загрузить Microsoft Visual Studio .
В результате будет создано окно с активной вкладкой Start Page (рисунок 1).
 Рисунок 1. Окно Microsoft Visual Studio
2. Создание приложения типа Windows Forms Application
Чтобы создать новый проект (решение) на языке C++ , нужно выбрать последовательность команд (рис. 2):
Система Microsoft Visual Studio предлагает разные виды шаблонов приложения для программирования на языке C++ (рис. 2).
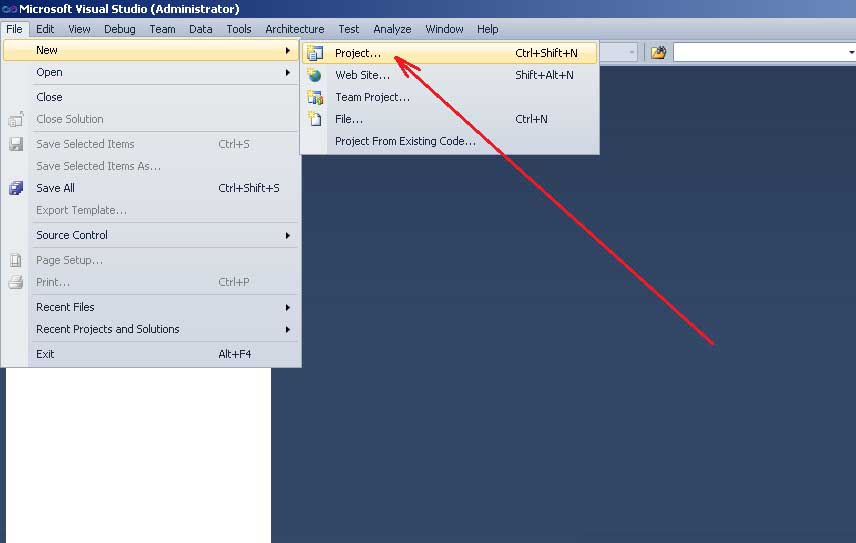 Рисунок 2. Вызов команды создания нового проекта
В результате откроется окно « New Project » (рисунок 3), в котором нужно выбрать шаблон « Visual C++ » и тип приложения Windows Forms Application .
В поле « Location: » надо задать путь к папке, в которой будет сохранен проект. В нашем случае задан следующий путь
В поле Name задается имя приложения. В нашем случае это имя « MyApp01 «.
Если включена опция « Create directory for solution » (создать директорию для решения), то проект будет сохранен в папке
В поле « Solution name: » задается имя решения. Решение ( solution ) может объединять в себе несколько проектов. В нашем случае имя решения остается таким как и имя проекта.
 Рисунок 3. Окно « New Project » создания нового проекта
3. Основные элементы оконного интерфейса для работы с программой
После выбора «ОК» в предыдущем окне « New Project «, система Microsoft Visual Studio создаст весь необходимый код для работы приложения типа Windows Forms Application .
В результате окно Microsoft Visual Studio примет вид как показано на рисунке 4.
В окне, в центре отображается основная форма приложения. На этой форме можно размещать компоненты. Компоненты размещаются на панели Toolbox (левая часть экрана).
Свойства формы или компонента отображаются в утилите Solution Explorer (правая часть экрана). Изменяя эти свойства, можно влиять на вид формы, поведение формы, реализовывать обработчики событий формы и прочее.
 Рисунок 4. Основные элементы окна приложения
4. Вызов режима ввода кода
На данный момент активным есть режим проектирования формы. Чтобы перейти в режим набора текста программы, нужно вызвать команду Code с меню View (рисунок 5):
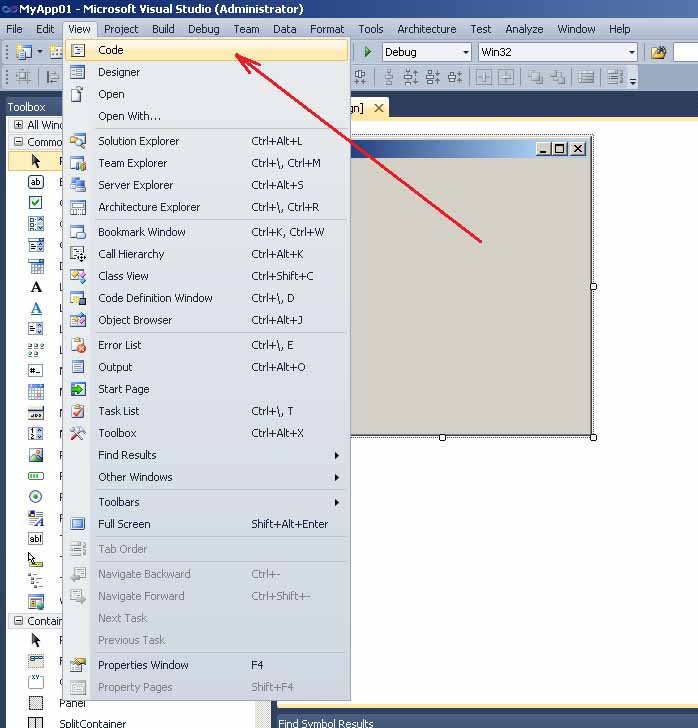 Рисунок 5. Команда перехода в режим набора текста программы
Другой вариант вызова команды перехода в режим набора текста, это клик на соответствующей кнопке в Solution Explorer (рисунок 6).
 Рисунок 6. Кнопка перехода в режим набора текста программы
В результате отобразится текст программы.
 Рисунок 7. Режим просмотра текста программы
5. Текст модуля « Form1.h «
При создании проекта, система Microsoft Visual Studio генерирует программный код, который сохраняется в различных файлах.
Главным файлом, в котором программист создает собственный код программы, есть файл « Form1.h «. Этот файл соответствует главной форме приложения. На главной форме размещаются различные компоненты. С помощью этих компонент реализуется решение конкретной задачи. При создании проекта создается пустая форма (рисунок 6). Кроме главной формы можно создавать другие формы и добавлять их к проекту.
Листинг файла « Form1.h » следующий.
Объясним некоторые фрагменты кода в тексте программы.
В вышеприведенном тексте создается пространство имен MyApp01 с помощью оператора
В этом пространстве имен подключаются другие пространства имен из библиотеки .NET Framework :
В пространстве имен MyApp01 создается класс с именем Form1. Этот класс соответствует главной форме приложения Form1.
Класс содержит конструктор, который вызывает метод
В методе InitializeComponent() создается компонента-форма (переменная components ), которая есть контейнером. Это означает, что на форме могут размещаться другие компоненты (кнопки, метки, поля ввода и т.д.). Также в методе InitializeComponent() настраиваются параметры формы: название заголовка, размер (300 * 300 пикселей), шрифт по умолчанию.
Form1() уничтожает форму (переменная components ) с помощью оператора delete .
6. Файлы, которые создаются в проекте
После создания проекта типа Windows Forms Application система Microsoft Visual Studio создает несколько файлов.
 Рисунок 8. Файлы C++ , которые создаются в проекте типа Windows Forms Application
Как было сказано раньше, главным файлом есть файл « Form1.h » (см. п. 5). Также, согласно правилам языка C++ , создается файл реализации « MyApp01.cpp «. В этом файле есть главная функция main() . Этот файл содержит код отображающий главную форму.
Листинг файла « MyApp01.cpp » следующий:
Файл « MyApp01.vcxproj «. Это главный файл проектов на Visual C++ , которые генерируются с использованием мастера приложений ( Application Wizard ). В нем содержится информация о версии Visual C++ , в которой сгенерирован файл, информация о платформах, настройках и особенностях (характеристиках) проекта выбранных с помощью мастера приложений ( Application Wizard ).
Файл « MyApp01.vcxproj.filters «. Это есть файл фильтров для сгенерированных проектов на Visual C++ с использованием мастера приложений ( Application Wizard ). В нем содержится информация об ассоциации между файлами в вашем проекте и фильтрами. Эта ассоциация используется в интегрированной среде, чтобы показать группирование файлов с одинаковыми расширениями.
Файл « AssemblyInfo.cpp «. Содержит пользовательские атрибуты для модификации данных сборки.
Файли « StdAfx.h » и « StdAfx.cpp «. Они используются для создания файла скомпилированных заголовков ( PCH ) с именем « MyApp01.pch » и скомпилированных типов названных « StdAfx.obj «.
7. Запуск проекта на выполнение
Для запуска проекта на выполнение используется команда Start Debuggin из меню Debug (клавиши F5).
Шаг 1. Создание проекта приложения Windows Forms Step 1: Create a Windows Forms App project
Первый шаг в создании программы для просмотра изображений — это создание проекта приложения Windows Forms. When you create a picture viewer, the first step is to create a Windows Forms App project.
Откройте Visual Studio 2017. Open Visual Studio 2017
В строке меню выберите Файл > Создать > Проект. On the menu bar, choose File > New > Project. Диалоговое окно должно выглядеть так же, как на следующем снимке экрана. The dialog box should look similar to the following screenshot.
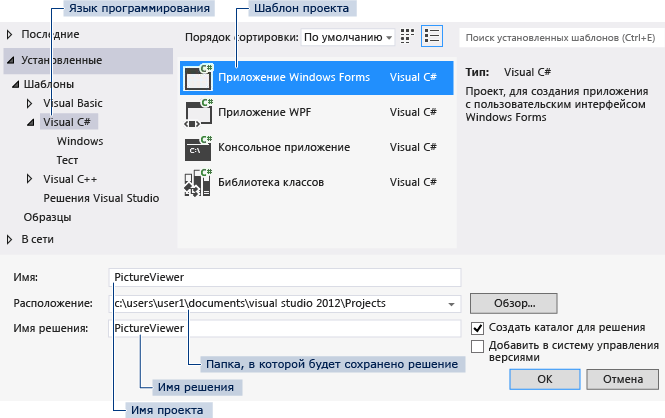
Диалоговое окно _ _»Новый проект» New project _ _dialog box
В левой части диалогового окна Новый проект выберите Visual C# или Visual Basic, а затем — Классическое приложение Windows. On the left side of the New Project dialog box, choose either Visual C# or Visual Basic, and then choose Windows Desktop.
В списке шаблонов проектов выберите Приложение Windows Forms (.NET Framework). In the project templates list, choose Windows Forms App (.NET Framework). Назовите новую форму PictureViewer и нажмите кнопку ОК. Name the new form PictureViewer, and then choose the OK button.
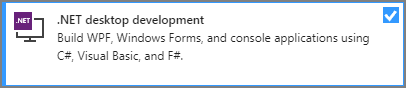
Если вы не видите шаблон Приложение Windows Forms (.NET Framework), используйте Visual Studio Installer, чтобы установить рабочую нагрузку Разработка классических приложений .NET. If you don’t see the Windows Forms App (.NET Framework) template, use the Visual Studio Installer to install the .NET desktop development workload.
Дополнительные сведения см. в разделе Установка Visual Studio. For more information, see the Install Visual Studio page.
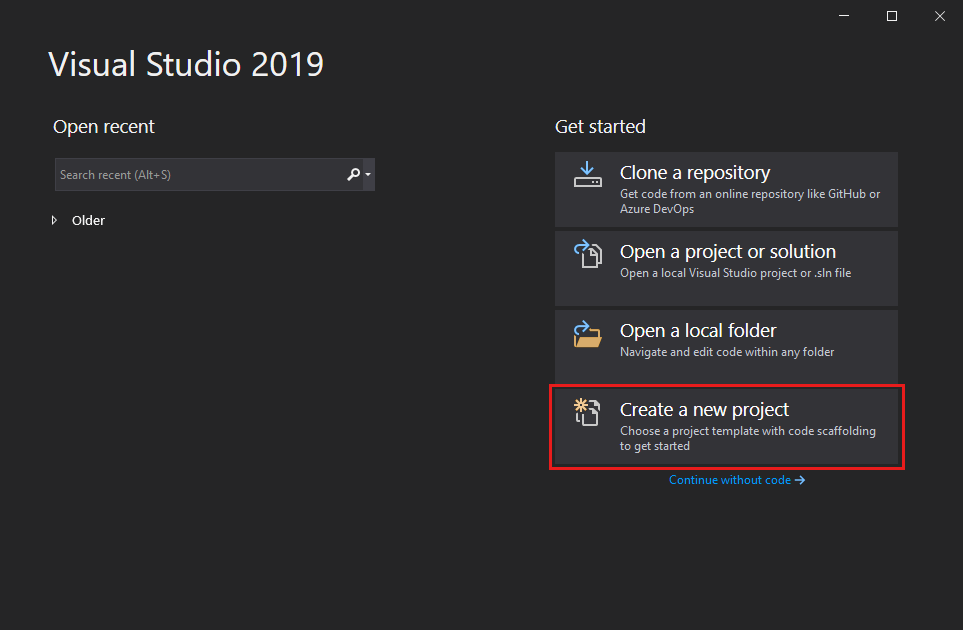
Запустите Visual Studio 2019. Open Visual Studio 2019
На начальном экране выберите Создать проект. On the start window, choose Create a new project.
В поле поиска окна Создание проекта введите Windows Forms. On the Create a new project window, enter or type Windows Forms in the search box. Затем в списке Тип проекта выберите Рабочий стол. Next, choose Desktop from the Project type list.
Применив фильтр Тип проекта, выберите шаблон Приложение Windows Forms (.NET Framework) для C# или Visual Basic и нажмите кнопку Далее. After you apply the Project type filter, choose the Windows Forms App (.NET Framework) template for either C# or Visual Basic, and then choose Next.

Если шаблон Приложение Windows Forms (.NET Framework) отсутствует, его можно установить из окна Создание проекта. If you don’t see the Windows Forms App (.NET Framework) template, you can install it from the Create a new project window. В сообщении Не нашли то, что искали? выберите ссылку Установка других средств и компонентов. In the Not finding what you’re looking for? message, choose the Install more tools and features link.

После этого в Visual Studio Installer выберите рабочую нагрузку Разработка классических приложений .NET. Next, in the Visual Studio Installer, choose the Choose the .NET desktop development workload.

Затем нажмите кнопку Изменить в Visual Studio Installer. After that, choose the Modify button in the Visual Studio Installer. Вам может быть предложено сохранить результаты работы; в таком случае сделайте это. You might be prompted to save your work; if so, do so. Выберите Продолжить, чтобы установить рабочую нагрузку. Next, choose Continue to install the workload.
В поле Имя проекта окна Настроить новый проект введите PictureViewer. In the Configure your new project window, type or enter PictureViewer in the Project name box. Затем нажмите Создать. Then, choose Create.
Visual Studio создает решение для приложения. Visual Studio creates a solution for your app. Решение играет роль контейнера для всех проектов и файлов, необходимых приложению. A solution acts as a container for all of the projects and files needed by your app. Более подробно эти термины поясняются далее в этом учебнике. These terms will be explained in more detail later in this tutorial.
Сведения о проекте приложения Windows Forms About the Windows Forms App project
Среда разработки содержит три окна: главное окно, Обозреватель решений и окно Свойства. The development environment contains three windows: a main window, Solution Explorer, and the Properties window.
Если какое-либо из этих окон отсутствует, можно восстановить макет окон по умолчанию. If any of these windows are missing, you can restore the default window layout. В строке меню выберите Окно > Сброс макета окна. On the menu bar, choose Window > Reset Window Layout.
Можно также отобразить окна с помощью команд меню. You can also display windows by using menu commands. В строке меню выберите Вид > Окно «Свойства» или Обозреватель решений. On the menu bar, choose View > Properties Window or Solution Explorer.
Если открыты какие-либо другие окна, закройте их с помощью кнопки Закрыть (x) в верхнем правом углу. If any other windows are open, close them by choosing the Close (x) button in their upper-right corners.
- Главное окно. В этом окне выполняется основная часть работы, например работа с формами и редактирование кода. Main window In this window, you’ll do most of your work, such as working with forms and editing code. В окне показана форма в редакторе форм. The window shows a form in the Form Editor. В верхней части окна находятся две вкладки — вкладка Начальная страница и вкладка Form1.cs [Design]. At the top of the window, the Start Page tab and the Form1.cs [Design] tab appear. (В Visual Basic имя вкладки заканчивается на .vb, а не на .cs.) (In Visual Basic, the tab name ends with .vb instead of .cs.)
- Главное окно. В этом окне выполняется основная часть работы, например работа с формами и редактирование кода. Main window In this window, you’ll do most of your work, such as working with forms and editing code. В окне показана форма в редакторе форм. The window shows a form in the Form Editor.
- Окно «Обозреватель решений». В этом окне можно просматривать все элементы, входящие в решение, и переходить к ним. Solution Explorer window In this window, you can view and navigate to all items in your solution.
Если выбрать файл, содержимое в окне Свойства изменится. If you choose a file, the contents of the Properties window changes. Если открыть файл кода (с расширением .cs в C# и .vb в Visual Basic), откроется сам файл кода или конструктор для него. If you open a code file (which ends in .cs in C# and .vb in Visual Basic), the code file or a designer for the code file appears. Конструктор — это визуальная поверхность, на которую можно добавлять элементы управления, такие как кнопки и списки. A designer is a visual surface onto which you can add controls such as buttons and lists. При работе с формами Visual Studio такая поверхность называется конструктор Windows Forms. For Visual Studio forms, the designer is called the Windows Forms Designer.
Окно «Свойства». В этом окне производится изменение свойств элементов, выбранных в других окнах. Properties window In this window, you can change the properties of items that you choose in the other windows. Например, выбрав форму Form1, можно изменить ее название путем задания свойства Text, а также изменить цвет фона путем задания свойства Backcolor. For example, if you choose Form1, you can change its title by setting the Text property, and you can change the background color by setting the Backcolor property.
В верхней строке в обозревателе решений отображается текст Решение «PictureViewer» (1 проект). Это означает, что Visual Studio автоматически создала для вас решение. The top line in Solution Explorer shows Solution ‘PictureViewer’ (1 project), which means that Visual Studio created a solution for you. Решение может содержать несколько проектов, но пока что вы будете работать с решениями, которые содержат только один проект. A solution can contain more than one project, but for now, you’ll work with solutions that contain only one project.
В строке меню выберите Файл > Сохранить все. On the menu bar, choose File > Save All.
Другой вариант — нажать кнопку Сохранить все на панели инструментов, как показано на рисунке ниже. As an alternative, choose the Save All button on the toolbar, which the following image shows.
Кнопка «Сохранить все» _ _на панели инструментов Save All _ _toolbar button
Visual Studio автоматически заполняет имя папки и имя проекта, а затем сохраняет проект в папке проектов. Visual Studio automatically fills in the folder name and the project name and then saves the project in your projects folder.
Дальнейшие действия Next steps
Следующий раздел руководства: Шаг 2. Запуск приложения . To go to the next tutorial step, see Step 2: Run your app.


