- Введение в Windows Forms
- Создание графического приложения
- Запуск приложения
- Windows forms applications examples
- Creating a Windows Forms Application Using Visual Studio 2017
- Create a Windows Forms app in Visual Studio with C#
- Create a project
- Create the application
- Add a button to the form
- Add a label to the form
- Add code to the form
- Run the application
- Next steps
Введение в Windows Forms
Для создания графических интерфейсов с помощью платформы .NET применяются разные технологии — Window Forms, WPF, приложения для магазина Windows Store (для ОС Windows 8/8.1/10). Однако наиболее простой и удобной платформой до сих пор остается Window Forms или формы. Данное руководство ставит своей целью дать понимание принципов создания графических интерфейсов с помощью технологии WinForms и работы основных элементов управления.
Создание графического приложения
Для создания графического проекта нам потребуется среда разработки Visual Studio. Поскольку наиболее распространенная пока версия Visual Studio 2013, то для данного руководства я буду использовать бесплатную версию данной среды Visual Studio Community 2013 которую можно найти на странице https://www.visualstudio.com/en-us/products/visual-studio-community-vs.aspx.
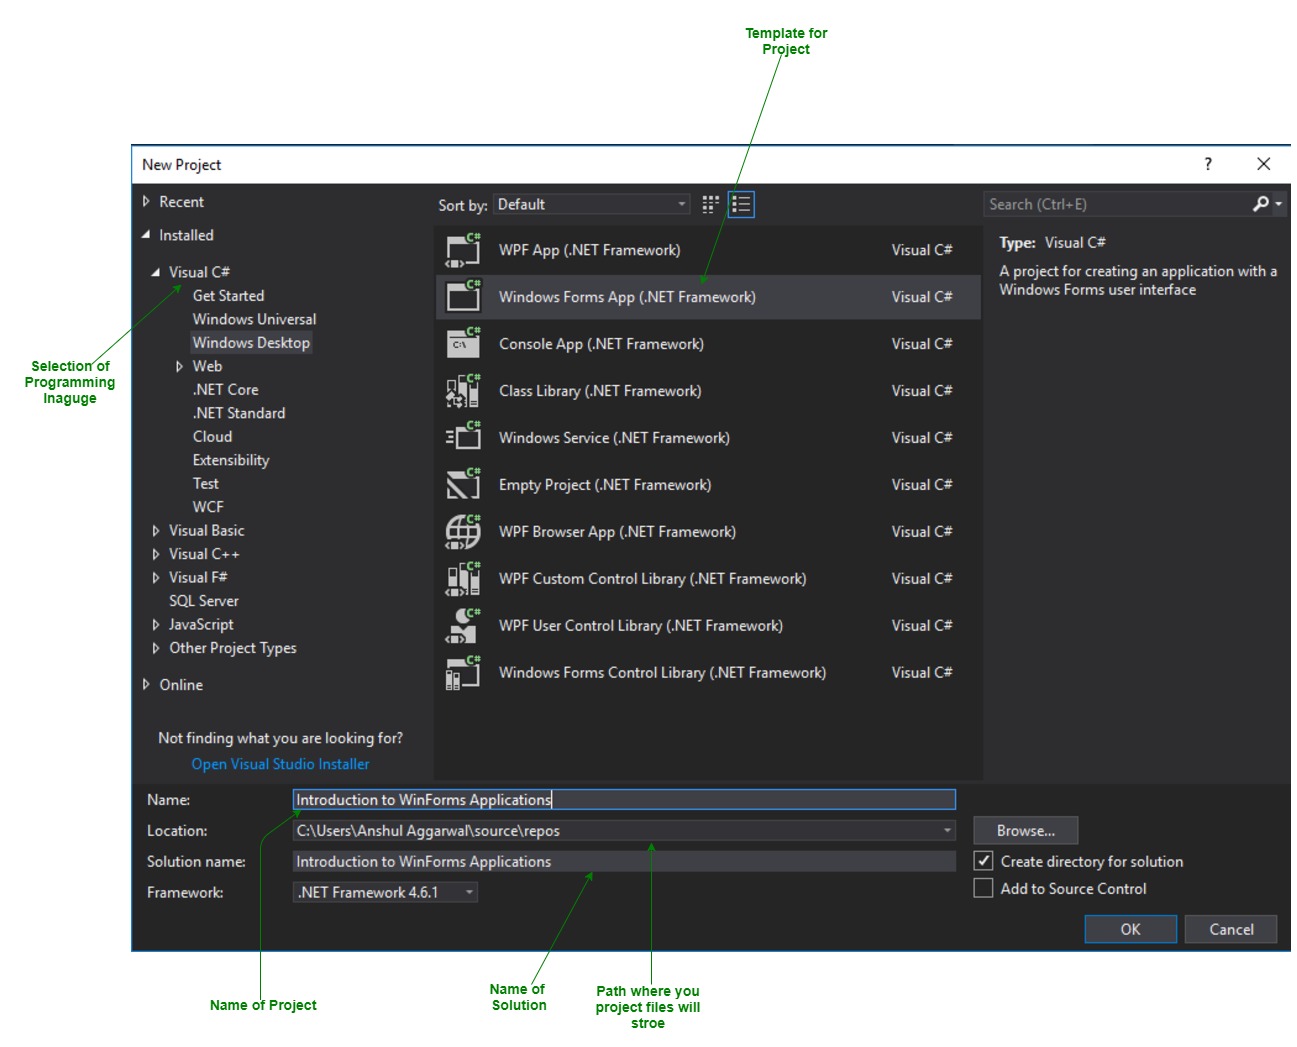
После установки среды и всех ее компонентов, запустим Visual Studio и создадим проект графического приложения. Для этого в меню выберем пункт File (Файл) и в подменю выберем New — > Project (Создать — > Проект). После этого перед нами откроется диалоговое окно создания нового проекта:

В левой колонке выберем Windows Desktop , а в центральной части среди типов проектов — тип Windows Forms Application и дадим ему какое-нибудь имя в поле внизу. Например, назовем его HelloApp. После этого нажимаем OK.
После этого Visual Studio откроет наш проект с созданными по умолчанию файлами:
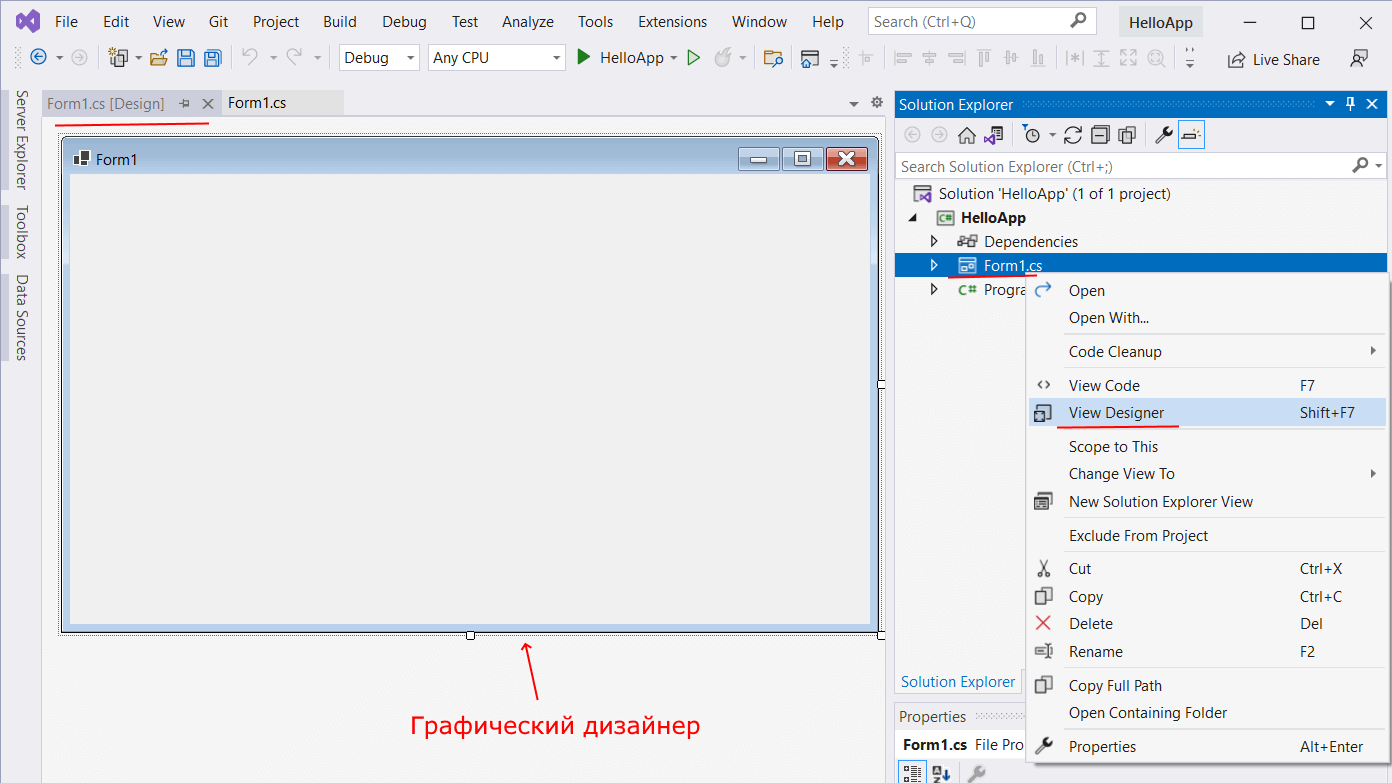
Большую часть пространства Visual Studio занимает графический дизайнер, который содержит форму будущего приложения. Пока она пуста и имеет только заголовок Form1. Справа находится окно файлов решения/проекта — Solution Explorer (Обозреватель решений). Там и находятся все связанные с нашим приложением файлы, в том числе файлы формы Form1.cs.
Внизу справа находится окно свойств — Properties. Так как у меня в данный момент выбрана форма как элемент управления, то в этом поле отображаются свойства, связанные с формой.
Теперь найдем в этом окне свойство формы Text и изменим его значение на любое другое:

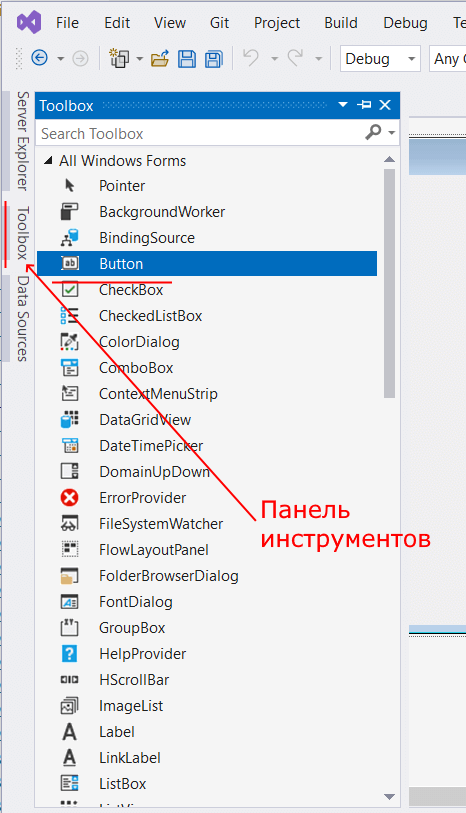
Таким образом мы поменяли заголовок формы. Теперь перенесем на поле какой-нибудь элемент управления, например, кнопку. Для этого найдем в левой части Visual Studio вкладку Toolbox (Панель инструментов) . Нажмем на эту вкладку, и у нас откроется панель с элементами, откуда мы можем с помощью мыши перенести на форму любой элемент:
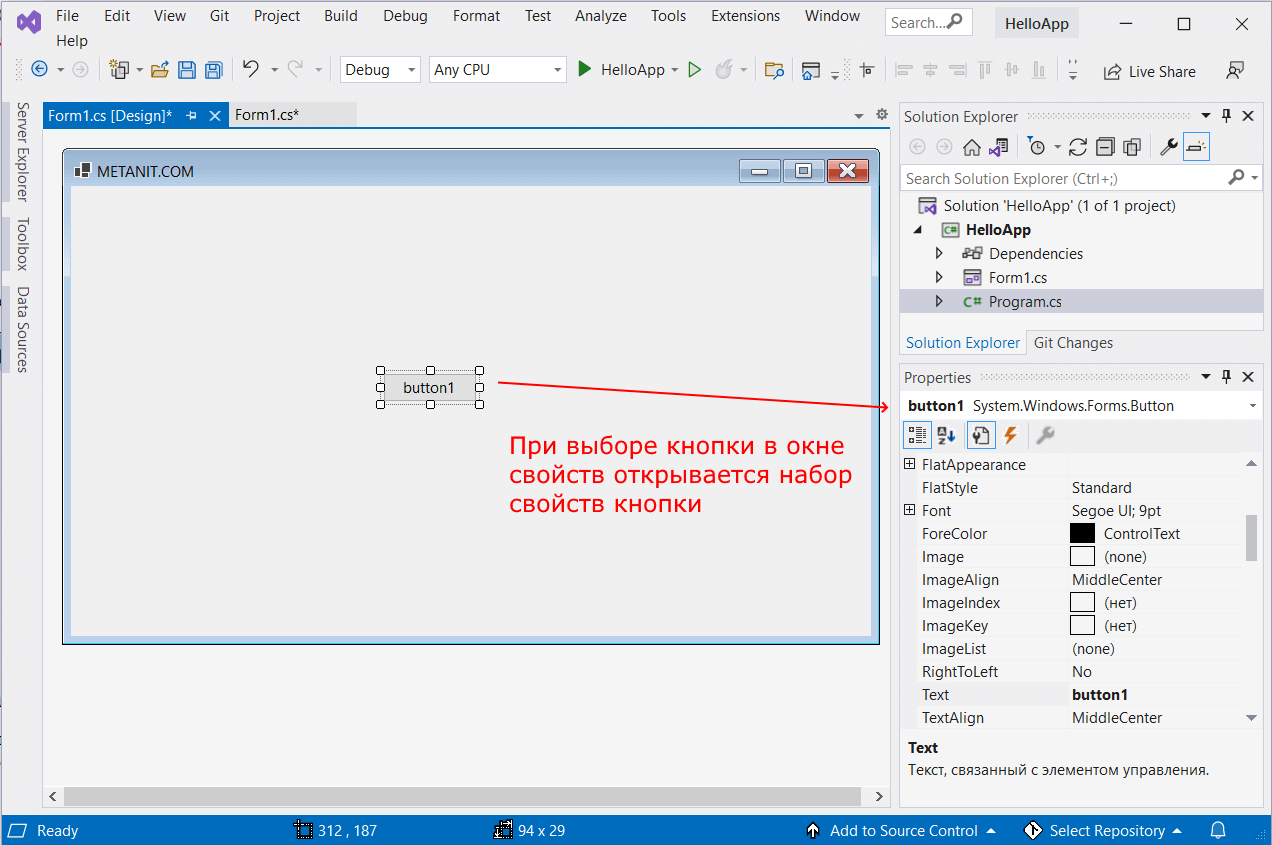
Найдем среди элементов кнопку и, захватив ее указателем мыши, перенесем на форму:
Это визуальная часть. Теперь приступим к самому программированию. Добавим простейший код на языке C#, который бы выводил сообщение по нажатию кнопки. Для этого мы должны перейти в файл кода, который связан с этой формой. Если у нас не открыт файл кода, мы можем нажать на форму правой кнопкой мыши и в появившемся меню выбрать View Code (Посмотреть файл кода):
Однако воспользуемся другим способом, чтобы не писать много лишнего кода. Наведем указатель мыши на кнопку и щелкнем по ней двойным щелчком. Мы автоматически попадаем в файл кода Form1.cs, который выглядит так:
Добавим вывод сообщения по нажатию кнопки, изменив код следующим образом:
Запуск приложения
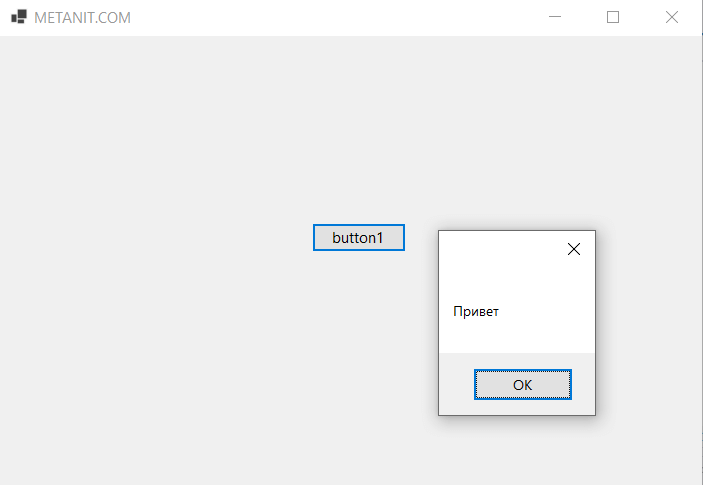
Чтобы запустить приложение в режиме отладки, нажмем на клавишу F5 или на зеленую стрелочку на панели Visual Studio. После этого запустится наша форма с одинокой кнопкой. И если мы нажмем на кнопку на форме, то нам будет отображено сообщение с приветствием.
После запуска приложения студия компилирует его в файл с расширением exe. Найти данный файл можно, зайдя в папку проекта и далее в каталог bin/Debug или bin/Release
Рассмотрев вкратце создание проекта графического приложения, мы можем перейти к обзору основных компонентов и начнем мы с форм.
Windows forms applications examples
Windows Forms is a Graphical User Interface(GUI) class library which is bundled in .Net Framework. Its main purpose is to provide an easier interface to develop the applications for desktop, tablet, PCs. It is also termed as the WinForms. The applications which are developed by using Windows Forms or WinForms are known as the Windows Forms Applications that runs on the desktop computer. WinForms can be used only to develop the Windows Forms Applications not web applications. WinForms applications can contain the different type of controls like labels, list boxes, tooltip etc.
Creating a Windows Forms Application Using Visual Studio 2017
- First, open the Visual Studio then Go to File -> New -> Project to create a new project and then select the language as Visual C# from the left menu. Click on Windows Forms App(.NET Framework) in the middle of current window. After that give the project name and Click OK.
Here the solution is like a container which contains the projects and files that may be required by the program.
- Editor Window or Main Window: Here, you will work with forms and code editing. You can notice the layout of form which is now blank. You will double click the form then it will open the code for that.
- Solution Explorer Window: It is used to navigate between all items in solution. For example, if you will select a file form this window then particular information will be display in the property window.
- Properties Window: This window is used to change the different properties of the selected item in the Solution Explorer. Also, you can change the properties of components or controls that you will add to the forms.

You can also reset the window layout by setting it to default. To set the default layout, go to Window -> Reset Window Layout in Visual Studio Menu.
Now to add the controls to your WinForms application go to Toolbox tab present in the extreme left side of Visual Studio. Here, you can see a list of controls. To access the most commonly used controls go to Common Controls present in Toolbox tab.

Now drag and drop the controls that you needed on created Form. For example, if you can add TextBox, ListBox, Button etc. as shown below. By clicking on the particular dropped control you can see and change its properties present in the right most corner of Visual Studio.

In the above image, you can see the TextBox is selected and its properties like TextAlign, MaxLength etc. are opened in right most corner. You can change its properties’ values as per the application need. The code of controls will be automatically added in the background. You can check the Form1.Designer.cs file present in the Solution Explorer Window.
To run the program you can use an F5 key or Play button present in the toolbar of Visual Studio. To stop the program you can use pause button present in the ToolBar. You can also run the program by going to Debug->Start Debugging menu in the menubar.

Attention reader! Don’t stop learning now. Get hold of all the important DSA concepts with the DSA Self Paced Course at a student-friendly price and become industry ready.
Create a Windows Forms app in Visual Studio with C#
In this short introduction to the Visual Studio integrated development environment (IDE), you’ll create a simple C# application that has a Windows-based user interface (UI).
If you haven’t already installed Visual Studio, go to the Visual Studio downloads page to install it for free.
If you haven’t already installed Visual Studio, go to the Visual Studio downloads page to install it for free.
Some of the screenshots in this tutorial use the dark theme. If you aren’t using the dark theme but would like to, see the Personalize the Visual Studio IDE and Editor page to learn how.
Create a project
First, you’ll create a C# application project. The project type comes with all the template files you’ll need, before you’ve even added anything.
Open Visual Studio 2017.
From the top menu bar, choose File > New > Project.
In the New Project dialog box in the left pane, expand Visual C#, and then choose Windows Desktop. In the middle pane, choose Windows Forms App (.NET Framework). Then name the file HelloWorld .
If you don’t see the Windows Forms App (.NET Framework) project template, cancel out of the New Project dialog box and from the top menu bar, choose Tools > Get Tools and Features. The Visual Studio Installer launches. Choose the .NET desktop development workload, then choose Modify.

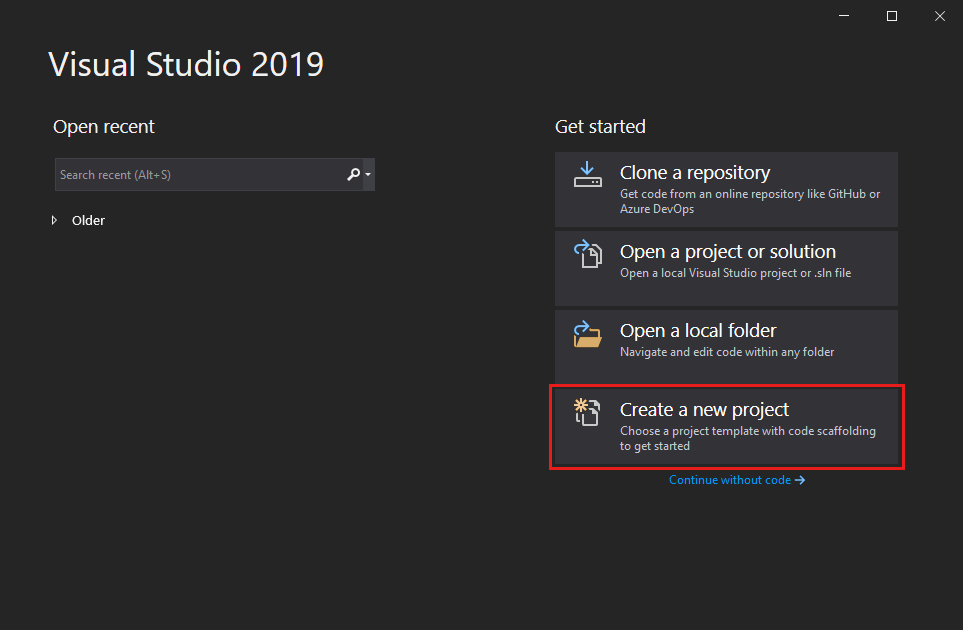
Open Visual Studio 2019.
On the start window, choose Create a new project.
On the Create a new project window, choose the Windows Forms App (.NET Framework) template for C#.
(If you prefer, you can refine your search to quickly get to the template you want. For example, enter or type Windows Forms App in the search box. Next, choose C# from the Language list, and then choose Windows from the Platform list.)

If you do not see the Windows Forms App (.NET Framework) template, you can install it from the Create a new project window. In the Not finding what you’re looking for? message, choose the Install more tools and features link.

Next, in the Visual Studio Installer, choose the Choose the .NET desktop development workload.
After that, choose the Modify button in the Visual Studio Installer. You might be prompted to save your work; if so, do so. Next, choose Continue to install the workload. Then, return to step 2 in this «Create a project» procedure.
In the Configure your new project window, type or enter HelloWorld in the Project name box. Then, choose Create.

Visual Studio opens your new project.
Create the application
After you select your C# project template and name your file, Visual Studio opens a form for you. A form is a Windows user interface. We’ll create a «Hello World» application by adding controls to the form, and then we’ll run the app.
Add a button to the form
Choose Toolbox to open the Toolbox fly-out window.

(If you don’t see the Toolbox fly-out option, you can open it from the menu bar. To do so, View > Toolbox. Or, press Ctrl+Alt+X.)
Choose the Pin icon to dock the Toolbox window.

Choose the Button control and then drag it onto the form.
In the Properties window, locate Text, change the name from Button1 to Click this , and then press Enter.
(If you don’t see the Properties window, you can open it from the menu bar. To do so, choose View > Properties Window. Or, press F4.)
In the Design section of the Properties window, change the name from Button1 to btnClickThis , and then press Enter.
If you’ve alphabetized the list in the Properties window, Button1 appears in the (DataBindings) section, instead.
Add a label to the form
Now that we’ve added a button control to create an action, let’s add a label control to send text to.
Select the Label control from the Toolbox window, and then drag it onto the form and drop it beneath the Click this button.
In either the Design section or the (DataBindings) section of the Properties window, change the name of Label1 to lblHelloWorld , and then press Enter.
Add code to the form
In the Form1.cs [Design] window, double-click the Click this button to open the Form1.cs window.
(Alternatively, you can expand Form1.cs in Solution Explorer, and then choose Form1.)
In the Form1.cs window, after the private void line, type or enter lblHelloWorld.Text = «Hello World!»; as shown in the following screenshot:

Run the application
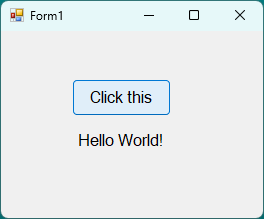
Choose the Start button to run the application.

Several things will happen. In the Visual Studio IDE, the Diagnostics Tools window will open, and an Output window will open, too. But outside of the IDE, a Form1 dialog box appears. It will include your Click this button and text that says Label1.
Choose the Click this button in the Form1 dialog box. Notice that the Label1 text changes to Hello World!.
Close the Form1 dialog box to stop running the app.
Next steps
To learn more, continue with the following tutorial:


