- Tutorial: Create a new WinForms app (Windows Forms .NET)
- Prerequisites
- Create a WinForms app
- Important parts of Visual Studio
- Add controls to the form
- Handle events
- Run the app
- How to: Create a Windows Forms application from the command line
- Procedure
- To create the form
- To compile and run the application
- Adding a control and handling an event
- To declare a button control and handle its click event
- Example
- Step 1: Create a Windows Forms App project
- Open Visual Studio 2017
- Open Visual Studio 2019
- About the Windows Forms App project
- Next steps
Tutorial: Create a new WinForms app (Windows Forms .NET)
In this short tutorial, you’ll learn how to create a new Windows Forms (WinForms) app with Visual Studio. Once the initial app has been generated, you’ll learn how to add controls and how to handle events. By the end of this tutorial, you’ll have a simple app that adds names to a list box.
The Desktop Guide documentation for .NET 5 (and .NET Core) is under construction.
In this tutorial, you learn how to:
- Create a new WinForms app
- Add controls to a form
- Handle control events to provide app functionality
- Run the app
Prerequisites
Create a WinForms app
The first step to creating a new app is opening Visual Studio and generating the app from a template.
Open Visual Studio.
Select Create a new project.

In the Search for templates box, type winforms, and then press Enter .
In the code language dropdown, choose C# or Visual Basic.
In the templates list, select Windows Forms App (.NET) and then click Next.
Don’t select the Windows Forms App (.NET Framework) template.

In the Configure your new project window, set the Project name to Names and click Create.
You can also save your project to a different folder by adjusting the Location setting.

Once the app is generated, Visual Studio should open the designer pane for the default form, Form1. If the form designer isn’t visible, double-click on the form in the Solution Explorer pane to open the designer window.
Important parts of Visual Studio
Support for WinForms in Visual Studio has four important components that you’ll interact with as you create an app:

All if your project files, code, forms, resources, will appear in this pane.
This pane shows property settings you can configure based on the item selected. For example, if you select an item from Solution Explorer, you’ll see property settings related to the file. If you select an object in the Designer, you’ll see settings for the control or form.
This is the designer for the form. It’s interactive and you can drag-and-drop objects from the Toolbox. By selecting and moving items in the designer, you can visually compose the user interface (UI) for your app.
The toolbox contains all of the controls you can add to a form. To add a control to the current form, double-click a control or drag-and-drop the control.
Add controls to the form
With the Form1 form designer open, use the Toolbox pane to add the following controls to the form:
You can position and size the controls according to the following settings. Either visually move them to match the screenshot that follows, or click on each control and configure the settings in the Properties pane. You can also click on the form title area to select the form:
| Object | Setting | Value |
|---|---|---|
| Form | Text | Names |
| Size | 268, 180 | |
| Label | Location | 12, 9 |
| Text | Names | |
| Listbox | Name | lstNames |
| Location | 12, 27 | |
| Size | 120, 94 | |
| Textbox | Name | txtName |
| Location | 138, 26 | |
| Size | 100, 23 | |
| Button | Name | btnAdd |
| Location | 138, 55 | |
| Size | 100, 23 | |
| Text | Add Name |
You should have a form in the designer that looks similar to the following:

Handle events
Now that the form has all of its controls laid out, you need to handle the events of the controls to respond to user input. With the form designer still open, perform the following steps:
Select the button control on the form.
In the Properties pane, click on the events icon to list the events of the button.
Find the Click event and double-click it to generate an event handler.
This action adds the following code to the the form:
The code we’ll put in this handler will add the name specified by the txtName textbox control to the lstNames listbox control. However, we want there to be two conditions to adding the name: the name provided must not be blank, and the name must not already exist.
The following code demonstrates adding a name to the lstNames control:
Run the app
Now that the event has been coded, you can run the app by pressing the F5 key or by selecting Debug > Start Debugging from the menu. The form displays and you can enter a name in the textbox and then add it by clicking the button.
How to: Create a Windows Forms application from the command line
The following procedures describe the basic steps that you must complete to create and run a Windows Forms application from the command line. There is extensive support for these procedures in Visual Studio. Also see Walkthrough: Hosting a Windows Forms Control in WPF.
Procedure
To create the form
In an empty code file, type the following Imports or using statements:
Declare a class named Form1 that inherits from the Form class:
Create a parameterless constructor for Form1 .
You will add more code to the constructor in a subsequent procedure.
Add a Main method to the class.
Apply the STAThreadAttribute to the C# Main method to specify your Windows Forms application is a single-threaded apartment. (The attribute is not necessary in Visual Basic, since Windows forms applications developed with Visual Basic use a single-threaded apartment model by default.)
Call EnableVisualStyles to apply operating system styles to your application.
Create an instance of the form and run it.
To compile and run the application
At the .NET Framework command prompt, navigate to the directory you created the Form1 class.
Compile the form.
If you are using C#, type: csc form1.cs
If you are using Visual Basic, type: vbc form1.vb
At the command prompt, type: Form1.exe
Adding a control and handling an event
The previous procedure steps demonstrated how to just create a basic Windows Form that compiles and runs. The next procedure will show you how to create and add a control to the form, and handle an event for the control. For more information about the controls you can add to Windows Forms, see Windows Forms Controls.
In addition to understanding how to create Windows Forms applications, you should understand event-based programming and how to handle user input. For more information, see Creating Event Handlers in Windows Forms, and Handling User Input
To declare a button control and handle its click event
Declare a button control named button1 .
In the constructor, create the button and set its Size, Location and Text properties.
Add the button to the form.
The following code example demonstrates how to declare the button control:
Create a method to handle the Click event for the button.
In the click event handler, display a MessageBox with the message, «Hello World».
The following code example demonstrates how to handle the button control’s click event:
Associate the Click event with the method you created.
The following code example demonstrates how to associate the event with the method.
Compile and run the application as described in the previous procedure.
Example
The following code example is the complete example from the previous procedures:
Step 1: Create a Windows Forms App project
When you create a picture viewer, the first step is to create a Windows Forms App project.
Open Visual Studio 2017
On the menu bar, choose File > New > Project. The dialog box should look similar to the following screenshot.
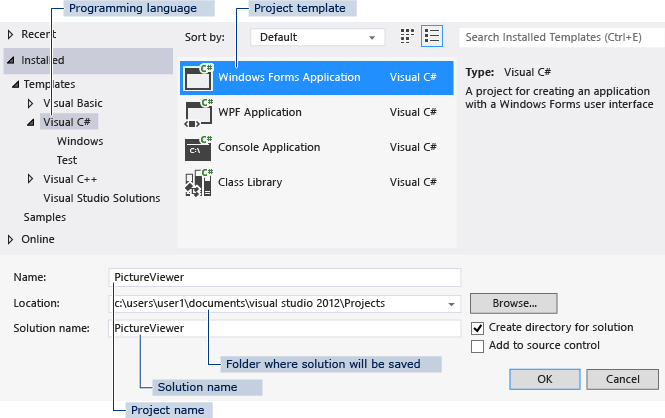
New project dialog box
On the left side of the New Project dialog box, choose either Visual C# or Visual Basic, and then choose Windows Desktop.
In the project templates list, choose Windows Forms App (.NET Framework). Name the new form PictureViewer, and then choose the OK button.
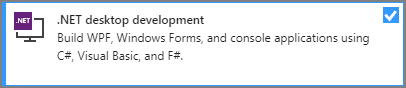
If you don’t see the Windows Forms App (.NET Framework) template, use the Visual Studio Installer to install the .NET desktop development workload.
For more information, see the Install Visual Studio page.
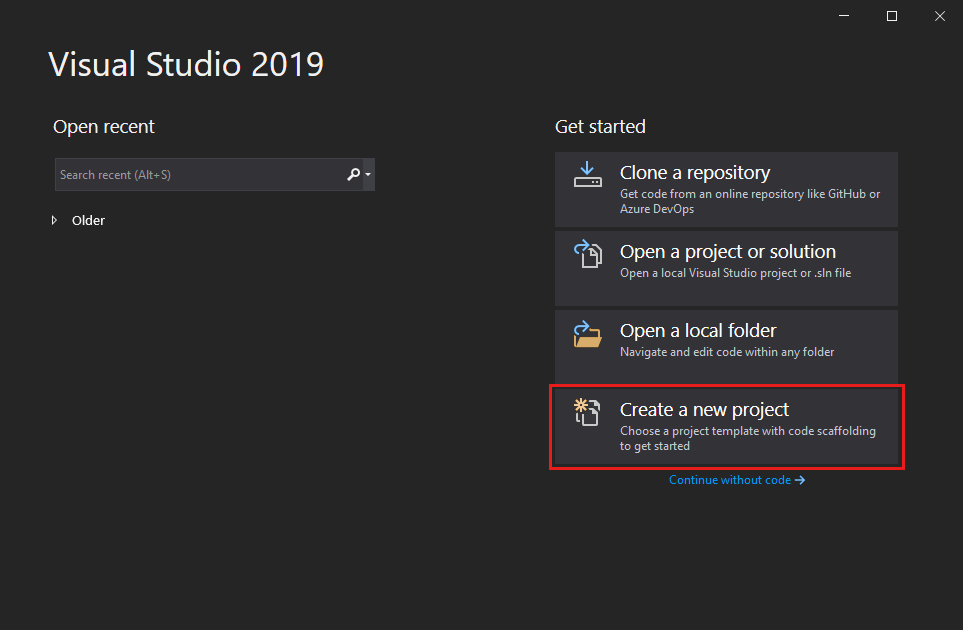
Open Visual Studio 2019
On the start window, choose Create a new project.
On the Create a new project window, enter or type Windows Forms in the search box. Next, choose Desktop from the Project type list.
After you apply the Project type filter, choose the Windows Forms App (.NET Framework) template for either C# or Visual Basic, and then choose Next.
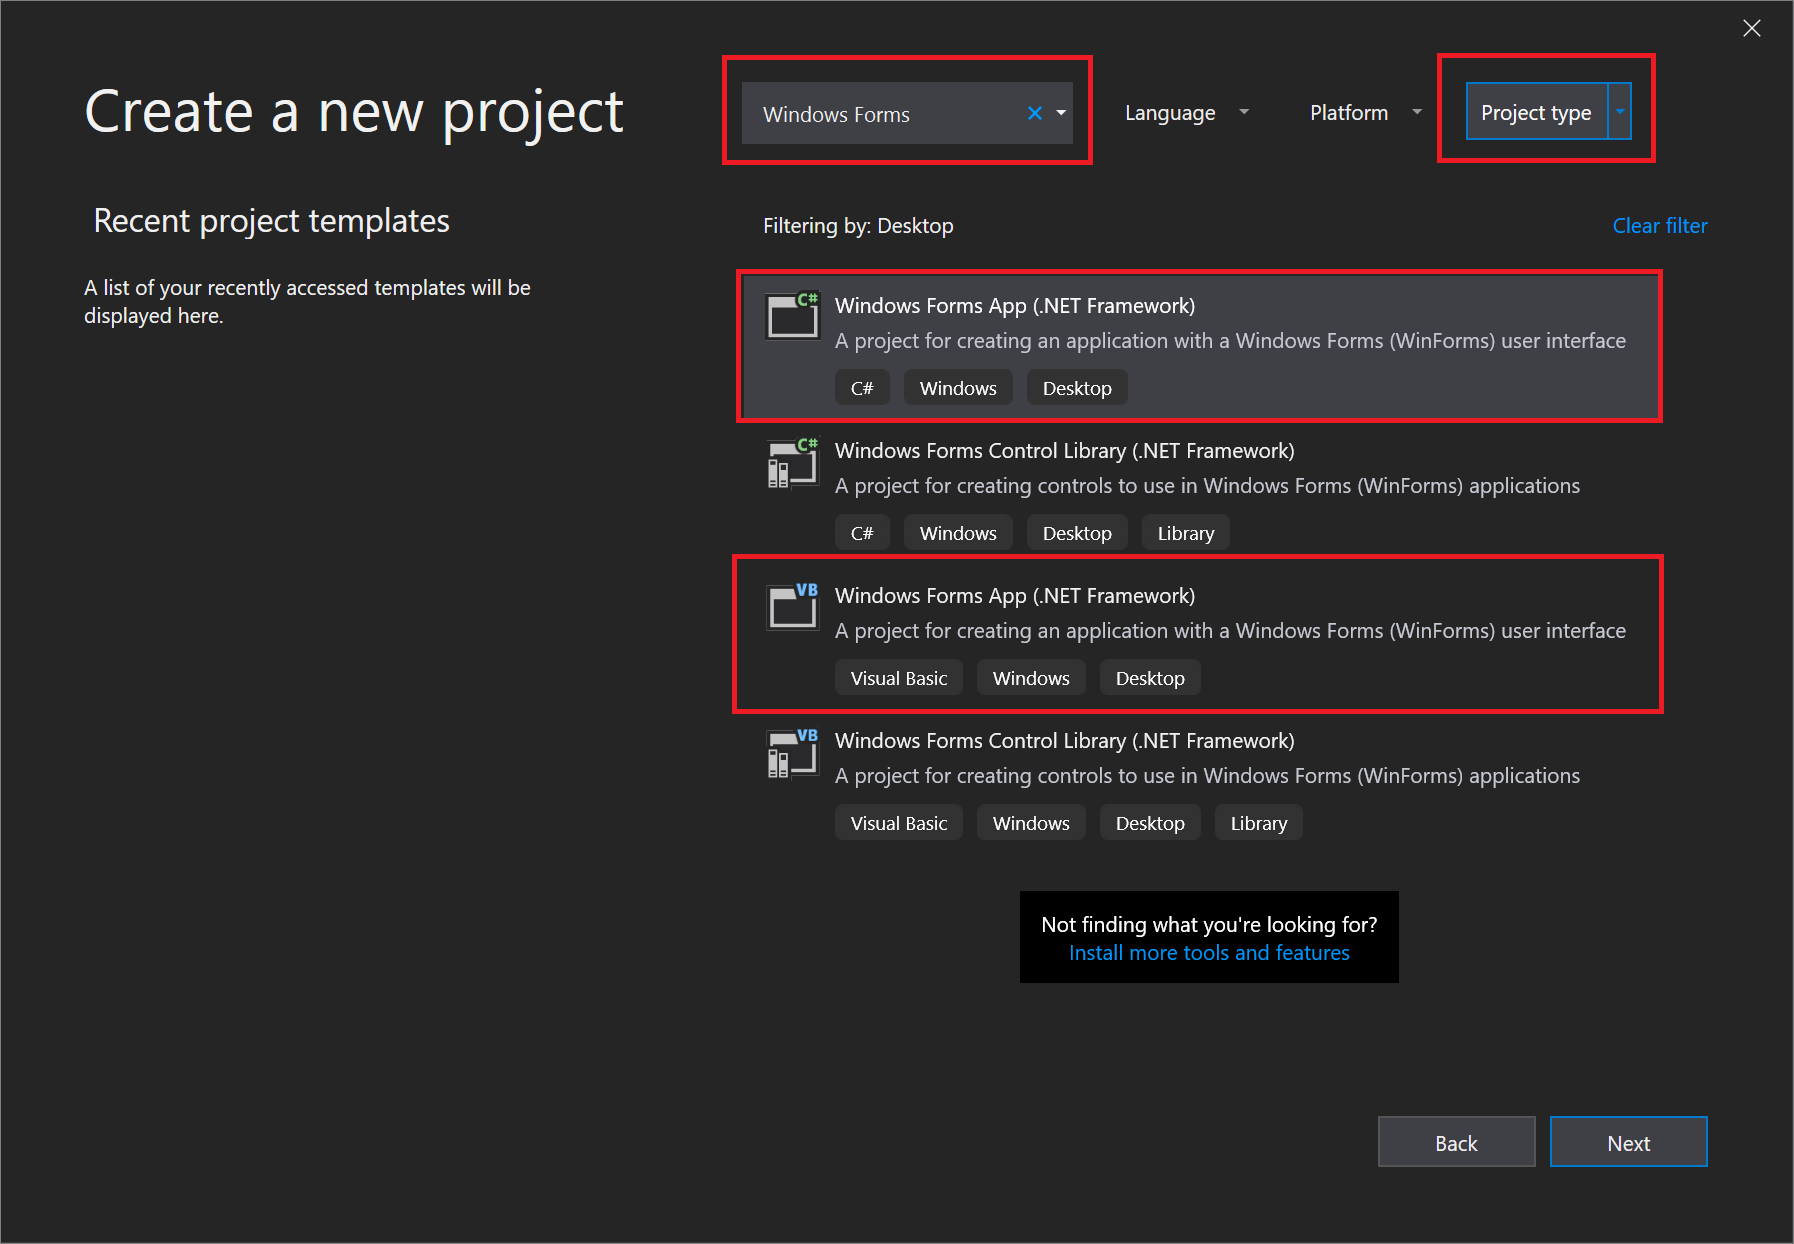
If you don’t see the Windows Forms App (.NET Framework) template, you can install it from the Create a new project window. In the Not finding what you’re looking for? message, choose the Install more tools and features link.

Next, in the Visual Studio Installer, choose the Choose the .NET desktop development workload.

After that, choose the Modify button in the Visual Studio Installer. You might be prompted to save your work; if so, do so. Next, choose Continue to install the workload.
In the Configure your new project window, type or enter PictureViewer in the Project name box. Then, choose Create.
Visual Studio creates a solution for your app. A solution acts as a container for all of the projects and files needed by your app. These terms will be explained in more detail later in this tutorial.
About the Windows Forms App project
The development environment contains three windows: a main window, Solution Explorer, and the Properties window.
If any of these windows are missing, you can restore the default window layout. On the menu bar, choose Window > Reset Window Layout.
You can also display windows by using menu commands. On the menu bar, choose View > Properties Window or Solution Explorer.
If any other windows are open, close them by choosing the Close (x) button in their upper-right corners.
- Main window In this window, you’ll do most of your work, such as working with forms and editing code. The window shows a form in the Form Editor. At the top of the window, the Start Page tab and the Form1.cs [Design] tab appear. (In Visual Basic, the tab name ends with .vb instead of .cs.)
- Main window In this window, you’ll do most of your work, such as working with forms and editing code. The window shows a form in the Form Editor.
- Solution Explorer window In this window, you can view and navigate to all items in your solution.
If you choose a file, the contents of the Properties window changes. If you open a code file (which ends in .cs in C# and .vb in Visual Basic), the code file or a designer for the code file appears. A designer is a visual surface onto which you can add controls such as buttons and lists. For Visual Studio forms, the designer is called the Windows Forms Designer.
Properties window In this window, you can change the properties of items that you choose in the other windows. For example, if you choose Form1, you can change its title by setting the Text property, and you can change the background color by setting the Backcolor property.
The top line in Solution Explorer shows Solution ‘PictureViewer’ (1 project), which means that Visual Studio created a solution for you. A solution can contain more than one project, but for now, you’ll work with solutions that contain only one project.
On the menu bar, choose File > Save All.
As an alternative, choose the Save All button on the toolbar, which the following image shows.
Save All toolbar button
Visual Studio automatically fills in the folder name and the project name and then saves the project in your projects folder.
Next steps
To go to the next tutorial step, see Step 2: Run your app.
To return to the overview topic, see Tutorial 1: Create a picture viewer.


