The primary window and the most frequent object you will use in your applications is the form. If you start a raw application from a file that implements the _WinMain() function, after creating an application, the next step you probably take is to create a form. Because C++Builder provides a rapid application development (RAD) environment, a form is created in two steps. First you must provide its resource. This is done by visually adding a form available from clicking the New Form button on the Standard toolbar or by clicking File -> New -> Form — C++Builder on the main menu.
After creating the form’s resource, you must let the application know that you have a form. To do this, you must call the CreateForm() method of the TApplication class. Its syntax is:
The name of the form is passed as a pointer as the second argument. Because the form is being added to the application, giving the application access to it for further operations and processing, the CreateForm() method requires that the class that controls the form be specified. This is normally done by calling the __classid() operator. Once you have specified the form to the application, you must also specify the name of the source file that holds the implementation of the form.
This is done by calling the USEFORM macro. Its syntax is:
This macro takes two arguments. The first is a string that specifies the source file. The second specifies the name of the form as it appears in the project.
The form in implemented by the TForm class which itself is derived from TCustomForm. TCustomForm is derived from the TScrollingWinControl class, which is based on the TWinControl class:
Like every other control, the form is equipped with a constructor that allows you to dynamically create it.
Practical Learning: Creating an Application
To start C++Builder, click Start -> (All) Programs -> Embarcadero RAD Studio 2010 -> C++Builder 2010
On the main menu, click File -> New -> Other.
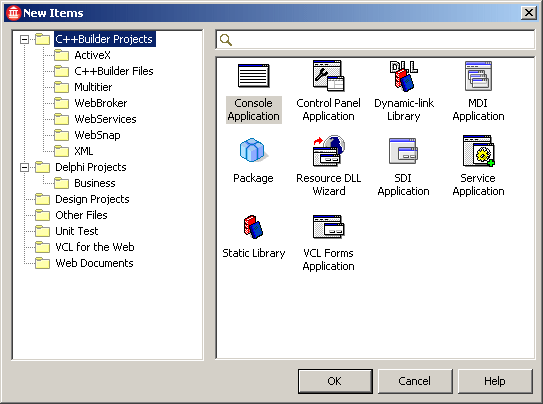
On the New Items dialog box, click Console Application
Click OK
In the New Console Application dialog box, accept the C++ radio button and the Use VCL check box. Clear the check mark on the Console Application check box
Click OK
In the file, before the return 0; line, type Application->Initialize();
Form Dynamic Creation
Besides designing a form visually, sometimes this will not be possible. You may have to create the form dynamically. To create a form dynamically, declare a pointer to a TForm class. If you want to quickly use a form in a function or an event, you can create it easily. There are two options you have.
If you want to create a duplicate of the form you already have, you can use it as the base class and simply create an instance of the form using the new operator. When dynamically creating a form, you must specify the object or form that «owns» the form. If you are creating a duplicate of the form, set the owner as the current form or the this pointer. The owner is provided to the constructor. For example, to create a duplicate form using a form’s OnDblClick event, you can implement the event as follows:
The problem with a duplicate is that, unless you go through a big deal of code writing, every time you do anything on the form, the duplicate produces the same action. Therefore, the second option consists of creating a fresh form. Here is an example:
The biggest problem with a locally created form is that it is available only in the event or the function in which it is created. If you try to access it outside, you would receive an error. If you want a form to be available to more than one event or function, you must create it in a header file of an existing form. If you want the form to be available outside of the parent form that «owns»ќ the header file, you must declare it in the public section. Otherwise, you should declare it in the private section:
After declaring the form, you can use the constructor of the host form to initialize the dynamic form. This is done by using the new operator and initializing the TForm class with the this pointer. Here is an example:
Customizing a Dynamic Form
Whatever technique you use to create your form, you can set its properties using code. The most basic thing you should do is to display it. This is done using the TForm::Show() method. If the form was created locally, you must display it in the function or event where it was created:
After creating and using a form, you should make sure the memory allocated to it is regained. The C++Builder compiler can take care of cleaning your dynamic controls when the application exists. Otherwise, you can delete it manually:
Furthermore, to avoid any memory leak, you can reclaim the dynamically allocated memory by assigning NULL to the deleted object:
Imagine you dynamically declare an object, such as a form, as follows:
We have seen that you can initialize it in the constructor of the form that owns your object:
Once the dynamic object has been initialized you can display it any time you choose. For example, you can do this when the user double-clicks in the primary form:
Over all, the C++Builder compiler takes care of deleting the dynamic object when the form that owns it is closed. If you want to make sure that your dynamic object is destroyed, you can use the delete operator as seen above. In reality, since you can use your judgment to decide when the object would be displayed, when the form that owns it is closed, before deleting the dynamic object, you can first find out if the object was really created. This can be performed with a simple if statement.
The best place to destroy a dynamically created object that a form owns is when the form is destroyed. When a form is being closed, it fires the OnDestroy event. This is the favorite place to perform any housecleaning necessary and related to the form. Based on this, you can destroy the above Fake object as follows:
Introduction to Windows Messages
As an application receives messages, it processes them and acts appropriately. For example, the application can be made aware that the user wants to close it. To process such messages, the TApplication class uses a method called Run(). Its syntax is:
Therefore, an application should (must) call this method to process its assignments. If Run() is not called, the application will compile and execute fine but because it cannot process messages, it will not display anything (displaying something on the screen is a message by itself and must be processed).
Practical Learning: Adding a Form to an Application
To add a form to the application, on the main menu, click File -> New -> Form — C++Builder
Note the name of the form as Form1. Press F12 to access the Code Editor window
Click the File.cpp tab to access its file and change the content of the file as follows:
To test the application, press F9
Close it and return to your programming environment
Design and Run Times
To create your applications, there are two settings you will be using. If a control is displaying on the screen and you are designing it, this is referred to as Design Time. This means that you have the ability to manipulate the control. You can visually set the control’s appearance, its location, its size, and other necessary or available characteristics. The design view is usually the most used and the easiest because you can glance at a control, have a realistic display of the control and configure its properties. The visual design is the technique that allows you to visually add a control and manipulate its display. This is the most common, the most regularly used, and the easiest technique.
The other system you will be using to control a window is with code, writing the program. This is done by typing commands or instructions using the keyboard. This is considered, or referred to, as Run Time. This is the only way you can control an object’s behavior while the user is interacting with the computer and your program.
Characteristics of Forms
The form is the primary object of a VCL application. It is a rectangular window whose main purpose is to carry, host, or hold other controls to allow the user to interact with the computer. Although there are various types of parent containers we will use, the form is the most commonly and regularly used.
If you start a new project from the VCL Forms Application, it creates a starting form and initializes the application. You can use such as form as you see fit. If you need additional forms:
On the main menu, you can click File -> New -> Form — C++Builder
On the main menu, you can click File -> New -> Other. Then, in the left list, click C++Builder Files. In the right list, click Form and click OK
On the Standard toolbar, you can click the New Items button to display the New Items dialog box from where you would select the Form icon
Another technique you can use is to create a form programmatically. To do this, declare a pointer to the TForm class using the new operator.
The System Icon
The top section of a form or a dialog box is called a title bar:
On the left side of the form’s title bar, there is an icon. By default, C++Builder uses an icon shipped with the studio. If you want to use your own icon, you can specify it using the Icon property. To do this, on the Object Inspector, you can either double-click the (None) value of the Icon field or click the ellipsis button of the field. This would open the Picture Editor dialog box. From it, you can click Load, which would open the Load Picture dialog box. From that dialog box, locate an icon:
After selecting the icon and clicking Open, the icon would be made available in the Picture Editor dialog box:
After clicking OK, the new icon would be used as the system icon of the form:
The System Menu
The icon used on the title bar possesses a menu called the system menu. This menu displays if the user clicks the icon:
The system menu of the icon’s title bar allows the user to perform the common actions of a regular Windows form. If you do not want to display the icon and its menu, refer to the section on the BorderIcons below.
On the right side of the system icon, there is the title bar. It displays a word or a group of words known as the title or caption of the form. By default, the title bar displays the name of the form. To customize the text displayed on the title bar, change the text of the Caption property.
At design time, you can only set the caption as text in the Object Inspector. The caption can be any type of string. At run time, you can control and programmatically display anything on the caption of the form. It can consist of an expression or the result of a calculation. To change the caption at run time, you can use a function, a method, or an event. Just type Caption = and the sentence you want. For example, you can display today’s date on the caption as follows:
You can also indirectly control the caption. For example, after the user has typed his or her name in an edit box, you can display it in the form’s caption as follows:
The System Buttons
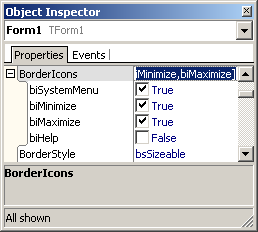
In the right section of the title bar, there are three system buttons that allow minimizing ( or or ), maximizing ( or or ), restoring ( or or ) or closing ( or or ) the form as a window. The presence, absence, or appearance of the system buttons is controlled by the BorderIcons property. To control this property, you can click its + button to expand it to display its four possible values: biSystemMenu, biMinimize, biMaximimize, and biHelp:
The BorderIcons property is a (Pascal-style) set, which means it can use one or more values in any allowed combination. Each member of the set can have a true or false value. If you set the biSystemMenu property to true, regardless of the values of the other fields of the BorderIcons property, the form would have neither the system icon (which also makes the system menu unavailable) nor the system buttons. If a form does not have a system close button, you should make sure the user has a way to close the form:
Using a combination of the biSystemMenu, the biMinimize and the biMaximimize properties, you can control the availability of the system buttons:
biSystemMenu = false
Notice that there is no system button
biSystemMenu = true
Notice that the Minimize button is disabled
biSystemMenu = true
Notice that the Maximize button is disabled
biSystemMenu = true
Both the Minimize and Maximize buttons are enabled
biSystemMenu = true
Notice that only the system Close button is available

 Practical Learning: Creating an Application