- Обзор конструктора Windows Forms Windows Forms Designer overview
- функциональное назначение; Functionality
- Windows Forms Designer for .NET Core Released
- How to use the designer
- What’s available in the designer
- What’s coming next
- New in 16.6 GA release
- New in 16.7 Preview 1 release
- Known issue
- Give us your feedback!
- Tutorial: Get started with Windows Forms Designer
- Create the custom control project
- Design the control layout
- Populate the control
- Use the Document Outline window
- Implement event handlers
- Test the control
- Use the control on a form
- Create the project
- Use the control in the form’s layout
- Next steps
Обзор конструктора Windows Forms Windows Forms Designer overview
Конструктор Windows Forms в Visual Studio — это решение для быстрого создания приложений на основе Windows Forms. Windows Forms Designer in Visual Studio provides a rapid development solution for creating Windows Forms-based applications. Конструктор Windows Forms позволяет легко добавлять элементы управления в форму, упорядочивать их и писать код для их событий. Windows Forms Designer lets you easily add controls to a form, arrange them, and write code for their events. Дополнительные сведения о Windows Forms см. в обзорной статье об этом решении. For more information about Windows Forms, see Windows Forms overview.
функциональное назначение; Functionality
Конструктор позволяет выполнять такие задачи: Using the designer you can:
Добавлять в форму компоненты, элементы управления данными или элементы управления для Windows. Add components, data controls, or Windows-based controls to a form.
Дважды щелкнув форму в конструкторе, создавать код в событии Load этой формы или, дважды щелкнув элемент управления в форме, создавать код для события по умолчанию этого элемента управления. Double-click the form in the designer and write code in the Load event for that form, or double-click a control on the form and write code for the control’s default event.
Изменять свойство Text элемента управления, выбрав элемент управления и введя имя. Edit a control’s Text property by selecting the control and typing a name.
Изменять положение выбранного элемента управления, перемещая его с помощью мыши или клавиш со стрелками. Adjust the placement of the selected control by moving it with the mouse or the arrow keys. Таким же образом задавать точное положение элемента с помощью клавиши CTRL и клавиш со стрелками. Similarly, adjust the placement more precisely using the Ctrl and arrow keys. Наконец, изменять размер элемента управления с помощью клавиши SHIFT и клавиш со стрелками. Finally, adjust the size of the control by using the Shift and arrow keys.
Одновременно выбирать несколько элементов управления, нажимая клавишу SHIFT или CTRL при щелчке. Select multiple controls by selecting either Shift or Ctrl while you click. Если использовать клавишу SHIFT в сочетании со щелчком, первый выбранный элемент управления становится главным при выравнивании или изменении размера. When using sing Shift+click, the first control selected is the dominant control when aligning or manipulating size. Если использовать клавишу CTRL в сочетании со щелчком, главным становится последний выбранный элемент, поэтому главный элемент управления меняется при добавлении нового элемента. When using Ctrl+click, the last control selected is dominant, so the dominant control changes with every new control added. Кроме того, можно выбрать несколько элементов управления, очертив требуемые элементы управления прямоугольником выделения. Alternatively, you can select multiple controls by dragging a selection rectangle around the controls that you want to select.
Для внесения изменений в файл ресурсов формы (RESX) используйте конструктор Windows Forms, а не редактор ресурсов. Use Windows Forms Designer, and not the Resource Editor, to make changes to a form’s resource (.resx) file. При редактировании файла RESX, связанного с формой, отображается предупреждение о том, что изменения, внесенные в редакторе ресурсов, могут быть потеряны. If you edit a form-based .resx file, you’ll see a warning that changes you make in the Resource Editor may be lost. Это происходит потому, что конструктор Windows Forms создает файл RESX. This is because the Windows Forms Designer generates the .resx file.
Windows Forms Designer for .NET Core Released

Today we’re happy to announce that the Windows Forms designer for .NET Core projects is now available as a preview in Visual Studio 2019 version 16.6! We also have a newer version of the designer available in Visual Studio 16.7 Preview 1!

Don’t forget to enable the designer in Tools > Options > Environment > Preview Features.
Many of you may remember that we open-sourced Windows Forms and ported it to .NET Core with .NET Core 3.0. Since then, we’ve been hard at work bringing the Windows Forms designer experience to .NET Core. While we are getting closer to completion, we are continuing work on the designer and plan on bringing more functional and performance improvements in the near future.
How to use the designer
- Install Visual Studio 2019 version 16.6 or Visual Studio 2019 version 16.7 Preview 1.
- To enable the designer in Visual Studio, go to Tools >Options >Environment >Preview Features and select the Use the preview Windows Forms designer for .NET Core apps option.
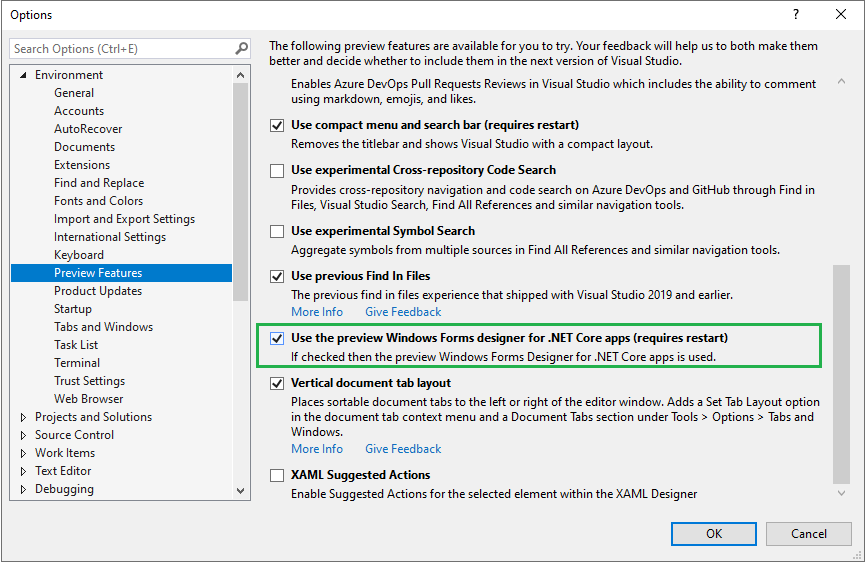
After completing these steps, once you double-click on your form in the Solution Explorer, the designer will open automatically the same way it is for .NET Framework applications.
Improving the performance is our next goal after we complete the functionality work, so don’t get upset if it’s not as fast as you envisioned while the designer is in the preview, that’s something we will improve in the future.
Currently the new Windows Forms designer works only on Windows 10.
What’s available in the designer
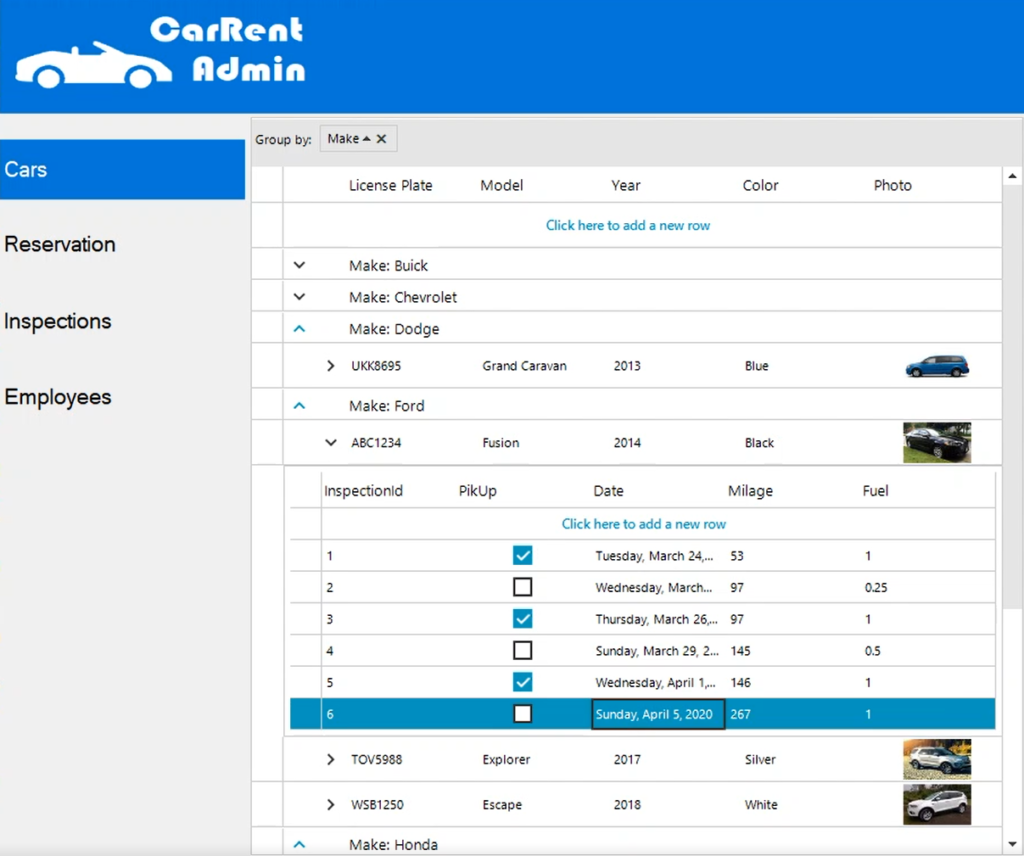
- All Windows Forms controls except DataGridView and ToolStripContainer (these are coming soon)
- UserControl and custom controls infrastructure (only available since Visual Studio 16.7 Preview 1 version)
- All designer functionality, such as
- drag-and-drop
- selection, move and resize
- cut/copy/paste/delete
- integration with Properties Window
- events generation and so on
- New WebView2 control This chromium-based embedded browser control allows to render web content (HTML/CSS/JavaScript) for .NET apps. It is supported in both .NET Core and .NET Framework platforms for Windows Forms and WPF applications. You can find a getting started tutorial in the Microsoft documentation and we will publish a blog post dedicated to WebView2 control in the nearest future.
- Local resources
- Partial support for localization
- Localizable properties of the controls and UserControl can be serialized into ResX-files (by setting Localizable property to true ).
- Different languages are supported via changing Language property.
- Additional Cultures are added in the preview of .NET 5 according to the International Components for Unicode Standard (ICU).
What’s coming next
- Project resources
- Complete localization
- Inherited dialogs support
- Data binding scenarios
This work is in progress, and you already can see some results in the Visual Studio 16.7 Preview 1 designer.
- Third-party control vendors support
New in 16.6 GA release
- All Dialogs controls
- PropertyGrid
- HScrollBar
- VScrollBar
- DomainUpDown
- TrackBar
- Drag-and-drop improvements
- Selection improvements
- Stability and bug fixes
New in 16.7 Preview 1 release
- UserControl and custom controls infrastructure
- TableLayoutPanel
- Fundamentals for third-party controls support
- Fundamentals for data binding support
- Improvements in designer interaction with the TableLayoutPanel
Known issue
Some users might not see some controls (like Button, CheckBox, etc.) in the Toolbox. That happens due to the Toolbox cache corruption issue that will be fixed in the next version. Meanwhile, there is a simple way to fix it on your machine:
- Right-click on the Toolbox >Choose Items…
- In the Choose Toolbox Items dialog click “Reset” button
This should fix the problem.
Give us your feedback!
Your feedback is important to us! Please report issues and send feature requests via the Visual Studio Feedback channel. Use the “Send Feedback” icon in Visual Studio top-right corner as shown in the following image and specify that it is related to the “WinForms .NET Core” area.
Tutorial: Get started with Windows Forms Designer
The Windows Forms Designer provides many tools for building Windows Forms applications. This article illustrates how to build an app using the various tools provided by the designer, including the following tasks:
- Arrange controls using snaplines.
- Accomplish designer tasks using smart tags.
- Set margins and padding for controls.
- Arrange controls using a TableLayoutPanel control.
- Partition your control’s layout by using a SplitContainer control.
- Navigate your layout with the Document Outline window.
- Position controls with the size and location information display.
- Set property values using the Properties window.
When you’re finished, you’ll have a custom control that’s been assembled using many of the layout features available in the Windows Forms Designer. This control implements the user interface (UI) for a simple calculator. The following image shows the general layout of the calculator control:

Create the custom control project
The first step is to create the DemoCalculator control project.
Open Visual Studio and create a new Windows Forms Control Library project. Name the project DemoCalculatorLib.

To rename the file, in Solution Explorer, right-click UserControl1.vb or UserControl1.cs, select Rename, and change the file name to DemoCalculator.vb or DemoCalculator.cs. Select Yes when you are asked if you want to rename all references to the code element «UserControl1».
The Windows Forms Designer shows the designer surface for the DemoCalculator control. In this view, you can graphically design the appearance of the control by selecting controls and components from Toolbox and placing them on the designer surface. For more information about custom controls, see Varieties of custom controls.
Design the control layout
The DemoCalculator control contains several Windows Forms controls. In this procedure, you’ll arrange the controls using the Windows Forms Designer.
In the Windows Forms Designer, change the DemoCalculator control to a larger size by selecting the sizing handle in the lower-right corner and dragging it down and to the right. In the lower-right corner of Visual Studio, find the size and location information for controls. Set the size of the control to width 500 and height 400 by watching the size information as you resize the control.
In Toolbox, select the Containers node to open it. Select the SplitContainer control and drag it onto the designer surface.
The SplitContainer is placed on the DemoCalculator control’s designer surface.
The SplitContainer control sizes itself to the fit the size of the DemoCalculator control. Look at the Properties window to see the property settings for the SplitContainer control. Find the Dock property. Its value is DockStyle.Fill, which means the SplitContainer control will always size itself to the boundaries of the DemoCalculator control. Resize the DemoCalculator control to verify this behavior.
In the Properties window, change the value of the Dock property to None .
The SplitContainer control shrinks to its default size and no longer follows the size of the DemoCalculator control.
Select the smart tag glyph ( ) on the upper-right corner of the SplitContainer control. Select Dock in Parent Container to set the Dock property to Fill .
The SplitContainer control docks to the DemoCalculator control’s boundaries.
Several controls offer smart tags to facilitate design. For more information, see Walkthrough: Perform common tasks using Smart Tags on Windows Forms controls.
Select the vertical border between the panels and drag it to the right, so that most of the space is taken by the left panel.
The SplitContainer divides the DemoCalculator control into two panels with a movable border separating them. The panel on the left will hold the calculator buttons and display, and the panel on the right will show a record of the arithmetic operations performed by the user.
In the Properties window, change the value of the BorderStyle property to Fixed3D .
In Toolbox, select the Common Controls node to open it. Select the ListView control and drag it into the right panel of the SplitContainer control.
Select the ListView control’s smart tag glyph. In the smart tag panel, change the View setting to Details .
In the smart tag panel, select Edit Columns.
The ColumnHeader Collection Editor dialog box opens.
In the ColumnHeader Collection Editor dialog box, select Add to add a column to the ListView control. Change the value of the column’s Text property to History. Select OK to create the column.
In the smart tag panel, select Dock in Parent Container, and then select the smart tag glyph to close the smart tag panel.
From the Containers node Toolbox, drag a TableLayoutPanel control into the left panel of the SplitContainer control.
The TableLayoutPanel control appears on the designer surface with its smart tag panel open. The TableLayoutPanel control arranges its child controls in a grid. The TableLayoutPanel control will hold the DemoCalculator control’s display and buttons. For more information, see Walkthrough: Arrange controls using a TableLayoutPanel.
Select Edit Rows and Columns on the smart tag panel.
The Column and Row Styles dialog box opens.
Select the Add button until five columns are displayed. Select all five columns, and then select Percent in the Size Type box. Set the Percent value to 20. This sets each column to the same width.
Under Show, select Rows.
Select Add until five rows are displayed. Select all five rows, and the select Percent in the Size Type box. Set the Percent value to 20. This sets each row to the same height.
Select OK to accept your changes, and then select the smart tag glyph to close the smart tag panel.
In the Properties window, change the value of the Dock property to Fill .
Populate the control
Now that the layout of the control is set up, you can populate the DemoCalculator control with buttons and a display.
In Toolbox, select the TextBox control icon.
A TextBox control is placed in the first cell of the TableLayoutPanel control.
In the Properties window, change the value of the TextBox control’s ColumnSpan property to 5.
The TextBox control moves to a position that is centered in its row.
Change the value of the TextBox control’s Anchor property to Left , Right .
The TextBox control expands horizontally to span all five columns.
Change the value of the TextBox control’s TextAlign property to Right .
In the Properties window, expand the Font property node. Set Size to 14, and set Bold to true for the TextBox control.
Select the TableLayoutPanel control.
In Toolbox, select the Button icon.
A Button control is placed in the next open cell of the TableLayoutPanel control.
In Toolbox, select the Button icon four more times to populate the second row of the TableLayoutPanel control.
Select all five Button controls by selecting them while holding down the Shift key. Press Ctrl+C to copy the Button controls to the clipboard.
Press Ctrl+V three times to paste copies of the Button controls into the remaining rows of the TableLayoutPanel control.
Select all 20 Button controls by selecting them while holding down the Shift key.
In the Properties window, change the value of the Dock property to Fill .
All the Button controls dock to fill their containing cells.
In the Properties window, expand the Margin property node. Set the value of All to 5.
All the Button controls are sized smaller to create a larger margin between them.
Select button10 and button20, and then press Delete to remove them from the layout.
Select button5 and button15, and then change the value of their RowSpan property to 2. These will be the Clear and = buttons for the DemoCalculator control.
Use the Document Outline window
When your control or form is populated with several controls, you may find it easier to navigate your layout with the Document Outline window.
On the menu bar, choose View > Other Windows > Document Outline.
The Document Outline window shows a tree view of the DemoCalculator control and its constituent controls. Container controls like the SplitContainer show their child controls as subnodes in the tree. You can also rename controls in place using the Document Outline window.
In the Document Outline window, right-click button1, and then select Rename. Change its name to sevenButton.
Using the Document Outline window, rename the Button controls from the designer-generated name to the production name according to the following list:
button1 to sevenButton
button2 to eightButton
button3 to nineButton
button4 to divisionButton
button5 to clearButton
button6 to fourButton
button7 to fiveButton
button8 to sixButton
button9 to multiplicationButton
button11 to oneButton
button12 to twoButton
button13 to threeButton
button14 to subtractionButton
button15 to equalsButton
button16 to zeroButton
button17 to changeSignButton
button18 to decimalButton
button19 to additionButton
Using the Document Outline and Properties windows, change the Text property value for each Button control name according to the following list:
Change the sevenButton control text property to 7
Change the eightButton control text property to 8
Change the nineButton control text property to 9
Change the divisionButton control text property to / (forward slash)
Change the clearButton control text property to Clear
Change the fourButton control text property to 4
Change the fiveButton control text property to 5
Change the sixButton control text property to 6
Change the multiplicationButton control text property to * (asterisk)
Change the oneButton control text property to 1
Change the twoButton control text property to 2
Change the threeButton control text property to 3
Change the subtractionButton control text property to — (hyphen)
Change the equalsButton control text property to = (equals sign)
Change the zeroButton control text property to 0
Change the changeSignButton control text property to +/-
Change the decimalButton control text property to . (period)
Change the additionButton control text property to + (plus sign)
On the designer surface, select all the Button controls by selecting them while holding down the Shift key.
In the Properties window, expand the Font property node. Set Size to 14, and set Bold to true for all the Button controls.
This completes the design of the DemoCalculator control. All that remains is to provide the calculator logic.
Implement event handlers
The buttons on the DemoCalculator control have event handlers that can be used to implement much of the calculator logic. The Windows Forms Designer enables you to implement the stubs of all the event handlers for all the buttons with one selection.
On the designer surface, select all the Button controls by selecting them while holding down the Shift key.
Select one of the Button controls.
The Code Editor opens to the event handlers generated by the designer.
Test the control
Because the DemoCalculator control inherits from the UserControl class, you can test its behavior with the UserControl Test Container. For more information, see How to: Test the run-time behavior of a UserControl.
Press F5 to build and run the DemoCalculator control in the UserControl Test Container.
Select the border between the SplitContainer panels and drag it left and right. The TableLayoutPanel and all its child controls resize themselves to fit in the available space.
When you are finished testing the control, select Close.
Use the control on a form
The DemoCalculator control can be used in other composite controls or on a form. The following procedure describes how to use it.
Create the project
The first step is to create the application project. You’ll use this project to build the application that shows your custom control.
Create a new Windows Forms Application project and name it DemoCalculatorTest.
In Solution Explorer, right-click the DemoCalculatorTest project, and then select Add Reference to open the Add Reference dialog box.
Go to the Projects tab, and then select the DemoCalculatorLib project to add the reference to the test project.
In Solution Explorer, right-click DemoCalculatorTest, and then select Set as StartUp Project.
In the Windows Forms Designer, increase the size of the form to about 700 x 500.
Use the control in the form’s layout
To use the DemoCalculator control in an application, you need to place it on a form.
In Toolbox, expand the DemoCalculatorLib Components node.
Drag the DemoCalculator control from Toolbox onto your form. Move the control to the upper-left corner of the form. When the control is close to the form’s borders, snaplines will appear. Snaplines indicate the distance of the form’s Padding property and the control’s Margin property. Position the control at the location indicated by the snaplines.
Drag a Button control from Toolbox and drop it onto the form.
Move the Button control around the DemoCalculator control and observe where the snaplines appear. You can align your controls precisely and easily using this feature. Delete the Button control when you’re finished.
Right-click the DemoCalculator control, and then select Properties.
Change the value of the Dock property to Fill .
Select the form, and then expand the Padding property node. Change the value of All to 20.
The size of the DemoCalculator control is reduced to accommodate the new Padding value of the form.
Resize the form by dragging the various sizing handles to different positions. Observe how the DemoCalculator control is resized to fit.
Next steps
This article has demonstrated how to construct the user interface for a simple calculator. To continue, you can extend its functionality by implementing the calculator logic, then publish the app using ClickOnce. Or, continue on to a different tutorial where you create a picture viewer using Windows Forms.


