- Windows from programming tool
- Fix problems that block programs from being installed or removed
- What it fixes
- 4 Great Tools to Create Windows Installer Packages
- Nullsoft Scriptable Install System (NSIS)
- Advanced Installer
- Inno Setup
- WIX Toolset
- Intel Flash Programming Tool
- Создаем загрузочную флэшку с FPT
- Создаем fullflash бэкап
- Прошиваем fullflash дамп
- Download Windows 10
- Windows 10 October 2020 Update
- Create Windows 10 installation media
Windows from programming tool
С помощью программы Intel Flash Programming Tool (FPT) можно сделать бэкап и прошить биос материнской платы. Если для брендовых материнок Asus, MSI, Gigabyte как правило есть фирменная утилита, то для Китайских плат такой утилиты нет, но мы можем прошить биос прямо из под Windows и без специальной фирменной утилиты — программой FPT.
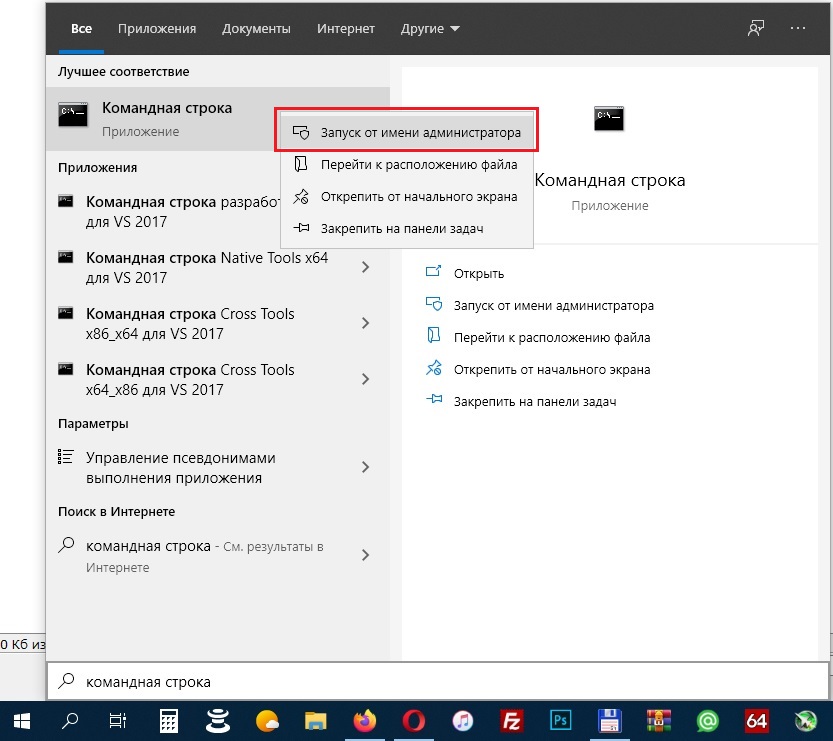
Запустите командную строку от имени администратора:
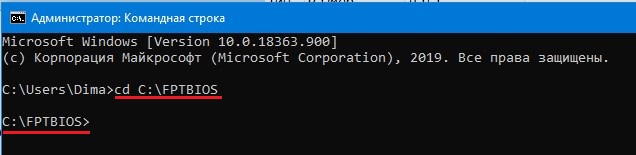
Далее нужно перейти в папку «FPTBIOS» с программой для прошивки биоса, если вы распаковали архив в корень диска «C», то команда будет следующая:
Для записи бэкапа биоса команда:
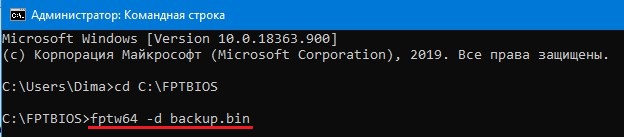
backup — это имя файла бэкапа, может быть любым
.bin — это расширение файла, может быть .bin, .rom и т.д., может быть даже без расширения
По завершению процесса бэкапа вы увидите надпись FPT Operation Passed , в папке «FPTBIOS» появится файл бэкапа backup.bin
Для записи биоса команда:
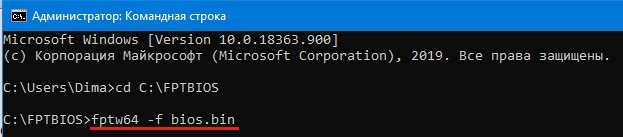
bios — имя файла биос
.bin — расширение файла биос
По завершению процесса прошивки вы увидите надпись FPT Operation Passed
Некоторые производители блокируют возможность прошивки из под Windows, проверить это легко, при создании бэкапа биос вы получите ошибку 26 , значит ваша плата не может быть прошита программой FPT из под Windows.
Но не стоит отчаиваться, такие платы можно прошить программой AFUDOS или программатором CH341A.
Архив с программой FPT.
При создание бэкапа ошибка 26 — Ваша плата не поддерживает прошивку из под Windows программой FPT.
Чтобы оставить комментарий, авторизуйтесь или зарегистрируйтесь.
1″ :pagination=»pagination» :callback=»loadData» :options=»paginationOptions»>
Fix problems that block programs from being installed or removed
Note: Use these steps for Windows programs. If you’re having problems with an app you got from Microsoft Store, go to Fix problems with apps from Microsoft Store.
The Program Install and Uninstall troubleshooter helps you automatically repair issues when you’re blocked from installing or removing programs. It also fixes corrupted registry keys.
First, you’ll need to download the troubleshooter.
If you see the File Download box when you start downloading, select Run or Open.
The troubleshooter provides steps for you to follow. If a program isn’t listed in the uninstall options, you’ll be asked for that program’s product code. To access the code, you’ll need a tool for reading MSI files—which is typically available to IT professionals. You’ll find the product code in the property table of the MSI file.
What it fixes
The troubleshooter helps fix problems that:
Corrupt registry keys on 64-bit operating systems.
Corrupt registry keys that control the update data.
Prevent new programs from being installed.
Prevent existing programs from being completely uninstalled or updated.
Block you from uninstalling a program through Add or Remove Programs (or Programs and Features) in Control Panel.
If you’re trying to remove malware, you can use Windows Security (or another antivirus tool), or you can use the Windows Malicious Software Removal tool.
4 Great Tools to Create Windows Installer Packages
For those of us that don’t have the $ for InstallShield
I’ve written a fair amount of code in my IT career and released a good number of Windows programs also, so a good tool to create Windows installer packages was always key. Each program would have a different set of needs, such as scripts, DLLs, security settings, etc., so one tool that could handle a complex set of requirements was necessary.
If you have the money or need tons of support, you can always go with InstallShield, the solid choice for many companies using Windows. We always used InstallShield in our early days as it came packaged with Visual Studio and Visual Foxpro.
However, it is not the only good software out there for creating Windows installers. In this article, I’m going to mention a couple of other free and paid (though much cheaper) utilities you can try out in your organization.
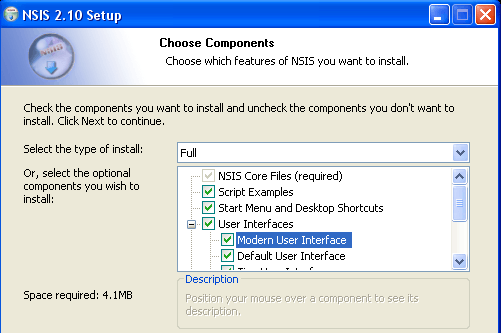
Nullsoft Scriptable Install System (NSIS)
If you love open source software, you may want to check out the Nullsoft Scriptable Install System (NSIS). NSIS is a professional system that you can use to create everything from very simple to very complex Windows installers. It’s small, yet has a large feature set, which makes it suitable for Internet distribution.
As you can tell by the name, NSIS is script-based, which allows you to create logic as complicated as you need to handle any situation. Luckily, for beginners, it also includes a bunch of plug-ins and pre-defined scripts to get you started.
Here is a short list of some of my favorite features of this MSI package creator:
- Ability to create Windows installers that can install, uninstall, set system settings, extract files, and more.
- NSIS has an overhead of only 34KB! It is by far the smallest Windows installer compared to InstallShield and Wise.
- One installer that is compatible with all major version of Windows from Windows 95 to Windows 10.
- Three compression methods (ZLib, BZip2, LZMA) to ensure the greatest compression for your installer packages.
- Script based installer is better than other programs that just generate a list of files and registry keys. Using the script language, you can perform many different installation tasks like upgrades, version checks, system reboots, modification of environment variables, access to Windows API and more.
- Create custom dialogs and interfaces to include user input, configuration options, and even a custom wizard interface.
- Extend the capabilities of NSIS with plug-ins that can communicate with the installer.
- Support for web installation and file patching across the Internet.
The program supports a tons of other features including installer self-verification using checksum, list and tree for component selection, silent mode for automated installations, full code editor for writing scripts, etc.
Advanced Installer
Advanced Installer also has a free version, but it also has several other versions that go up in price depending on how complex your installer needs to be. It’s updated very often and works extremely well.
If you’re looking for something more professional that also includes some options for support, then Advanced Installer is a good choice. If you want a feature breakdown between the five different versions they have, then check out the link. The free version actually has a lot of features and we were able to use that in our company for a long time because our installers were fairly simple.

One unique feature to Advanced Installer is Installer Analytics. It’s basically a set of tools to see how users install, use and uninstall your applications. You can easily see how large your user base is, load a survey when a user uninstalls the program, and get information about the user’s system and geographic location. All of this on a sleek and modern web interface that you can test yourself.

It also lets you easily repackage your applications into the new AppX format, which is required for the Universal Windows Platform. It doesn’t require any code changes and they have a free AppX converter tool. Those are just some of the unique features, but Advanced Installer pretty much covers all the bases. Check out the full list of features here for each edition.
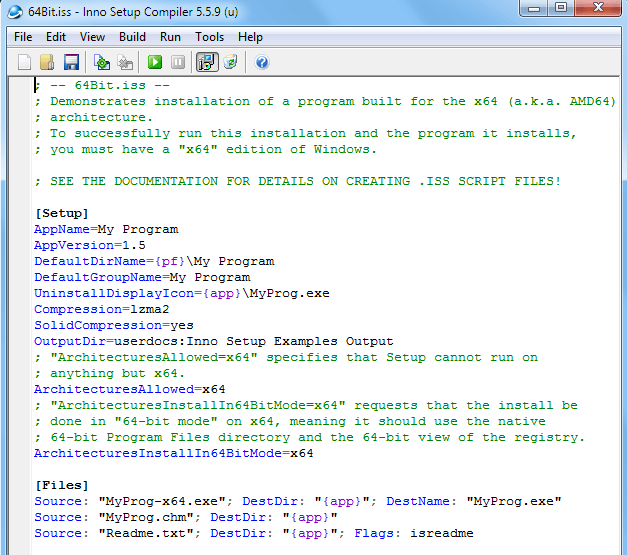
Inno Setup
Inno Setup is an advanced Windows installer that is completely free and that has been around since 1997. It’s got a ton of features and works great for small businesses with moderately complex requirements.
Here is a list of some of the best features of Inno Setup:
- Supports all versions of Windows from Windows 2000 up to Windows 10
- Supports installation of 64-bit applications on 64-bit Windows
- Supports the creation of a single EXE file for easy file distribution
- Customizable setup types and full support for application uninstalls
- Creation of shortcuts, registry entries and INI files
- Supports silent installs and Pascal scripting engine for more advanced installs
- Third party extensions that enhance the features of Inno setup
Overall, this is a really good option since it’s completely free and very easy to use. It’s not going to be able to do what InstallShield or even Advanced Installer can do, but it covers pretty much all of the basics.
WIX Toolset
The WIX Toolset is a free set of tools for creating Windows installers that works with Visual Studio 2012 or higher. I mention it last because it requires the biggest learning curve. You can create some very complex installers with it, but you’ll be coding quite a bit and using a command line often.
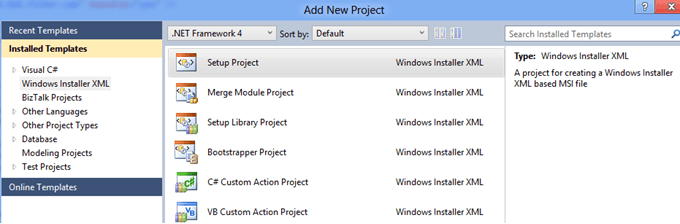
WIX Toolset is based on the XML authoring model. If you don’t have Visual Studio, you can use the Wix tools or MSBuild. It supports building MSI, MSP, MSM, and MST installer files. It also supports a large number of Windows Installer features.
So those are some of the better known and stable programs you can use to create Windows installers. I’m sure there are many others out there, so feel free to let us know which one you use in the comments. Enjoy!
Founder of Help Desk Geek and managing editor. He began blogging in 2007 and quit his job in 2010 to blog full-time. He has over 15 years of industry experience in IT and holds several technical certifications. Read Aseem’s Full Bio
Intel Flash Programming Tool
С помощью Intel Flash Programming Tool (или просто fpt) можно сделать дамп (бэкап) Bios материнской платы или прошить свой или чужой дамп. Нам программа понадобится для прошивки модифицированного дампа биос в некоторые китайские платы на сокете 2011.
Работает программа как из под командной строки windows, так и под дос. Мы будем пользоваться загрузочной dos флешкой. В нашем конкретном случае используется плата Huanan x79 Deluxe Gaming.
Все действия выполняем на свой страх и риск.
Данная инструкция писалась для китайских плат 2011 сокета, для работы с которыми подходит версия FPT 8.1.60.1561. Для сокета 2011-3 можно попробовать использовать версию 9.1.10.1000, скачать которую можно также внизу данной страницы.
Создаем загрузочную флэшку с FPT
На загрузочной флешке удобно хранить сразу fpt и afudos. Afudos может пригодится, если в процессе прошивки будут ошибки.
- Скачиваем Rufus и создаем в нем загрузочную флешку с параметрами как на скриншоте.

- Скачиваем архив Intel ME System Tools v8 r1 внизу данной страницы, распаковываем и копируем на созданную флешку все файлы, лежащие в папке System Tools v8 r1\Flash Programming Tool\DOS\
- Если планируется не только сделать бэкап, но и прошить модифицированный дамп — копируем его в корень флешки. Для удобства назовем его new.bin
- (Опционально) На всякий случай, копируем на флешку Afudos.

Создаем fullflash бэкап
- Загружаемся с созданной флешки. FreeDOS спросит, какую раскладку клавиатуры мы хотим использовать, выбираем US-English.
- Появляется командная строка. Для создания бэкапа пишем fpt -d fullbackup.bin и дожидаемся надписи FPT Operation Passed. Теперь на нашей флешке сохранен дамп биоса в указанном файле.

Прошиваем fullflash дамп
- Все в той же командной строке пишем
fpt -f new.bin - Прошиваем Bios повторно этой же командой, часто с первого раза не всё прошивает, потом допрошивает. Некоторые платы в принципе шьются только со второго раза.

В результате мы должны увидеть примерно такую надпись
Download Windows 10
Before updating, please refer to the Windows release information status for known issues to confirm your device is not impacted.
Windows 10 October 2020 Update
The Update Assistant can help you update to the latest version of Windows 10. To get started, click Update now.
Create Windows 10 installation media
To get started, you will first need to have a license to install Windows 10. You can then download and run the media creation tool. For more information on how to use the tool, see the instructions below.

Here’s when to use these instructions:
- You have a license to install Windows 10 and are upgrading this PC from Windows 7 or Windows 8.1.
- You need to reinstall Windows 10 on a PC you’ve already successfully activated Windows 10.
If you are installing Windows 10 on a PC running Windows XP or Windows Vista, or if you need to create installation media to install Windows 10 on a different PC, see Using the tool to create installation media (USB flash drive, DVD, or ISO file) to install Windows 10 on a different PC section below.
Note: Before you install Windows 10, check to make sure your PC meets the system requirements for Windows 10. We also recommend going to the PC manufacturer’s website for any additional info about updated drivers and hardware compatibility.
- Select Download tool, and select Run. You need to be an administrator to run this tool.
- On the License terms page, if you accept the license terms, select Accept.
- On the What do you want to do? page, select Upgrade this PC now, and then select Next.
After downloading and installing, the tool will walk you through how to set up Windows 10 on your PC. All Windows 10 editions are available when you select Windows 10, except for Enterprise edition. For more information on Enterprise edition, go to the Volume Licensing Service Center.
- If you don’t have a license to install Windows 10 and have not yet previously upgraded to it, you can purchase a copy here: https://www.microsoft.com/en-us/windows/get-windows-10.
- If you previously upgraded to Windows 10 on this PC and you’re reinstalling it, you don’t need to enter a product key. Your copy of Windows 10 will automatically activate later using your digital license.
Follow these steps to create installation media (USB flash drive or DVD) you can use to install a new copy of Windows 10, perform a clean installation, or reinstall Windows 10.
Before you download the tool make sure you have:
- An internet connection (internet service provider fees may apply).
- Sufficient data storage available on a computer, USB or external drive for the download.
- A blank USB flash drive with at least 8GB of space or blank DVD (and DVD burner) if you want to create media. We recommend using a blank USB or blank DVD, because any content on it will be deleted.
- When burning a DVD from an ISO file, if you are told the disc image file is too large you will need to use Dual Layer (DL) DVD Media.
Check a few things on the PC where you want to install Windows 10:
- 64-bit or 32-bit processor (CPU). You’ll create either a 64-bit or 32-bit version of Windows 10. To check this on your PC, go to PC info in PC settings or System in Control Panel, and look for System type.
- System requirements. Make sure the PC meets the system requirements for Windows 10. We also recommend going to the PC manufacturer’s website for additional info about updated drivers and hardware compatibility.
- Language in Windows. You’ll need to choose the same language when you install Windows 10. To see what language you’re currently using, go to Time and language in PC settings or Region in Control Panel.
- Edition of Windows. You should also choose the same edition of Windows. To check what edition you’re currently running, go to PC info in PC settings or System in Control Panel, and look for Windows edition. Windows 10 Enterprise isn’t available in the media creation tool. For more info, go to the Volume Licensing Service Center.
- Microsoft Office products. If you just purchased a new device that includes Office 365, we recommend redeeming (installing) Office before upgrading to Windows 10. To redeem your copy of Office, please see Download and install Office 365 Home, Personal, or University on your PC. For more information, check How to upgrade to Windows 10 on new devices that include Office 365.
If you have Office 2010 or earlier and choose to perform a clean install of Windows 10, you will need to locate your Office product key. For tips on locating your product key, check Find your Office 2010 product key or Enter the product key for your Office 2007 program.
Using the tool to create installation media:
- Select Download tool now, and select Run. You need to be an administrator to run this tool.
- If you agree to the license terms, select Accept.
- On the What do you want to do? page, select Create installation media for another PC, and then select Next.
Select the language, edition, and architecture (64-bit or 32-bit) for Windows 10. This table will help you decide which edition of Windows 10 you’ll choose:
| Your current edition of Windows | Windows 10 edition |
|---|---|
| Windows 7 Starter Windows 7 Home Basic Windows 7 Home Premium Windows 7 Professional Windows 7 Ultimate Windows 8/8.1 Windows 8.1 with Bing Windows 8 Pro Windows 8.1 Pro Windows 8/8.1 Professional with Media Center Windows 8/8.1 Single Language Windows 8 Single Language with Bing Windows 10 Home Windows 10 Pro | Windows 10 |
| Windows 8/8.1 Chinese Language Edition Windows 8 Chinese Language Edition with Bing | Windows 10 Home China |
- USB flash drive. Attach a blank USB flash drive with at least 8GB of space. Any content on the flash drive will be deleted.
- ISO file. Save an ISO file to your PC, which you can use to create a DVD. After the file is downloaded, you can go to location where the file is saved, or select Open DVD burner, and follow the instructions to burn the file to a DVD. For more info about using an ISO file, see Additional methods for using the ISO file to install Windows 10 section below.
After completing the steps to install Windows 10, please check that you have all the necessary device drivers installed. To check for updates now, select the Start button, and then go to Settings > Update & Security > Windows Update, and select Check for updates. You may also wish to visit your device manufacturer’s support site for any additional drivers that may be needed.
Note: Drivers for Surface devices may be found on the Download drivers and firmware for Surface page.
Before you install Windows 10, it’s a good idea to save any work and back up your PC before you start. If you used the media creation tool to download an ISO file for Windows 10, you’ll need to burn it to a DVD before following these steps.
- Attach the USB flash drive or insert the DVD on the PC where you want to install Windows 10.
- Restart your PC.
If your PC does not automatically boot to the USB or DVD media, you might have to open a boot menu or change the boot order in your PC’s BIOS or UEFI settings. To open a boot menu or change the boot order, you’ll typically need to press a key (such as F2, F12, Delete, or Esc) immediately after you turn on your PC. For instructions on accessing the boot menu or changing the boot order for your PC, check the documentation that came with your PC or go to the manufacturer’s website. If you do not see the USB or DVD media device listed within the boot options, you may need to reach out to the PC manufacturer for instructions for temporarily disabling Secure Boot in your BIOS settings.
If changing the boot menu or order doesn’t work, and your PC immediately boots into the OS you want to replace, it is possible the PC had not fully shut down. To ensure the PC fully shuts down, select the power button on the sign-in screen or on the Start menu and select Shut down.
If you downloaded an ISO file for Windows 10, the file is saved locally at the location you selected. If you have a third-party DVD burning program installed on your computer that you prefer to use for creating the installation DVD, that program might open by going to the location where the file is saved and double-clicking the ISO file, or right-click the ISO file, select Open with and choose your preferred DVD burning software.
If you want to use the Windows Disk Image Burner to create an installation DVD, go to the location where the ISO file is saved. Right-click the ISO file and select Properties. On the General tab, click Change and select Windows Explorer for the program you would like to use to open ISO files and select Apply. Then right-click the ISO file and select Burn disc image.
If you want to install Windows 10 directly from the ISO file without using a DVD or flash drive, you can do so by mounting the ISO file. This will perform an upgrade of your current operating system to Windows 10.


