- Install Windows from a USB Flash Drive
- What you need
- Step 1 — Format the drive and set the primary partition as active
- Step 2 — Copy Windows Setup to the USB flash drive
- Step 3 — Install Windows to the new PC
- If your Windows image is larger than 4GB
- Diskpart: Format USB with Command Prompt
- “Windows was unable to complete the format”
- Ways to format USB drive successfully
- Solution 1: Disk Management format USB drive
- Solution 2: Diskpart format USB drive
- Solution 3: Format USB drive with AOMEI Partition Assistant
- Создание загрузочной флешки с Windows с помощью Diskpart
- Приступаем
- Заключение
- Easily Create Windows (UEFI) Bootable USB Stick via Diskpart
- Why create (UEFI) bootable USB?
- Diskpart to create bootable USB
- Create bootable USB for repairing via AOMEI Partition Assistant
Install Windows from a USB Flash Drive
Here’s how to create a bootable Windows installation USB drive starting with a Windows .iso file or a Windows Setup DVD.
If you’re looking for an easy way to create a bootable USB Windows installation drive, use the media creation tool.
What you need
- Windows 10 install .iso or DVD
- USB flash drive with at least 5GB free space. This drive will be formatted, so make sure it doesn’t have any important files on it.
- Technician PC — Windows PC that you’ll use to format the USB flash drive
- Destination PC — A PC that you’ll install Windows on
Step 1 — Format the drive and set the primary partition as active
Connect the USB flash drive to your technician PC.
Open Disk Management: Right-click on Start and choose Disk Management.
Format the partition: Right-click the USB drive partition and choose Format. Select the FAT32 file system to be able to boot either BIOS-based or UEFI-based PCs.
Set the partition as active: Right-click the USB drive partition and click Mark Partition as Active.
If Mark Partition as Active isn’t available, you can instead use diskpart to select the partition and mark it active.
Step 2 — Copy Windows Setup to the USB flash drive
Use File Explorer to copy and paste the entire contents of the Windows product DVD or ISO to the USB flash drive.
Optional: add an unattend file to automate the installation process. For more information, see Automate Windows Setup.
Step 3 — Install Windows to the new PC
Connect the USB flash drive to a new PC.
Turn on the PC and press the key that opens the boot-device selection menu for the computer, such as the Esc/F10/F12 keys. Select the option that boots the PC from the USB flash drive.
Windows Setup starts. Follow the instructions to install Windows.
Remove the USB flash drive.
If your Windows image is larger than 4GB
Windows USB install drives are formatted as FAT32, which has a 4GB filesize limit. If your image is larger than the filesize limit:
Copy everything except the Windows image file (sources\install.wim) to the USB drive (either drag and drop, or use this command, where D: is the mounted ISO and E: is the USB flash drive.)
Split the Windows image file into smaller files, and put the smaller files onto the USB drive:
Diskpart: Format USB with Command Prompt
How to format USB drive? The Diskpart format USB drive can help you format write protected usb using cmd. This article will introduce you the specific way to format USB drive.

By Cherry  / Last Updated April 26, 2020
“Windows was unable to complete the format”
Many users would meet the error: “Windows was unable to complete the format” when they try to format their USB drive to FAT 32 or NTFS in Windows Explorer. But why would this happen?
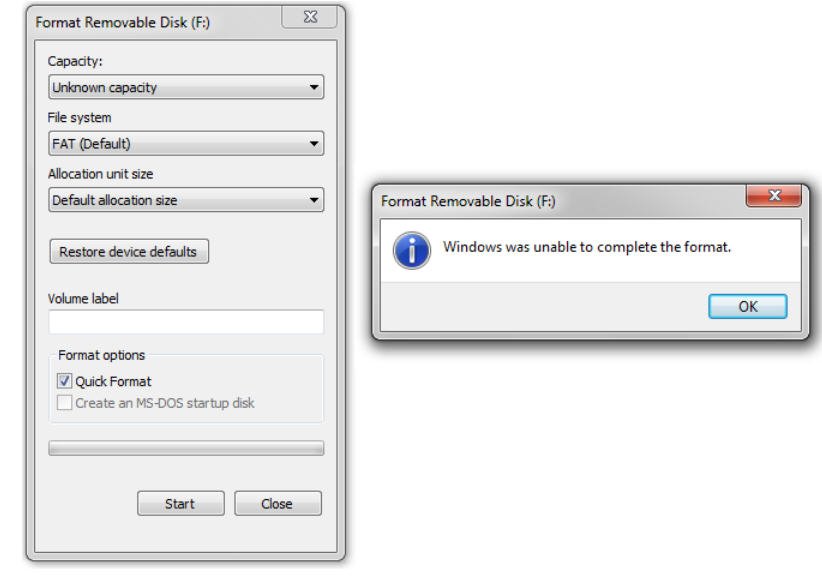
There are many causes that can lead Windows format USB drive failed such as virus infection, the storage device damage, or there has bad sectors on the USB drive, or the USB drive is write-protected. Well, how can you format USB drive successfully under those circumstances?
Ways to format USB drive successfully
You may have a lot of problem about those questions, and you may take a lot of measures to overcome those bad situations like kill virus, check bad sectors, or release the write protection, and so on. Actually, there are many easier solutions.
Note: Following operation will wipe your data on USB drive. Please back up important files to safe places like local PC or cloud.
Solution 1: Disk Management format USB drive
When you cannot format USB drive in Windows Explorer, or the USB drive not shows in My computer or Windows Explorer, you can go to the Windows Disk Management to format USB drive.
Step 1. Open Windows Disk Management by typing “diskmgmt.msc” and pressing Enter in the search box.
Step 2. Right-click the USB drive and select Format at the menu.
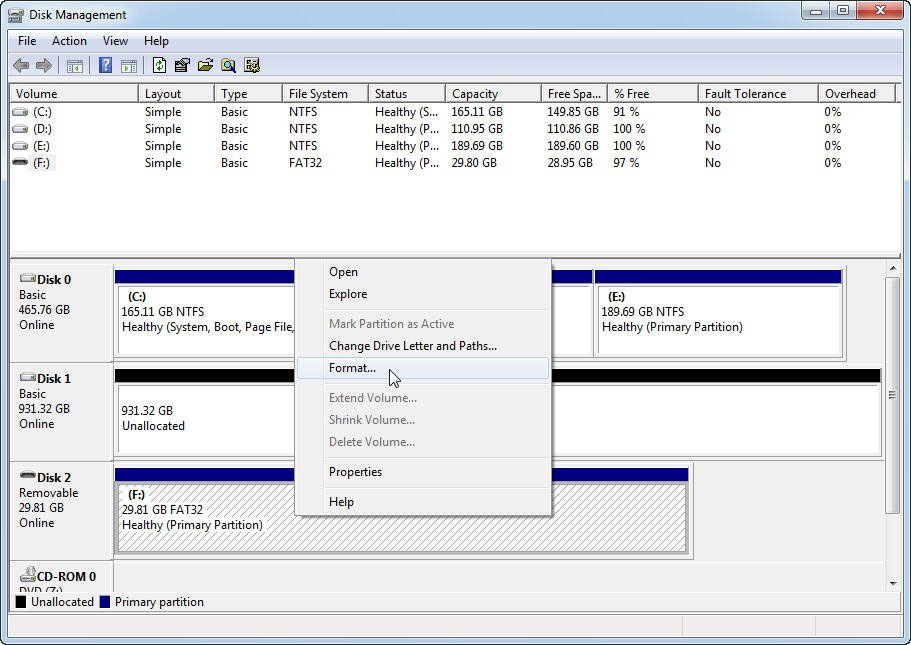
Step 3. Then, select a file system to format USB drive into FAT 32, or NTFS, or others. Click OK to start.
However, if the USB drive is shown as unallocated space in Disk Management, here you need right-click the unallocated space, select “New Simple Volume” to create new partition for the USB drive. After creating partition on the USB drive, you will find that it has been formatted and it can be recognized by Windows Explorer.
Solution 2: Diskpart format USB drive
Mostly, when the computer cannot recognize a USB drive, you can try to use Diskpart to format USB drive. Diskpart is a built-in tool that manage your hard drives. You can use it to format disk including internal or external hard drive. Diskpart format USB drive is much more effective than Windows Explorer. Here we’ll take an example of how to format USB drive with Diskpart while it is not shown in Windows Explorer.
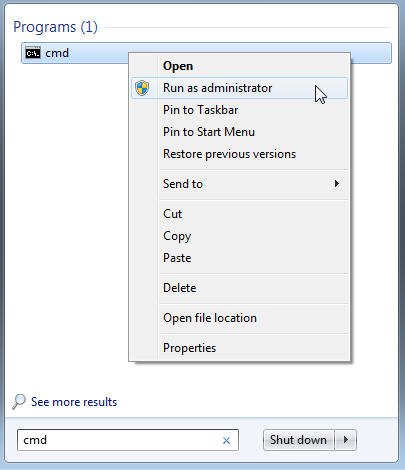
1. Open the command prompt by typing “cmd” at the search box, right-click the program and select Run as Administrator.
2. Then,type “diskpart” and press enter to launch the program.
3. Next, type “list disk” to display all disks on your computer.
4. Type “select disk 2” and press Enter. Here disk 2 is the USB drive.
5. Type “clean” and press Enter.
6. Type “create partition primary”, press Enter.
7. Type “format fs=fat32 quick” or “format fs=ntfs quick” and press Enter to format USB drive to FAT 32 or NTFS as you want.

Finally, type «exit» to end up this, and you have already finished the task about Diskpart format USB. Then, you can active the partition and assign drive letter for the USB drive. For all this, Diskpart is dangerous for people who do not familiar with Diskpart cause all the operations cannot be revoked once the progress launched. Thus, if there is one mistake, you may get into a big trouble. Fortunately, there is another easy way to format USB drive that even a noob can do it alone.
Solution 3: Format USB drive with AOMEI Partition Assistant
AOMEI Partition Assistant Standard is a remarkable free software that can manage your hard drive in Windows 7/8/10. You can use it to create/resize/delete/format/move/merge partitions in a few simple mouse-clicks in its intuitive interface. Format USB drive could be much simpler than Windows Disk Management or Diskpart format USB.
Step 1. Plug in your USB drive to your computer. Download the freeware, install and launch it. All disks on your hard dive will be shown on its concise main interface.
Step 2. Right-click your USB drive, select Format Partition at the drop-down menu.
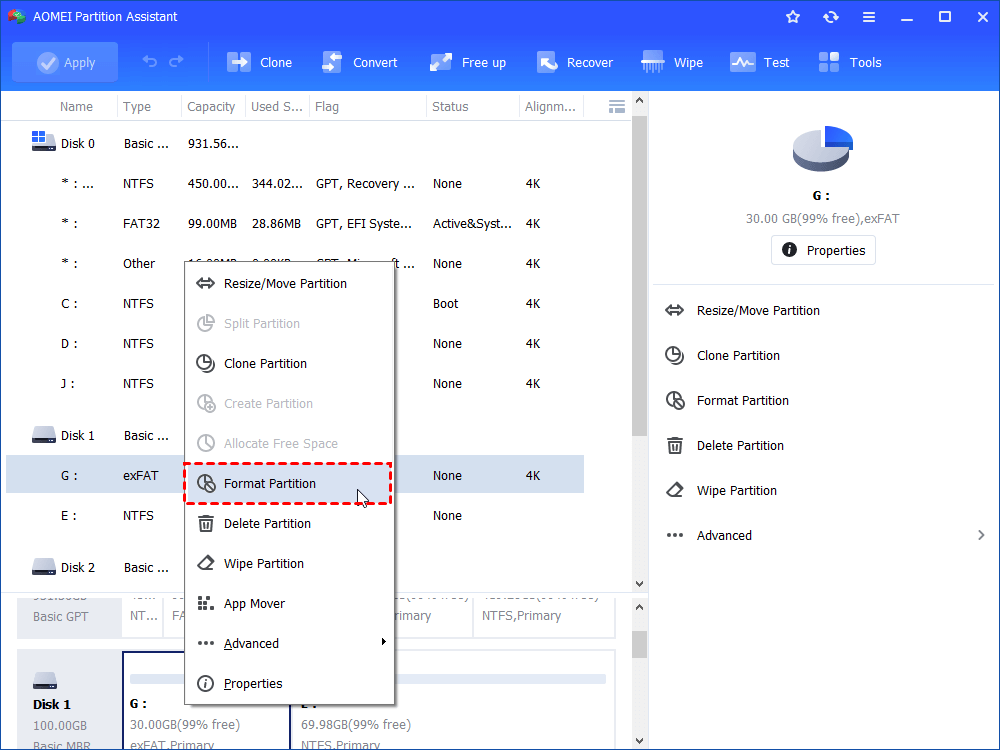
Step 3. Here you can select the file system you need, edit the partition label and the cluster size.
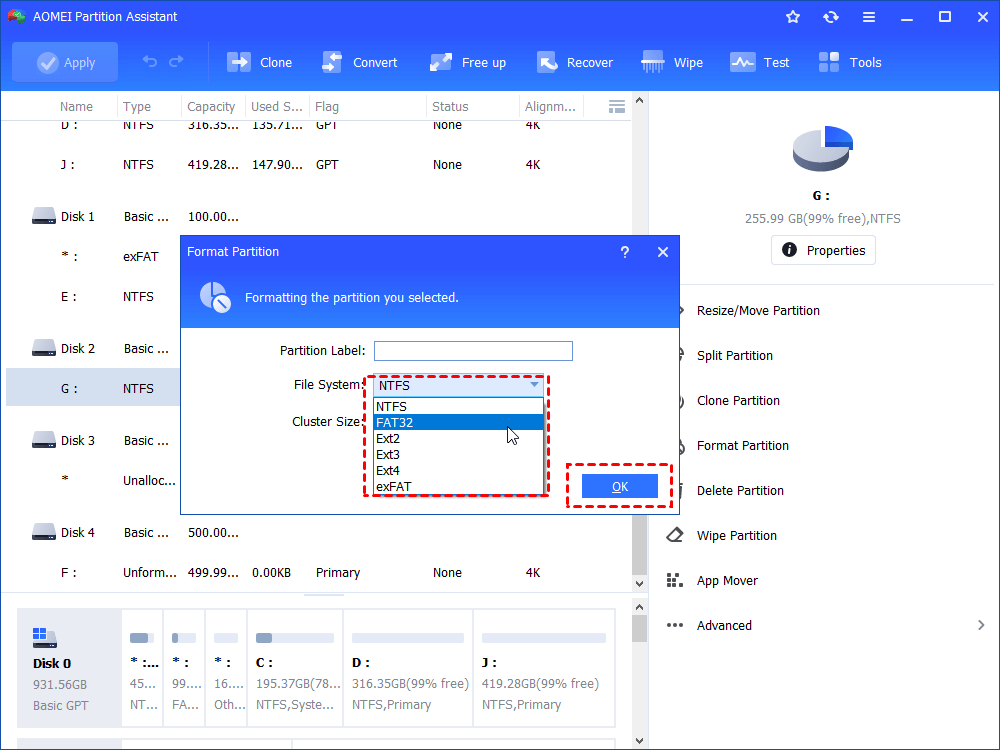
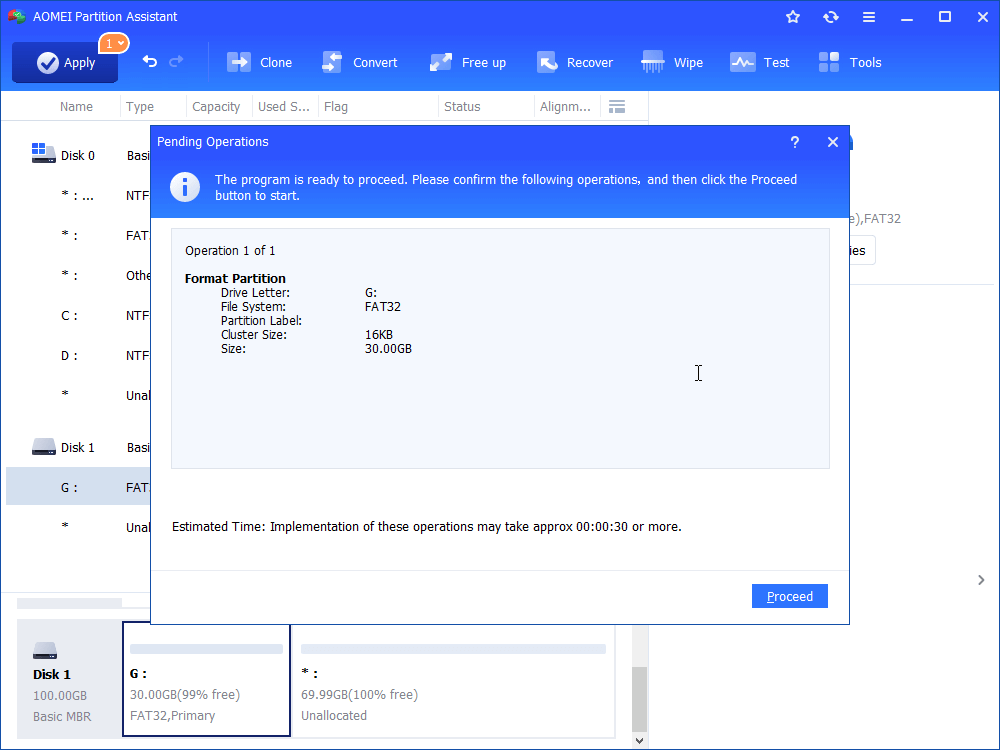
Step 4. Finally, click Apply at the toolbar to submit the operations.
Even though, AOMEI Partition Assistant still provides you the way to partition hard drive from command prompt including format USB drive with command prompt. AOMEI Partition Assistant format USB drive is a good alternative to Diskpart format USB drive. Besides, you can use it to do many other things for managing your hard drive better.
Создание загрузочной флешки с Windows с помощью Diskpart
Обычно для создания загрузочных флешек используется специализированный софт, который нужно скачивать, устанавливать и разбираться с настройками. Было бы неплохо уметь установить Windows без всех этих манипуляций, не правда ли? Такой способ есть, осуществляется он с помощью консольной команды Diskpart, которая способна подготовить ваш носитель к использованию без сторонних программ. Не плохо? Тогда давайте разберёмся, как создать загрузочную флешку Windows в программе Diskpart.

Использование Diskpart при создании загрузчика Windows упрощает процесс.
Diskpart имеет достаточно большое количество команд, которые помогут вам управляться с дисками, разделами и томами с помощью сценариев. Незаменимый инструмент, когда скачать требующуюся программу нет возможности или желания. Чтобы просмотреть все возможности этой программы, используйте «Help».
Приступаем
Diskpart — создание загрузочной флешки. Чтобы производить манипуляции с командами, нам нужно попасть в командную строку. Сделать это можно несколькими способами:
- Зажимаем комбинацию клавиш «Win+R», откроется окно «Выполнить», где нам нужно ввести «cmd» и нажать «Ок». В «Выполнить» можно попасть также через «Пуск/ Все программы».
- Зайдя в меню «Пуск», вбиваем в строку поиска фразу «cmd» либо «Командная строка». Жмём на результат поиска и продолжаем.
Мы внутри командной строки. Выполняем следующие команды:
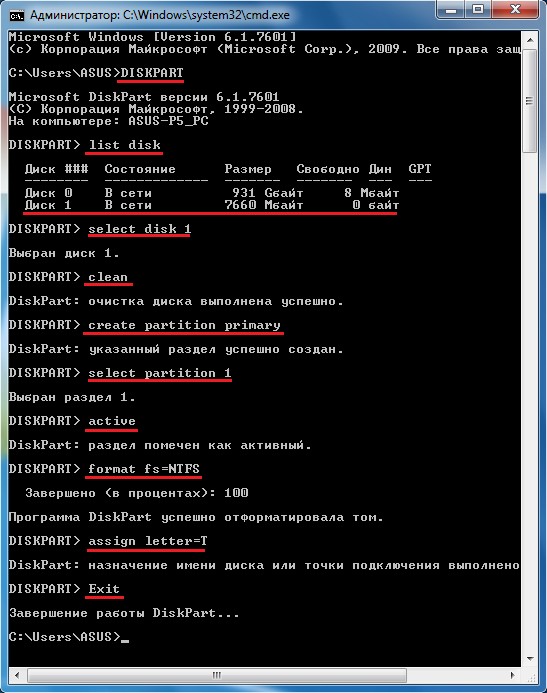
- DISKPART — Запускаем саму программу, для этого просто вводим её название
- list disk — показывает все диски, которые на данный момент подсоединены к компьютеру.
- select disk 1 — выбор диска, где «1» порядковый номер флешки, этот номер нам нужно вычислить по результатам предыдущего запроса. Смотрим на объём накопителя, сравниваем с заявленным объёмом флешки.
- clean — очистка диска.
- create partition primary — создание первичного раздела
- select partition 1 — выбор этого раздела
- active — его активирование
- format fs=NTFS — форматирование в NTFS. Выбрать можно также и файловую систему FAT. Если не хотим долго ждать, то вместо обычного форматирования используем быстрое, добавив слово QUICK. Выбор файловой системы во многом основывается на личных предпочтениях и других различных факторов. Если не знаете, что выбрать, то оставьте команду без изменений, скорее всего NTFS будет для вас предпочтительнее.
- assign letter=T — присвоение буквы «T» носителю.
- Exit — выход.
Мы создали загрузочную флешку, осталось перекинуть на неё файлы с Widows. Обратите внимание, файлы, а не образ. Образ вы должны самостоятельно распаковать.
Заключение
Итак, мы справились с помощью встроенного решения Diskpart. Загрузочная флешка с Windows 7 создана, мы можем со спокойным сердцем устанавливать её хоть каждый день. Многих начинающих пользователей пугает само слово «Командная строка». Бояться её совсем не нужно, во многих случаях она намного упрощает жизнь, хотя и играть с ней не стоит, если нет конкретного понимания, что ты собираешься делать. В нашем случае достаточно просто следовать указанным командам и всё получится.
Если у вас появились вопросы — задайте их в комментариях!
Easily Create Windows (UEFI) Bootable USB Stick via Diskpart
Learn how to create UEFI bootable USB stick using Diskpart Commands (CMD) and AOMEI Partition Assistant in Windows 7, 8.1, (and install Windows 7, XP using it if necessary).
![]()
By Teresa / Last Updated January 13, 2020
Why create (UEFI) bootable USB?
(UEFI) Bootable USB, just as its name implies, is used to boot non-OS computer or OS corrupted machine.
Bootable USB drive can help to repair system when your OS fails to boot.
Bootable USB stick can assist you back up the hard drive without booting Windows when Windows is unbootable due to damaged boot files.
It can help you to install operating system. For example, if you want to install Windows on other hard drives or other computers and you don’t have an installer disc around, it is time to create (UEFI)bootable USB key using Diskpart or other tools. This bootable drive has all the necessary Drivers to boot the machine. So downloading an ISO file to the bootable drive makes the preparation done.
However, either to use third party software or to use Diskpart in Windows, you have to figure out how to create a bootable USB.
Diskpart to create bootable USB
Tips: This part will introduce you how to create (UEFI) bootable USB using Diskpart. Note that all operations in Diskpart are irreversible. If you are not familiar with Diskpart commands and want to take less risk of losing data, skip to next part directly.
Firstly, insert an USB drive into running computer. All data in the USB drive will be formatted, you can backup files before reformatting. Open a Command Prompt window as an administrator, and type diskpart. Remember press Enter key after your each move.
Secondly, type the following commands in order.
1. list disk
2. select disk X (X stands for the drive letter or disk number of your USB drive)
3. clean
4. create part pri
5. select partition 1 (this is the partition you just created)
6. assign letter=N
7. select partiion N
8. format fs=ntfs quick (if you want to create UEFI bootable USB in Diskpart, format it as FAT32. Type format fs=fat32 quick instead)
9. active
10. exit
Finally, place your prepared custom image onto the root of the USB flash drive. Pay attention to that if your USB showing as Removable Disk in Windows Explore, you can only create one primary partition there. If it shows as Fixed Disk, you can create multiple primary partitions in accordance with its size.
Create bootable USB for repairing via AOMEI Partition Assistant
Diskpart to create bootable USB in Windows 7, 8.1 is effective and advanced operation. If you are a novice to computer and looking for more graphical and easier solution to create bootable USB stick for repairing Windows, you can try AOMEI Partition Assistant Professional.
You can download its demo version to have a tryпјЃ
This partition tool has a user-friendly interface and you can finish making bootable USB in fewer steps. The most important thing is you don’t need to prepare custom image (ISO.file) again because Partition Assistant takes care of that. It provides Create Windows PE Bootable Media to follow. No need to worry about potential mistakes you may make. What’s more, burn Partition Assistant into bootable device and boot from bootable device to manage hard drive, you can manage a mass of computers without directly install the software on these machines.
Step1. Install and start AOMEI Partition Assistant. Click Make Bootable Media in the left pane.

Step2. Click USB Boot Device to select your USB drive as the path to store ISO file, and click Proceed.
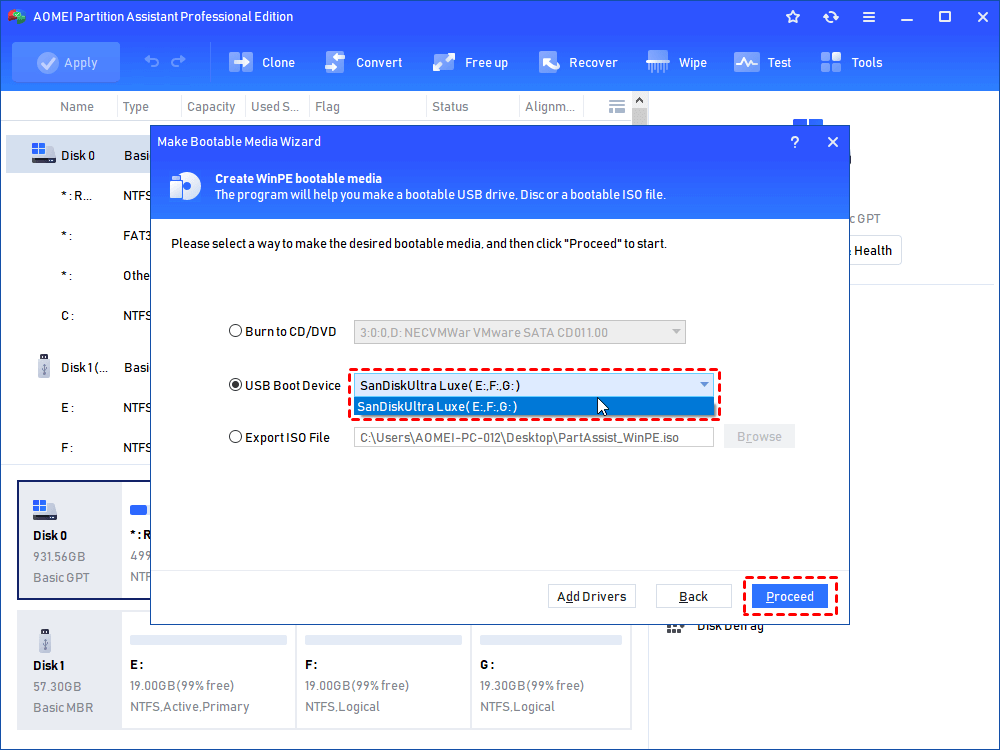
Step3. Click Yes in the pop-up window, and wait for the process completes.
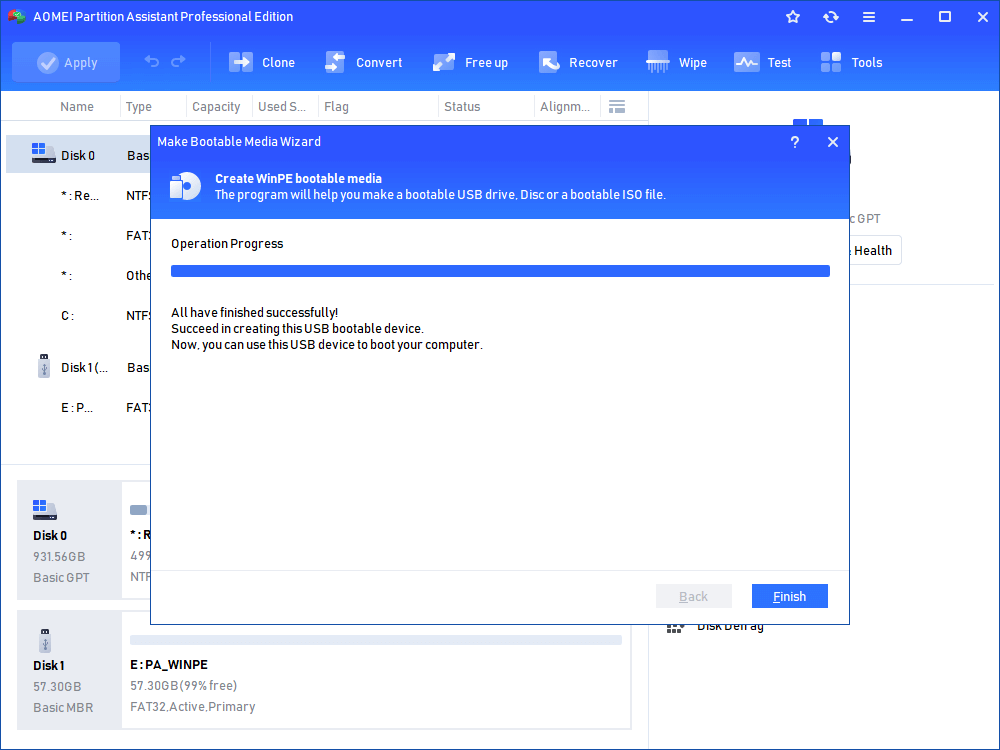
When the process is done, connect the bootable USB drive into the computer with boot issue, change boot order to boot from the bootable USB stick. And then you can fix Windows OS through rebuilding MBR or check whether there are bad sectors on the partition.
All in all, it is easy to use Diskpart create bootable USB drive yet using AOMEI Partition Assistant is much more convenient indeed. After booting from the bootable USB drive created by AOMEI Partition Assistant, you can also use its other functions, like resize partition, copy disk, copy partition, create partition in Windows from C drive, etc. If you are running Windows 8, 8.1, or 10, you can make a Windows To Go USB drive via AOMEI Partition Assistant.


