- Getting Started with Games Explorer
- What is Games Explorer?
- Using Games Explorer
- Creating Games Explorer Data Files
- Step 1. Create GDFs
- Step 2. Create Bitmaps
- Step 3. Embed GDFs and Bitmaps
- Adding a Game to Games Explorer
- Adding a Game to Recent Versions of Windows
- Adding a Game to Windows Vista, Windows 7, or Windows 8 Desktop
- Adding the Game to Windows XP
- Enabling Games Explorer on a Domain
- Windows games explorer download
- Game and developer details
- Parental controls
- Game art and data
- Media Center registration
- Новые проблемы с установкой старых игр на Windows 7 или очередной “чумной поцелуй” от Microsoft
- Дубликаты не найдены
Getting Started with Games Explorer
Windows Games Explorer provides game developers with a secure and attractive way to present their games to users of the Windows platform (starting with Vista). This document details how to add a game to Games Explorer.
What is Games Explorer?
Windows Games Explorer is a custom folder for the Windows shell that provides a rich presence for games. It is accessed on the Start by clicking Games.
Games Explorer provides:
Display of game title, description, version, release date, publisher, and developer information
Display of general or region-specific game box art
Display of minimum and recommended system performance ratings
Display of game content ratings and descriptors
Restriction of game play based on parental control settings
Customizable context menus when a game is right-clicked
Unique settings for multiple installations on the same system
Display of game statistics
Display of game notifications
Display of game providers with optional news feeds
Using Games Explorer
To enable your game to use Games Explorer, you must create the data files that Games Explorer relies on, and add your game to Games Explorer.
- Creating Games Explorer Data Files
- Adding a Game to Games Explorer
- Enabling Games Explorer on a Domain
Creating Games Explorer Data Files
The first part to adding a game to Games Explorer is to create and properly include a set of data that is consumed by Games Explorer. Doing this consists of the following steps.
Step 1. Create GDFs
Games Explorer displays a variety of data about each game. This data is stored in an XML-based document called a game definition file (GDF). For your information to be shown, you must author at least one GDF; if you want your game information to be localized for different world regions, you must author several GDFs, one for each region.
The GDF format is defined by a schema, which requires only a minimal set of information; many of the fields are optional. In creating your GDF, you can choose the level of detail that you want to supply to Games Explorer.
To see examples of minimal and full GDF files, and to understand the schema for GDF files, see The Game-Definition-File (GDF) Schema.
Step 2. Create Bitmaps
Games Explorer displays artwork for every game that provides it. The artwork provided is shown in a small format in the list of games, and in a large format when a game is selected by the user. Create an image file that will represent your game in Games Explorer.
The image should be in PNG format, as this allows for transparency features to give your artwork a clean look in the Games Explorer. Other formats are also available. For a list of formats, see GDF Delivery and Localization
Step 3. Embed GDFs and Bitmaps
The GDF files and bitmap files that are used by Games Explorer cannot be independent files that are simply installed in a game’s directory along with the rest of the game files. They must be embedded as resources, either into an executable file or a DLL.
The Games Explorer header (GameUx.h) contains defined constants that you must use in the resource script to identify your GDF and bitmap file so that Games Explorer can find them. By separating the resource script into sections with #ifdef for multiple languages, you can instruct Games Explorer to search for localized versions of GDF files and bitmaps.
Adding a Game to Games Explorer
The second step to adding a game to Games Explorer is performed by the game’s installer. The installer’s code must identify the location of the game data for Games Explorer. Because Games Explorer is only available on Windows starting with Vista, a different set of steps must be taken for an installation on a computer running Windows XP as opposed to on one running a more recent version of Windows. Games that do not use an installer can perform these tasks at launch time, if necessary.
- Adding a Game to Recent Versions of Windows
- Adding a Game to Windows Vista, Windows 7, or Windows 8 Desktop
- Adding the Game to Windows XP
Adding a Game to Recent Versions of Windows
If a game is installed on a recent version of Windows (Windows 7 or later), see the Windows Games Explorer for Game Developers technical article for instructions on how to add your game.
Adding a Game to Windows Vista, Windows 7, or Windows 8 Desktop
If a game is installed on Windows Vista, Windows 7, or Windows 8 Desktop, it can be added to Game Explorer, and this is the most straightforward scenario.
Step 1. Install Game Files
The first step in adding your game to the Games Explorer is to have your game files installed on the hard drive. It is important that all game files be installed by this step; once the game is added to Games Explorer in step 4, the parental controls of Windows Family Safety might prevent your installation process from accessing the game’s base directory to add or change files.
Step 2. Create IGameExplorer COM Object
The next step is to create the IGameExplorer COM object that you will use to add your game information to Games Explorer.
Step 3. Call IGameExplorer::VerifyAccess
To check whether the game has permission to run on the current user’s account, call VerifyAccess. Note that doing so also adds the game to the «Parental Controls Activity Viewer» log. Additionally, you must call this function prior to logging into the parental controls activity viewer. The VerifyAccess method takes as a parameter the path to your game’s GDF. It checks parental control rating in the GDF against the current user’s parental control settings and determines whether the current user has the necessary permission to run the game.
You might choose to inform the user of their lack of permission to run the game, since if VerifyAccess returns FALSE, the user will not be allowed to run the game.
Step 4. Call IGameExplorer::AddGame
To identify your game to Games Explorer, you must call AddGame with the path to your GDF resource, the path to your base installation, the installation scope, and optionally, an InstanceID (a GUID). You can either provide an InstanceID for the pguidInstanceID parameter using a GUID that you generate, or, by setting pguidInstanceID to GUID_NULL, one will be generated for you. The InstanceID uniquely identifies the instance of your game added to Games Explorer, and you must persist it in the next step.
Note that after calling AddGame, restriction by parental control settings might prevent the game’s installation directory from being accessed by the current user.
Step 5. Make the Game InstanceID Persistent
Store the InstanceID that you retrieved from or passed into AddGame, using either a file or the registry. Alternatively you can look up your InstanceID at runtime using WMI. See the various samples for more information on how to do this.
Step 6. Create Game Task Folders
Tasks are the actions that a user can perform on your game in Games Explorer. Actions such as playing the game, updating the game, or visiting the game’s website are examples of tasks. You must create a directory structure that represents the tasks that you wish to support for your game, even if you only want to support the default task, which runs when the user double-clicks on the game in Games Explorer. See Games Explorer Tasks.
Adding the Game to Windows XP
You can install your game on a computer running Windows XP and store extra information so that your game will show up in Games Explorer if the user upgrades the system to a more recent version of Windows.
Step 1. Install Game Files
As in the scenario for more recent versions of Windows, the first step will be to install all of your game files to the user’s system.
Step 2. Generate Your Own InstanceID
Because the Games Explorer APIs are not available in Windows XP, the system cannot generate an InstanceID for your game. Therefore, you must create your own InstanceID, which you should persist in a file or the registry.
Step 3. Create Game Task Folders
As in the scenario for installation with more recent versions of Windows, you can prepare tasks — commonly-used actions — for your user. Because the user is currently running Windows XP, the tasks will not be available for use immediately, but they will be automatically added to the game in Games Explorer when the user upgrades to a newer version of Windows, such as Windows Vista or Windows 7. See Games Explorer Tasks as well as Supporting an Upgrade from Windows XP.
Step 4. Install Registry Values
So that a more recent version of Windows will add your game automatically upon installation of the operating system, you must create some values in the registry; for more information, see Creating Custom Registry Values.
Enabling Games Explorer on a Domain
To use parental controls on a Windows system joined to a domain, you must change a group policy setting to make parental controls visible:
Navigate to Local Computer Policy | Computer Configuration | Administrative Templates | Windows Components | Parental Controls.
Set «Parental Controls control panel visible on a Domain» to enabled.
Log off and parental controls will be visible.
Windows games explorer download
In order to integrate a game into Games Explorer a game definition file (GDF) is needed. A GDF is an XML file that contains metadata describing the game. Advanced Installer automatically generates this file for you based on the information you provide in the user-friendly graphical editor.
It then encapsulates the GDF within a resource section of a binary file (DLL), along with the game’s thumbnail and icon. The binary file which contains the GDF will be digitally signed by Advanced Installer with the Authenticode certificate you provide, ensuring Games Explorer can trust the rating information.
Game and developer details
The Games Explorer, easily accessible from the Start menu, provides a list of all games installed on the user’s PC. For each game, detailed information is displayed: title, description, version, release date, publisher, and developer information.
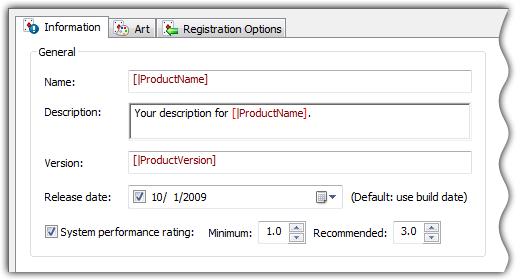
Provide rich information about your game
The minimum and recommended system performance ratings ensure that your users will enjoy the game experience at the level you designed it for them.
Parental controls
Specify game ratings and content description from a multitude of international rating organizations. Define the game genre(s).
Specify game executables for the General Application Restrictions, which allow Administrators to restrict user’s game play through the Parental Control settings.
Game art and data
Provide a game icon and a general or region-specific «thumbnail» game box art image. These will be displayed in Games Explorer.
Offer a better experience for players browsing saved games from Windows Explorer by exposing metadata and thumbnails from your saved games.
Media Center registration
If your game can be run from Windows Media Center, register it with just a few mouse clicks.
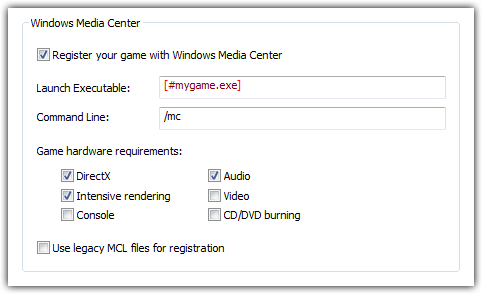
Game configuration for Windows Media Center
Новые проблемы с установкой старых игр на Windows 7 или очередной “чумной поцелуй” от Microsoft
Кратко: Старые игры до 2013 года без удаления службы не запустить.
Я был конкретно поражен, когда не смог установить знаменитую игру 2003 года “No One Lives Forever 2” на свою Windows 7×64 SP1 (!!)
Игра была официальная американская, с лицензионным CD-key, на двух CD-дисках, честно куплена на Амазоне лет 8 назад за $15.
Windows 7×64 SP1 тоже официальная, [MSDN], 4-х ядерный процессор core i5 3,3GHz, память 16GB, видеокарта GeForce GTX 560 Ti, все путем…
Игра тупо НЕ устанавливалась, просто НИЧЕГО не происходит.
Ну ладно… Стал устанавливать вторую игру Contract J.A.C.K., тоже официальная американская лицензия, на 2-х CD … эта игра установилась, но при попытке запуска тоже НИЧЕГО не происходит, полный игнор.
Аналогичная ситуация с игрой Far Cry (официальный DVD от Буки с лицензионным CD-key), игра установилась, но не запускается хоть умри .
При этом, во ВСЕХ случаях, в Диспетчере Задач одно ядро процессора из четырех грузится на 100% процессом rundll32.exe … ну что это за…
До сих пор никаких проблем c установкой и запуском этих игр не было.
Некоторые “тормоза” с установкой и запуском были и раньше, но чтоб такое…
И вдруг, в 2019 году хрен тебе: старые игры на Windows 7 SP1 не устанавливается или не запускаются ВООБЩЕ, хоть тресни.
Виновником «зависания» процесса установки/запуска игры оказался(кто бы сомневался) MicroSoft, а точнее системная программа “Обозреватель Игр”, он же “Game Explorer”, жестко встроенная в Windows 7.
Этот самый “Game Explorer”контролирует установку и запуск 2072 старых игр на вашем компьютере и отправляет информацию об установленной игре на сайт MicroSoft по адресу https://games.metaservices.microsoft.com/games/SGamesWebServ.
Как выяснилось, в 2019 году сервер https://games.metaservices.microsoft.com/ был закрыт и теперь попытка системной программы “Game Explorer” связаться с этим сервером приводит к блокировке или “тормозам” вашего компьютера в процессе установки или запуска игры, если
эта игра входит в список 2072 «контролируемых игр».
Список «контролируемых игр» находится в C: \Windows\System32\GameUXLegacyGDFs.dll
Список ваших установленных игр, которые «тормозит» Обозреватель Игр находится в этой ветке Реестра:
ИМХО, “заплатки” от MicroSoft для отключения “Game Explorer” в Windows 7 мы вряд ли дождемся, поскольку официальная поддержка Windows 7 прекращена, т.е. MicroSoft кнутом и пряником загоняет всех Пользователей в Windows10, где программа Game Explorer [пока(?)] деактивирована и поэтому ТАКИХ проблем нету (зато есть другие).
СПИСОК всех (2072) игр, которые отслеживает “Game Explorer” на Windows 7
Способы отключения “Game Explorer” на Windows 7
1. Отключение “Game Explorer” через Реестр.
Этот Архив также содержит список из 2072 игр, которые контролирует “Game Explorer”
Скачать, открыть Архив, запустить файл BLOCK_GameExplorer.reg и согласиться на внесение изменений в Реестр.
В результате “Game Explorer” будет отправлять информацию о вашей игре на «пустой» адрес 127.0.0.1, но не на сервер https://games.metaservices.microsoft.com/
Теперь нет проблем с установкой и запуском ваших игр !!
ПРИМЕЧАНИЕ: блокировка может «слететь», поэтому правку Реестра файлом BLOCK_GameExplorer.reg надо делать до и после каждой установки очередной игры
Чтобы восстановить стандартный «тормозной» режим работы “Game Explorer” запустите файл UNBLOCK_GameExplorer.reg и согласиться на внесение изменений в Реестр.
2. Отключение “Game Explorer” с помощью программы «Stop Game Explorer»
Программа «Stop Game Explorer» НЕ содержит вирусов, но использует утилиту Trusted Shell(которую очень НЕ любит VirusTotal) и работает с системными файлами, поэтому ваш Антивирус может ругаться, и(или) заблокировать работу этой программы.
Скачать программу Stop Game Explorer ( 2 версии: для 32-х и 64-х разрядных Windows 7)
Краткое описание Программы «Stop Game Explorer»
“Game Explorer” контролирует только те игры, названия которых хранятся в каталоге GameUXLegacyGDFs.dll
Программа «Stop Game Explorer» переименует файлы GameUXLegacyGDFs.dll в папках \ Windows \ System32 и Windows \ SysWOW64 в GameUXLegacyGDFs_OLD.dll с сохранением Владельца, всех Пользователей и Разрешений этих файлов с помощью
утилиты Trusted Shell : выполнение команд от имени системной записи TrustedInstaller.
В результате “Game Explorer” не находит GameUXLegacyGDFs.dll и поэтому не может отследить запуск игры на вашем компьютере.
Программа «Stop Game Explorer» имеет режим восстановления оригинального названия файлов GameUXLegacyGDFs.dll из GameUXLegacyGDFs_OLD.dll с восстановлением прав системной записи TrustedInstaller, после чего “Game Explorer” будет работать в стандартном режиме.
ПРЕДУПРЕЖДЕНИЕ: Права на все системные файла в папке Windows принадлежат системной записи TrustedInstaller. Не пытайтесь самостоятельно присвоить себе права на системные файлы для их переименования или удаления из папке Windows, т.к. Вы не сможете в дальнейшем(при необходимости) восстановить эти файлы с правами системной записи TrustedInstaller!
3. Отключение “Game Explorer” при переименовании запускающего файла игры (работает не для всех игр)
Этот метод основан на том факте, что «Game Explorer» идентифицирует игру по имени файла запуска. Откройте папку с игрой и переименуйте файл запуска(на файл запуска ссылается ярлык Игры на вашем Рабочем Столе), после чего «Game Explorer» не заблокирует вашу игру.
— для игры «Far Cry» переименовать FarCry.exe в FarCry_1.exe
— для игры «Max Payne» переименовать MaxPayne.exe в MaxPayne_1.exe
Затем создайте новый ярлык для переименованного файла и скопируйте этот ярлык на рабочий стол. Используйте новый ярлык для запуска игры.
Теперь ваша игра начнется мгновенно.
4. Если игра «зависает» при установке.
Некоторые игры «зависают» из-за «Game Explorer» еще на этапе установки.
Если не начинается процесс установки игры автоустановщиком(актуально, например, для игры «No One Lives Forever 2»), тогда для установки игры используйте файл Setup.exe, а не AutoRun.exe, а затем, после установки игры, всех патчей и модов, откройте папку с игрой и переименуйте NOLF2.exe в NOLF2_1.exe
Также можно использовать методы (1) или (2).
1-й способ(блокировка через Реестр) дает программе “Game Explorer” возможность отработать весь цикл и блокирует её только на последнем этапе отправки сообщения на сайт MicroSoft, при этом факт установки игры фиксируется.
НЕДОСТАТКИ 1-го способа: Блокировка может «слететь», поэтому правку Реестра надо делать до и после каждой установки очередной игры
2-й способ блокирует программу “Game Explorer” на начальном этапе, поскольку нет каталога с “контролируемыми играми”, при этом факт установки игры не фиксируется.
НЕДОСТАТКИ 2-го способа: ваш Антивирус может заблокировать работу программы «Stop Game Explorer»
3-й способ блокирует программу “Game Explorer” на начальном этапе, поскольку изменено название файла, запускающего игру; при этом факт установки игры не фиксируется.
НЕДОСТАТКИ 3-го и 4-го способов: эти способы надо постоянно применять для каждой игры.
Для Windows 8/10 всех этих проблем не будет – там Обозреватель Игр(Game Explorer) изначально деактивирован.
Дубликаты не найдены
А не проще ли указанный адрес занести в файл hosts?
Служба автономно проверяет игру по списку и если не сообщает на адрес сервера то запуск игры блокируется, тоесть, идёт appcrash
Так подождите, в первом способе у Вас сказано:
«В результате “Game Explorer” будет отправлять информацию о вашей игре на «пустой» адрес 127.0.0.1»
Это я и предложил сделать через соответствующую запись в hosts вместо правки реестра, который, как Вы потом пишете, иногда слетает. Что не так?
Оригинальный пост под авторством Alex002 от 2 июля 2019 года лежит здесь https://www.old-games.ru/forum/threads/novye-problemy-s-usta.
@moderator, очень похоже на некорректное использование [моё].
Четт анек вспомнился из начала 2000х:
Два хацкера(снйчас таких гиками кличут) сидят на лавке, у подъезда, пиво пьют.
-у тебя винда какая?
— ну я там при установке все че можно. 175 метров.
— ну ты лох! У меня 2 мегабайта!
— та я дебагером ее крякнул и все глюки выкинул!
Дебаггером крякнул? Чет я подзавис немного
Наоборот бы. Новые чтоб приложения на windows 7 чтобы ставились. Не хочуть.
Может, кто знает, как поправить. Эту еботу?
Это не критично, но хотелось бы. К примеру — Мой телефон, VOIP приложение, и ещё чего-то не ставится.
Кто-то знает, как заставить их думать, что Windows 7 не так уж и стара? )))
А не пробовал запускать установщик и саму игру в режиме совместимости с ХР SP3 ?
А перед установкой копировать содержимое дисков на хард?
Ты думаешь, пиратки таким образом не глючат?
лол ни одна из названных групп не имеет ни какого отношения к релизам. Они тупо пожимают обычные сценовые iso, от кодекса например, и все. Ни каких патчей и ни каких кряков эти лоботрясы не делают.
Я что, сказал, что они их делают? Их релизы включают в себя эти патчи/кряки.
Примеры? Сотни их. Прям щас вот могу вспомнить два, дальше лень — хотите больше, идите в гугл.
Sacred, например. Официалка от некоторых лицензированных издателей багнутая наглухо. Пройти невозможно. А люди покупали ещё на дисках.
Mass Effect. Лифт на Феросе люди ненавидят страшной силой.
Может, вам напомнить TES III: Morrowind? Где официалы включили в мастхэв-апдейты наработки геймеров? Сотни багов, исправляемые сторонними патчами, которые включаются в пиратский релиз? Про мод-контент, правящий как графическую, так и геймплейную составляющую, не говоря уж о багах, пожалуй, промолчу — не то у людей пукан так рванёт, что до Плутона долетим всей планетой.
Та же фигня с TES IV: Oblivion.
Далее, стоит зайти на zog, и внезапно обнаружится, что там лежат сотни переводов, куда более соответствующих оригиналу, чем официальные локализации от всяких Бук, Акелл и прочей хуйни. И в офрелизах, конечно, никаких переводов от Сержанта нет. ВНЕЗАПНО.
Может, вы мне укажете на ААА-проект, который официально выпускал пользовательский мод под лицензией нахаляву? Вспомним Diablo II и Median XL?
Поймите, что это вам не инди-проекты с открытым исходником или редактором с полной документацией, это проприетарные проекты, которые, во-первых, уже давным-давно неактуальны в плане продаж, поскольку давно и прочно заслужили свою хорошую репутацию, несмотря на объективные минусы вроде багов (Аллоды? Да-да), и правообладатели просто пытаются на почти дохлом коне ещё один урожай собрать.
Bethesda раздаёт нахаляву QII и QIII, СЕРЬЁЗНО, БЛЯДЬ?! Халява доступна 72 часа? Ещё и лаунчер от Беседки запускать? Да ебать, куда проще пойти в эти ваши торренты, скачать те же самые QII и QIII, размером раза в три больше (что вообще несущественно, чай, не 90-е на дворе, три гига даже в глухом селе не так уж тяжело скачать), с самыми легендарными модами типа defrag, не считая остального контента.
Так что да, в жопу официальные и несжатые образы. В погоне за прибылью маленькая кучка разработчиков упускает множество багов и недоработок, которые за них исправляет огромная куча игроков. И уж лучше я скачаю пиратский релиз, пожатый (за счёт чего? Правильно, за счёт нахуй мне не нужной китайской, испанской, французской, итальянской локализации вместе с роликами двух десятков студий, а так же кривых оригинальных алгоритмов сжатия игровых баз), зато без багов, с уже включённым допконтентом вроде DLC или официальных патчей, простыми и понятными инструкциями на случай неполадок, вынесенными в readme (за которыми не нужно будет гоняться по десятку зарубежных форумов), достойной локализацией и, по желанию, модами, расширяющими геймплей или улучшающими графику.
Мне вспоминается UT’99+Halo+Akimbo Arena. Крайне рекомендую попробовать. Туда же можете добавить ещё немножко мутаторов, так, для разнообразия. И если вам не с кем устроить мясо на арене, включите ботов посложнее. Я вам гарантирую — или вам понравится, или вы сольётесь через минут 5-10 максимум. А для сравнения включите тот же UT’99 без модов и мутаторов.
Вот тогда и поговорим о том, что же всё-таки лучше — платить деньги за недоработанное официальное старое говно, или не платить деньги за то, что давно лежит в открытом доступе с куда большим функционалом и работоспособностью, при том, что оба варианта суть одна игра.


