- Windows games explorer install
- Game and developer details
- Parental controls
- Game art and data
- Media Center registration
- games explorer removed in latest windows 10
- Replies (5)
- Getting Started with Games Explorer
- What is Games Explorer?
- Using Games Explorer
- Creating Games Explorer Data Files
- Step 1. Create GDFs
- Step 2. Create Bitmaps
- Step 3. Embed GDFs and Bitmaps
- Adding a Game to Games Explorer
- Adding a Game to Recent Versions of Windows
- Adding a Game to Windows Vista, Windows 7, or Windows 8 Desktop
- Adding the Game to Windows XP
- Enabling Games Explorer on a Domain
- Windows Games Explorer for Game Developers
- Prerequisites
- Integrating with an Installer
- Integration Process
- Games Explorer Tasks
- Integrating into InstallScript
- Integrating into an MSI Package
Windows games explorer install
In order to integrate a game into Games Explorer a game definition file (GDF) is needed. A GDF is an XML file that contains metadata describing the game. Advanced Installer automatically generates this file for you based on the information you provide in the user-friendly graphical editor.
It then encapsulates the GDF within a resource section of a binary file (DLL), along with the game’s thumbnail and icon. The binary file which contains the GDF will be digitally signed by Advanced Installer with the Authenticode certificate you provide, ensuring Games Explorer can trust the rating information.
Game and developer details
The Games Explorer, easily accessible from the Start menu, provides a list of all games installed on the user’s PC. For each game, detailed information is displayed: title, description, version, release date, publisher, and developer information.
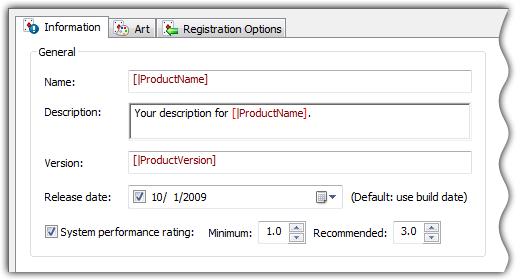
Provide rich information about your game
The minimum and recommended system performance ratings ensure that your users will enjoy the game experience at the level you designed it for them.
Parental controls
Specify game ratings and content description from a multitude of international rating organizations. Define the game genre(s).
Specify game executables for the General Application Restrictions, which allow Administrators to restrict user’s game play through the Parental Control settings.
Game art and data
Provide a game icon and a general or region-specific «thumbnail» game box art image. These will be displayed in Games Explorer.
Offer a better experience for players browsing saved games from Windows Explorer by exposing metadata and thumbnails from your saved games.
Media Center registration
If your game can be run from Windows Media Center, register it with just a few mouse clicks.
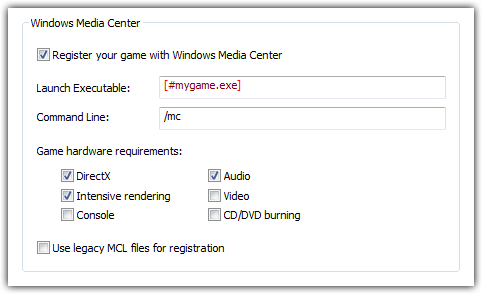
Game configuration for Windows Media Center
games explorer removed in latest windows 10
Version 1803 OS build 17111.1 just was installed on my system
The games explorer folder disappeared.
The usual fix — run shell:games now says that the program is not found or does not exist
How do I restore this useful thing.
BTW — under the Games folder in the start menu is games explorer, but it just points to the desktop
Replies (5)
I’m sorry to say but unfortunately, Microsoft removed it without any opportunity to restore it: https://winaero.com/blog/games-folder-windows-1.
6 people found this reply helpful
Was this reply helpful?
Sorry this didn’t help.
Great! Thanks for your feedback.
How satisfied are you with this reply?
Thanks for your feedback, it helps us improve the site.
How satisfied are you with this reply?
Thanks for your feedback.
Here;s a hack to approximate the games explorer:
1. Find the games folder in your startup menu:
(or wherever your ProgramData lives)
2. Go up 1 level to C:\ProgramData\Microsoft\Windows\Start Menu\Programs
Right click Games, make a shortcut on the desktop
3. If you want the old Games Explorer icon, you’ll need to find a copy of gameux.dll from an earlier version (it’s in windows\system32), put it in some convenient place, and then right click on the Games shortcut you just created, use change icon, point to wherever you put gameux.dll and pick the old icon.
This won’t get you the windows performance index, nor does it look exactly like the old Games Explorer, but it’s close and usable, especially if you change the view to icons or large icons
17 people found this reply helpful
Was this reply helpful?
Sorry this didn’t help.
Great! Thanks for your feedback.
How satisfied are you with this reply?
Thanks for your feedback, it helps us improve the site.
Getting Started with Games Explorer
Windows Games Explorer provides game developers with a secure and attractive way to present their games to users of the Windows platform (starting with Vista). This document details how to add a game to Games Explorer.
What is Games Explorer?
Windows Games Explorer is a custom folder for the Windows shell that provides a rich presence for games. It is accessed on the Start by clicking Games.
Games Explorer provides:
Display of game title, description, version, release date, publisher, and developer information
Display of general or region-specific game box art
Display of minimum and recommended system performance ratings
Display of game content ratings and descriptors
Restriction of game play based on parental control settings
Customizable context menus when a game is right-clicked
Unique settings for multiple installations on the same system
Display of game statistics
Display of game notifications
Display of game providers with optional news feeds
Using Games Explorer
To enable your game to use Games Explorer, you must create the data files that Games Explorer relies on, and add your game to Games Explorer.
- Creating Games Explorer Data Files
- Adding a Game to Games Explorer
- Enabling Games Explorer on a Domain
Creating Games Explorer Data Files
The first part to adding a game to Games Explorer is to create and properly include a set of data that is consumed by Games Explorer. Doing this consists of the following steps.
Step 1. Create GDFs
Games Explorer displays a variety of data about each game. This data is stored in an XML-based document called a game definition file (GDF). For your information to be shown, you must author at least one GDF; if you want your game information to be localized for different world regions, you must author several GDFs, one for each region.
The GDF format is defined by a schema, which requires only a minimal set of information; many of the fields are optional. In creating your GDF, you can choose the level of detail that you want to supply to Games Explorer.
To see examples of minimal and full GDF files, and to understand the schema for GDF files, see The Game-Definition-File (GDF) Schema.
Step 2. Create Bitmaps
Games Explorer displays artwork for every game that provides it. The artwork provided is shown in a small format in the list of games, and in a large format when a game is selected by the user. Create an image file that will represent your game in Games Explorer.
The image should be in PNG format, as this allows for transparency features to give your artwork a clean look in the Games Explorer. Other formats are also available. For a list of formats, see GDF Delivery and Localization
Step 3. Embed GDFs and Bitmaps
The GDF files and bitmap files that are used by Games Explorer cannot be independent files that are simply installed in a game’s directory along with the rest of the game files. They must be embedded as resources, either into an executable file or a DLL.
The Games Explorer header (GameUx.h) contains defined constants that you must use in the resource script to identify your GDF and bitmap file so that Games Explorer can find them. By separating the resource script into sections with #ifdef for multiple languages, you can instruct Games Explorer to search for localized versions of GDF files and bitmaps.
Adding a Game to Games Explorer
The second step to adding a game to Games Explorer is performed by the game’s installer. The installer’s code must identify the location of the game data for Games Explorer. Because Games Explorer is only available on Windows starting with Vista, a different set of steps must be taken for an installation on a computer running Windows XP as opposed to on one running a more recent version of Windows. Games that do not use an installer can perform these tasks at launch time, if necessary.
- Adding a Game to Recent Versions of Windows
- Adding a Game to Windows Vista, Windows 7, or Windows 8 Desktop
- Adding the Game to Windows XP
Adding a Game to Recent Versions of Windows
If a game is installed on a recent version of Windows (Windows 7 or later), see the Windows Games Explorer for Game Developers technical article for instructions on how to add your game.
Adding a Game to Windows Vista, Windows 7, or Windows 8 Desktop
If a game is installed on Windows Vista, Windows 7, or Windows 8 Desktop, it can be added to Game Explorer, and this is the most straightforward scenario.
Step 1. Install Game Files
The first step in adding your game to the Games Explorer is to have your game files installed on the hard drive. It is important that all game files be installed by this step; once the game is added to Games Explorer in step 4, the parental controls of Windows Family Safety might prevent your installation process from accessing the game’s base directory to add or change files.
Step 2. Create IGameExplorer COM Object
The next step is to create the IGameExplorer COM object that you will use to add your game information to Games Explorer.
Step 3. Call IGameExplorer::VerifyAccess
To check whether the game has permission to run on the current user’s account, call VerifyAccess. Note that doing so also adds the game to the «Parental Controls Activity Viewer» log. Additionally, you must call this function prior to logging into the parental controls activity viewer. The VerifyAccess method takes as a parameter the path to your game’s GDF. It checks parental control rating in the GDF against the current user’s parental control settings and determines whether the current user has the necessary permission to run the game.
You might choose to inform the user of their lack of permission to run the game, since if VerifyAccess returns FALSE, the user will not be allowed to run the game.
Step 4. Call IGameExplorer::AddGame
To identify your game to Games Explorer, you must call AddGame with the path to your GDF resource, the path to your base installation, the installation scope, and optionally, an InstanceID (a GUID). You can either provide an InstanceID for the pguidInstanceID parameter using a GUID that you generate, or, by setting pguidInstanceID to GUID_NULL, one will be generated for you. The InstanceID uniquely identifies the instance of your game added to Games Explorer, and you must persist it in the next step.
Note that after calling AddGame, restriction by parental control settings might prevent the game’s installation directory from being accessed by the current user.
Step 5. Make the Game InstanceID Persistent
Store the InstanceID that you retrieved from or passed into AddGame, using either a file or the registry. Alternatively you can look up your InstanceID at runtime using WMI. See the various samples for more information on how to do this.
Step 6. Create Game Task Folders
Tasks are the actions that a user can perform on your game in Games Explorer. Actions such as playing the game, updating the game, or visiting the game’s website are examples of tasks. You must create a directory structure that represents the tasks that you wish to support for your game, even if you only want to support the default task, which runs when the user double-clicks on the game in Games Explorer. See Games Explorer Tasks.
Adding the Game to Windows XP
You can install your game on a computer running Windows XP and store extra information so that your game will show up in Games Explorer if the user upgrades the system to a more recent version of Windows.
Step 1. Install Game Files
As in the scenario for more recent versions of Windows, the first step will be to install all of your game files to the user’s system.
Step 2. Generate Your Own InstanceID
Because the Games Explorer APIs are not available in Windows XP, the system cannot generate an InstanceID for your game. Therefore, you must create your own InstanceID, which you should persist in a file or the registry.
Step 3. Create Game Task Folders
As in the scenario for installation with more recent versions of Windows, you can prepare tasks — commonly-used actions — for your user. Because the user is currently running Windows XP, the tasks will not be available for use immediately, but they will be automatically added to the game in Games Explorer when the user upgrades to a newer version of Windows, such as Windows Vista or Windows 7. See Games Explorer Tasks as well as Supporting an Upgrade from Windows XP.
Step 4. Install Registry Values
So that a more recent version of Windows will add your game automatically upon installation of the operating system, you must create some values in the registry; for more information, see Creating Custom Registry Values.
Enabling Games Explorer on a Domain
To use parental controls on a Windows system joined to a domain, you must change a group policy setting to make parental controls visible:
Navigate to Local Computer Policy | Computer Configuration | Administrative Templates | Windows Components | Parental Controls.
Set «Parental Controls control panel visible on a Domain» to enabled.
Log off and parental controls will be visible.
Windows Games Explorer for Game Developers
WindowsВ Vista improves the user experience of gaming on Windows by including Games Explorer. Games Explorer is exposed in the Windows Vista Start Menu as the Games folder and provides a central location for accessing games.
Starting with the March 2009 release of the DirectX SDK, a new game definition file (GDF) schema is used to support features in Windows 7, Game Provider and RSS feed, and IGameExplorer2. IGameExplorer2 is a new interface on Windows 7 that simplifies the process of integrating a game with Games Explorer.
This article outlines the process of registering a game with Games Explorer and parental controls on Windows Vista and Windows 7 by using the new GDF schema.
Prerequisites
Before you can integrate a game into Games Explorer, you must create a game definition file (GDF). A GDF is an XML file that contains metadata that describes the game. In the March 2009 release of the DirectX SDK, a section for game provider, RSS feed, and game task has been added to the GDF schema. To use the instructions in this article, you must use this new GDF format to create your GDF file.
Microsoft provides a tool for authoring GDFs in the DirectX SDK, Game Definition File Editor, to make this creation process easier. This tool also helps you create localized versions of a GDF.
Once a GDF has been authored and localized, it must be encapsulated within a resource section of a binary file (either an executable or DLL), along with the game’s thumbnail and icon. The GDF contains all of the metadata associated with the game, including the game’s rating. Windows Parental Controls use the game’s rating to allow parents to control access to the game. The binary file which contains the GDF must be digitally signed with a valid Authenticode certificate; otherwise, Games Explorer and the parental control system ignores the game’s rating, because the rating information cannot be trusted without certification. For more details about signing code with Authenticode, see Authenticode Signing for Game Developers.
Integrating with an Installer
To simplify Games Explorer integration, the GameUXInstallHelper sample provides a common API that can be called on Windows XP, Windows Vista, and Windows 7. It is designed to work with scripts for InstallShield and Wise Installation System, as well as MSI custom actions and custom installation tools. Detection of the operating system is handled inside this sample DLL, so the caller does not need to worry whether the client is running Windows XP, Windows Vista, or Windows 7.
The functions exported by this DLL are the following:
GameExplorerInstallW
Registers a game with Games Explorer, given a path to the GDF binary, a full path to the folder where the game is installed, and the installation scope.
GameExplorerInstallA
Registers a game with Games Explorer; ANSI version of GameExplorerInstallW.
GameExplorerUninstallW
Removes a game from registration with Games Explorer, given a path to the GDF binary.
GameExplorerUninstallA
Removes a game from registration with Games Explorer; ANSI version of GameExplorerUninstallW.
GameExplorerSetMSIProperties
Configures the CustomActionData properties for the actions of an MSI deferred custom installation. Usage of this function is described in detail later in this article.
GameExplorerInstallUsingMSI
Adds a game to Games Explorer; for use during an MSI custom action installation.
GameExplorerUninstallUsingMSI
Remove a game from Games Explorer; for use during an MSI custom action installation.
These functions are further explained in the GameUXInstallHelper.h header.
Integration Process
Once the GDF and related files have been added to a binary resource, it is then possible to integrate the game with Games Explorer. Using GameUXInstallHelper will simplify the integration process. To register the game with Games Explorer, call the GameExplorerInstall with a path to the GDF binary, a full path to the folder where the game is installed, and the installation scope. To remove the game’s registration, call GameExplorerUninstall with a path to the GDF binary.
Note that the removal process only removes one unique installation. If a game has been installed multiple times, this process must be repeated for each unique installation.
Games Explorer Tasks
Games Explorer tasks will appear in the context menu of an item in Games Explorer. Tasks are divided into play tasks and support tasks. Play tasks launch a game into a particular mode, while support tasks serve any other purpose, including linking to web sites.
In Windows Vista, tasks are simply shortcuts that are located in specific folders. Play tasks and support tasks are stored in folders with the corresponding names PlayTasks and SupportTasks. GameUXInstallHelper can read the game’s task information from the GDF binary file and create all of the shortcuts automatically.
In Windows 7, the shortcuts to the tasks are not needed, because Games Explorer obtains all of the task information directly from the GDF binary file.
Integrating into InstallScript
Calling Games Explorer APIs from InstallShield’s InstallScript is made easy by using the GameUXInstallHelper sample. The steps required to integrate with InstallShield are as follows:
Open an InstallScript project in the InstallShield editor.
Add GameUXInstallHelper.dll to the project to be installed to the target directory.
To add GameUXInstallHelper.dll to an InstallScript project:
On the Installation Designer tab, click Application Data in the navigation pane on the left.
Click Files and Folders and browse in Source computer’s folders to locate GameUXInstallerHelper.dll in Source computer’s files.
The default location for GameUXInstallerHelper.dll is DirectX SDK root\Samples\C++\Misc\Bin\x86.
Under Destination computer’s folders, click Application Target Folder.
Drag GameUXInstallerHelper.dll from Source computer’s files to Destination computer’s files.
In the InstallScript explorer, click the InstallScript file (usually setup.rul) that calls the DLL function.
Paste the following InstallScript into the file:
Integrating into an MSI Package
The following is a high-level description of the steps required to call the Games Explorer APIs using MSI custom actions:
- Add a property to the MSI Property table called «RelativePathToGDF» containing the relative path to the GDF binary.
- After the CostFinalize action, call the GameUXInstallHelper DLL function SetMSIGameExplorerProperties in an immediate custom action to set the appropriate MSI properties for the other custom actions.
- Upon installation, trigger a deferred custom action after the InstallFiles action that calls the GameUXInstallHelper DLL function AddToGameExplorerUsingMSI. If the installation is for all users, then the custom action must set the flag msidbCustomActionTypeNoImpersonate; otherwise, it must not set this flag. Therefore, two nearly identical custom actions are defined: GameUXAddAsAdmin and GameUXAddAsCurUser.
- Upon removal of the installation, trigger a deferred custom action before the RemoveFiles action that calls the GameUXInstallHelper DLL function RemoveFromGameExplorerUsingMSI. If the installation was for all users, then the custom action must set the flag msidbCustomActionTypeNoImpersonate; otherwise, it must not set this flag. Therefore, two nearly identical custom actions are defined: GameUXRemoveAsAdmin and GameUXRemoveAsCurUser.
- Define rollback custom actions to handle the case where the user cancels installing or removing after one of the these custom actions has already happened. This results in an additional 4 custom actions: GameUXRollBackAddAsAdmin, GameUXRollBackAddAsCurUser, GameUXRollBackRemoveAsAdmin, and GameUXRollBackRemoveAsCurUser.
This procedure is described in detail in the following instructions, which describe a process that can be done using an MSI editor, such as the Orca editor found in the Platform SDK. Some MSI editors have wizards which simplify some of these configuration steps.
To configure an MSI package for integration with Games Explorer
Open the MSI package in Orca.
Add the row shown in the following table to the Binary table in the MSI package.
| Name | Data |
|---|---|
| GAMEUX | file path to the DLL\GameUXInstallHelper.dll |
This file will be embedded in the MSI package, so you must do this step every time you recompile GameUXInstallHelper.dll.
Add the rows shown in the following table to the CustomAction table in the MSI package.
| Action | Type | Source | Target |
|---|---|---|---|
| GameUXSetMSIProperties | msidbCustomActionTypeDll + msidbCustomActionTypeBinaryData + msidbCustomActionTypeContinue = 65 | GAMEUX | SetMSIGameExplorerProperties |
| GameUXAddAsAdmin | msidbCustomActionTypeDll + msidbCustomActionTypeBinaryData + msidbCustomActionTypeContinue + msidbCustomActionTypeInScript + msidbCustomActionTypeNoImpersonate = 3137 | GAMEUX | AddToGameExplorerUsingMSI |
| GameUXAddAsCurUser | msidbCustomActionTypeDll + msidbCustomActionTypeBinaryData + msidbCustomActionTypeContinue + msidbCustomActionTypeInScript = 1089 | GAMEUX | AddToGameExplorerUsingMSI |
| GameUXRollBackAddAsAdmin | msidbCustomActionTypeDll + msidbCustomActionTypeBinaryData + msidbCustomActionTypeContinue + msidbCustomActionTypeRollback + msidbCustomActionTypeInScript + msidbCustomActionTypeNoImpersonate = 3393 | GAMEUX | RemoveFromGameExplorerUsingMSI |
| GameUXRollBackAddAsCurUser | msidbCustomActionTypeDll + msidbCustomActionTypeBinaryData + msidbCustomActionTypeContinue + msidbCustomActionTypeRollback + msidbCustomActionTypeInScript = 1345 | GAMEUX | RemoveFromGameExplorerUsingMSI |
| GameUXRemoveAsAdmin | msidbCustomActionTypeDll + msidbCustomActionTypeBinaryData + msidbCustomActionTypeContinue + msidbCustomActionTypeInScript + msidbCustomActionTypeNoImpersonate = 3137 | GAMEUX | RemoveFromGameExplorerUsingMSI |
| GameUXRemoveAsCurUser | msidbCustomActionTypeDll + msidbCustomActionTypeBinaryData + msidbCustomActionTypeContinue + msidbCustomActionTypeInScript = 1089 | GAMEUX | RemoveFromGameExplorerUsingMSI |
| GameUXRollBackRemoveAsAdmin | msidbCustomActionTypeDll + msidbCustomActionTypeBinaryData + msidbCustomActionTypeContinue + msidbCustomActionTypeRollback + msidbCustomActionTypeInScript + msidbCustomActionTypeNoImpersonate = 3393 | GAMEUX | AddToGameExplorerUsingMSI |
| GameUXRollBackRemoveAsCurUser | msidbCustomActionTypeDll + msidbCustomActionTypeBinaryData + msidbCustomActionTypeContinue + msidbCustomActionTypeRollback + msidbCustomActionTypeInScript = 1345 | GAMEUX | AddToGameExplorerUsingMSI |
Add the values shown for Action, Condition, and Sequence in the following table to the InstallExecuteSequence table in the MSI package.
| Action | Condition | Sequence | Notes |
|---|---|---|---|
| GameUXSetMSIProperties | 1015 | The sequence number places the action soon after CostFinalize. | |
| GameUXAddAsAdmin | NOT Installed AND ALLUSERS | 4003 | This custom action will only happen during a fresh installation for all users. The sequence number places the action after InstallFiles and after the rollbacks. |
| GameUXAddAsCurUser | NOT Installed AND NOT ALLUSERS | 4004 | This custom action will only happen during a fresh installation for the current user only. The sequence number places the action after InstallFiles and after the rollbacks. |
| GameUXRollBackAddAsAdmin | NOT Installed AND ALLUSERS | 4001 | This custom action will only happen when a fresh installation for all users is cancelled. The sequence number places the action after InstallFiles and before the Add custom action. |
| GameUXRollBackAddAsCurUser | NOT Installed AND NOT ALLUSERS | 4002 | This custom action will only happen when a fresh installation for the current user only is cancelled. The sequence number places the action after InstallFiles and before the Add custom action. |
| GameUXRemoveAsAdmin | REMOVE =»ALL» AND ALLUSERS | 3452 | This custom action will only happen during removal for all users. The sequence number places the action directly before RemoveFiles and after the rollbacks. |
| GameUXRemoveAsCurUser | REMOVE =»ALL» AND NOT ALLUSERS | 3453 | This custom action will only happen during removal for the current user. The sequence number places the action directly before RemoveFiles and after the rollbacks. |
| GameUXRollBackRemoveAsAdmin | REMOVE =»ALL» AND ALLUSERS | 3450 | This custom action will only happen when removal for all users is cancelled. The sequence number places the action directly before RemoveFiles and before the Remove custom action. |
| GameUXRollBackRemoveAsCurUser | REMOVE =»ALL» AND NOT ALLUSERS | 3451 | This custom action will only happen when removal for the current user is cancelled. The sequence number places the action directly before RemoveFiles and before the Remove custom action. |
Add the row shown in the following table to the Property table in the MSI package.


