- Как сгенерировать ключ SSH в Windows 10
- Проверка OpenSSH в Windows 10
- Сгенерировать SHH в Windows 10
- Manually generating your SSH key in Windows
- PuTTY
- About PuTTY
- Generating an SSH key
- Importing your SSH key
- Git Bash
- Launching GitBash
- Generating SSH keys
- Uploading an SSH key
- Generating a new SSH key and adding it to the ssh-agent
- In this article
- Generating a new SSH key
- Adding your SSH key to the ssh-agent
- Как создать ключ для авторизации по SSH и добавить его на сервер?
- Создание SSH-ключей в Linux на примере CentOS
- Создание SSH-ключей на Windows с PuTTYgen
- Отключение аутентификации по паролю
Как сгенерировать ключ SSH в Windows 10
Генерация ключей SSH в среде Windows раньше была сложным процессом, требующим установки сторонних инструментов. После обновления Windows 10 апреля 2018 года, Windows поставляется с предустановленным клиентом OpenSSH, что означает, что вы можете использовать ssh-keygen для генерации ключей SSH. Давайте разберем, как сгенерировать SHH ключ в Windows 10.
Проверка OpenSSH в Windows 10
Нужно убедиться, что OpenSSH установлен на вашем компьютере, если вы обновили более раннюю версию Windows 10, вам может потребоваться включить ее вручную. Для этого:
- Откройте параметры «Параметры» > «Приложения«. Затем справа нажмите на ссылку «Дополнительные возможности«.
- Если вы не видите «Клиент OpenSSH» в появившемся списке, нажмите кнопку «Добавить компонент» и установите его из списка.

Сгенерировать SHH в Windows 10
Откройте командную строку и введите ssh-keygen
- Вам будет предложено подтвердить место сохранения (можете изменить путь). Нажмите Enetr и место будет по умолчанию.
- Далее вам будет предложено задать пароль (ключевую фразу) к ключу, он не отображается при вводе, но вводится. Можно без пароля, нажать сразу Enter.
- Подтверждение выше заданного пароля.
Manually generating your SSH key in Windows
On Windows, you can create SSH keys in many ways. This document explains how to use two SSH applications, PuTTY and Git Bash.
Joyent recommends RSA keys because the node-manta CLI programs work with RSA keys both locally and with the ssh agent. DSA keys will work only if the private key is on the same system as the CLI, and not password-protected.
PuTTY
PuTTY is an SSH client for Windows. You can use PuTTY to generate SSH keys. PuTTY is a free open-source terminal emulator that functions much like the Terminal application in macOS in a Windows environment. This section shows you how to manually generate and upload an SSH key when working with PuTTY in the Windows environment.
About PuTTY
PuTTY is an SSH client for Windows that you will use to generate your SSH keys. You can download PuTTY from www.chiark.greenend.org.uk.
When you install the PuTTY client, you also install the PuTTYgen utility. PuTTYgen is what you will use to generate your SSH key for a Windows VM.
| This page gives you basic information about using PuTTY and PuTTYgen to log in to your provisioned machine. For more information on PuTTY, see the PuTTY documentation |
|---|
Generating an SSH key
To generate an SSH key with PuTTYgen, follow these steps:
- Open the PuTTYgen program.
- For Type of key to generate, select SSH-2 RSA.
- Click the Generate button.
- Move your mouse in the area below the progress bar. When the progress bar is full, PuTTYgen generates your key pair.
- Type a passphrase in the Key passphrase field. Type the same passphrase in the Confirm passphrase field. You can use a key without a passphrase, but this is not recommended.
- Click the Save private key button to save the private key. You must save the private key. You will need it to connect to your machine.
- Right-click in the text field labeled Public key for pasting into OpenSSH authorized_keys file and choose Select All.
- Right-click again in the same text field and choose Copy.

Importing your SSH key
Now you must import the copied SSH key to the portal.
- After you copy the SSH key to the clipboard, return to your account page.
- Choose to Import Public Key and paste your SSH key into the Public Key field.
- In the Key Name field, provide a name for the key. Note: although providing a key name is optional, it is a best practice for ease of managing multiple SSH keys.
- Add the key. It will now appear in your table of keys under SSH.

PuTTY and OpenSSH use different formats of public SSH keys. If the text you pasted in the SSH Key starts with —— BEGIN SSH2 PUBLIC KEY , it is in the wrong format. Be sure to follow the instructions carefully. Your key should start with ssh-rsa AAAA… .
Once you upload your SSH key to the portal, you can connect to your virtual machine from Windows through a PuTTY session.
Git Bash
The Git installation package comes with SSH. Using Git Bash, which is the Git command line tool, you can generate SSH key pairs. Git Bash has an SSH client that enables you to connect to and interact with Triton containers on Windows.
- (Download and initiate the Git installer](https://git-scm.com/download/win).
- When prompted, accept the default components by clicking Next.
- Choose the default text editor. If you have Notepad++ installed, select Notepad++ and click Next.
- Select to Use Git from the Windows Command Prompt and click Next.
- Select to Use OpenSSL library and click Next.
- Select to Checkout Windows-style, commit Unix-style line endings and click Next.
- Select to Use MinTTY (The default terminal of mYSYS2) and click Next.
- Accept the default extra option configuration by clicking Install.
When the installation completes, you may need to restart Windows.
Launching GitBash
To open Git Bash, we recommend launching the application from the Windows command prompt:
- In Windows, press Start+R to launch the Run dialog.
- Type C:\Program Files\Git\bin\bash.exe and press Enter.
Generating SSH keys
First, create the SSH directory and then generate the SSH key pair.
One assumption is that the Windows profile you are using is set up with administrative privileges. Given this, you will be creating the SSH directory at the root of your profile, for example:
- At the Git Bash command line, change into your root directory and type.
- To create the keys, type:
Change into the .ssh directory C:\Users\joetest\.ssh
- When prompted for a password, type apassword to complete the process. When finished, the output looks similar to:
Uploading an SSH key
To upload the public SSH key to your Triton account:
- Open Triton Service portal, select Account to open the Account Summary page.
- From the SSH section, select Import Public Key.
- Enter a Key Name. Although naming a key is optional, labels are a best practice for managing multiple SSH keys.
- Add your public SSH key.
When Triton finishes the adding or uploading process, the public SSH key appears in the list of SSH keys.
Generating a new SSH key and adding it to the ssh-agent
After you’ve checked for existing SSH keys, you can generate a new SSH key to use for authentication, then add it to the ssh-agent.
In this article
If you don’t already have an SSH key, you must generate a new SSH key. If you’re unsure whether you already have an SSH key, check for existing keys.
If you don’t want to reenter your passphrase every time you use your SSH key, you can add your key to the SSH agent, which manages your SSH keys and remembers your passphrase.
Generating a new SSH key
Open Terminal Terminal Git Bash .
Paste the text below, substituting in your GitHub email address.
Note: If you are using a legacy system that doesn’t support the Ed25519 algorithm, use:
When you’re prompted to «Enter a file in which to save the key,» press Enter. This accepts the default file location.
At the prompt, type a secure passphrase. For more information, see «Working with SSH key passphrases».
Adding your SSH key to the ssh-agent
Before adding a new SSH key to the ssh-agent to manage your keys, you should have checked for existing SSH keys and generated a new SSH key. When adding your SSH key to the agent, use the default macOS ssh-add command, and not an application installed by macports, homebrew, or some other external source.
Start the ssh-agent in the background.
If you’re using macOS Sierra 10.12.2 or later, you will need to modify your
/.ssh/config file to automatically load keys into the ssh-agent and store passphrases in your keychain.
First, check to see if your
/.ssh/config file exists in the default location.
If the file doesn’t exist, create the file.
/.ssh/config file, then modify the file, replacing
/.ssh/id_ed25519 if you are not using the default location and name for your id_ed25519 key.
Note: If you chose not to add a passphrase to your key, you should omit the UseKeychain line.
Add your SSH private key to the ssh-agent and store your passphrase in the keychain. If you created your key with a different name, or if you are adding an existing key that has a different name, replace id_ed25519 in the command with the name of your private key file.
Note: The -K option is Apple’s standard version of ssh-add , which stores the passphrase in your keychain for you when you add an ssh key to the ssh-agent. If you chose not to add a passphrase to your key, run the command without the -K option.
If you don’t have Apple’s standard version installed, you may receive an error. For more information on resolving this error, see «Error: ssh-add: illegal option — K.»
If you have GitHub Desktop installed, you can use it to clone repositories and not deal with SSH keys.
Ensure the ssh-agent is running. You can use the «Auto-launching the ssh-agent» instructions in «Working with SSH key passphrases», or start it manually:
Add your SSH private key to the ssh-agent. If you created your key with a different name, or if you are adding an existing key that has a different name, replace id_ed25519 in the command with the name of your private key file.
Start the ssh-agent in the background.
Add your SSH private key to the ssh-agent. If you created your key with a different name, or if you are adding an existing key that has a different name, replace id_ed25519 in the command with the name of your private key file.
Как создать ключ для авторизации по SSH и добавить его на сервер?
SSH-ключи используются для идентификации клиента при подключении к серверу по SSH-протоколу . Используйте этот способ вместо аутентификации по паролю.
SSH-ключи представляют собой пару — закрытый и открытый ключ. Закрытый должен храниться в закрытом доступе у клиента, открытый отправляется на сервер и размещается в файле authorized_keys.
Создание SSH-ключей в Linux на примере CentOS
На клиентской стороне должен быть установлен пакет ssh (openssh). На серверах FirstVDS с шаблонами по умолчанию необходимое ПО уже установлено.
На клиентском компьютере в командной строке выполните команду генерации ключей:

Введите путь файла, в который будут помещены ключи. Каталог по умолчанию указан в скобках, в примере /домашний_каталог/.ssh/id_rsa . Если хотите оставить расположение по умолчанию, нажмите Enter .
Пароль (passphrase) используется для ограничения доступа к закрытому ключу. Пароль усложнит использование ключа третьими лицами в случае утраты. Если не хотите использовать секретную фразу, нажмите Enter без заполнения строки.
Успешно сгенерировав пару ключей, вы увидите уведомление:
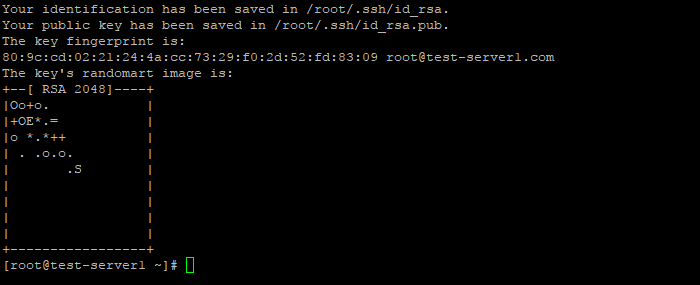
Открытый ключ хранится в файле /домашний_каталог/.ssh/id_rsa.pub , закрытый — /домашний_каталог/.ssh/id_rsa .
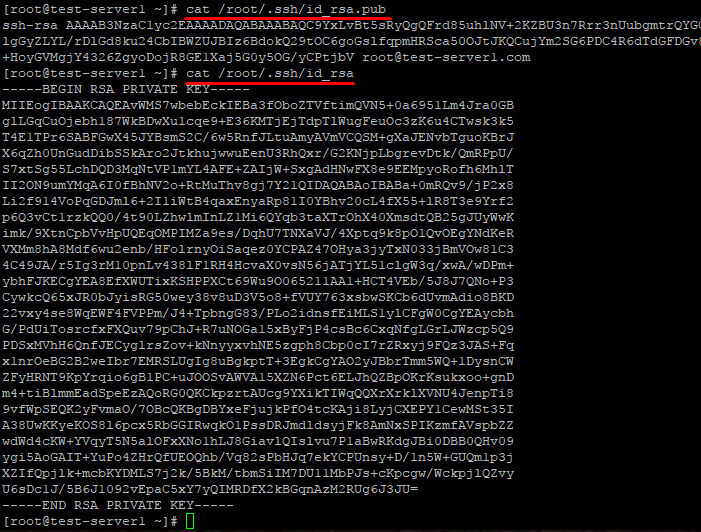
Скопируйте открытый ключ на сервер в файл /домашний_каталог/.ssh/authorized_keys . Одной строкой:
Или откройте этот файл на сервере редактором vi и вставьте строку с открытым ключом после ssh-rsa .

Ещё один способ скопировать ключ в authorized_keys — команда echo , которая помещает строку в конец файла.

Теперь можно отключить на сервере аутентификацию по паролю и использовать только SSH-ключи.
Создание SSH-ключей на Windows с PuTTYgen
Если вы используете ОС Windows, то подключиться по SSH к вашему (Linux) серверу можно через PuTTY или OpenSSH . Генерация ключей в этом случае выполняется также при помощи этих программ. В примере мы используем клиент PuTTY.
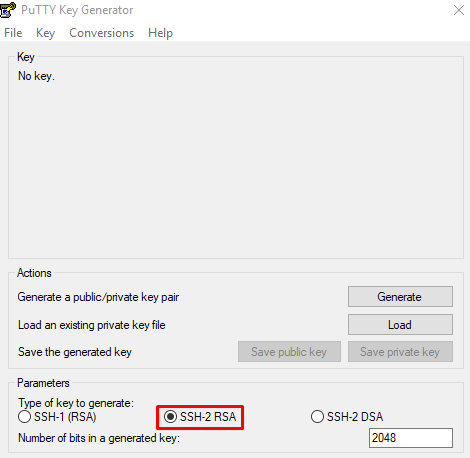
Запустите приложение PuTTYgen , которое устанавливается вместе с PuTTY.

Выберите тип ключа SSH2-RSA и нажмите Generate .
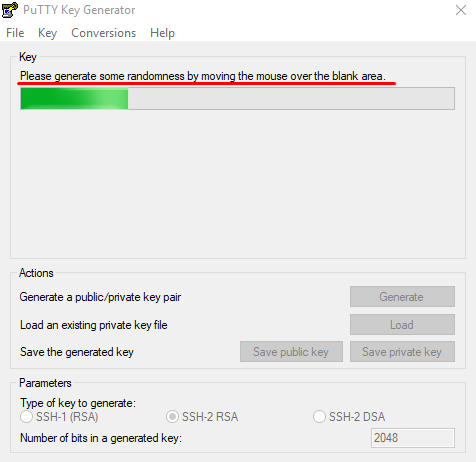
В процессе генерации ключей несколько раз произвольно проведите мышкой по экрану приложения для создания случайных величин, используемых для ключей.
После завершения создания ключей открытый ключ выводится на экран, закрытый хранится в памяти приложения. Чтобы сохранить эти ключи нажмите Save public key и Save private key . Укажите расположение файлов с ключами.
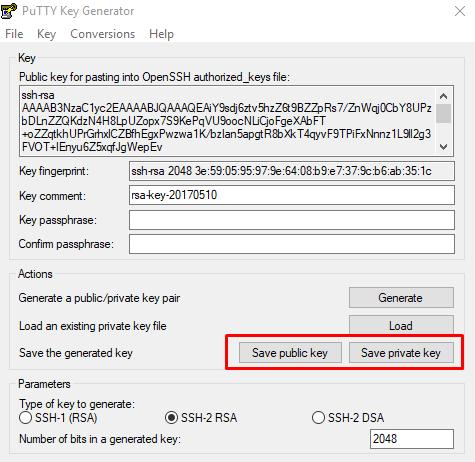
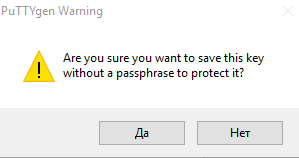
При сохранении закрытого ключа, если не заполнено поле Key passphrase , появится запрос «Хотите ли вы сохранить ключ без секретной фразы?»
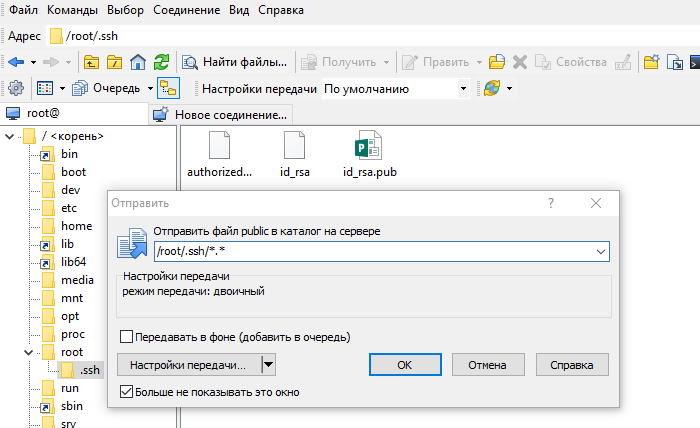
Теперь открытый ключ необходимо скопировать на сервер в файл authorized_keys . Используйте WinSCP или другой клиент для работы с файлами на удалённом Linux-сервере. Вы можете скопировать файл с открытым ключом целиком на сервер, чтоб его копия хранилась в папке .ssh
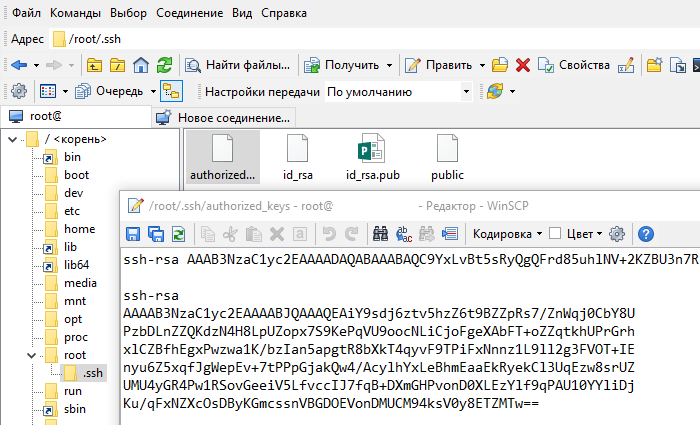
Откройте файл authorized_keys через WinSCP и файл, в который вы сохранили открытый ключ (public), на локальном компьютере текстовым редактором. Скопируйте значение ключа, сохраните и закройте файл в WinSCP.
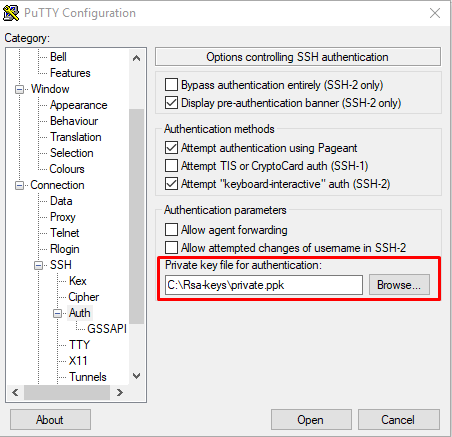
При запуске PuTTY укажите путь к закрытому ключу на локальном компьютере. Для этого во вкладке Connections → Auth выберите необходимый путь.
Теперь можно отключить на сервере аутентификацию по паролю и использовать только SSH-ключи.
Отключение аутентификации по паролю
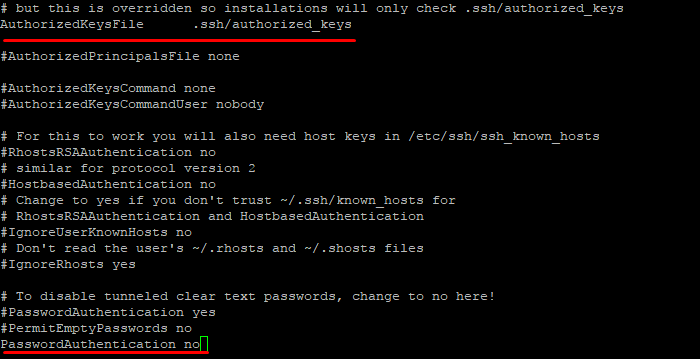
Подключитесь к серверу по SSH, используя пароль, и откройте файл sshd_config для редактирования.
Убедитесь, что указан правильный путь к открытым ключам SSH, поставьте значение параметра PasswordAuthentication no .
Перезапустите службу sshd.

Подключитесь к серверу по SSH без использования пароля. Например, запустите PuTTY, проверьте, что во вкладке Connections -> Auth содержится путь к закрытому ключу и откройте подключение.

В случае успешной аутентификации по SSH-ключу вы получите доступ к командной строке сервера и сообщение вида Authenticating with public key «rsa-key-20170510» , где rsa-key-20170510 — имя применённого закрытого ключа, указанное вами в файле authorized_keys .


