- Update drivers in Windows 10
- Before you begin
- Update the device driver
- Reinstall the device driver
- More help
- Automatically get recommended drivers and updates for your hardware
- Drivers and information
- Get drivers signed by Microsoft for multiple Windows versions
- How to submit to the dashboard
- How to submit HLK test results
- How to retrieve a submission after Microsoft signs it
- How to validate the Microsoft signature
Update drivers in Windows 10
Before you begin
Driver updates for Windows 10, along with many devices, such as network adapters, monitors, printers, and video cards, are automatically downloaded and installed through Windows Update. You probably already have the most recent drivers, but if you’d like to manually update or reinstall a driver, here’s how: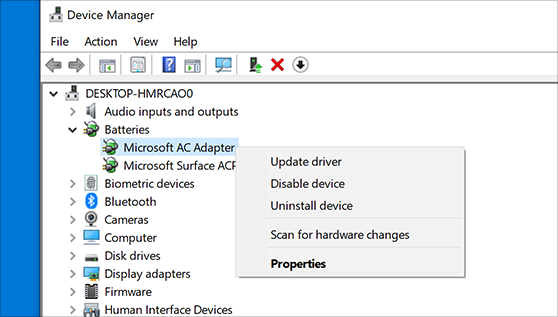
Update the device driver
In the search box on the taskbar, enter device manager, then select Device Manager.
Select a category to see names of devices, then right-click (or press and hold) the one you’d like to update.
Select Search automatically for updated driver software.
Select Update Driver.
If Windows doesn’t find a new driver, you can try looking for one on the device manufacturer’s website and follow their instructions.
Reinstall the device driver
In the search box on the taskbar, enter device manager, then select Device Manager.
Right-click (or press and hold) the name of the device, and select Uninstall.
Restart your PC.
Windows will attempt to reinstall the driver.
More help
If you can’t see the desktop and instead see a blue, black, or blank screen, see Troubleshoot blue screen errors or Troubleshoot black or blank screen errors.
Automatically get recommended drivers and updates for your hardware
Support for Windows 7 ended on January 14, 2020
We recommend you move to a Windows 10 PC to continue to receive security updates from Microsoft.
You can have Windows automatically download recommended drivers and detailed information for your hardware and devices. This is a good way to make sure all your hardware and devices work properly.
Drivers and information
Windows can find and download two kinds of updates for devices connected to your computer:
Drivers. A driver is software that allows your computer to communicate with hardware devices. Without drivers, the devices you connect to your computer—for example, a mouse or external hard drive—won’t work properly. Windows can automatically check if there are drivers available for new devices that you connect to your computer.
For hardware that you’ve connected to your computer in the past, updated drivers might become available at a later date; but those drivers aren’t installed automatically. To install these optional updates, go to Windows Update in Control Panel, check for updates, and then view and install driver updates that are available for your computer.
Information. Windows can download high-resolution icons for many hardware devices that you connect to your computer, along with detailed information about them, such as product name, manufacturer, and model number—even detailed information about the sync capabilities of a device. These details can make it easier for you to distinguish between similar devices that are connected to your computer, such as different mobile phones.
You can check Windows Update at any time to see if it found new drivers and icons for your hardware, especially if you recently installed a new device. If you want to have Windows Update automatically check for the latest drivers and icons, here’s how:
Open Devices and Printers by clicking the Start button  , and then, on the Start menu, clicking Devices and Printers.
Right-click the name of your computer, and then click Device installation settings.
Click Yes, do this automatically (recommended), and then click Save changes.  If you’re prompted for an administrator password or confirmation, type the password or provide confirmation.
If Yes is already selected, click Cancel to close the dialog box.
To get all important and recommended updates for your computer and your devices, make sure that Windows Update is turned on and configured properly.
Even if you have Windows Update set to automatically download and install all important and recommended updates, you still might not be getting all of the updated drivers available for your devices. For instance, optional updates might include updated drivers that become available for hardware or devices you’ve already installed. Windows doesn’t automatically download and install optional updates, but you will be notified when optional updates are available.
To get all the available updates for your devices, periodically check Windows Update for all available updates, including optional updates. You can review the available updates and then select them from the list of updates that Windows finds for your computer. Here’s how to do this:
Open Windows Update by clicking the Start button . In the search box, type Update, and then, in the list of results, click Windows Update.
In the left pane, click Check for updates, and then wait while Windows looks for the latest updates for your computer.
If there are any available updates, click the link in the box under Windows Update to see more information about each update. Each type of update might include drivers.
On the Select the updates you want to install page, look for updates for your hardware devices, select the check box for each driver that you want to install, and then click OK. There might not be any driver updates available.
On the Windows Update page, click Install updates. If you’re prompted for an administrator password or confirmation, type the password or provide confirmation.
Windows Update tells you if an update is important, recommended, or optional.
Some updates require you to restart your computer.
Windows Update will tell you if the updates were successfully installed.
Get drivers signed by Microsoft for multiple Windows versions
How to submit to the dashboard
This topic explains how to make a submission to the dashboard, such as a driver, and have it apply to multiple versions of Windows. This topic also covers how to retrieve the submission after Microsoft signs it, and how to validate the Microsoft signature.
There are two ways to make a dashboard submission apply to WindowsВ 10 and earlier versions of Windows:
- Use the Hardware Lab Kit (HLK) to test your submission against WindowsВ 10 and use the Hardware Certification Kit (HCK) to test against earlier versions of Windows. Then create a dashboard submission that includes all the merged HLK test results. During the submission process, you can opt-in to get a free signature for Windows Vista and Windows XP, as shown later in this topic. To opt-in for Windows Server 2008, provide a submission ID from a Windows Hardware Lab Kit (HLK) submission. This is the only way to make a submission apply to all Windows versions.
- As an alternative to HLK and HCK testing, you can submit your driver to the dashboard for attestation signing so that it also works on WindowsВ 10. This is more complicated, but still a valid option. For more information about how to attestation sign a driver, see Attestation signing a kernel driver for public release.
This topic will provide some background info about the dashboard for context, then walk through the process for using the HLK/HCK.
In the dashboard, there are two options related to signing submissions – either way, you can get a Microsoft-signed driver. The Hardware compatibility option means you’ve gone the extra distance and met Windows Hardware Compatibility Program requirements. This gives you reputation with Microsoft SmartScreen, visibility on the Certified Products List, and other business benefits.
For background, there are two code signing operations to consider:
- One is a code signing operation that identifies an organization to the dashboard. This is a signature on the package you plan to submit, and it’s a requirement that the dashboard imposes on partners so that the dashboard to prevent malicious people outside your organization from making submissions using your credentials – which could harm your reputation!
- The other is where Microsoft actually signs the individual files within your submission, such as your driver.
You must have an EV certificate bound to your company to access submission features in the dashboard.
To confirm the certificate that is used to identify your organization within the Partner Center, see Update a code signing certificate.
After you sign in to Partner Center and you are ready to sign your submission, you can use either a standard code signing cert or an EV code signing cert. This is true for all operating system versions, not just WindowsВ 10.
This is a recent change in policy. If you have an EV cert bound to the account for your organization, you’re good to go – that is, you can continue to use a standard SHA-2 certificate when you submit your package.
How to submit HLK test results
Here’s how to submit HLK test results to the dashboard. There are separate tabs where you can see what tests were run and the test results. For dashboard purposes, the most interesting part of an HLK project is the Package tab:

Select the file path for the project to open it. In this case, the submission is one driver.

Let’s say you want to create a submission package from scratch. In the HLK, select Add Driver Folder.

Now is you first chance to make declarations about the OS versions that are supported for your submission. In this case, the submission has been tested for WindowsВ 10 x64 and earlier versions of Windows.

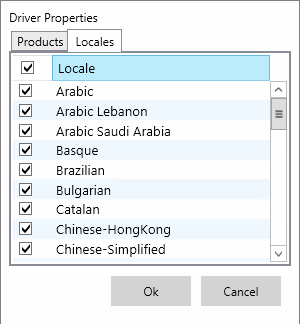
You also need to make declarations for locales. For example, depending on the design and architecture of your driver, you may choose to display different strings in different locales. In that case, you might actually have different compiled binaries for different locales. So for one device, you might have a hundred different drivers; one for each locale.
To add symbols, select and hold (or right-click) the driver folder.

Select Add Supplemental Folder to submit other files that are important to the submission but are not actually part of the submission itself. You can add any content you want to the package. This is a way for you to get other items to the Dashboard that are important for the submission, such as a readme file for a driver submission.

When you are ready, select Create Package.

The next step is to specify a certificate that you will you use to sign the package – this is the first of the two code signing operations that were covered at the start of this topic. You can select Use a certificate file to specify a certificate that is stored on something like a USB drive, or select Use the certificate store to specify a certificate that has been imported into the certificate store of the local computer.

After you select OK, you name the package and it gets created and signed (assuming you have a certificate installed on the computer you are using for the submission), and you’ll get back a friendly success message.
And the package has a green check under Signability:

The next steps occur in the Partner Center dashboard. Sign in and follow the instructions in Create a new hardware submission to upload your HLK package.
How to retrieve a submission after Microsoft signs it
For an HLK or HCK submission that you submitted to the Partner Center:
- Find the hardware submission that contains the drivers that you want to download signed files for. Select the ID to open the driver details. On that page, expand the package tab for the package containing the driver you want to download and select “Download signed files”.
For a WLK submission, system submission, or attestation signed driver that you submitted to Hardware Dev Center (Sysdev):
- Select Hardware Compatibility >Manage submissions > and on the Summary and Tasks tab, if the status is Approved, the submission is ready to be retrieved. Under Download in the lower right corner of the screen, select Signed driver package. Microsoft will stream an in-memory zip file that includes the signed submission.
Inside the submission folder will be the package files. These files are signed by Microsoft. The partner does not have to sign the returned payload. Microsoft always returns a .cat file with an approved submission. If a partner includes its own .cat file. Microsoft discards it and returns its own signed .cat file.
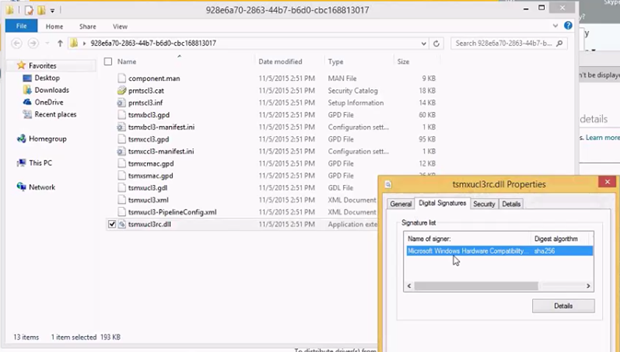
In the past, Microsoft only signed the .cat file. Starting with Windows 10, Microsoft now signs all of the portable executables in the returned payload. For example, the .dll file is also signed by Microsoft:
How to validate the Microsoft signature
There are a couple cases where you may want to validate the Microsoft signature for a submission.
- You aren’t sure if a driver has been signed by Microsoft or not, and you want to check.
- You have two drivers, and you need to determine which one was signed by attestation and which one was signed after submission of HLK/HCK results to the dashboard.
You can validate the Microsoft signature by checking the Enhanced Key Usages (EKUs) of the certificate that Microsoft signs the submission with. To check the EKU, select and hold (or right-click) the .cat file and select Properties. Select the Digital Signatures tab, select the name of the certificate, and then select Details.

On the certificate Details tab, select Enhanced Key Usage. There you will see the EKUs and corresponding OID values for the certificate. In this case, the Windows Hardware Driver Verification OID ends with a 5, which means the driver has not been signed by attestation:

If the driver had been signed by attestation, then the OID would end with a 1:


