- Console get key press w/o windows messages c++
- 3 Answers 3
- Not the answer you’re looking for? Browse other questions tagged c++ console keypress or ask your own question.
- Related
- Hot Network Questions
- Subscribe to RSS
- Windows get key pressed
- Answered by:
- Question
- How to recover your Windows product key
- How to fix Windows key or WinKey not working on Windows 10?
- 1. Check whether it is a hardware issue
- 2. Check your Start menu
- 3. Disable gaming mode
- 4. Use the Win Lock key
- 5. Disable the Filter Keys option
- 6. Enable the Windows logo key via Windows Registry
- 7. Restart your Windows/File Explorer
- 8. Update your keyboard drivers
- 9. Run System File Checker
- 10. Run the Deployment Image Servicing and Management (DISM) tool
- 11. Re-register your apps
- 12. Run a full system scan
Console get key press w/o windows messages c++
Is there any way to get the last key press in a console without using Windows messages or the std::cin stream? I’ve heard that there is a function in the standard library. Solutions should preferably be as portable as possible. Thanks for your help in advance.
3 Answers 3
There’s conio.h but it’s not technically standard. On Linux, my first Google hit suggests termios.h.
Not really portable but you can access the current key state using GetAsyncKeyState even from console app under windows. More technical, and equally windows specific, would be to hook the keyboard using SetWindowsHookEx into a call back in your system that simply stores the last key pressed.
But your basic problem: Console + Portability — seems to imply cin is your best bet — what do you need that cin doesn’t provide?
Have you considered using a curses library like pdcurses? That’s about the only cross-platform library that will do console management that I know of.
Not the answer you’re looking for? Browse other questions tagged c++ console keypress or ask your own question.
Related
Hot Network Questions
Subscribe to RSS
To subscribe to this RSS feed, copy and paste this URL into your RSS reader.
site design / logo © 2021 Stack Exchange Inc; user contributions licensed under cc by-sa. rev 2021.4.16.39093
By clicking “Accept all cookies”, you agree Stack Exchange can store cookies on your device and disclose information in accordance with our Cookie Policy.
Windows get key pressed
This forum has migrated to Microsoft Q&A. Visit Microsoft Q&A to post new questions.
Answered by:
![]()
Question
![]()
![]()
How can i capture key press in Windows Forms not from a Control?
I want the user to press any key any where in the Form and display the keypress in label
like if you write in the text box
I knew that i have to setup ( KeyPreview to true in the Form1 ) and use
private void Form1_KeyUp(object sender, KeyEventArgs e)
<
to capture the key press.
But my problem is that i did not get the value correctly in the label
Pressing number 5 in keyboard will give
1. If using e.KeyCode
===========================
label1.Text = e.KeyCode.ToString();
NumKey will give ===>> NumPad5
MainKey will give ===>> D5
2. If using e.KeyValue
==========================
label1.Text = e.KeyValue.ToString();
NumKey will give ===>>101
MainKey will give ===>>53
3. If using e.KeyData
==========================
label1.Text = e.KeyData.ToString();
NumKey will give ===>> NumPad5
MainKey will give ===>> D5
How to recover your Windows product key
Technical Level : Basic
If you are planning to reinstall Windows but you can’t find your product key, this article will show you where and how you can find your product key.
The key could be:
- Printed on a Certificate of Authenticity sticker
- Stored in the Windows Registry
- Embedded in the PC’s UEFI firmware
Note that if you are currently running Windows 10 and wish to reinstall the operating system, you don’t need your product key. After the reinstall, Windows 10 will detect that it has been reinstalled on a previously activated system and will automatically reactivate.
Printed on a Certificate of Authenticity Sticker
If your PC came with Windows 7 or earlier, then your product key will be printed on a COA sticker. This sticker verifies that the computer came with a genuine copy of Windows. You will need to examine your computer to find the sticker. On laptops, it’s usually on the bottom side. On desktops, it could be on the back, sides, or top. It looks something like this:
Embedded in the PC’s UEFI firmware
If you have a newer PC that came with Windows 8 or Windows 10, then your product key likely won’t be on a sticker. Instead, computer manufacturers now embed the key right into the computer’s UEFI firmware. Unlike the COA sticker, the embedded key can’t be smudged off, stolen or erased (easily).
If you want to extract the UEFI key, the process is simple. Open the Start menu, type powershell and then run the program.
Next type the following command in the PowerShell window and hit Enter.
You will be presented with the key in the window.
Stored in the Windows Registry
If your product key isn’t embedded in the firmware or you’re missing your COA sticker, you’re not out of luck as long as you haven’t formatted your computer. You can still recover the key because Windows stores it in the registry. Here is how:
1. Open a new Notepad window
2. Copy and paste the following text into the window
3. Click File > Save As and save the file to your desktop as productkey.vbs. It’s important to include the .vbs extension because this is a Windows Scripting Host file.
4. Close Notepad and double-click the file. Wait a few seconds, and then you will be presented with a popup displaying your product key:
How to fix Windows key or WinKey not working on Windows 10?
‘Problems cannot be solved
at the same level of awareness
that created them’
Albert Einstein
The Windows logo key is by all means an essential component of your keyboard: it takes part in multiple shortcuts as well as evoking your Start menu. As you can see, this key is exceptionally useful, so its failure to work can evoke the feeling of frustration in any Windows 10 user.
Although there might be many reasons for WinKey not working (Windows 10), we have thoroughly investigated the issue and collected an exhaustive list of proven tips on how to fix the Windows key is not working on Windows 10 nuisance. So, be sure to examine them all since we believe we have succeeded in addressing your problem.
Before you start your troubleshooting adventure, we strongly advise you to back up your personal files. This is to secure them against permanent loss in case something goes wrong. For this purpose, you can use an external storage device or a cloud solution. You are also free to migrate your files to another laptop.
Besides, it is also a good idea to back up your registry since many of the following fixes include registry tweaks:
- To enter Registry Editor, right-click on the Windows logo icon, click Run, type regedit, and hit Enter.
- Navigate to File and select Export.
- Go to Export Range. Select All.
- Select to what location you wish to save your backup file.
- Name it and select Save.
If things do not go as planned, you will be able to restore your backup file and get your Windows Registry up and running again:
- Open Registry Editor, using the instructions above.
- Navigate to Import. Select your backup file.
Now that you have exercised deliberate prudence to ensure that your registry is safe and protected from irreparable damage, feel free to have a go at fixing your Windows logo key:
1. Check whether it is a hardware issue
Unfortunately, your keyboard is a fragile piece of hardware. Thus, it can go haywire at any moment. With this in mind, you should make sure it is not faulty right now. Check if the Windows logo key fails to perform its functions every time you press it. See if other keys on your keyboard work well. If you use an external keyboard, check if it is having the same WinKey issue when attached to another machine. The point is, the device might need replacement.
2. Check your Start menu
Now check if your Start menu can be accessed at all. The thing is, you might have been misled into thinking that your Windows logo key is malfunctioning while it is your Start menu that is behind the problem.
First, let’s try to enable your Start menu by doing the following:
- Right-click on your Windows logo icon on the taskbar.
- Select Run from the drop-down menu.
- Type ‘regedit’ (without quotes).
- Go to HKEY_CURRENT_USER\Software\Microsoft\Windows\CurrentVersion\Explorer\Advanced
- Go to the right panel and click on it.
- Select New -> DWORD (32-bit) value.
- Call it EnableXamlStartMenu.
Exit your registry. Then restart your PC and see if the issue persists. If the manipulation above has proved to no avail, hurry up to fix your Win 10 Start menu not working issue.
3. Disable gaming mode
If you are using a gaming keyboard, it can be in gaming mode. This can make your Windows key unresponsive. In such a case, search for a key that enables/disables gaming mode and use it – this key is usually with a joystick drawing (or something like that) on it.
4. Use the Win Lock key
Some keyboards have a special key that is designed to turn your Windows logo key on or off. You might have accidentally pressed that Win Lock key and disabled your Windows logo key. If that is your case, you can easily resolve the issue by hitting the Win Lock key once again.
To quickly fix «Windows key or WinKey not working on Windows 10» issue, use a safe FREE tool developed by the Auslogics team of experts.
The app contains no malware and is designed specifically for the problem described in this article. Just download and run it on your PC. free download
Developed by Auslogics
Auslogics is a certified Microsoft® Silver Application Developer. Microsoft confirms Auslogics’ high expertise in developing quality software that meets the growing demands of PC users.
5. Disable the Filter Keys option
This feature makes your keyboard ignore brief or repeated keystrokes, which might have led to your WinKey issue in Windows 10. To disable filter keys, use the instructions below:
- Right-click on your Start menu icon.
- Select Settings from the menu.
- Navigate to Ease of Access and click on it.
- Go to the left pane and click Keyboard.
- Locate the Filter Keys feature.
- Toggle it off.
Check if this manoeuvre has resolved your issue.
6. Enable the Windows logo key via Windows Registry
Reportedly, ‘WinKey not working (Windows 10)’ is often resolved through this registry tweak. Here is what you should do:
- Right-click on your Start menu icon and opt for Run.
- Type ‘regedit’ without quotes to launch Registry Editor.
- Then navigate to HKEY_LOCAL_MACHINE\SYSTEM\CurrentControlSet\Control\Keyboard Layout.
- In the right pane, locate Scancode Map.
- Right-click on it and select Delete.
Exit the editor. Reboot your computer to see if this method has worked for you.
7. Restart your Windows/File Explorer
If the Windows logo key issue persists, you might need to restart the explorer.exe process on your PC. This simple trick is reported to have got WinKey back on track for many users. Here is how you can perform it:
- Open your Task Manager. For this purpose, you can use the Ctrl+Alt+Delete or the Ctrl+Shift+Esc shortcut.
- Navigate to the Details tab.
- Locate explorer.exe. Right-click on it and select End task. After this procedure, your screen is supposed to go black. Do not worry – that’s part of the fix.
- Open your Task Manager again.
- Click File. Select Run new task from the drop-down menu.
- The Create new task window will appear. Type ‘explorer.exe’ into it (without quotes).
- Press Enter.
Now see if your Windows logo key has been fixed.
8. Update your keyboard drivers
If you are looking for a way how to fix the Windows key is not working on Windows 10 problem, updating your keyboard driver is an essential step in your troubleshooting plan.
You can search for updated driver software yourself: you will have to visit the website of your keyboard/laptop manufacturer and download the necessary driver from there.
That said, you are free to get your keyboard driver updated with the help of the built-in Device Manager utility:
- Right-click on your Start menu icon.
- Select Device Manager from the list of options.
- Navigate to your keyboard.
- Right-click on the device and select Update driver.
- Let Device Manager search for the necessary driver online.
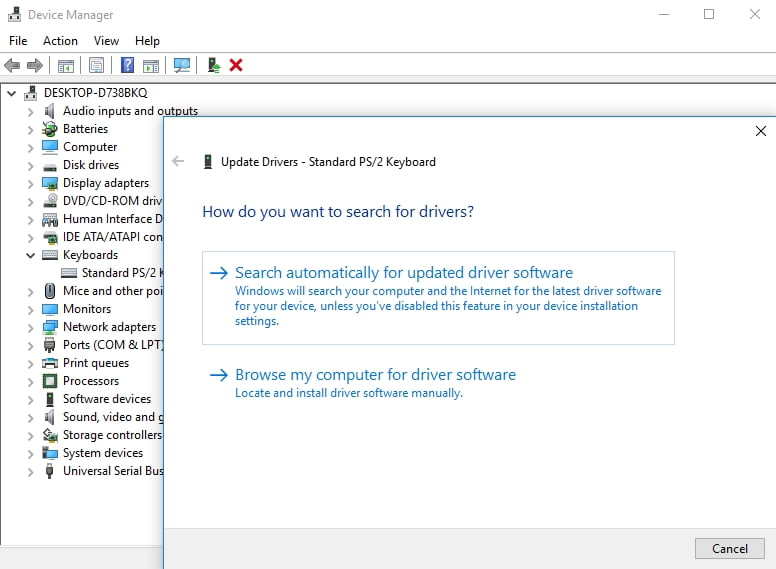
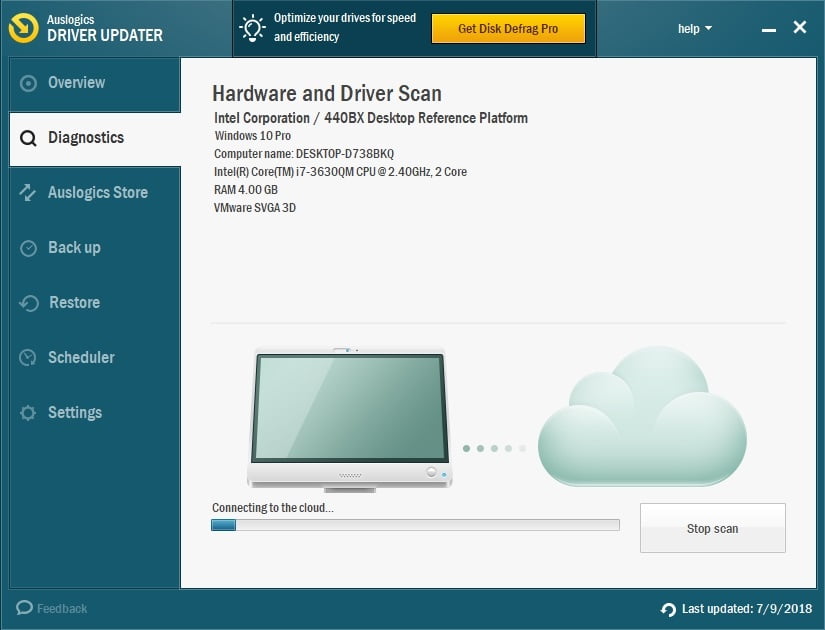
Nevertheless, we recommend you to use a special tool to update all your drivers and therefore make your PC more stable. For instance, Auslogics Driver Updater will do the job for you. With just one click, you will have your system scanned for driver issues. You will end up getting the latest manufacturer-recommended driver versions for all your devices, which will fix and prevent many issues with your computer.
9. Run System File Checker
Unfortunately, your system files can go corrupt or missing, thus causing persistent keyboard issues. In a situation like this, your best bet is to run the built-in System File Checker solution, using the instructions below:
- Right-click on your Start menu icon. Select Search.
- Type cmd. Locate Command Prompt in the list of results.
- Right-click on Command Prompt. Select Run as administrator.
- Once your elevated Command Prompt window is open, type sfc /scannow.

- Press Enter. Wait for the scan to finish.
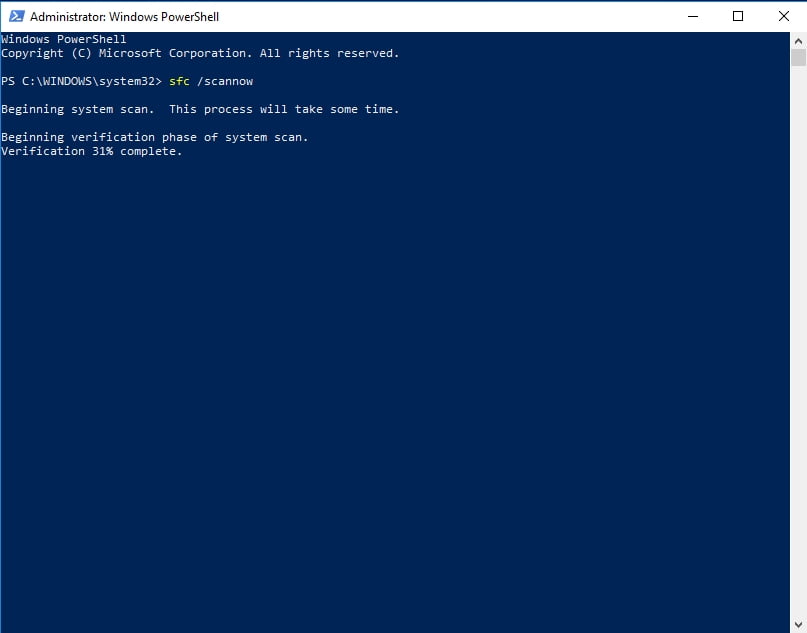
When the process is complete, restart your computer. Hopefully, your Windows logo key is active again.
10. Run the Deployment Image Servicing and Management (DISM) tool
If the previous scan has failed to help you, we advise running a DISM scan to repair your image – let’s hope this will make your WinKey issue a thing of the past:
- Open an elevated command prompt (use the instructions from the previous fix).
- One at a time, type ‘DISM /online /Cleanup-Image / ScanHealth’ and ‘DISM /Online /Cleanup-Image /RestoreHealth’ (without quotes) into your command prompt window and hit Enter after each.
Wait until the scan is complete. Then you should restart your machine. Check if your problem has been successfully solved.
11. Re-register your apps
If your Windows key keeps having issues despite all your efforts, your keyboard might be involved in some software conflict. This is the reason why you might find it useful to re-register all your apps. There is no need to worry – it is a pretty straightforward procedure. Just use the following guidelines:
- Right-click on your Start menu icon on the taskbar.
- Select the Search option. Type powershell.
- Select the PowerShell result. Right-click on it.
- From the drop-down menu, select Run as administrator.
- Paste the following command into the PowerShell window:
Get-AppXPackage -AllUsers | Foreach - Press Enter to start the procedure.
Wait until your apps are re-registered and reboot your PC. We hope this method has proved helpful.
12. Run a full system scan
The sad truth is, malware is a common cause of keyboard issues on Windows computers. Unfortunately, the chances are that is your case. This means it is time for you to scan your system.
You can do that with Windows Defender:
- Open your Start menu and click the Settings gear.
- Go to Update & Security. Select Windows Defender.
- Then click Open Windows Defender.
- Move to the shield icon, which is in the left pane.
- Click Advanced scan and select Full scan.
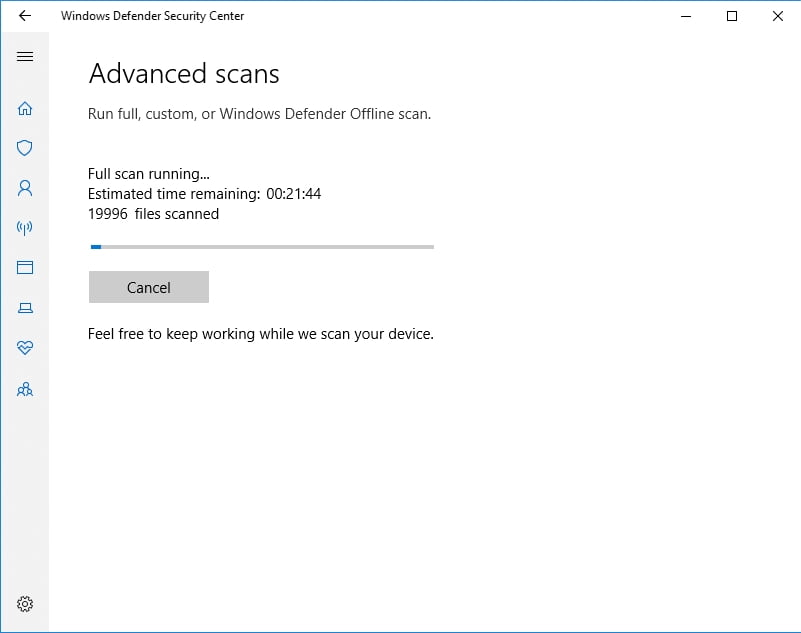
That said, using Windows Defender may not be enough. There might be some particularly malicious intruder lurking about. With this in mind, try running a full scan with Auslogics Anti-Malware: this tool is capable of killing the most powerful entities from the world of malware.

Have our tips helped you fix the Windows key in Windows 10?
If you need more assistance or have any suggestions regarding the topic, feel free to leave a comment below.


