- How To Find Your Local IP Address In Windows 7 or Vista
- How To Find Your Local IP Address In Windows 7 Using CMD
- Step 1
- Step 2
- Step 3 (optional)
- Further reading
- How to find IP address of your computer (Windows XP, Vista, 7, 8, 10,Mac)?
- Как посмотреть IP-адрес компьютера на Windows 10
- В командной строке
- В диспетчере задач
- В параметрах подключения
- В веб-интерфейсе роутера
- 8 ways to find your IP address in Windows (all versions)
- 1. How to find your IP address from the Command Prompt (all versions of Windows)
- 2. How to find your IP address in the Settings app (Windows 10 only)
- 3. How to find your IP Address in the Control Panel (all versions of Windows)
- 4. How to find your IP address in System Information (all versions of Windows)
- 5. How to find the IP address in PowerShell (all versions of Windows)
- 6. How to find your IP address in Task Manager (Windows 10 and Windows 8.1 only)
- 7. How to find your computer’s IP address using the Network Map (Windows 7 only)
- 8. How to find your IP address in the PC Settings app (Windows 8.1 only)
- Conclusion
How To Find Your Local IP Address In Windows 7 or Vista


Finding your IP address under Windows 7 is a very simple process. The process is exactly the same whether you’re using Windows 7, Windows Vista, Windows XP or even Windows Server 2003/2008.
In most circumstances, the majority of users don’t need to worry about their “IP Address” due to DHCP from your local network or ISP. For system administrators, knowing the IP address of your machine, server, or customer’s PC is imperative.
How To Find Your Local IP Address In Windows 7 Using CMD
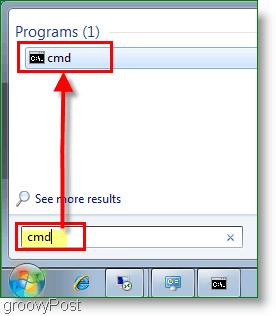
Step 1
Click Start, in the search Type in cmd. Next, Click on the program cmd. This click will open the Command Prompt/Windows.
Step 2
The command prompt should open; now in the open line, you’ll need to type in ipconfig and press Enter
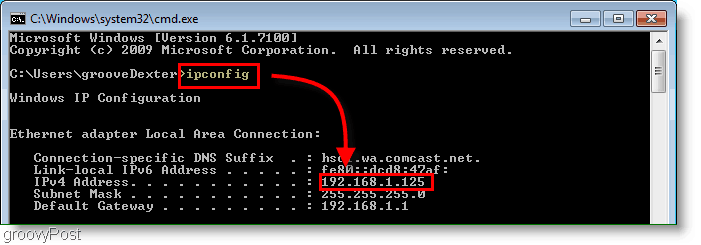
You’ll see your IP address listed right above the subnet mask. Usually, it will say IPv4 Address and follow the prefix 192.168.1.# or 192.168.0.# for home networks as shown in the screenshot above.
Step 3 (optional)
If you’re not looking for your LOCAL IP address but instead the IP address provided by your ISP to your Cable Modem or FIOS Router, just open your browser and go to https://whatismyip.org.
Please note – This is not the actual IP you’re using on your LOCAL computer as shown above in Step 2. This IP address is the one assigned to your Cable Modem/FIOS Router on the Internet.
Further reading
What is an IP Address?
- If you want to call someone, you use their Telephone or Mobile number, right? Well, an IP Address or Internet Protocol Address for a computer or network device is a phone number for your computer. That’s it. It’s pretty simple.
- Because no one knows the “ Phone Number IP Address” for www.google.com, another technology was created to act as an Automatic Phonebook for IP Addresses. It’s called DNS. When you type www.groovypost.com into your browser, DNS will translate that into an IP Address and send you to the website. It’s all very simple once you understand it.
IPV6 Address?
- In a system or network that uses IPv6, you won’t see a Subnet mask, and the address will follow the fe80::## prefix. However, for most home users, IPv6 use is uncommon.
IPv4 Vs. IPv6?
- IPv4 is the old system we currently use to designate IP addresses across all of the public computers that are connecting to the internet. The problem with IPv4 is the address is only 32bit’s in length which means there are not enough addresses to go around.
- IPv6 is 128 bits in length which should allow for more than enough addresses in the foreseeable future. The good news is most modern operating systems understand both, so when the times comes for the cutover, it should be invisible for most users.
Do You Have Any Groovy Questions or Comments? Drop your comment below, or join us in the groovyPost Free Tech Support Community.
How to find IP address of your computer (Windows XP, Vista, 7, 8, 10,Mac)?
The steps below will help you to find your IP address of your computer. There are two ways to find IP address of your computer.


Step 1
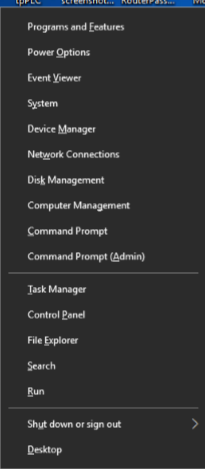
Go to Control Panel. Press Windows key+X at the same time and select Control Panel.
Step 2
Click on Network and Internet -> Network and Sharing Center, click on Change adapter settings on the left side.
Step 3
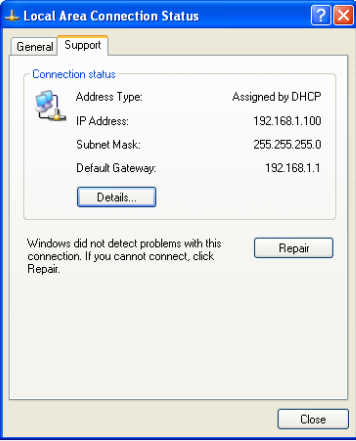
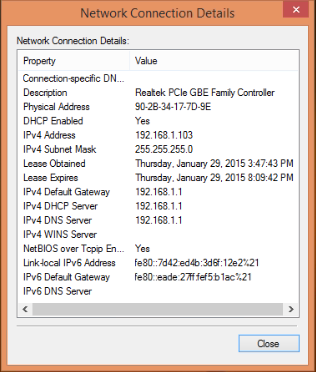
Highlight and right click on Ethernet, go to Status -> Details. The IP address will display.
Method 2
Step1
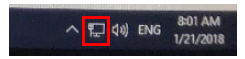
Click the network icon (may look like a computer or Wi-Fi signal) in the task tray. Go to Network settings.
Click the Windows symbol and then choose the Settings button on the bottom- left corner. It will pop up on the Settings page, go to Network & Internet.


Step 2
Click Ethernet > Change adapter options. Or click Status > Change adapter options. The IP address will display.
Как посмотреть IP-адрес компьютера на Windows 10
Windows 10 предлагает несколько простых способов узнать внутренний IP-адрес компьютера. Мы будем использовать для этого только встроенные инструменты системы.
В командной строке
Самый быстрый способ узнать IP-адрес компьютера — воспользоваться командной строкой.
- Запускаем консоль с правами администратора.
- Выполняем команду «ipconfig».
- Смотрим значение строки «IPv4-адрес».
Это и есть IP-адрес компьютера, который можно использовать для удалённого подключения или решения других задач.
В диспетчере задач
Ещё один быстрый способ — просмотр IP-адреса через «Диспетчер задач».
- Запускаем «Диспетчер задач». Я предпочитаю использовать сочетание клавиш Ctrl+Shift+Esc.
- Если диспетчер открывается в свёрнутом виде, нажимаем на ссылку «Подробнее».
- Переходим на вкладку «Производительность».
- Выбираем вкладку «Ethernet» или «Wi-Fi» в зависимости от того, каким способом компьютер подключен к интернету. В моём случае это беспроводная сеть.
- Смотрим значение строки «IPv4-адрес».
Если компьютер подключен к интернету через кабель Ethernet, то адрес будет внутри одноимённой вкладки в разделе «Производительность».
В параметрах подключения
Логично, что посмотреть IP-адрес компьютера можно в настройках подключения. Есть несколько способов:
- Кликаем правой кнопкой по значку подключения на панели уведомлений.
- Выбираем опцию «Открыть «Параметры сети и интернет»».
- На вкладке «Состояние» нажимаем «Изменить свойства подключения».
4. Пролистываем экран и в поле «Свойства» видим строку «IPv4-адрес».
На вкладке «Состояние» есть ещё несколько ссылок, которые ведут в свойства подключения с информацией об IP-адресе. Например, можно нажать на ссылку «Просмотр свойств сети». Откроется общий экран со всеми возможными соединениями. Это не очень удобно, потому что приходится искать подходящее подключение. Но информация об IP-адресе компьютера здесь тоже есть.
Ещё можно кликнуть по ссылке «Настройка параметров адаптера», чтобы перейти к полному списку подключений.
Здесь мы находим действующее соединение, кликаем по нему правой кнопкой и переходим в раздел «Состояние». Затем нажимаем на кнопку «Сведения» и снова видим IP-адрес компьютера.
Можно использовать другой метод. В разделе «Сеть и интернет» есть вкладки «Wi-Fi» и «Ethernet». Внутри них — ссылки на свойства оборудования. Выбираем вкладку, которая соответствует нашему подключению к сети. В моём случае это Wi-Fi. Затем переходим по ссылке «Свойства оборудования». Внутри будет информация о подключении, в том числе и IP-адрес компьютера.
В веб-интерфейсе роутера
Если компьютер подключен к беспроводной сети, можно узнать его IP-адрес в веб-интерфейсе маршрутизатора. Я покажу, как это сделать, на примере роутера D-Link DIR-615. На других устройствах порядок может незначительно отличаться.
- Открываем в браузере веб-интерфейс роутера. В моем случае он доступен по стандартному адресу 192.168.0.1. Адрес, логин и пароль должны быть указаны на самом роутере — наклейка находится внизу.
- Переходим в режим «Расширенные настройки».
- Открываем раздел «DHCP».
- Видим все устройства, которые подключены к интернету через роутер.
В моём случае это ноутбук, смартфон, Яндекс.Станция и умная лампа. Имена устройств задаются по умолчанию, но обычно их легко определить по модели или явным указаниям типа «Nout» или «Desktop».
8 ways to find your IP address in Windows (all versions)
The IP address or Internet Protocol address is a numerical label that is used in networks to identify and locate network devices, from computers to smartphones, to printers and other devices. The IP address can be a useful piece of information, especially when you want to set up your home router or when you want to connect to other devices on a network. But how do you check a PC’s IP address in Windows? In this tutorial, we will show you eight methods that work in Windows 10, Windows 7 and Windows 8.1:
NOTE: The information shared in this tutorial applies to all modern Windows operating systems: Windows 10, Windows 8.1 and Windows 7. To make things simpler, we use screenshots taken mostly in Windows 10. If you want to learn more technical details about IP addresses and their role in networking, we recommend you to read these articles:
1. How to find your IP address from the Command Prompt (all versions of Windows)
Open the Command Prompt , type the command ipconfig and press Enter. This command lists all the network adapters (both Ethernet and wireless) found on your Windows computer, and it shows details about each of them.
For each network adapter, you get to see both the IPv4 address and the IPv6 Address.
To learn more about the parameters accepted by the ipconfig command and what each of them does, run the command ipconfig /?.
And, if you are interested in finding more information about other networking commands that you can run using the Command Prompt, check this tutorial: Command Prompt – Advanced networking commands .
2. How to find your IP address in the Settings app (Windows 10 only)
If you are using Windows 10, open the Settings app . There, go to Network & Internet. You are shown a list of networking related settings and categories. If you are connected to a wireless network, in the column on the left, choose Wi-Fi and then, on the right, click or tap on the name of the network that you are connected to.
You are shown a long list of properties. Scroll down until you find the fields for the IPv6 and IPv4 addresses, highlighted below.
If you are connected using a network cable, in the column on the left choose Ethernet and then click or tap on the network name, on the right side of the screen.
Scroll down the list of network properties until you find the entries for the IPv6 and IPv4 addresses, highlighted below.
Now you can close the Settings app.
3. How to find your IP Address in the Control Panel (all versions of Windows)
Another geeky method that does not involve using a command is to use the Network and Sharing Center. To access it, open the Control Panel and go to “Network and Internet -> Network and Sharing Center.” If you want to learn more about it, read this guide: Simple questions: What is the Network and Sharing Center in Windows? . Next, click or tap the “Change adapter settings” link on the left.
The Network Connections window is opened, listing the network adapters installed on your computer, including virtual ones, used by VPN services or virtualization apps. Double click (or double tap) the network adapter for which you want to see the IP address.
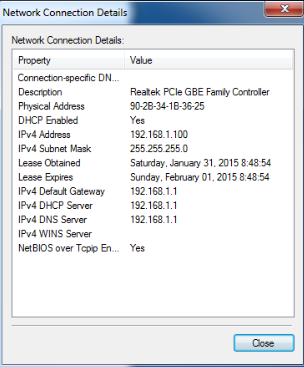
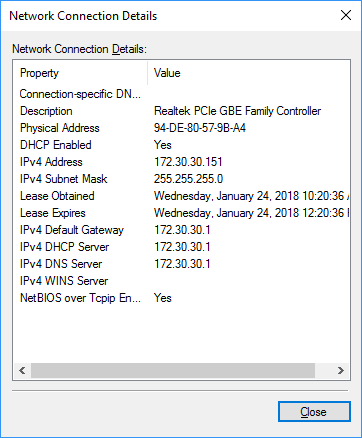
This action opens the Status window of that adapter. Click or tap the Details button to see a series of details about that network adapter, including its IPv4 and IPv6 addresses.
Scroll through the list of details until you find the IPv4 and IPv6 address fields, highlighted below.
When done, Close the windows you just opened.
4. How to find your IP address in System Information (all versions of Windows)
Another method that works in all versions of Windows is to use the System Information desktop app. You can open it by using search and typing “System Information“ in the appropriate search field and clicking on the search result with the same name. Learn more about this tool and how to open it, from this guide: System Information – How to learn your PC’s complete configuration .
In the System Information desktop app, on the column on the left, expand Components followed by Networks and then Adapter. On the right side of the app window, you can see detailed information about each network adapter that is found on your computer. Scroll down the list until you find the network card that you are interested in. There you see a field named IP Address, giving you all the information you need.
Close the System Information app when done.
5. How to find the IP address in PowerShell (all versions of Windows)
PowerShell is a tool similar to the Command Prompt, but it is even more powerful and allows you to work with more elements that make up Windows. PowerShell has two commands which you can use to find the IPv4 and IPv6 address of a network adapter. The first one is gip. Type it in PowerShell and then press Enter. The command triggers the display of several details about each network adapter, including their IP addresses.
Another command which returns the same results is Get-NetIPConfiguration. Type it, press Enter and then look for the information that you want.
Close PowerShell when done.
6. How to find your IP address in Task Manager (Windows 10 and Windows 8.1 only)
If you use Windows 10 or Windows 8.1, start the Task Manager . If it starts in the compact view that only displays open apps, click or tap “More details.” Next, select the Performance tab and look for your network card. If you are connected to a wireless network, click or tap Wi-Fi. On the right side, you can see the IPv6 and IPv4 addresses.
If you are connected to a wired network, choose Ethernet on the left side of the Performance tab. On the right side look for the IPv6 and IPv4 addresses.
Close Task Manager when done.
7. How to find your computer’s IP address using the Network Map (Windows 7 only)
Windows 7 has a unique feature that is not available in Windows 8.1 or Windows 10. It is called the Network Map, and it shares a visual map of your network. If you want to find more about it, we recommend that you read this article: The Network Map – Access your network computers in a fun way . First, open the Network and Sharing Center. On the top right of the window, there is a link called “See full map.” Click on it.
This opens the Network Map. If you hover with the mouse over your computer, networking related information will be displayed, including the IPv4 and IPv6 address.
Write it down and close the Network Map.
8. How to find your IP address in the PC Settings app (Windows 8.1 only)
If you are using Windows 8.1, open the PC Settings app . There, choose Network and then go to Connections. Here you can see the network adapter that you are using the name of the network that you are connected to. Click or tap on the network name, under Ethernet (if you are on a wired connection) or Wi-Fi (if you are using a wireless network).
You are shown the properties of your connection, including the IP address.
Close PC Settings when done.
Conclusion
Finding the IP address of your Windows computer provides information that can be useful in many networking situations. If you know of other ways to find the IP address in Windows, or if you have questions regarding this subject, do not hesitate to leave a comment below.


