- How to create and manage the Central Store for Group Policy Administrative Templates in Windows
- Links to download the Administrative Templates files based on the operating system version
- Overview
- Administrative Templates file storage
- The Central Store
- Group Policy administration
- Updating the Administrative Templates files
- Known Issues
- Копирование файлов и папок на компьютеры пользователей с помощью GPO
- Use Group Policy to remotely install software
- Summary
- Create a distribution point
- Create a Group Policy Object
- Assign a package
- Publish a package
- Redeploy a package
- Remove a package
- Troubleshoot
How to create and manage the Central Store for Group Policy Administrative Templates in Windows
This article describes how to use the new .admx and .adml files to create and administer registry-based policy settings in Windows. This article also explains how the Central Store is used to store and to replicate Windows-based policy files in a domain environment.
Original product version: В Windows 10 — all editions, Windows Server 2019, Windows Server 2012 R2, Windows 7 Service Pack 1
Original KB number: В 3087759
Links to download the Administrative Templates files based on the operating system version
To view ADMX spreadsheets of the new settings that are available in later operating system versions, see Group Policy Settings Reference Spreadsheet Windows 1809
Overview
Administrative Templates files are divided into .admx files and language-specific .adml files for use by Group Policy administrators. The changes that are implemented in these files let administrators configure the same set of policies by using two languages. Administrators can configure policies by using the language-specific .adml files and the language-neutral .admx files.
Administrative Templates file storage
Windows uses a Central Store to store Administrative Templates files. The ADM folder is not created in a Group Policy Object (GPO) as it is done in earlier versions of Windows. Therefore, Windows domain controllers do not store or replicate redundant copies of .adm files.
The Central Store
To take advantage of the benefits of .admx files, you must create a Central Store in the sysvol folder on a Windows domain controller. The Central Store is a file location that is checked by the Group Policy tools by default. The Group Policy tools use all .admx files that are in the Central Store. The files that are in the Central Store are replicated to all domain controllers in the domain.
We suggest keeping a repository of any ADMX/L files that you have for applications that you may want to use. For example, operating system extensions like Microsoft Desktop optimization Pack (MDOP), Microsoft Office, and also third-party applications that offer Group Policy support.
To create a Central Store for .admx and .adml files, create a new folder named PolicyDefinitions in the following location (for example) on the domain controller:
When you already have such a folder that has a previously built Central Store, use a new folder describing the current version such as:
Copy all files from the PolicyDefinitions folder on a source computer to the new PolicyDefinitions folder on the domain controller. The source location can be either of the following ones:
- The C:\Windows\PolicyDefinitions folder on a Windows 8.1-based or Windows 10-based client computer
- The C:\Program Files (x86)\Microsoft Group Policy\ \PolicyDefinitions folder, if you have downloaded any of the Administrative Templates separately from the links above.
The PolicyDefinitions folder on the Windows domain controller stores all .admx files and .adml files for all languages that are enabled on the client computer.
The .adml files are stored in a language-specific folder. For example, English (United States).adml files are stored in a folder that is named en-US. Korean .adml files are stored in a folder that is named ko_KR, and so on.
If .adml files for additional languages are required, you must copy the folder that contains the .adml files for that language to the Central Store. When you have copied all .admx and .adml files, the PolicyDefinitions folder on the domain controller should contain the .admx files and one or more folders that contain language-specific .adml files.
When you copy the .admx and .adml files from a Windows 8.1-based or Windows 10-based computer, verify that the most recent updates to these files are installed. Also, make sure that the most recent Administrative Templates files are replicated. This advice also applies to service packs, as applicable.
When the operating system collection is completed, merge any OS extension or application ADMX/ADML files into the new PolicyDefinitions folder.
When this is finished, rename the current PolicyDefinitions folder to reflect that it’s the previous version, such as PolicyDefinitions-1709. Then, rename the new folder (such as PolicyDefinitions-1803) to the production name.
We suggest this approach as you can revert to the old folder in case you experience a severe problem with the new set of files. When you don’t experience any problems with the new set of files, you can move the older PolicyDefinitions folder to an archive location outside sysvol folder.
Group Policy administration
Windows 8.1 and Windows 10 do not include Administrative Templates that have an .adm extension. We recommend that you use computers that are running Windows 8.1 or later versions of Windows to perform Group Policy administration.
Updating the Administrative Templates files
In Group Policy for Windows Vista and later version of Windows, if you change Administrative Templates policy settings on local computers, sysvol folder isn’t automatically updated to include the new .admx or .adml files. This behavior is implemented to reduce network load and disk storage requirements, and to prevent conflicts between .admx and .adml files when changes are made to Administrative Templates policy settings across different locations.
To ensure that any local updates are reflected in sysvol folder, you must manually copy the updated .admx or .adml files from the PolicyDefinitions file on the local computer to the Sysvol\PolicyDefinitions folder on the appropriate domain controller.
The following update enables you to configure the Local Group Policy editor to use Local .admx files instead of the Central Store:
You can also use this setting to:
- Test a newly built folder as c:\windows\policydefinitions on an Administrative Workstation against your Domain Policies, before you copy it to the Central Store on sysvol folder.
- Use older PolicyDefinitions folder to edit policy settings that don’t have an ADMX file in the latest build of your Central Store. One common example would be policies that have settings for older versions of Microsoft Office that are still in the Group Policies. Microsoft Office has a separate set of ADMX/L files for each release.
Known Issues
After you copy the Windows 10 .admx templates to the sysvol folder Central Store and overwrite all existing .admx and .adml files, select the Policies node under Computer Configuration or User Configuration. In this situation, you may receive the following error message:
Namespace ‘Microsoft.Policies.Sensors.WindowsLocationProvider’ is already defined as the target namespace for another file in the store.
File
\\ \SysVol \Policies\PolicyDefinitions\Microsoft-Windows-Geolocation-WLPAdm.admx, line 5, column 110
In the path in this message, represents the domain name.
Updated ADMX/L files for Windows 10 version 1803 contain only SearchOCR.ADML. It is not compatible with an older release of SearchOCR.ADMX that you still have in the Central Store. For more information about the problem, see «Resource ‘$(string referenced in attribute displayName could not be found» error when you open gpedit.msc in Windows.
Both issues can be avoided by building a pristine PolicyDefinitions folder from a base OS release folder as described above.
Копирование файлов и папок на компьютеры пользователей с помощью GPO
С помощью групповых политики вы можете автоматически скопировать определенные файлы и папки на все компьютеры домена. Вы можете поместить файлы на рабочий стол, в определенный каталог профиля пользователя или любой другой каталог на локальном диске компьютера. С помощью GPO вы можете автоматически копировать и обновлять из единого репозитория различные файлы конфигурации, ini-файлы, исполняемые exe-файлы приложений, dll-библиотеки или скрипты.
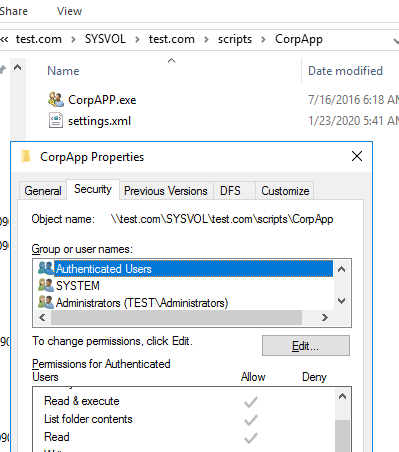
Допустим, наша задача – скопировать два файла ( app.exe и settings.xml ) на рабочий стол некоторых пользователей домена AD.
Прежде всего создайте сетевой каталог, в котором будут хранится исходные файлы, которые нужно скопировать на компьютеры пользователей. Это может быть, как общая папка на файловом сервере, так и каталог SYSVOL на контроллере домена (каталог автоматически реплицируется между всеми DC в домене с помощью DFS, его использовать удобно с точки зрения уменьшения нагрузки на WAN каналы). Я поместил файлы в каталог \\test.com\SYSVOL\test.com\scripts\CorpApp . Убедитесь, что у группы Authenticated Users есть права на чтение в этой папке.
- Создайте новую группу безопасности в AD – CorpAPPUsers. Можно создать группу с помощью PowerShell командлета: New-ADGroup CorpAPPUsers -path ‘OU=Groups,OU=SPB,dc=test,DC=com’ -GroupScope Global -PassThru –Verbose
Добавьте в группу пользователей, на рабочий стол которых нужно автоматически копировать файлы через GPO: Add-AdGroupMember -Identity CorpAPPUsers -Members aaivanov, bbpetrov, ausidorov - Запустите консоль управления политиками Group Policy Management ( gpmc.msc );
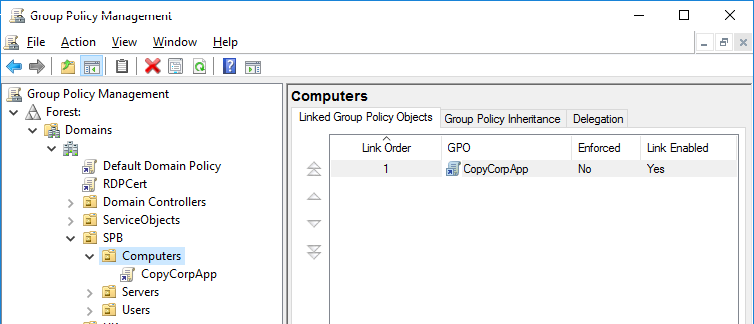
- Создайте новую объект GPO (CopyCorpApp) и назначьте его на OU, в котором находятся компьютеры пользователей;

- Перейдите в режим редактирования GPO (Edit);
- Разверните следующий раздел предпочтений групповых политик (Group Policy Preferences) UserConfiguration –>Preferences ->Windows Settings ->Files;

В качестве целевого каталога можно выбрать конкретную папку на компьютере, или использовать переменные окружения. Чтобы скопировать файл на рабочий стол текущего пользователя, используйте %DesktopDir% ;
Таким образом можно скопировать на компьютеры пользователей скрипты, исполняемые файлы приложений, или системные утилиты (PsTools, iperf, Portqry и т.д). Можно скопировать файл в Program Files и через GPO поместить ярлык на него на рабочий стол.
Пару слов о копирование каталогов с помощью групповых политик. В GPO нет встроенной возможности скопировать целиком каталог со всем содержимым. Вместо этого можно использовать политику Computer (User) Configuration –> Preferences -> Windows Settings -> Folders, которая позволяет создать каталог на компьютере. В этом случае для копирования файлов нужно использовать рассмотренный выше сценарий.
Use Group Policy to remotely install software
This article describes how to use Group Policy to automatically distribute programs to client computers or users.
Original product version: В Windows Server 2012 R2
Original KB number: В 816102
Summary
You can use Group Policy to distribute computer programs by using the following methods:
You can assign a program distribution to users or computers. If you assign the program to a user, it’s installed when the user logs on to the computer. When the user first runs the program, the installation is completed. If you assign the program to a computer, it’s installed when the computer starts, and it’s available to all users who log on to the computer. When a user first runs the program, the installation is completed.
You can publish a program distribution to users. When the user logs on to the computer, the published program is displayed in the Add or Remove Programs dialog box, and it can be installed from there.
Windows Server 2003 Group Policy automated-program installation requires client computers that are running Microsoft Windows 2000 or a later version.
Create a distribution point
To publish or assign a computer program, create a distribution point on the publishing server by following these steps:
- Log on to the server as an administrator.
- Create a shared network folder where you’ll put the Windows Installer package (.msi file) that you want to distribute.
- Set permissions on the share to allow access to the distribution package.
- Copy or install the package to the distribution point. For example, to distribute a .msi file, run the administrative installation ( setup.exe /a ) to copy the files to the distribution point.
Create a Group Policy Object
To create a Group Policy Object (GPO) to use to distribute the software package, follow these steps:
- Start the Active Directory Users and Computers snap-in by clicking Start, pointing to Administrative Tools, and then clicking Active Directory Users and Computers.
- In the console tree, right-click your domain, and then click Properties.
- Click the Group Policy tab, and then click New.
- Type a name for this new policy, and then press Enter.
- Click Properties, and then click the Security tab.
- Clear the Apply Group Policy check box for the security groups that you don’t want this policy to apply to.
- Select the Apply Group Policy check box for the groups that you want this policy to apply to.
- When you’re finished, click OK.
Assign a package
To assign a program to computers that are running Windows Server 2003, Windows 2000, or Windows XP Professional, or to users who are logging on to one of these workstations, follow these steps:
Start the Active Directory Users and Computers snap-in by clicking Start, pointing to Administrative Tools, and then clicking Active Directory Users and Computers.
In the console tree, right-click your domain, and then click Properties.
Click the Group Policy tab, select the policy that you want, and then click Edit.
Under Computer Configuration, expand Software Settings.
Right-click Software installation, point to New, and then click Package.
In the Open dialog box, type the full Universal Naming Convention (UNC) path of the shared installer package that you want. For example, \\ \ \ .msi .
Don’t use the Browse button to access the location. Make sure that you use the UNC path of the shared installer package.
Click Open.
Click Assigned, and then click OK. The package is listed in the right-pane of the Group Policy window.
Close the Group Policy snap-in, click OK, and then close the Active Directory Users and Computers snap-in.
When the client computer starts, the managed software package is automatically installed.
Publish a package
To publish a package to computer users and make it available for installation from the Add or Remove Programs list in Control Panel, follow these steps:
Start the Active Directory Users and Computers snap-in by clicking Start, pointing to Administrative Tools, and then clicking Active Directory Users and Computers.
In the console tree, right-click your domain, and then click Properties.
Click the Group Policy tab, click the policy that you want, and then click Edit.
Under User Configuration, expand Software Settings.
Right-click Software installation, point to New, and then click Package.
In the Open dialog box, type the full UNC path of the shared installer package that you want. For example, \\file server\share\file name.msi .
Don’t use the Browse button to access the location. Make sure that you use the UNC path of the shared installer package.
Click Open.
Click Publish, and then click OK.
The package is listed in the right-pane of the Group Policy window.
Close the Group Policy snap-in, click OK, and then close the Active Directory Users and Computers snap-in.
Test the package.
Because there are several versions of Windows, the following steps may be different on your computer. If they are, see your product documentation to complete these steps.
- Log on to a workstation that is running Windows 2000 Professional or Windows XP Professional by using an account that you published the package to.
- In Windows XP, click Start, and then click Control Panel.
- Double-click Add or Remove Programs, and then click Add New Programs.
- In the Add programs from your network list, click the program that you published, and then click Add. The program is installed.
- Click OK, and then click Close.
Redeploy a package
In some cases, you may want to redeploy a software package (for example, if you upgrade or change the package). To redeploy a package, follow these steps:
Start the Active Directory Users and Computers snap-in by clicking Start, pointing to Administrative Tools, and then clicking Active Directory Users and Computers.
In the console tree, right-click your domain, and then click Properties.
Click the Group Policy tab, click the Group Policy Object that you used to deploy the package, and then click Edit.
Expand the Software Settings container that contains the software installation item that you used to deploy the package.
Click the software installation container that contains the package.
In the right-pane of the Group Policy window, right-click the program, point to All Tasks, and then click Redeploy application. You will receive the following message:
Redeploying this application will reinstall the application everywhere it is already installed. Do you want to continue?
Click Yes.
Quit the Group Policy snap-in, click OK, and then close the Active Directory Users and Computers snap-in.
Remove a package
To remove a published or assigned package, follow these steps:
- Start the Active Directory Users and Computers snap-in by clicking Start, pointing to Administrative Tools, and then clicking Active Directory Users and Computers.
- In the console tree, right-click your domain, and then click Properties.
- Click the Group Policy tab, click the Group Policy Object that you used to deploy the package, and then click Edit.
- Expand the Software Settings container that contains the software installation item that you used to deploy the package.
- Click the software installation container that contains the package.
- In the right-pane of the Group Policy window, right-click the program, point to All Tasks, and then click Remove.
- Perform one of the following actions:
- Click Immediately uninstall the software from users and computers, and then click OK.
- Click Allow users to continue to use the software but prevent new installations, and then click OK.
- Close the Group Policy snap-in, click OK, and then closet the Active Directory Users and Computers snap-in.
Troubleshoot
Published packages are displayed on a client computer after you use a Group Policy to remove them.
This situation can occur when a user has installed the program but hasn’t used it. When the user first starts the published program, the installation is finished. Group Policy then removes the program.


