- 25 Useful Tips, Tricks, and Hacks to Master Windows 10
- Create a Full Windows 10 Backup
- Use the Hidden Screen Recorder App
- Sync Files to OneDrive
- Switch Between Desktops
- Search from the Start Menu
- Resize the Start Menu
- Remove Live Tiles from the Start Menu
- Pin Folders in File Explorer
- New Search Feature in File Explorer
- New Ribbon Menu in File Explorer
- Maximize Any Window
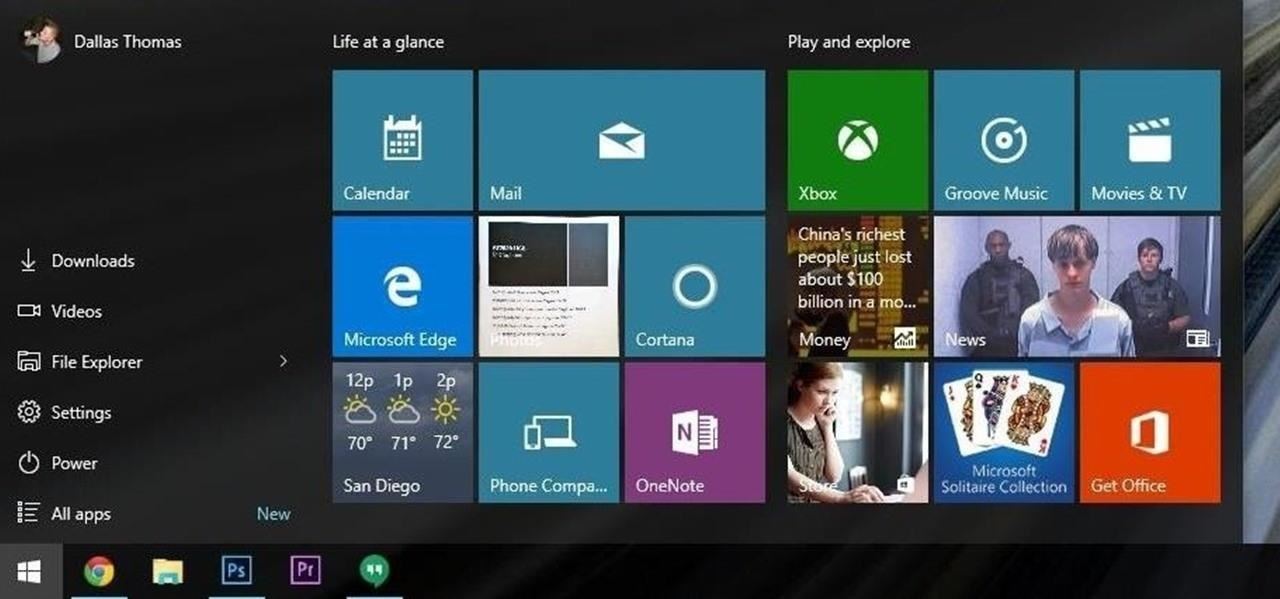
- Live Tiles in the Start Menu
- Libraries Menu in File Explorer
- Install It for Free
- Get Back Precious Hard Drive Space
- Enable Dark Mode System-wide
- Enable Cortana and Voice Search
- Disable the Lock Screen
- Create Multiple Desktops
- Customize the Start Menu As You Please
- Change Title Bar Color in Windows
- Change the Login Screen Background
- Change the Default Search Engine in Edge
- Access the Quick Actions Menu
- Access All Your Apps in the Start Menu
- How To : 45 Tips & Tricks You Need to Know to Master Windows 10
- #1: Install Windows 10 for Free
- Customize the Start Menu
- #2: Resize the Start Menu
- #3: Live Tiles in the Start Menu
- #4: Remove Live Tiles from the Start Menu
- #5: Move & Resize Tiles in the Start Menu
- #6: Reboot & Shut Down Options in the Start Menu
- #7: Access All Your Apps in the Start Menu
- #8: Pin Items to the Start Menu
- #9: Search from the Start Menu
- #10: Customize the Start Menu Even More
- Quick Actions Toggles
- #11: Access the Quick Actions Menu
- #12: Customize the Quick Actions Menu
- Cortana Voice Assistant
- #13: Enable Cortana & Voice Search
- #14: Save Locations for Cortana
- #15: Set Reminders with Cortana
- #16: Get Directions with Cortana
- #17: Get at-a-Glance Information with Cortana
- #18: Have Fun with Voice Commands
- Desktop Control
- #19: Create Multiple Desktops
- #20: Switch Between Desktops
- Window Control
- #21: Maximize Any Window
- #22: Use Snap Assist for Split-Screen View
- #23: Snap Windows into Corners for 3 or 4 Apps at a Time
- #24: Change Title Bar Color in Windows
- Microsoft’s New Edge Browser
- #25: Use Cortana Inside of Edge
- #26: Change the Default Search Engine in Edge
- #27: Annotate, Highlight, & Insert Notes in Edge
- #28: Use Reader Mode in Edge
- #29: Share Links Easier in Edge
- #30: Pin Websites to Start Menu from Edge
- #31: Enable Dark Mode in Edge
- #32: Enable ‘Do Not Track’ in Edge
- #33: Keyboard Navigation in Edge
- #34: Easy Tab Management in Edge
- New File Explorer
- #35: New Ribbon Menu in File Explorer
- #36: New Search Feature in File Explorer
- #37: Pin Folders in File Explorer
- #38: Libraries Menu in File Explorer
- Everything Else
- #39: Get Back Precious Hard Drive Space
- #40: Change the Login Screen Background
- #41: Disable the Lock Screen
- #42: Enable Dark Mode System Wide
- #43: Use the Hidden Screen Recorder App
- #44: Sync Files to OneDrive
- #45: Create & Restore a Full Windows 10 Backup
25 Useful Tips, Tricks, and Hacks to Master Windows 10
by Theodorus II September 24, 2015, 6:00 pm
Windows 10 has finally arrived and people are probably looking for useful tips, tricks and hacks to better help them understand this new system! As you probably know by now, upgrading to Windows 10 is totally free, but that shouldn’t stop you from asking, “is it worth the cost?” Cost can mean different things to different people and if the only reason you are thinking to upgrade is because it’s free, you might want to stop for a second. Keep in mind that the cost to you can be a lot greater in the near future, especially if you are comfortable with how your computer works now and the potential for Windows 10 to disrupt your work flow with new feature locations and overall a new look. Nevertheless, we were able to find specific features Microsoft Windows 10 offers that some will love and others will loathe as usually happens in such cases. As expected, the company—thank God—brought back the familiar Start menu, but it has also refined Windows 8 features and added entirely new elements, such as “task view.” However the question remains, will you see these changes as major advancements you can’t live without, or will you stay with a previous version of Windows? To help you decide (and to help you personalize Windows 10), here are 25 Useful Tips, Tricks and Hacks to Master Windows 10.
After you’ve mastered these useful Windows 10 tips, tricks, and hacks, be sure to take your new Operating System on the road to one of these 25 Great Destinations Digital Nomads Should Visit Today.
Create a Full Windows 10 Backup
To begin with, it’s always a good idea to keep your system backed up, and Windows 10 makes it really easy to do so using the built-in “System Image” utility. Go to the Start button (windows logo), then select Settings, Update & security, Backup, add a drive and choose an external drive or network location for your backups. All set. Every hour, Microsoft will back up everything in your user folder (C:Usersusername).
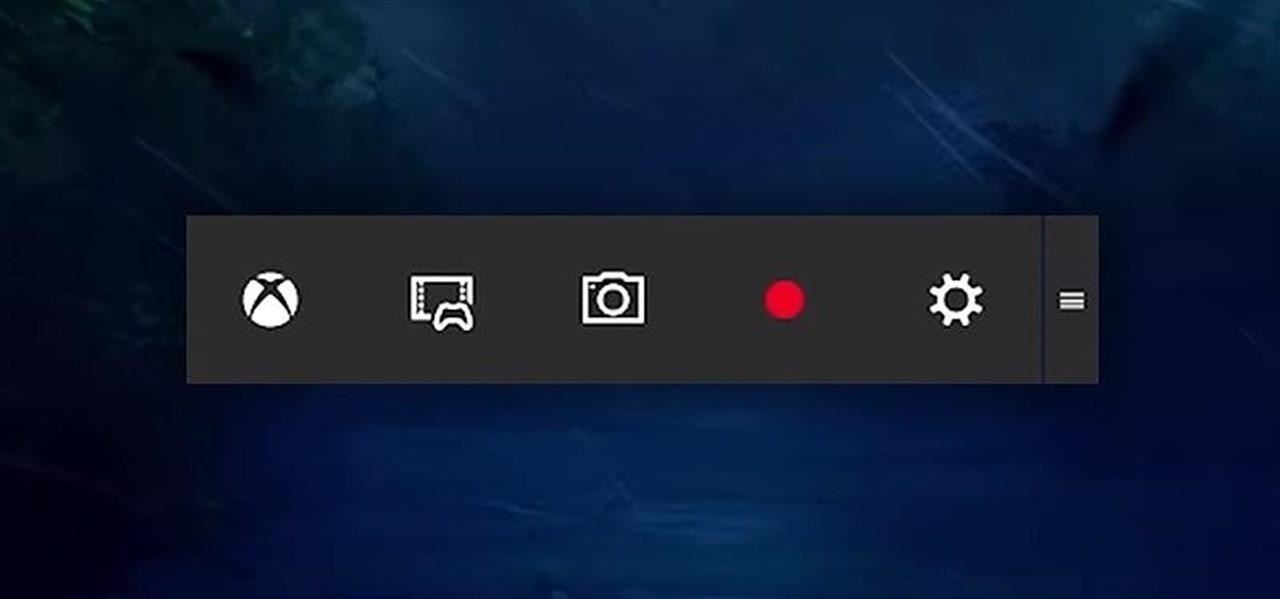
Use the Hidden Screen Recorder App
Windows 10 has a secret screen recording tool that can be used to capture on-screen activity as a video file. One of the new features of the Xbox app is the Game bar, which allows you to record footage of your gameplay. But as it turns out, this functionality allows you to not only record video games, but capture footage inside most of your apps as well. Accessing the Game bar is straightforward. Simply press and hold the Windows and G keys. The Game bar, which is essentially a toolbar, will then pop up on the screen. If it’s your first time launching the Game bar for that app, you will get a message asking, “Do you want to open Game bar?”—simply click on “Yes, this is a game.” Once launched, it’s pretty straightforward to use.
Sync Files to OneDrive
In Windows 10, placeholders are replaced by selective sync. To change OneDrive settings, right-click the icon in the notification area, select Settings, switch to the Choose folders tab, and click the Choose folders button. You can either sync All files and folders on your OneDrive, or Choose folders to sync, meaning they will be available locally and you will be ready to go.
Switch Between Desktops
Just click the Task View button, then click any of the thumbnails at the bottom of the screen to switch to an open desktop. Closing your desktops out is equally simple—just click the Task View button, then hover your mouse pointer over one of the desktop thumbnails and click the X.
Search from the Start Menu
Another great way to quickly get to an app or file is to open the Start menu, either by clicking on it or using the Windows key, then simply type in the name of the app, file, or folder you’re looking for.
Resize the Start Menu
The Start Menu itself has many features, the ability to resize it being a very new one. Thanks to the Windows 10 interface this is done in a very simple way and it can make using the operating system a much friendlier experience. To resize the Start Menu horizontally, move your mouse to its right edge until the cursor becomes a double-headed arrow. Now click or tap and drag it to the left to shrink the Start Menu. To increase the horizontal size of the Start Menu, click or tap on the edge and drag it to the right.
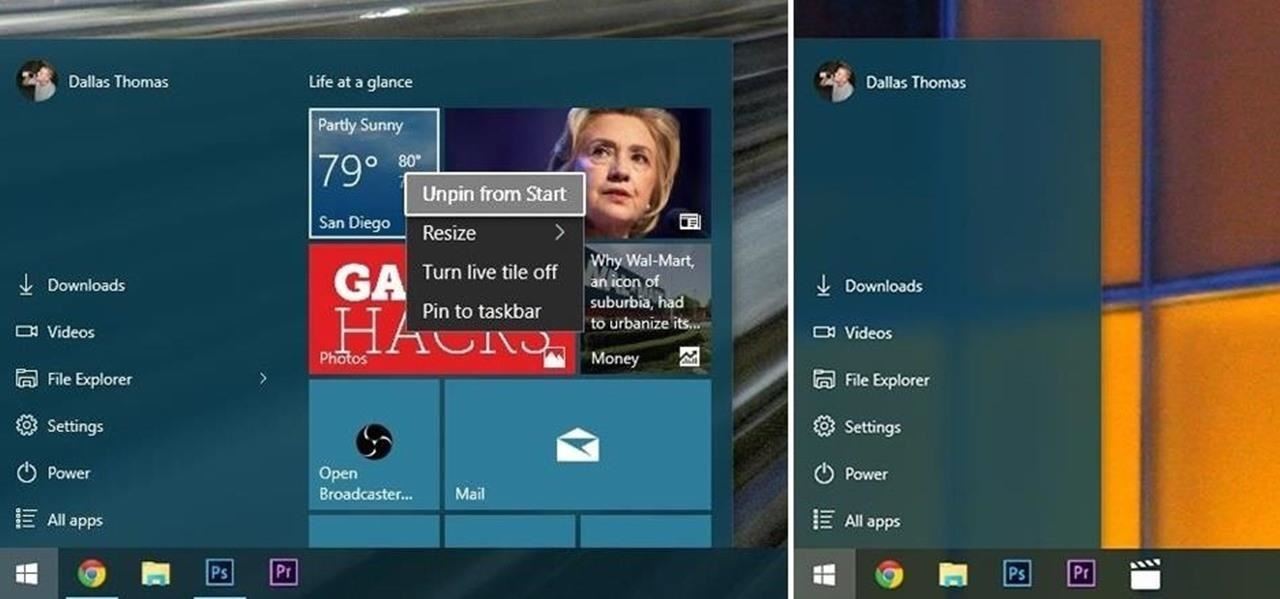
Remove Live Tiles from the Start Menu
If you used Windows 7 and never got around to 8, then not only are Live Tiles new for you, but they also may not be that useful. Luckily, it’s a simple process; the bad news is that you’ll have to right-click on each tile in your Start Menu and select unpin. Once that’s done, you’ll be left with an empty space where the tiles used to be. Just click and hold on the top-right corner of the Start Menu, and drag it all the way to the left so that only the “Places” and “Most used” section is showing. Voila…You just got rid of them!
Pin Folders in File Explorer
If there are any folders or libraries that you’d like to pin to your Quick Access menu, simply right-click them in File Explorer, then select “Pin to Quick Access” and they’ll be easily available in the left pane.
New Search Feature in File Explorer
The search box isn’t new, but now it’ll only look for files and folders within the folder or drive you’ve currently selected, helping to narrow things down quite a bit. Once search results have populated, click the Search tab near the top of the screen to expose more options in a ribbon menu.
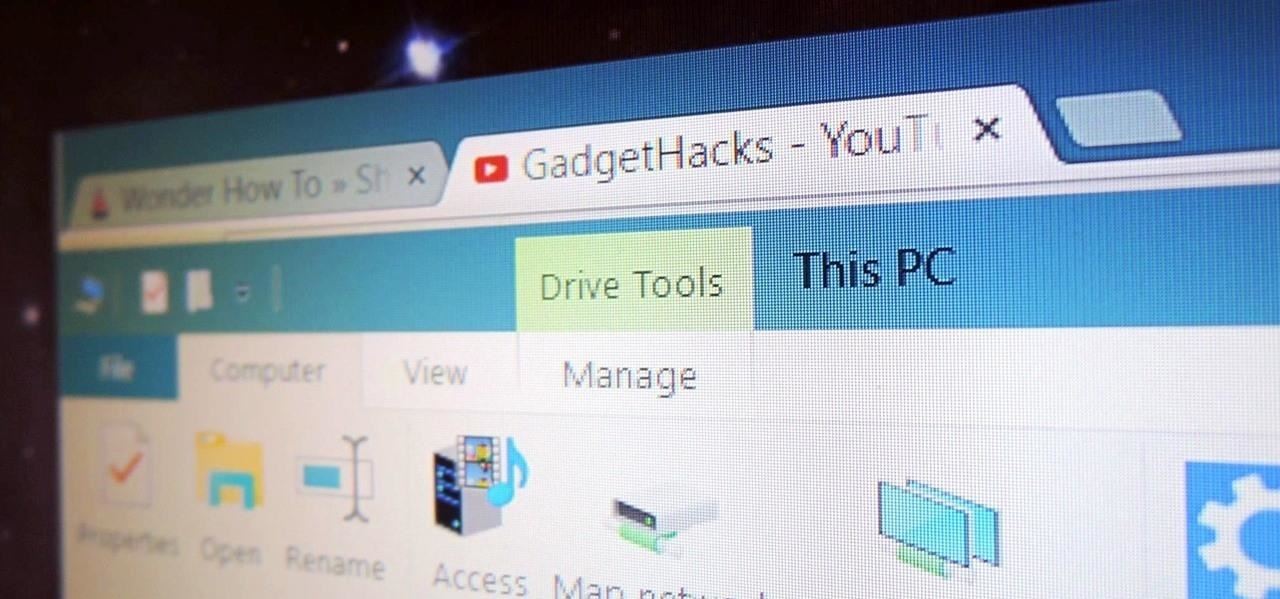
New Ribbon Menu in File Explorer
Much like recent versions of Microsoft Office, the new File Explorer uses what is called a Ribbon menu. When you click one of the menu options near the top of the screen (File, Home, Share, or View), this new menu will appear.
Maximize Any Window
First, if you want to quickly maximize any window, just click and hold the title bar, then drag it all the way to the top edge of your screen. As soon as you let go of your mouse, the window will be maximized.
Live Tiles in the Start Menu
If you’ve used Windows 8, then you know all about Live Tiles, the interactive and updated “icons” used to display information like weather, news, and more. Well now they’re contained in the Start menu.
Libraries Menu in File Explorer
The old Libraries feature is nowhere in sight, but it isn’t gone. Simply go to the View ribbon menu then click the “Navigation Pane” option. From here, select the “Show Libraries” entry and it’ll be back in the left-side pane.
Install It for Free
The greatest thing about Windows 10 is that it is 100 percent free. All you have to do is upgrade and you’re ready to go.
Get Back Precious Hard Drive Space
When you upgrade from an older version of Windows to Windows 10, a good chunk of your disk space is used to keep old system information on hand, in case you decide to revert back. But if you value disk space over easy rollbacks, you can reclaim around 20 GB simply by removing these old files.
Enable Dark Mode System-wide
The Edge browser comes with a Dark Mode, which can also be applied to other menus and apps. Very simply, in the search bar, just type in “regedit” without the quotes and click on the disintegrating cube icon to launch the Registry Editor. Depending on your security settings, User Account Control might prompt you for permission. If so, simply click on “Yes.” On the left sidebar is the directory structure. For the following, simply click on the chevron next to the directory name to expand it and navigate down the hierarchy. On the right pane, should be an empty area, right-click and choose “New,” then “DWORD (32-bit) Value.” You should now see a new entry on the right pane called “New Value #1” highlighted in blue. Rename the highlighted field to “AppsUseLightTheme,” and you’ll now see a new entry in the right pane called “AppsUseLightTheme” with a default value set to 0. Just log out and log back in and you’re ready.
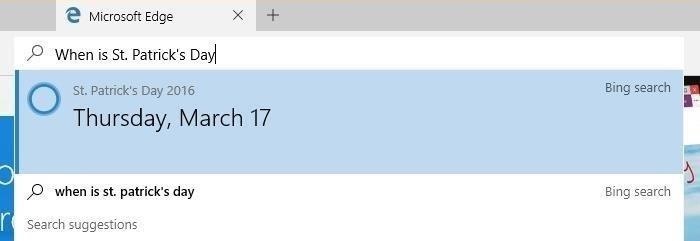
Enable Cortana and Voice Search
Start by clicking the search box right next to the Start button in your taskbar then click the Cortana icon in the bottom-left corner of the pop-up, which looks like a circle just above the Windows logo. Accept the agreement and Cortana will be ready to go, but keep in mind that you’ll still need to activate the Voice Search Hotword.
Disable the Lock Screen
The Windows 10 lock screen is great if you’re using a tablet, but for most of us with standard PCs, it’s an unnecessary feature. Unfortunately, there isn’t a straightforward way of removing it, but there are a couple of methods that are easy enough even for the true novice. My favorite one for example goes like this: To begin, press and hold the Windows button on your keyboard, then hit the R key to open the Run dialog. Next, simply type “regedit” and hit Enter. Next, right-click the Windows folder, then choose “New” and select “Key.” From here, right-click this newly-created key and choose “Rename,” then change the name to read Personalization. When you’re done with that, right-click this newly-created DWORD and choose “Rename,” then change the name to read NoLockScreen. From here, double-click the NoLockScreen DWORD that you just renamed, then a small window will pop up. In the “Value data” field of this pop-up, enter the number 1, then click “OK.” At this point, just reboot your PC, and when you get back up, you shouldn’t see the superfluous lock screen anymore.
Create Multiple Desktops
Start by clicking the Task View button next to the search bar (or icon) in your taskbar, which will bring up a button in the bottom-right corner of your screen labeled “+ New Desktop.” Just click this button to create a second desktop, then click it again to create a third, and so on.
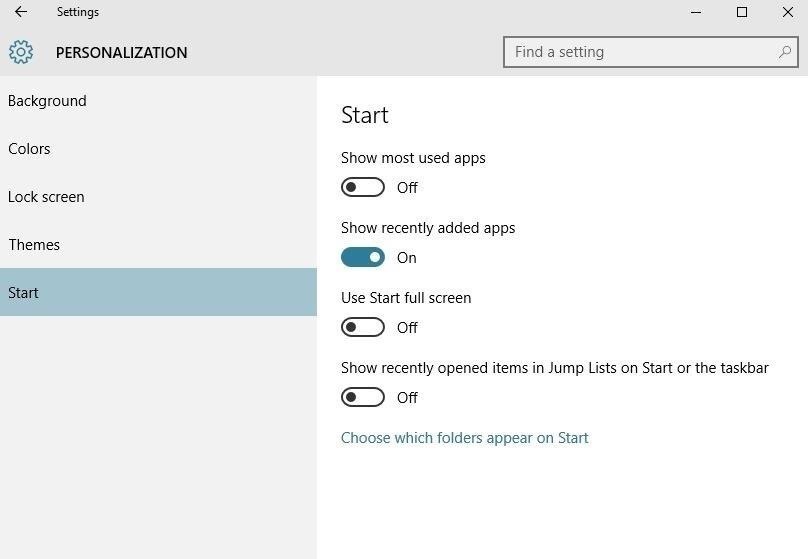
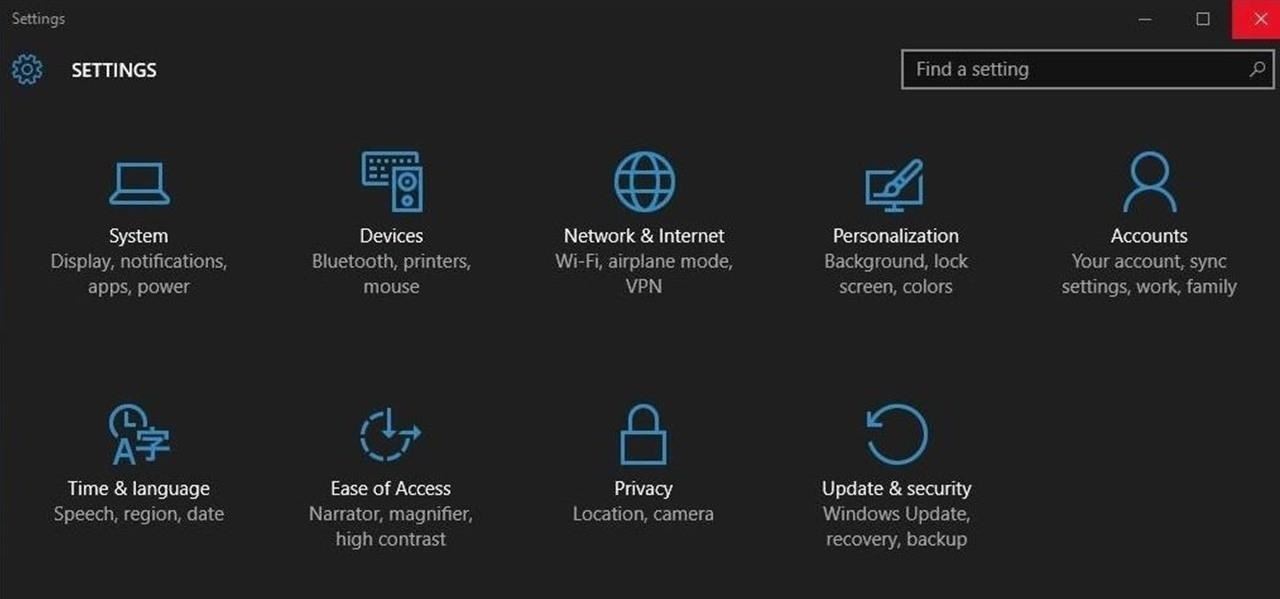
Customize the Start Menu As You Please
You can change the overall appearance of the Start menu by choosing Settings, then go to Personalization. From there, select the Colors option to change the background color of your Start menu. Head to the Start tab to adjust even more options, such as hiding most used and recently added apps as well as the folders that appear and more.
Change Title Bar Color in Windows
What should’ve been a no-brainer ended up not being an option—changing the color of a window’s title bar. If you’re unhappy with the drab white, there’s an easy trick you can do to change the color. To begin with, visit your update settings and see if build 10525 is available for download and install. You will have to wait for the download to install and your system to restore. After that you will need to head back to Settings and click on Personalization. Now, make sure “Show color on Start, Taskbar, and Action center” is selected. Choose your color…Yep you can finally choose your own color.
Change the Login Screen Background
Windows 10 uses the same “accent color” used elsewhere on your desktop. By default, it grabs an accent color from your desktop background. To change this, visit the Settings app, select Personalization, select Colors, and disable the “Automatically pick an accent color from my background” option. The color you select here will be used on your login screen if you’ve used the above registry hack.
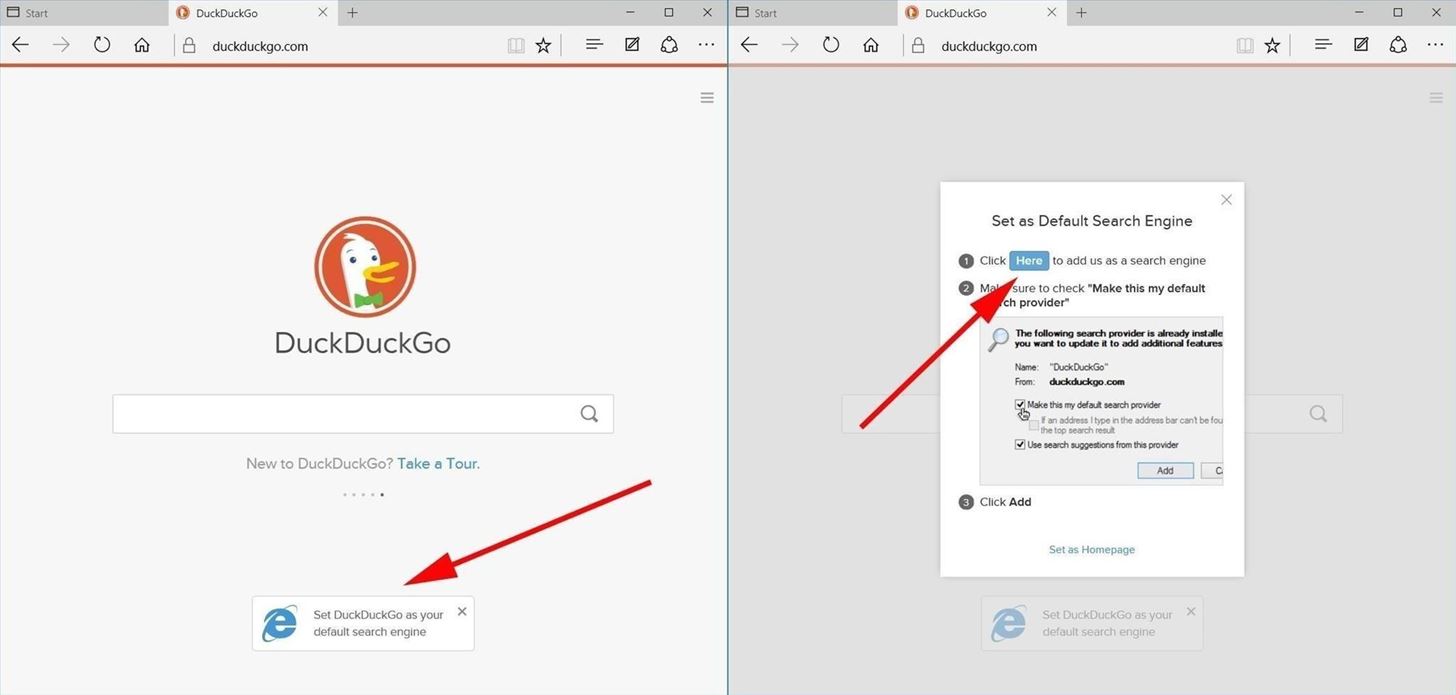
Change the Default Search Engine in Edge
Bing, unsurprisingly, is Edge’s default search engine, but it doesn’t have to be. Navigate to another, and if it’s supported, you’ll see an option to add it to Edge. If a search engine isn’t supported, change your search provider, click or tap the menu button — that’s the button with three dots at the top-right corner of the MIcroosft Edge window. Select “Settings” in the menu. Scroll down in the Settings panel and tap or click the “View advanced settings” button near the bottom. Scroll down again in the Advanced settings list and you’ll see the “Search in the address bar with” box. Click or tap it and select “Add new.” You’ll see a list of available search providers. Select the search engine you want to use and click or tap “Add as default.” If the search engine you want to use doesn’t appear here, be sure you’ve visited the search engine’s homepage first. If you have and it still doesn’t appear, that search engine probably doesn’t support OpenSearch yet so be patient or pick another one.
Access the Quick Actions Menu
To access the Quick Actions menu, simply click the Action Center icon in your notification area, which looks a lot like a chat bubble icon. From there, just click any icon to quickly adjust any of its settings.
Access All Your Apps in the Start Menu
Possibly the best thing about having the Start menu back is the ability to access all your apps from it. All you have to do is just click the “All Apps” option to see them in an alphabetical list.
How To : 45 Tips & Tricks You Need to Know to Master Windows 10
Windows 10 is officially here, and frankly, there’s a ton of new features in Microsoft’s latest operating system. From the return of the Start menu to the new Edge browser, Windows 10 can take some getting used to.
Luckily, we’ve done a lot of the leg work for you, and what follows are all the tips and tricks, big and small, that you need to know to get you quickly up and running with Windows 10 on your laptop, desktop, or Surface.
#1: Install Windows 10 for Free
If you haven’t yet upgraded, what the heck are you waiting for?! Windows 10 is not only the best version of the operating system since Windows 7, it’s also totally free. More info here.
Customize the Start Menu
The return of the Start menu has to be the most anticipated addition to Windows 10, at least for those of you using Windows 8. More info here.
#2: Resize the Start Menu
You can resize the Start menu, making it so that it only takes up a small corner of your screen, or as large as your entire desktop. Just drag from the corners.
#3: Live Tiles in the Start Menu
If you’re coming from Windows 8, you know about Live Tiles, the interactive and updated «icons» used to display information like weather, news, and more. Luckily, they’re now contained within the Start menu.
#4: Remove Live Tiles from the Start Menu
If you’re coming from Windows 7, not only are Live Tiles new, but they may not be all that useful. Luckily, it’s a simple process to not only remove them, but to slim up the Start menu so it more closely resembles the view you’re used to. More info here.
#5: Move & Resize Tiles in the Start Menu
Live Tiles can easily to be moved and resized to your liking so that the information you want is just where you want it. To move a Tile, simply click, hold, and drag it. To resize a Tile, right-click on it, then choose a size from the «Resize» option.
#6: Reboot & Shut Down Options in the Start Menu
Options for shutting down, rebooting, and sleeping your PC are now located in the Start menu. Simply click on the «Power» entry in the Start menu to access these options.
#7: Access All Your Apps in the Start Menu
Possibly the best thing about having the Start menu back is the ability to access all your apps from it—just click the «All apps» option to see them in an alphabetical list.
#8: Pin Items to the Start Menu
While having a full app list is great, it can be a pain to scroll through if you find yourself constantly opening the same few apps over and over. To make them easier to access, simply right-click on them, then choose the «Pin to Start» option to have placed as a Tile. This can also be done with folders and documents from File Explorer.
#9: Search from the Start Menu
Another great way to quickly get to an app or file is to open the Start menu, either by clicking on it or using the Windows key, then simply typing is the name of the app, file, or folder you’re looking for.
#10: Customize the Start Menu Even More
You can change the overall appearance of the Start menu by choosing Settings, then going to Personalization. From there, select the Colors option to change the background color of your Start menu. Head to the Start tab to adjust even more options, like hiding most used and recently added apps, as well as the folders that appear and more.
Quick Actions Toggles
There are a handful of toggles for common functions that are easily accessible without having to delve into the Control panel or Settings. More info here.
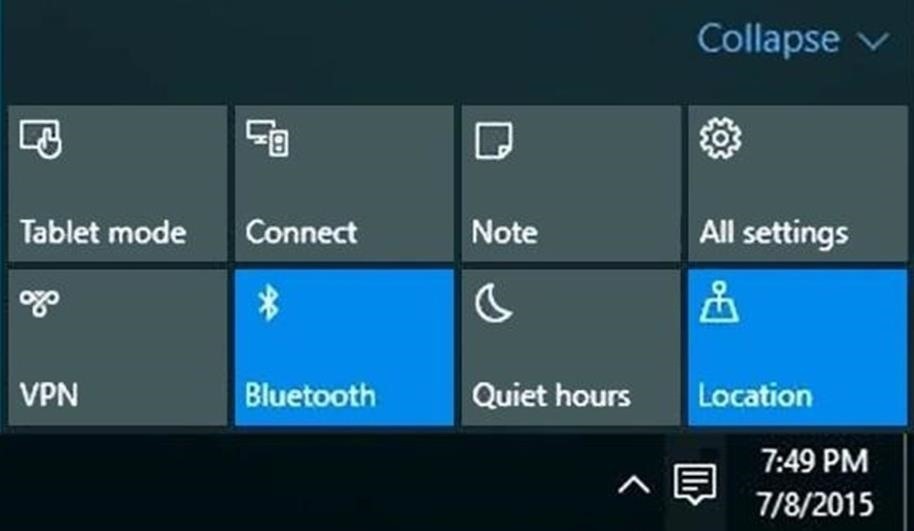
#11: Access the Quick Actions Menu
To access the quick actions menu, simply click the Action Center icon in your notification area, which looks a lot like a chat bubble icon. From there, just click any icon to quickly adjust any of its settings.
#12: Customize the Quick Actions Menu
Head to the Settings entry in your Start menu, then choose the System entry. Now go to the «Notifications & actions» tab where you’ll see your top four quick action toggles listed at the top of the screen. From there, you’ll see a drop-down menu with all of the possible quick actions that you can assign to that spot.
Cortana Voice Assistant
Microsoft’s long-awaited voice assistant—Cortana—has finally debuted officially with Windows 10, but there is a bit of setup involved. More info here.

#13: Enable Cortana & Voice Search
Start by clicking the search box right next to the Start button in your taskbar, then click the Cortana icon in the bottom-left corner of the popup, which looks like a circle just above the Windows logo. Accept the agreement and Cortana will be ready to go, but you’ll still need to activate the Voice Search hotword.
To set up «Hey Cortana» hotword detection on your computer, click the Notebook icon in Cortana’s sidebar menu (which looks like a book with a small circle on the cover), then head to Settings. Now scroll down to the Hey Cortana option, enable it, and click the «Learn my voice» button to begin setup.
#14: Save Locations for Cortana
Like other voice assistants, Cortana works best when she has some information about you. A good place to start would be to set up common locations so that you get better directions and traffic info.
To add addresses such as home, work, and your other favorite places, head to the Notebook menu and click «About Me» again. From here, select «Edit favorites,» then click the + button near the bottom-right corner, add an address, label it, and repeat for additional locations.
#15: Set Reminders with Cortana
Saying or typing «Remind me to (blank)» will prompt you to enter a time or location for your reminder, or you can skip the second part by saying it all at once—»Remind me to take my vitamins every morning at 8,» or «Remind me to buy dish soap the next time I’m at Target,» for instance.
#16: Get Directions with Cortana
This is where having set locations will come into play. You can ask conversational questions like «Get me to the nearest coffee shop,» or «How far is it to Chicago,» so location-based searching is rather easy.
#17: Get at-a-Glance Information with Cortana
Of course, you don’t have to pro-actively search for information—Cortana aims to get you the info you want before you want it.
As soon as you click the Cortana search box—even before you actually perform a search—you’ll see a series of cards that display relevant information, which are ordered by what Cortana thinks is most relevant to you at this exact moment.
#18: Have Fun with Voice Commands
Being a voice assistant means you can literally talk to Cortana, and ask her some funny and useful things. Have her set reminders, control music, open an app, or tell you a joke. We have a great list of commands to get you going right here.
Desktop Control
Windows 10 handles multiple desktops beautifully, once you know how to set them up and switch between them. More info here.
#19: Create Multiple Desktops
Start by clicking the task view button next to the search bar (or icon) in your taskbar, which will bring up a button in the bottom-right corner of your screen labeled «+ New desktop.» Just click this button to create a second desktop, then click it again to create a third, and so on.
#20: Switch Between Desktops
Just click the task view button, then click any of the thumbnails at the bottom of the screen to switch to an open desktop.
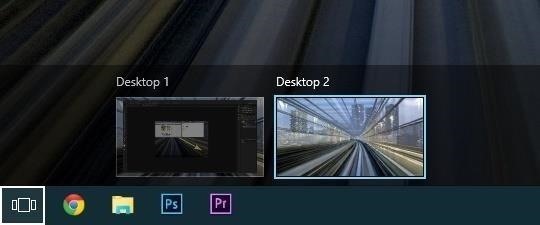
Closing your desktops out is equally simple—just click the task view button, then hover your mouse pointer over one of the desktop thumbnails and click the «X» button.
Window Control
The window «Snap» feature was introduced in Windows 7, but now has a few new tricks up its sleeve with the ability to easily maximize windows, snap windows into corners, and a new «Snap Assist» feature. More info here.
#21: Maximize Any Window
First, if you want to quickly maximize any window, just click and hold the title bar, then drag it all the way to the top edge of your screen. As soon as you let go of your mouse, the window will be maximized.
#22: Use Snap Assist for Split-Screen View
To open two windows in a perfect split-screen view, start by dragging the first window to either the left or right edge of your screen. When you release your mouse button, the window will automatically be sized to fit exactly one half of your screen, then Snap Assist will populate the opposite half of your display with thumbnails of any other windows you currently have open.
#23: Snap Windows into Corners for 3 or 4 Apps at a Time
You can even snap windows to each corner of your display by dragging any window into one of the four corners of your screen, then let go of your mouse button to snap it into a window that’s a quarter of the size.
#24: Change Title Bar Color in Windows
What should’ve been a no-brainer ended up not being an option—changing the color of a window’s title bar. If you’re unhappy with the drab white, there’s some easy trickery you can do to change the color. More info here.
Microsoft’s New Edge Browser
Out with the old (Internet Explorer) and in with the new (Edge). Microsoft’s long-awaited IE successor is here, but there is a lot to learn about Edge. More info here.
#25: Use Cortana Inside of Edge
As long as Cortana has been set up through the taskbar, you can use her inside of Edge. Start using it by typing something you would typically ask Cortana into the search bar at the top of Edge. After your request is completely typed in, a Cortana window with your results will appear underneath it in blue.
#26: Change the Default Search Engine in Edge
Bing, unsurprisingly, is Edge’s default search engine, but it doesn’t have to be. Navigate to another, and if it’s supported, you’ll see option to add it to Edge.
If a search engine isn’t supported, check out our guide for a third-party solution that can add in many search options to Edge.
#27: Annotate, Highlight, & Insert Notes in Edge
Probably the coolest feature of them all is the ability to mark up webpages in Edge. You can quickly take notes, write, highlight, and even type directly on a website. When you click on the Edit icon at the top right, a purple bar will appear, with tools to draw, highlight, erase, make notes, take screenshots, and share.
#28: Use Reader Mode in Edge
Seeing a page littered with ads, related stories and pictures, and videos can be a big distraction. Luckily, Edge comes with a Reading view that strips all that crap away, leaving behind a clean page with just the important stuff.
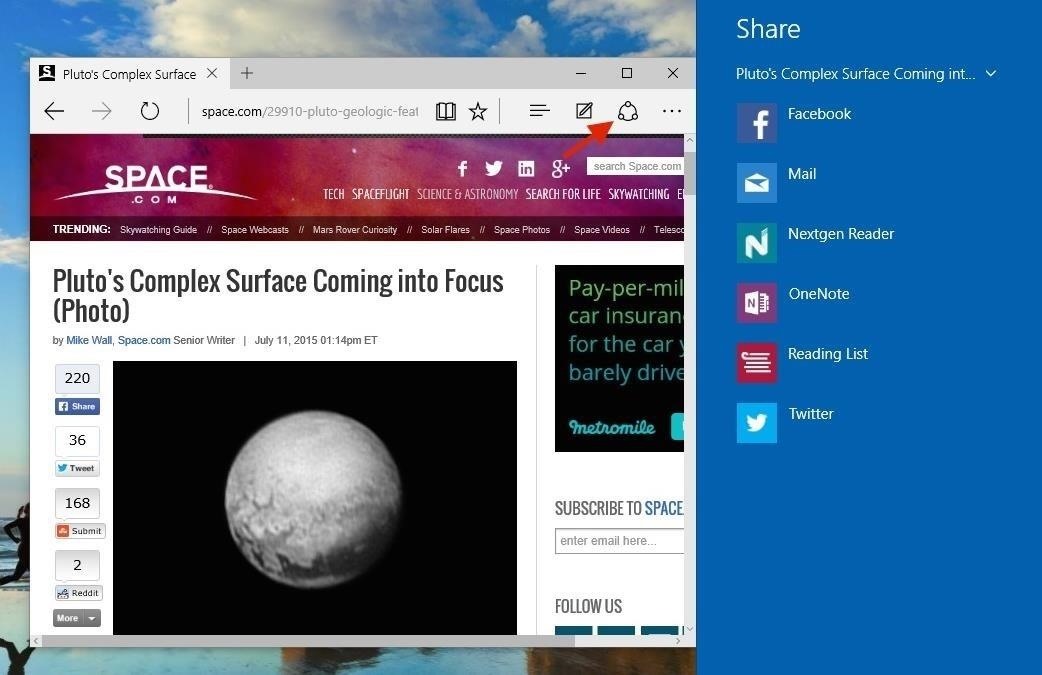
#29: Share Links Easier in Edge
As long as you have the corresponding apps installed, you can easily share links to them using the Share button located to the right of the address bar.
#30: Pin Websites to Start Menu from Edge
You can add your favorite websites to the brand new Start menu by clicking on «Pin to Start» in Edge’s three-dot menu.
#31: Enable Dark Mode in Edge
Dark mode in Edge is easily accessible—just go to Settings and choose Dark from the «Choose a theme» option.

#32: Enable ‘Do Not Track’ in Edge
The «Do Not Track» option in Window 10 is disabled by default, which notifies online advertisers to not gather or use information based on your location and requests. If you want to enable this feature, click on the three-dot menu and go to Settings -> View advanced settings, scroll down and turn on «Send Do Not Track requests.»
#33: Keyboard Navigation in Edge
On Windows 10, you can enable caret, or keyboard, browsing by clicking on the three-dot menu, going to Settings -> View advanced settings, and enabling «Always use caret browsing,» then turn it on by hitting F7.
Once enabled, you can control the flashing text cursor (or caret) and copy and paste text, as well as open links, without having to use your mouse or trackpad. Disable caret browsing by hitting F7 again.
#34: Easy Tab Management in Edge
Right-click on any tab to see options to open recently closed tabs, close tabs to the right of the tab you selected, refresh all tabs, duplicate the tab you selected, and move the selected tab to a new window.
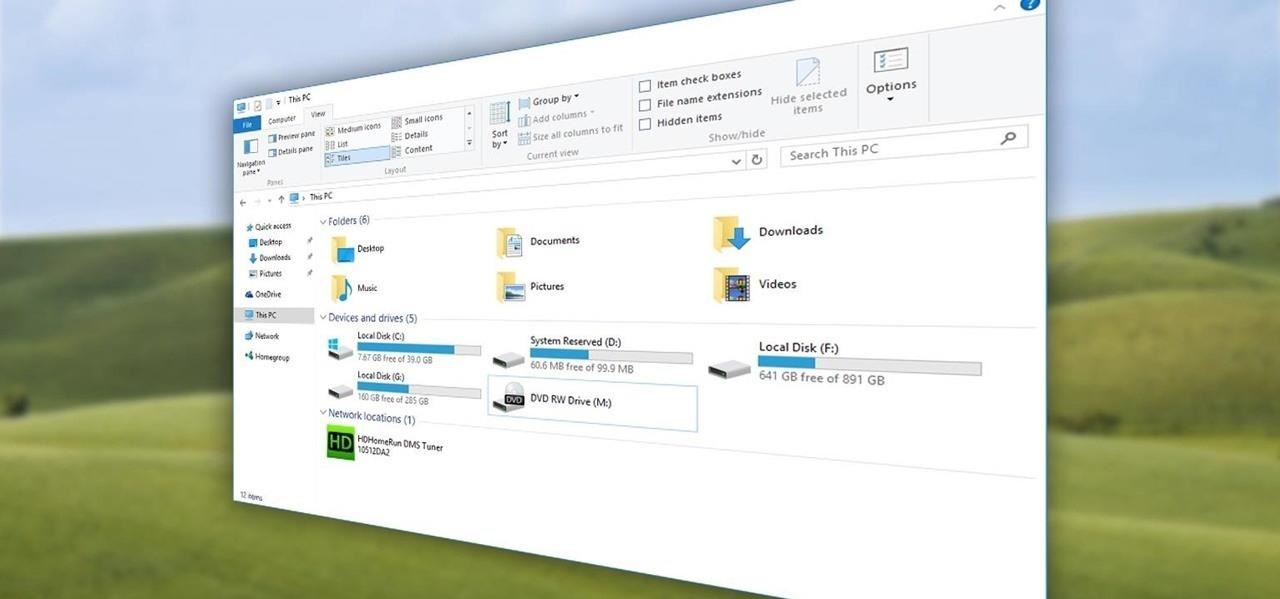
New File Explorer
Windows Explorer has become File Explorer, and with the name change come plenty of improvements. More info here.
#35: New Ribbon Menu in File Explorer
Much like recent versions of Microsoft Office, the new File Explorer uses what is called a Ribbon menu. When you click one of the menu options near the top of the screen (File, Home, Share, or View), this new menu will appear.
#36: New Search Feature in File Explorer
The search box isn’t new, but now it’ll only look for files and folders within the folder or drive you’ve currently selected, helping to narrow things down quite a bit. Once search results have populated, click the Search tab near the top of the screen to expose more options in a ribbon menu.
#37: Pin Folders in File Explorer
If there are any folders or libraries that you’d like to pin to your Quick access menu, simply right-click them in File Explorer, then select «Pin to Quick access» and they’ll be easily available in the left pane.
#38: Libraries Menu in File Explorer
The old Libraries features is nowhere in sight, but it isn’t gone. Simply go to the View ribbon menu, then click the Navigation Pane option. From here, select the «Show libraries» entry and it’ll be back in the left-side pane.
Everything Else
There’s more to Windows 10 than just the Start menu, quick action toggles, Cortana, desktop and window controls, Edge, and the new File Explorer. Here’s all of the other goodies hiding within Windows 10.
#39: Get Back Precious Hard Drive Space
When you upgrade from an older version of Windows to Windows 10, a good chuck of your disk space is used to keep old system information on-hand, in case you decide to revert back.
But, if you value disk space over easy rollbacks, you can claim around 20 GB back simply by removing these old files. More info here.
#40: Change the Login Screen Background
Windows 10 sports a spiffy new Login screen with its «Hero» background, but annoyingly, without a way to change the background. But with the help of a third-party app, you can very easily change the background to a color or picture of your choosing (and remove your account picture for a sleeker look). More info here.

#41: Disable the Lock Screen
The Windows 10 lock screen is great if you’re using a tablet, but for most of us with standard PCs, it’s an unnecessary feature. Unfortunately, there isn’t a straightforward way of removing it, but there are a couple of methods that are easy enough even for the most-novice user. More info here.
#42: Enable Dark Mode System Wide
The Edge browser comes with a Dark mode, but the theme can also be applied to other menus and apps. To do so, you’ll need to delve into the Registry, but it’s all pretty simple. More info here.
#43: Use the Hidden Screen Recorder App
Windows 10 comes with the Xbox app, and within that is a screen recorder function that you can use in other apps. More info here.
#44: Sync Files to OneDrive
Microsoft’s OneDrive is their cloud storage service, and it integrates incredibly well across Windows, Mac, iOS, and Android systems. As long as you have the OneDrive app, all connected devices can share data. More info here.
#45: Create & Restore a Full Windows 10 Backup
It’s always a good idea to keep your system backed up, and Windows 10 makes it really easy to do so using the built-in «system image» utility. More info here.
And it doesn’t stop here. Check out our followup guide with 15 more tips and tricks you need to know to master Windows 10.
Got any tips not covered? Be sure to share your own in the comment section below, or on Facebook, Google+, or Twitter.
Keep Your Connection Secure Without a Monthly Bill. Get a lifetime subscription to VPN Unlimited for all your devices with a one-time purchase from the new Gadget Hacks Shop, and watch Hulu or Netflix without regional restrictions, increase security when browsing on public networks, and more.


