- Quick Fix Windows Detected a Hard Disk Problem in Windows 10/8/7 [Partition Magic]
- Summary :
- Quick Navigation :
- Windows Has Detected a Hard Disk Problem
- Copy Disk for Backup When Windows Detected a Hard Disk Problem
- Windows Detected a Hard Disk Problem Fix Windows 7/8/10
- Way 1: Scan and Kill Virus
- Way 2: Run SFC to Fix System File
- Way 3: CHKDSK
- Way 4: Surface Test
- How to Avoid Windows Hard Disk Problem Warning
- Summary
- Windows Detected a Hard Disk Problem FAQ
- ABOUT THE AUTHOR
- Проверка жесткого диска на наличие ошибок в Windows 7
- Проблема
- Решение
Quick Fix Windows Detected a Hard Disk Problem in Windows 10/8/7 [Partition Magic]
By Vera | Follow | Last Updated November 30, 2020
Summary :
“Windows detected a hard disk problem” error message appears in your computer? What should you do in case of this issue? How to fix hard disk problem Windows 7/8/10? Just follow this post and you will be able to fix the hard disk error without losing any data.
Quick Navigation :
Windows Has Detected a Hard Disk Problem
«Windows detected a hard disk problem» is an always asked issue. When running Windows 10, Windows 8, or Windows 7, it is possible that you come across with such an error message.
Just like the following screenshot shows and suggests you «Back up your files immediately to prevent information loss, and then contact the computer manufacturer to determine if you need to repair or replace the disk».
Generally speaking, this error shows you a serious warning.
- The hard drive is failing and it may die sooner or later.
- All data on the hard drive, including programs, applications, documents, excels, files, photos, videos, may be lost once the disk died.
- The system file in Windows may get corrupted and the operating system may be unbootable.
- The computer may freeze, namely, it will load for a long time and finally stop responding.
Why does this hard disk problem occur in Windows 10/8/7? When searching for the topic in Google, you will find one related search “Windows detected a hard disk problem virus”. Generally, virus attack is the main factor. Besides, system error, bad sectors, improper operations and more can cause the hard disk error.
When receiving this error, it’s really annoying and may make you panic. More seriously, it warns you continuously every 5 or 10 minutes. In this article, we will show many details on hard disk problem and solutions.
Copy Disk for Backup When Windows Detected a Hard Disk Problem
Once Windows has detected a hard disk problem, the most important thing is to back up the important data to a safe location or another hard drive, as Microsoft suggests.
How to perform this operation? In the software market, there are many kinds of programs which can be used to do this work. Among them, MiniTool Partition Wizard Free Edition is worth using to back up your partition or the entire hard drive.
As a free partition and disk management software, it is highly recommended to you and it is compatible with many operating systems, including Windows 7/8/10.
So, download MiniTool Partition Wizard Free Edition and then install it on your computer to make a backup once a problem with the hard drive has been detected Windows 10/8/7.
Step 1: Launch this free application. Then right-click the source hard drive and select Copy feature or click Copy Disk in the left pane.
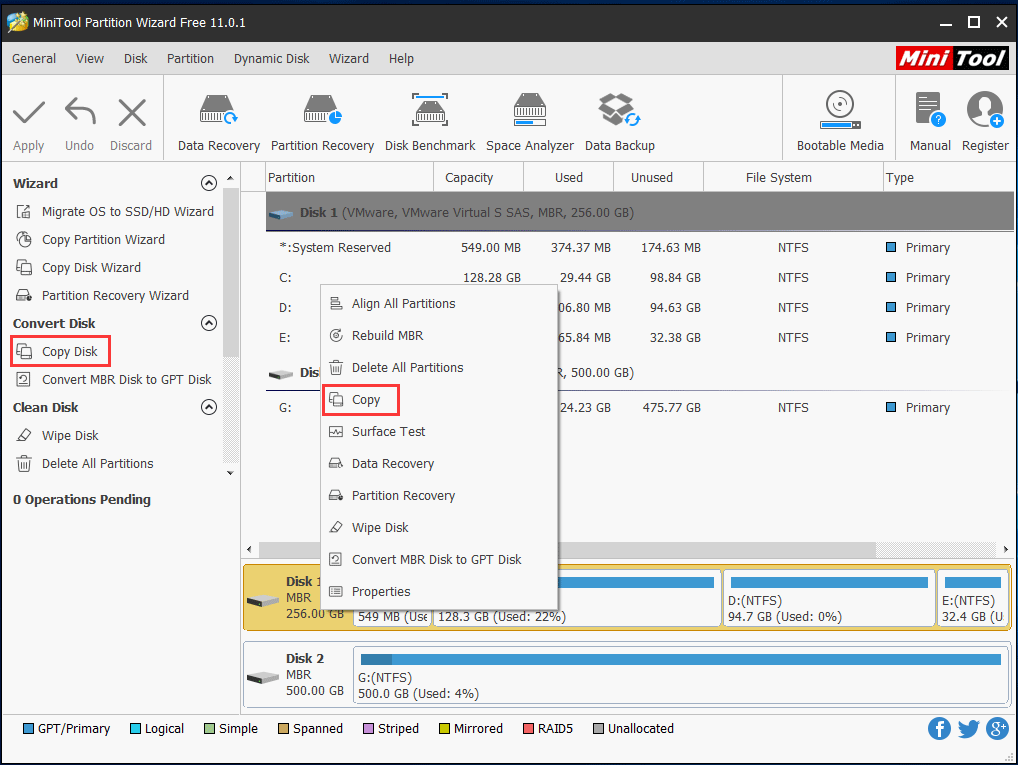
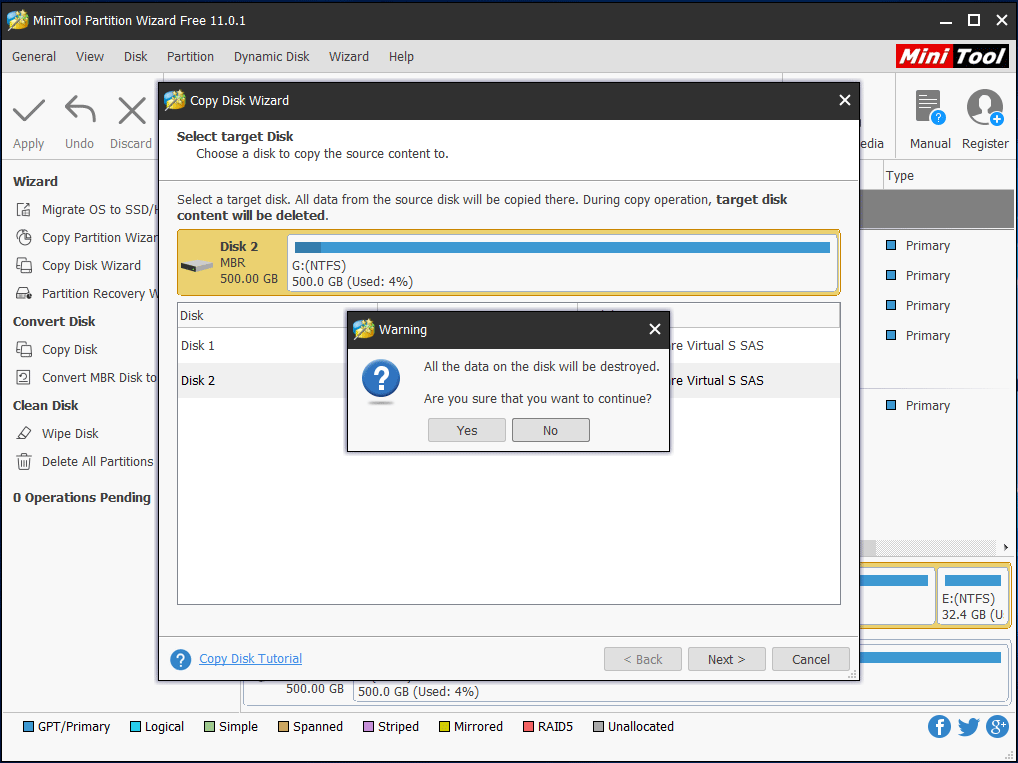
Step 2: Then select a target hard drive to copy the source content to. Click Next to continue.
Step 3: Next you can preview the changes you have made. The following picture shows you two copy options, you can choose to fit partitions to the entire disk, or copy partitions without resizing during disk clone.
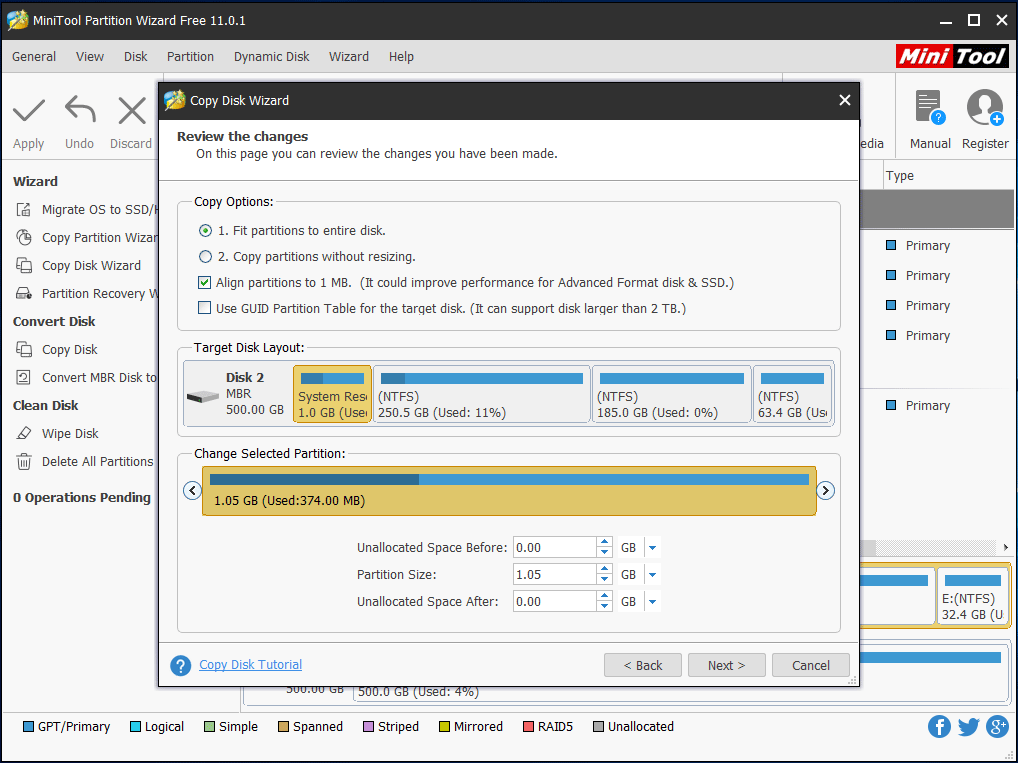
Here it is suggested to choose to align partitions to 1MB and this option can improve performance for advanced format hard drive or SSD. Moreover, Use GUID Partition Table for the target disk can make your target disk become GPT disk but this feature is a paid one, and you need to get Pro Edition or advanced one to achieve your aim.
Step 4: If you want to boot from the target disk, please configure BIOS setting and make sure the new disk is configured as the default boot disk.
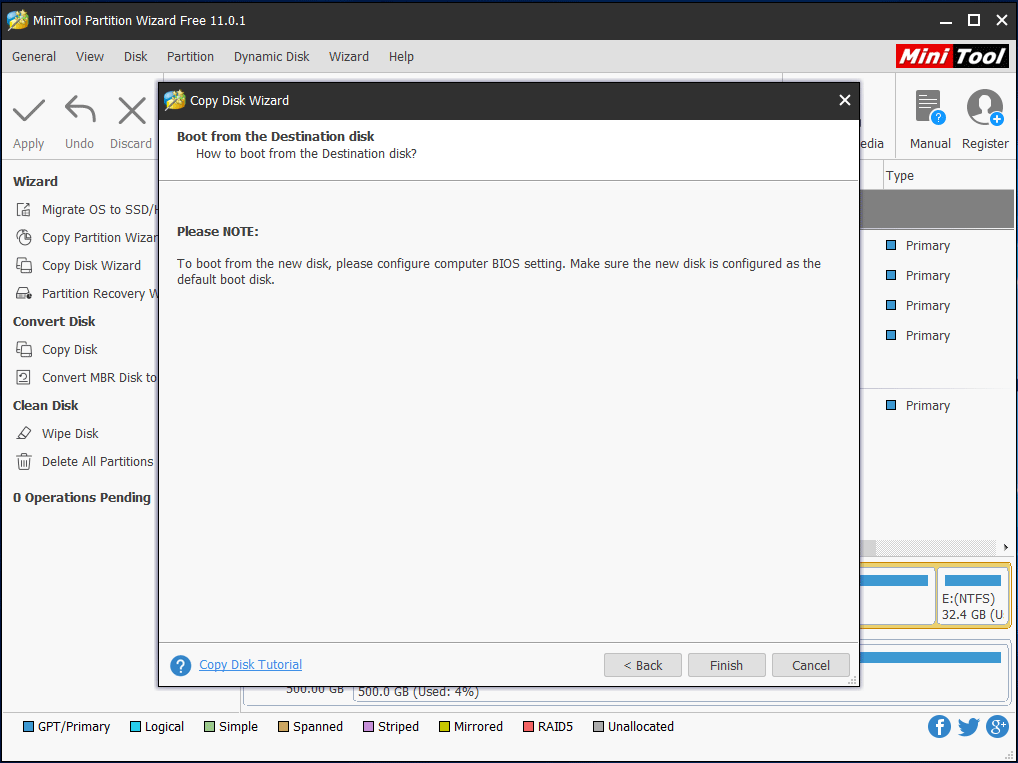
Step 5: At last, click Apply to execute all changes.
In addition to making a backup for the entire disk, you can also copy partitions where you have saved important data. Just choose a mode according to your needs. Besides, it is recommended to migrate the system to SSD/HD in Windows 10 which can help you make a backup for the operating system and do a recovery from a disaster.
Windows Detected a Hard Disk Problem Fix Windows 7/8/10
After backing up your disk, now it is time to search hard disk problems and solutions. How to fix hard disk problem Windows 7/8/10? Continue reading and you’ll get what you want here now. Here are four ways aiming at the above different cases, and you can try them.
Way 1: Scan and Kill Virus
As you know, the virus often attacks your computer. Once the computer encounters virus infection, some damage will happen. More seriously, the virus damage will do some harm to the system. Sometimes, it causes errors and reports you disk problem to some degree. Usually, virus damage is the main reason.
First of all, you need to download anti-virus software from the internet. Then open it to scan and find viruses to clean up. Usually, if you download some programs, spyware or malware, virus damage may happen. Please use anti-virus software to kill the virus and clean up your computer right now to solve Windows detected a hard disk problem virus issue.
Way 2: Run SFC to Fix System File
In Windows 10/8/7, there is a basic tool to help you to fix many errors. When there is a disk problem, you don’t know whether the system file is damaged or not. So you can use System File Checker which is also called SFC to check system file error and deal with the integrity issue. This tool is helpful to repair many problems and it is easy-to-use.
Step 1: Input cmd in the search box and right-click the tool from the search result to choose Run as administrator.
Step 2: Type sfc /scannow prompt. Then please wait for a while until verification completes. Don’t close the window before verification is 100% complete.
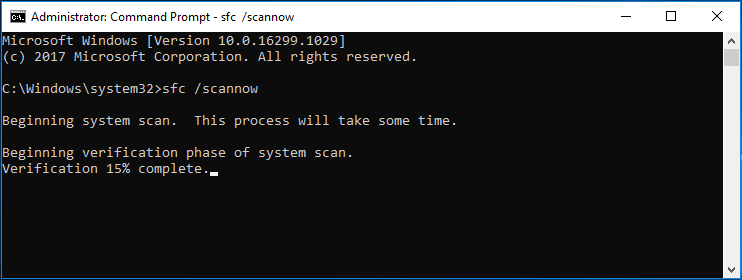
This command can help to quickly scan all protected system files and then replaces those corrupted or damaged files with a backup copy in Windows when there is a system file error. If this command doesn’t work for you to fix “Windows detected a hard disk problem” error, please try way 3.
Way 3: CHKDSK
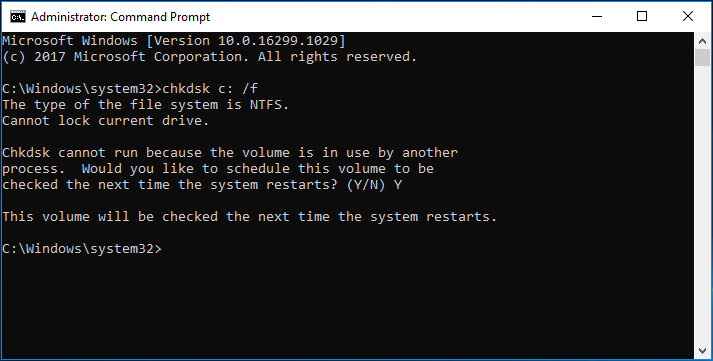
Firstly you also need to run Command Prompt as administrator and then type chkdsk (drive letter): /f to find the disk error. Unfortunately, this command only works in NTFS file system.
In addition to using the command line, you can try another way to run a disk check. Take Windows 10 as an example.
Step 1: Please open Windows Explorer, and right click the system partition, then select Properties.
Step 2: Then under the Tools tab, click the Check button.
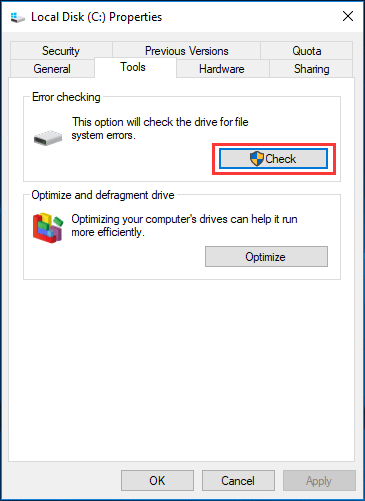
Step 3: Click Scan drive to start scanning your drive.
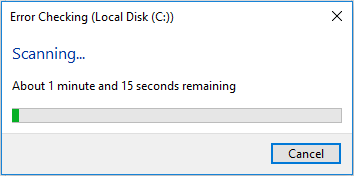
If the message «Windows detected a hard disk problem» is caused by system file error, after you perform a disk check, the issue will be fixed. If this way still can’t fix the hard disk problem detected issue in Windows 10/8/7, just try the next way.
Way 4: Surface Test
It is likely that there is something wrong with your disk, so Windows detected a hard disk problem start the backup process error occurs. In this case, you should test all the hard drive and ensure whether there are some bad sectors or not, because sometimes disk problem message is due to the bad sectors.
How to check the entire hard drive? MiniTool Partition Wizard can also help you. Here is the step-by-step guide:
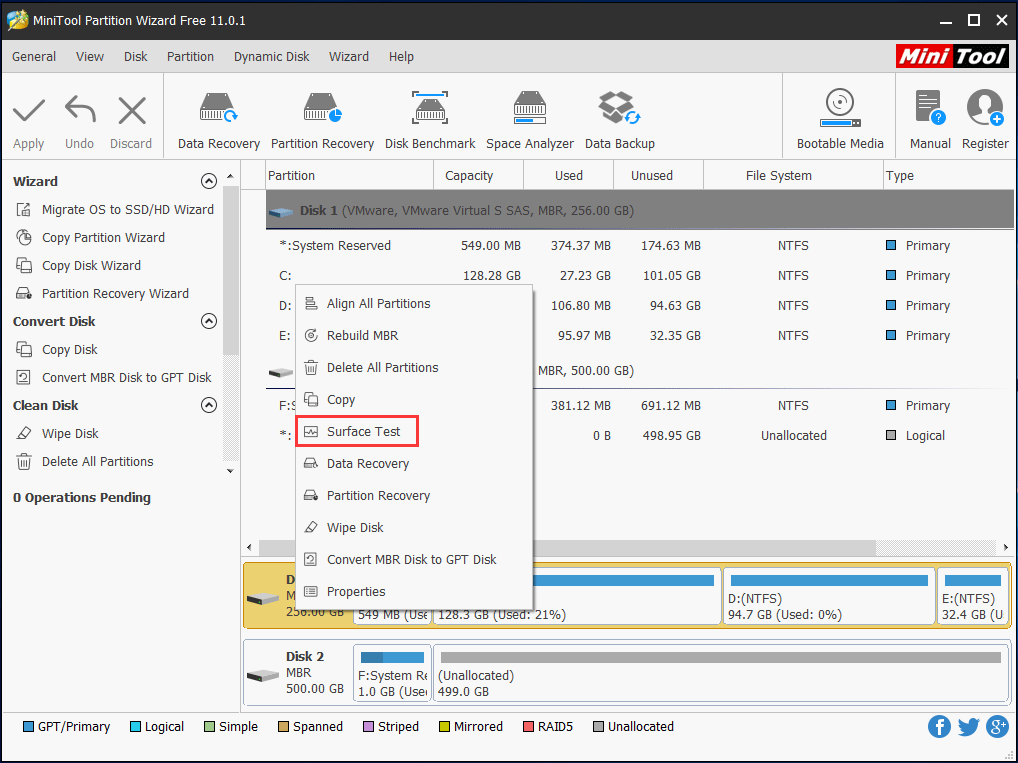
Step 1: Launch this free partition manager and then enter into the clear and simple main interface. You need to select a target hard drive and then click Surface Test in the Check Disk menu or choose the feature from the context menu.
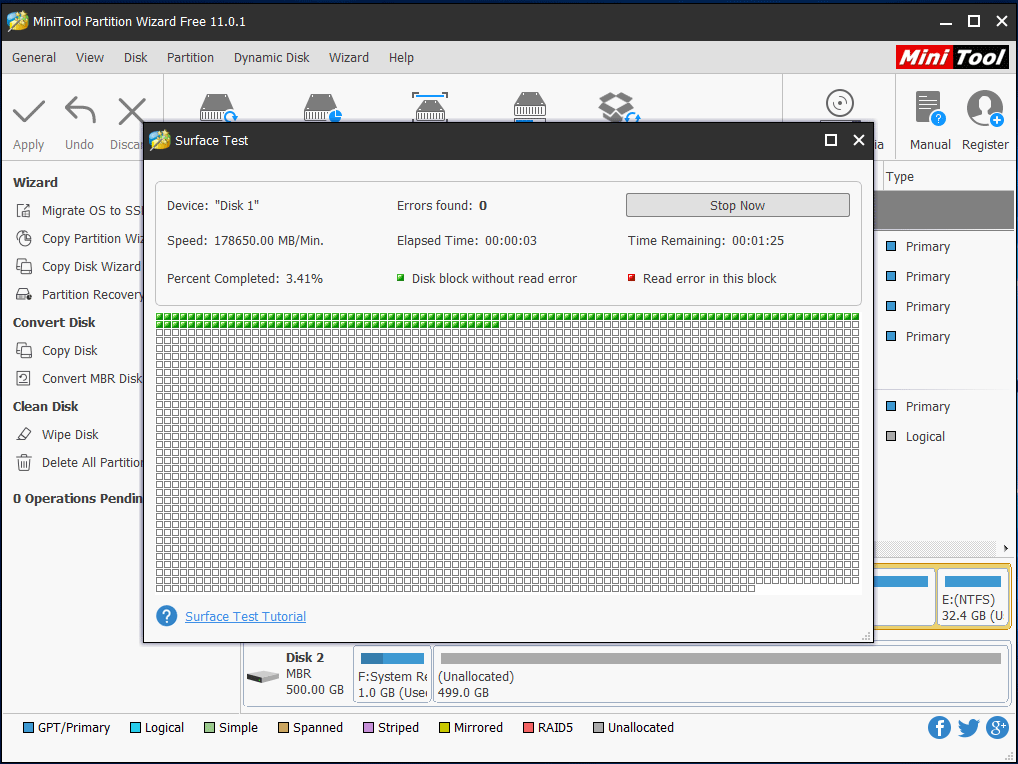
Step 2: Click Start Now to perform a disk test operation. This process will take a few minutes, so please wait patiently. From the picture below, you can clearly find MiniTool Partition Wizard can help to mark disk block without read error green. If there are some errors, this software marks them red.
If you have finished doing the disk surface test and find there are some errors in the hard drive, you need to repair hard drive to solve the issue. Unfortunately, MiniTool Partition Wizard only can check disk but it is unable to fix the bad errors and you can look for third-party software to help solve the problem. Or you can use chkdsk (drive letter:) /r command prompt to shield the bad sectors.
If you have tried many ways to solve disk problem in Windows 10/8/7 but all fail, you need to replace the hard drive and solve this issue on the hard disk. Before replacing the disk, please back up your important files with MiniTool Partition Wizard.
How to Avoid Windows Hard Disk Problem Warning
Probably Windows will reports you such a message when there is no system file error, no virus attack or disk error in Windows 10/8/7, therefore, after trying all methods, in order to not receive this warning again, it is suggested to disable the setting about this topic.
Here is the guide on Windows detected a hard disk problem disable:
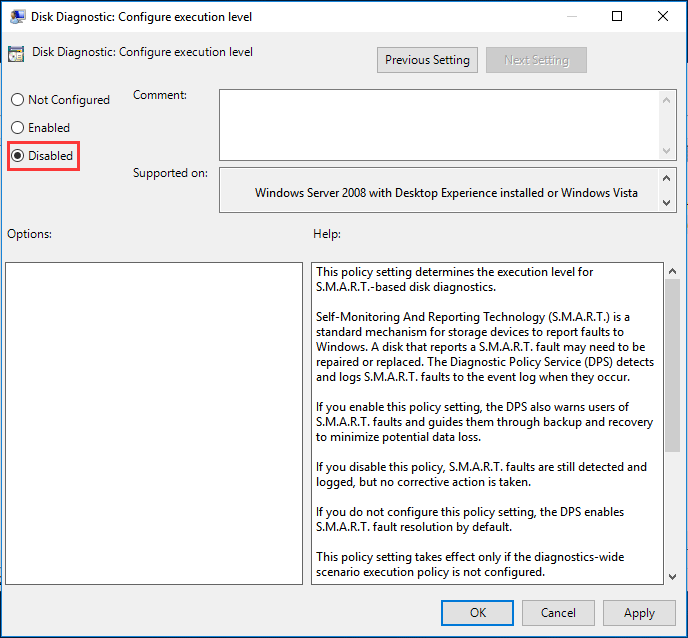
Step 1: Press Win + R and then input gpedit.msc to open Local Group Policy Editor.
Step 2: Please go Administrative Templates > System > Troubleshooting and Diagnostics > Disk Diagnostics.
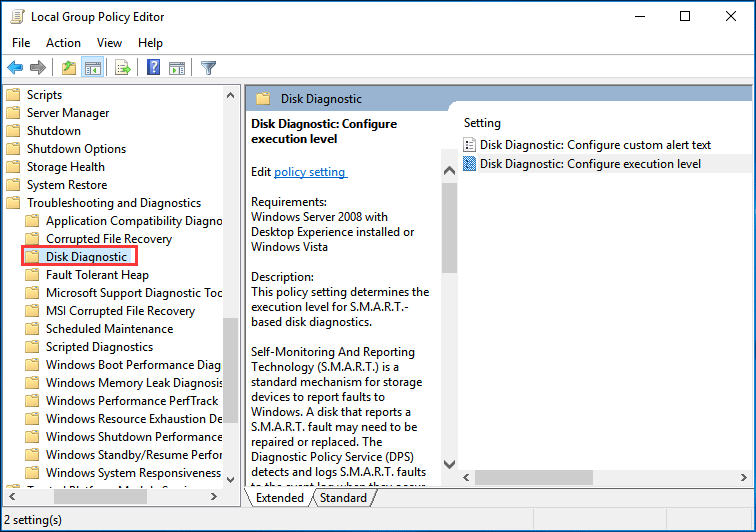
Step 3: And then double click Disk Diagnostic: Configure execution level and set it to Disabled. At last, click Apply and OK.
Summary
In this post, we introduce you «Windows detected a hard disk problem» error and how to disable the setting. When you encounter such a warning message, you should analyze the reasons for the issue and then try different solutions according to the different cases.
If you have any question or suggestion, welcome to leave a message below or directly email us via [email protected] . Thanks for your support in advance.
Windows Detected a Hard Disk Problem FAQ
- Scan and kill viruses
- Run SFC to fix system files
- Use CHKDSK command
- Run a disk surface test
To check your disk for problems, fix errors and bad sectors, you can use the CHKDSK tool.
- Right-click on the drive that you want to check for errors and click Properties.
- Go to Tools and click Check to start the operations.
ABOUT THE AUTHOR

Position: Columnist
Vera is an editor of the MiniTool Team since 2016 who has more than 5 years’ writing experiences in the field of technical articles. Her articles mainly focus on disk & partition management, PC data recovery, video conversion, as well as PC backup & restore, helping users to solve some errors and issues when using their computers. In her spare times, she likes shopping, playing games and reading some articles.
Проверка жесткого диска на наличие ошибок в Windows 7
Проблема
При выполнении определенных действий или открытии определенных файлов происходит сбой системы или зависают программы.
Решение
Проверка диска в Windows 7
Иногда при доступе к определенным файлам начинает медленно работать компьютер или зависают какие-либо программы. Эта проблема может вызываться ошибками на жестком диске.
Устранить проблему можно с помощью средства проверки диска в Windows 7. Оно позволяет найти и автоматически устранить ошибки файловой системы, чтобы вы могли и дальше вести запись и чтение данных на жестком диске. Средство проверки диска в Windows 7 можно использовать не только для локальных жестких дисков, но и для съемных носителей, например USB-устройств флэш-памяти или карт памяти.
Примечание. Закройте все открытые программы и файлы перед проверкой диска.
1. Щелкните правой кнопкой мыши по значку Пуск Windows.

2. В контекстном меню выберите пункт Открыть проводник.

3. В области переходов выберите пункт Компьютер, чтобы открыть справа список дисков.

4. Щелкните правой кнопкой мыши нуждающийся в проверке жесткий диск.

5. Выберите пункт Свойства.

6. Перейдите на вкладку Сервис.

7. Нажмите кнопку Выполнить проверку.

8. В окне Проверить диск установите флажок Автоматически исправлять системные ошибки.
Примечание. Чтобы провести подробную проверку жесткого диска, установите флажок Проверять и восстанавливать поврежденные сектора. Это следует делать при любых подозрениях на ошибку оборудования. Но учтите, что в этом режиме проверка может занять много времени. Использовать эту функцию для первоначальной проверки не рекомендуется.

9. Нажмите кнопку Запуск.

10. Если проверяемый диск сейчас используется и является системным, появится диалоговое окно с предупреждением. В этом случае выберите команду Расписание проверки диска.

11. Закройте все открытые программы и перезагрузите компьютер. Проверка начнется автоматически перед запуском Windows. После ее завершения будут показаны результаты.

12. Если проверяемый диск не является системным, перезагружать компьютер не нужно. При этом выбранный диск все же может использоваться. В данной ситуации появится сообщение. Сохранив все файлы и закрыв все открытые программы, нажмите кнопку Отключить.

13. Проверка начнется сразу после этого. По завершении будут показаны результаты.


