- Quick Fix Windows Detected a Hard Disk Problem in Windows 10/8/7 [Partition Magic]
- Summary :
- Quick Navigation :
- Windows Has Detected a Hard Disk Problem
- Copy Disk for Backup When Windows Detected a Hard Disk Problem
- Windows Detected a Hard Disk Problem Fix Windows 7/8/10
- Way 1: Scan and Kill Virus
- Way 2: Run SFC to Fix System File
- Way 3: CHKDSK
- Way 4: Surface Test
- How to Avoid Windows Hard Disk Problem Warning
- Summary
- Windows Detected a Hard Disk Problem FAQ
- ABOUT THE AUTHOR
- «Windows обнаружила неполадки жесткого диска» — как исправить?
- Содержание:
- Возможные причины ошибки
- Как исправить ошибку «Windows обнаружила неполадки жесткого диска»?
- Проверка диска chkdsk
- Оценка состояния носителя
- Проверка и исправление системных файлов
- Как убрать сообщение об ошибке «Windows обнаружила неполадки жесткого диска»?
- Что делать, если в результате ошибки были утеряны файлы?
- Часто задаваемые вопросы
Quick Fix Windows Detected a Hard Disk Problem in Windows 10/8/7 [Partition Magic]
By Vera | Follow | Last Updated November 30, 2020
Summary :
“Windows detected a hard disk problem” error message appears in your computer? What should you do in case of this issue? How to fix hard disk problem Windows 7/8/10? Just follow this post and you will be able to fix the hard disk error without losing any data.
Quick Navigation :
Windows Has Detected a Hard Disk Problem
«Windows detected a hard disk problem» is an always asked issue. When running Windows 10, Windows 8, or Windows 7, it is possible that you come across with such an error message.
Just like the following screenshot shows and suggests you «Back up your files immediately to prevent information loss, and then contact the computer manufacturer to determine if you need to repair or replace the disk».
Generally speaking, this error shows you a serious warning.
- The hard drive is failing and it may die sooner or later.
- All data on the hard drive, including programs, applications, documents, excels, files, photos, videos, may be lost once the disk died.
- The system file in Windows may get corrupted and the operating system may be unbootable.
- The computer may freeze, namely, it will load for a long time and finally stop responding.
Why does this hard disk problem occur in Windows 10/8/7? When searching for the topic in Google, you will find one related search “Windows detected a hard disk problem virus”. Generally, virus attack is the main factor. Besides, system error, bad sectors, improper operations and more can cause the hard disk error.
When receiving this error, it’s really annoying and may make you panic. More seriously, it warns you continuously every 5 or 10 minutes. In this article, we will show many details on hard disk problem and solutions.
Copy Disk for Backup When Windows Detected a Hard Disk Problem
Once Windows has detected a hard disk problem, the most important thing is to back up the important data to a safe location or another hard drive, as Microsoft suggests.
How to perform this operation? In the software market, there are many kinds of programs which can be used to do this work. Among them, MiniTool Partition Wizard Free Edition is worth using to back up your partition or the entire hard drive.
As a free partition and disk management software, it is highly recommended to you and it is compatible with many operating systems, including Windows 7/8/10.
So, download MiniTool Partition Wizard Free Edition and then install it on your computer to make a backup once a problem with the hard drive has been detected Windows 10/8/7.
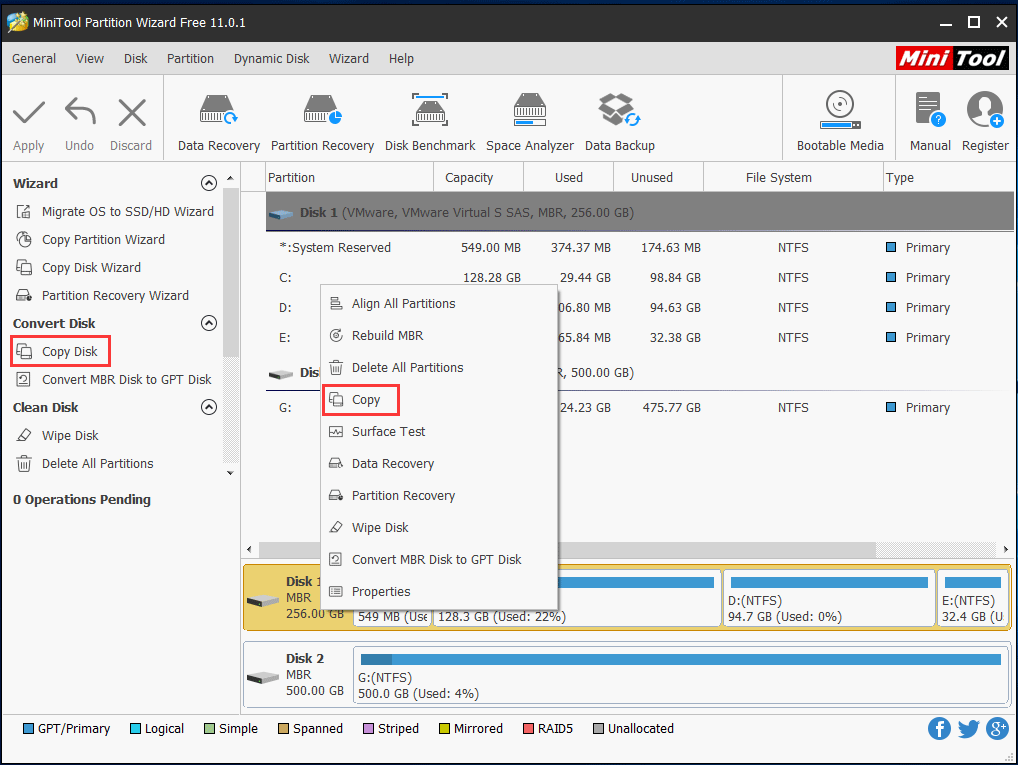
Step 1: Launch this free application. Then right-click the source hard drive and select Copy feature or click Copy Disk in the left pane.
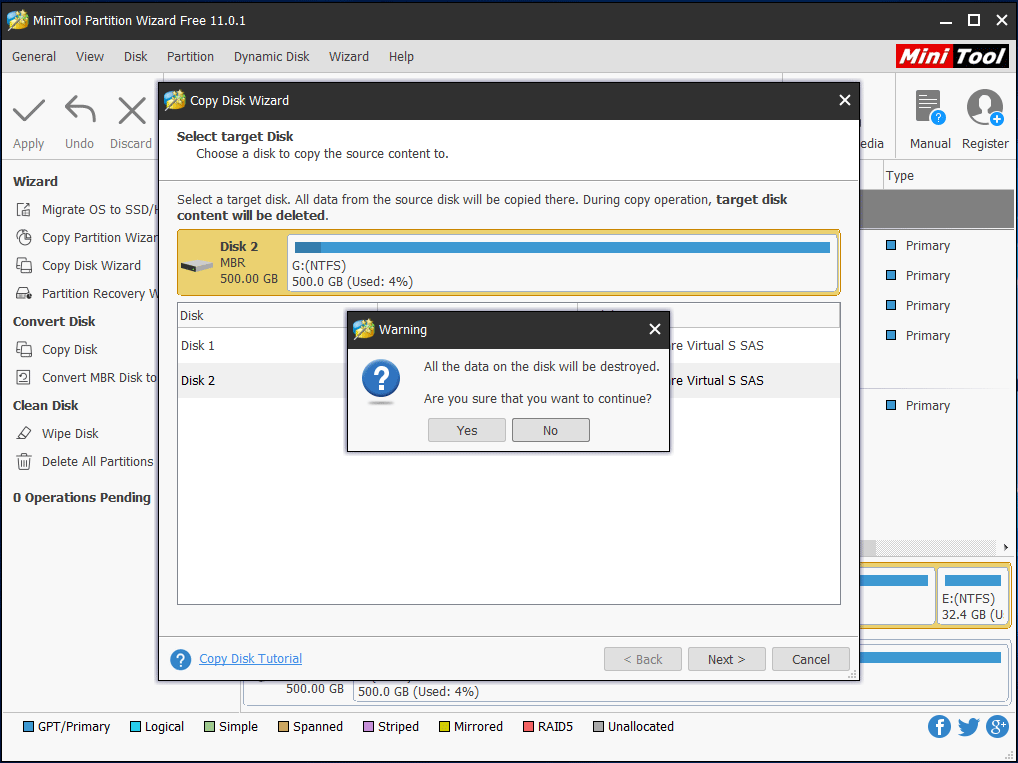
Step 2: Then select a target hard drive to copy the source content to. Click Next to continue.
Step 3: Next you can preview the changes you have made. The following picture shows you two copy options, you can choose to fit partitions to the entire disk, or copy partitions without resizing during disk clone.
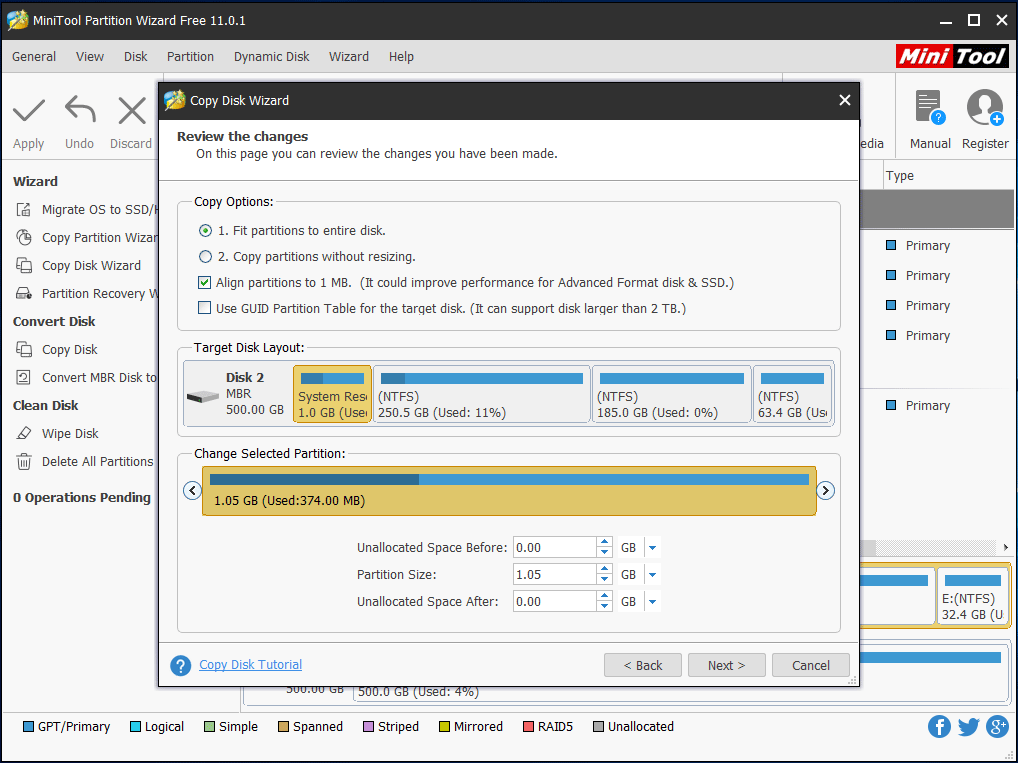
Here it is suggested to choose to align partitions to 1MB and this option can improve performance for advanced format hard drive or SSD. Moreover, Use GUID Partition Table for the target disk can make your target disk become GPT disk but this feature is a paid one, and you need to get Pro Edition or advanced one to achieve your aim.
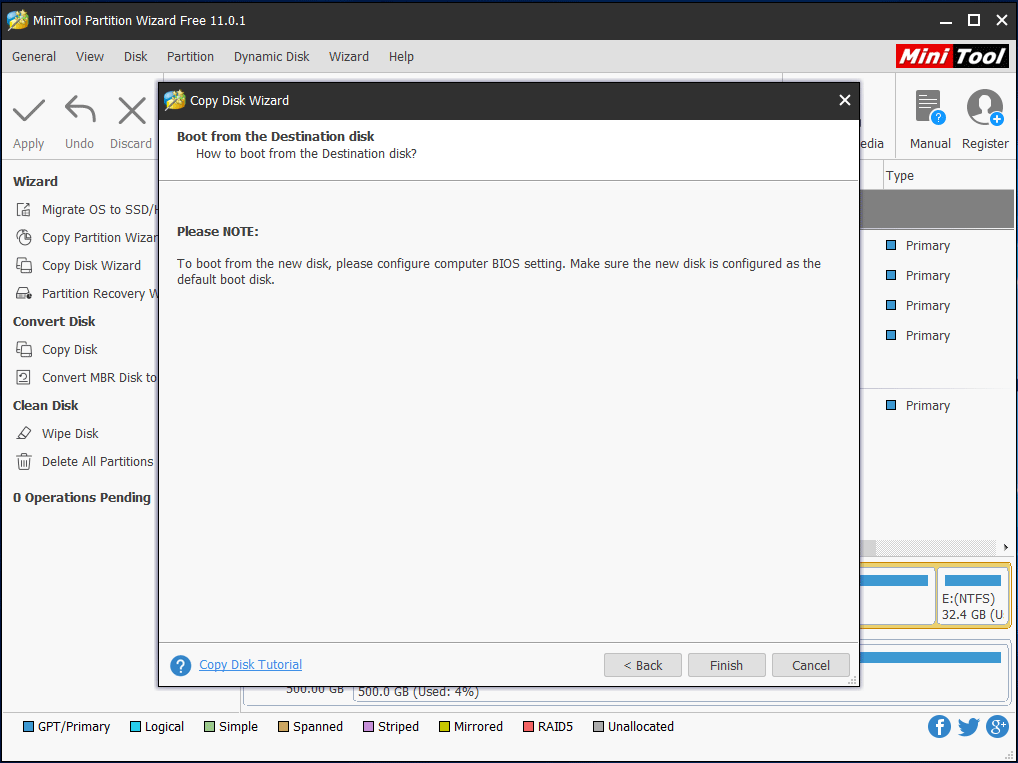
Step 4: If you want to boot from the target disk, please configure BIOS setting and make sure the new disk is configured as the default boot disk.
Step 5: At last, click Apply to execute all changes.
In addition to making a backup for the entire disk, you can also copy partitions where you have saved important data. Just choose a mode according to your needs. Besides, it is recommended to migrate the system to SSD/HD in Windows 10 which can help you make a backup for the operating system and do a recovery from a disaster.
Windows Detected a Hard Disk Problem Fix Windows 7/8/10
After backing up your disk, now it is time to search hard disk problems and solutions. How to fix hard disk problem Windows 7/8/10? Continue reading and you’ll get what you want here now. Here are four ways aiming at the above different cases, and you can try them.
Way 1: Scan and Kill Virus
As you know, the virus often attacks your computer. Once the computer encounters virus infection, some damage will happen. More seriously, the virus damage will do some harm to the system. Sometimes, it causes errors and reports you disk problem to some degree. Usually, virus damage is the main reason.
First of all, you need to download anti-virus software from the internet. Then open it to scan and find viruses to clean up. Usually, if you download some programs, spyware or malware, virus damage may happen. Please use anti-virus software to kill the virus and clean up your computer right now to solve Windows detected a hard disk problem virus issue.
Way 2: Run SFC to Fix System File
In Windows 10/8/7, there is a basic tool to help you to fix many errors. When there is a disk problem, you don’t know whether the system file is damaged or not. So you can use System File Checker which is also called SFC to check system file error and deal with the integrity issue. This tool is helpful to repair many problems and it is easy-to-use.
Step 1: Input cmd in the search box and right-click the tool from the search result to choose Run as administrator.
Step 2: Type sfc /scannow prompt. Then please wait for a while until verification completes. Don’t close the window before verification is 100% complete.
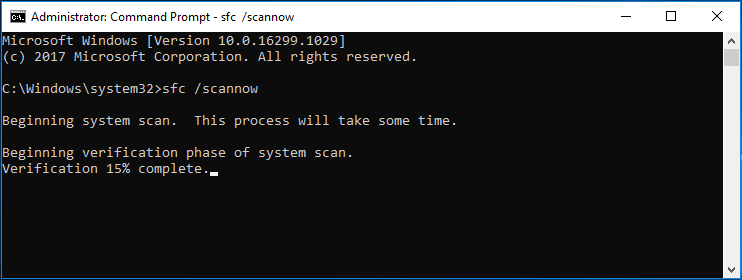
This command can help to quickly scan all protected system files and then replaces those corrupted or damaged files with a backup copy in Windows when there is a system file error. If this command doesn’t work for you to fix “Windows detected a hard disk problem” error, please try way 3.
Way 3: CHKDSK
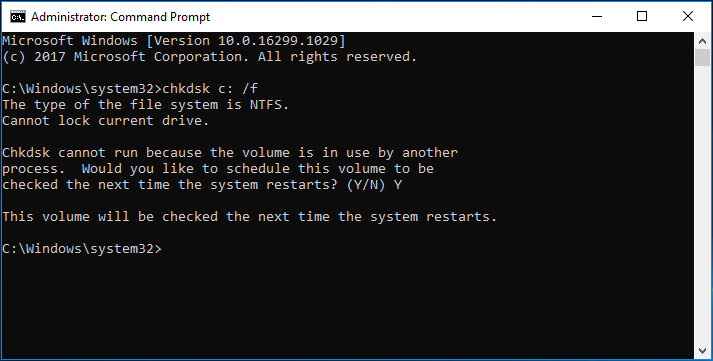
Firstly you also need to run Command Prompt as administrator and then type chkdsk (drive letter): /f to find the disk error. Unfortunately, this command only works in NTFS file system.
In addition to using the command line, you can try another way to run a disk check. Take Windows 10 as an example.
Step 1: Please open Windows Explorer, and right click the system partition, then select Properties.
Step 2: Then under the Tools tab, click the Check button.
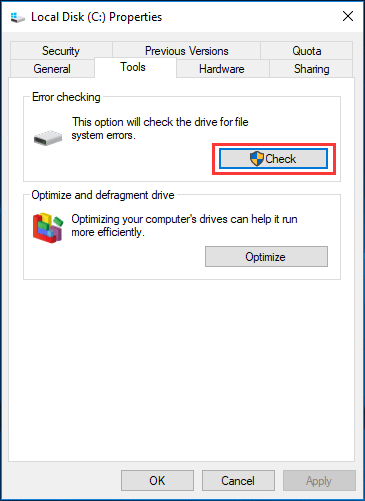
Step 3: Click Scan drive to start scanning your drive.
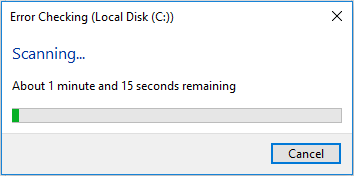
If the message «Windows detected a hard disk problem» is caused by system file error, after you perform a disk check, the issue will be fixed. If this way still can’t fix the hard disk problem detected issue in Windows 10/8/7, just try the next way.
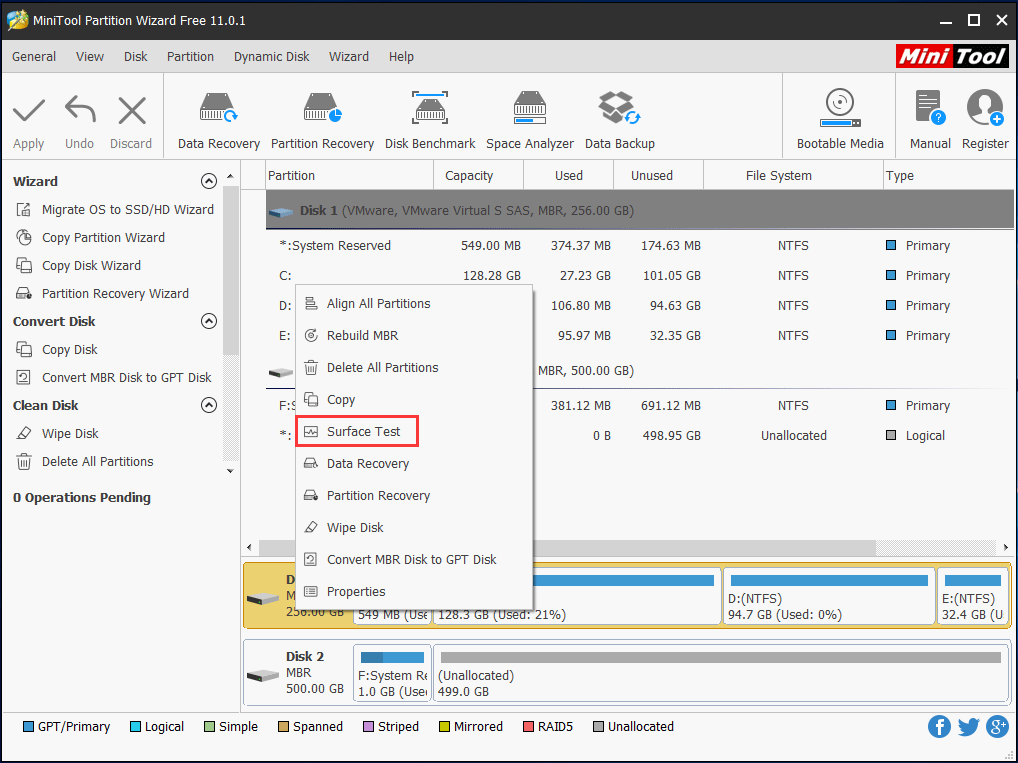
Way 4: Surface Test
It is likely that there is something wrong with your disk, so Windows detected a hard disk problem start the backup process error occurs. In this case, you should test all the hard drive and ensure whether there are some bad sectors or not, because sometimes disk problem message is due to the bad sectors.
How to check the entire hard drive? MiniTool Partition Wizard can also help you. Here is the step-by-step guide:
Step 1: Launch this free partition manager and then enter into the clear and simple main interface. You need to select a target hard drive and then click Surface Test in the Check Disk menu or choose the feature from the context menu.
Step 2: Click Start Now to perform a disk test operation. This process will take a few minutes, so please wait patiently. From the picture below, you can clearly find MiniTool Partition Wizard can help to mark disk block without read error green. If there are some errors, this software marks them red.
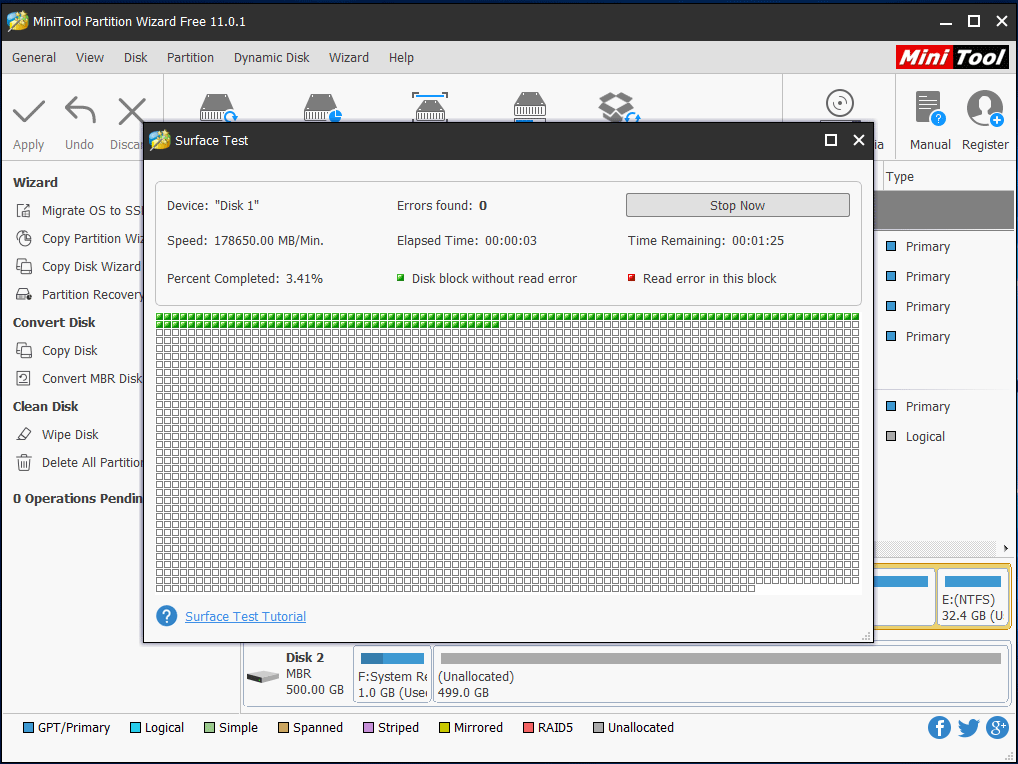
If you have finished doing the disk surface test and find there are some errors in the hard drive, you need to repair hard drive to solve the issue. Unfortunately, MiniTool Partition Wizard only can check disk but it is unable to fix the bad errors and you can look for third-party software to help solve the problem. Or you can use chkdsk (drive letter:) /r command prompt to shield the bad sectors.
If you have tried many ways to solve disk problem in Windows 10/8/7 but all fail, you need to replace the hard drive and solve this issue on the hard disk. Before replacing the disk, please back up your important files with MiniTool Partition Wizard.
How to Avoid Windows Hard Disk Problem Warning
Probably Windows will reports you such a message when there is no system file error, no virus attack or disk error in Windows 10/8/7, therefore, after trying all methods, in order to not receive this warning again, it is suggested to disable the setting about this topic.
Here is the guide on Windows detected a hard disk problem disable:
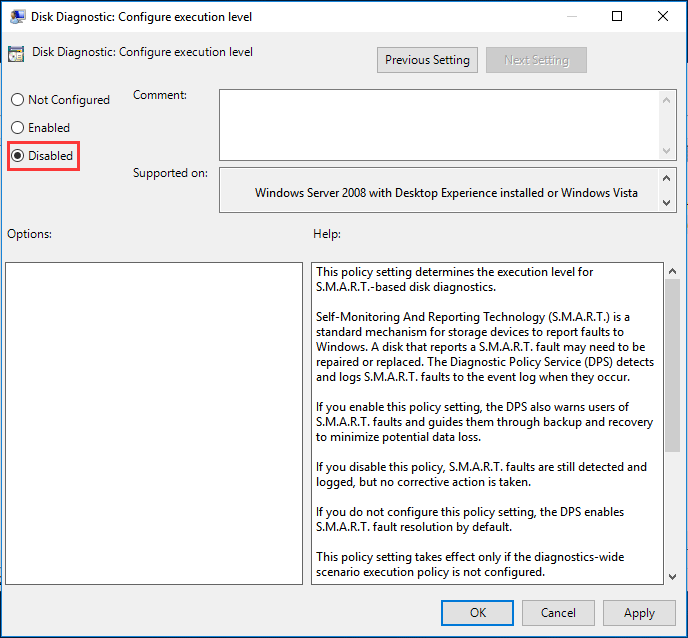
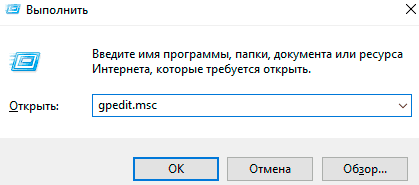
Step 1: Press Win + R and then input gpedit.msc to open Local Group Policy Editor.
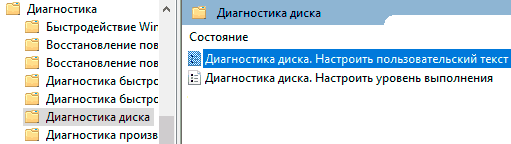
Step 2: Please go Administrative Templates > System > Troubleshooting and Diagnostics > Disk Diagnostics.
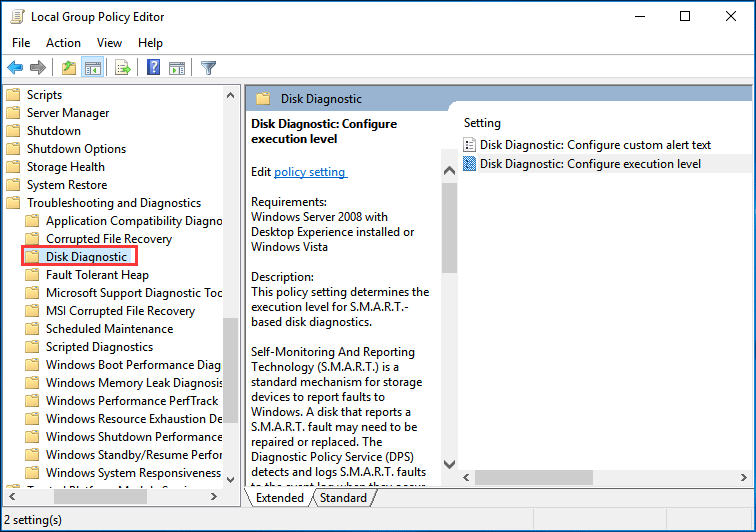
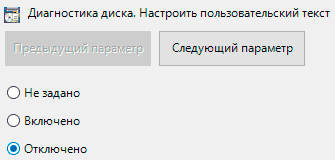
Step 3: And then double click Disk Diagnostic: Configure execution level and set it to Disabled. At last, click Apply and OK.
Summary
In this post, we introduce you «Windows detected a hard disk problem» error and how to disable the setting. When you encounter such a warning message, you should analyze the reasons for the issue and then try different solutions according to the different cases.
If you have any question or suggestion, welcome to leave a message below or directly email us via [email protected] . Thanks for your support in advance.
Windows Detected a Hard Disk Problem FAQ
- Scan and kill viruses
- Run SFC to fix system files
- Use CHKDSK command
- Run a disk surface test
To check your disk for problems, fix errors and bad sectors, you can use the CHKDSK tool.
- Right-click on the drive that you want to check for errors and click Properties.
- Go to Tools and click Check to start the operations.
ABOUT THE AUTHOR

Position: Columnist
Vera is an editor of the MiniTool Team since 2016 who has more than 5 years’ writing experiences in the field of technical articles. Her articles mainly focus on disk & partition management, PC data recovery, video conversion, as well as PC backup & restore, helping users to solve some errors and issues when using their computers. In her spare times, she likes shopping, playing games and reading some articles.
«Windows обнаружила неполадки жесткого диска» — как исправить?
Сегодня мы рассмотрим причины и методы исправления ошибки «Windows обнаружила неполадки жесткого диска», приводящей к критическим неполадкам с системой.
Содержание:
Ошибка «Windows обнаружила неполадки жесткого диска» является достаточно серьезным сигналом, который свидетельствует о неполадках в работе системы или жесткого диска. Данная ошибка может возникать с некоторой периодичностью, что значительно снижает удобство использования компьютером. Помимо этого, после ошибки может возникать «мертвое» зависание ПК, синий экран или другие проблемы.
Если пользователь хотя бы раз увидел подобную ошибку, следует немедленно обезопасить себя и произвести резервное копирование всей важной информации на другой носитель. Если под рукой ничего не оказалось, следует загрузить резервные копии в любой облачный сервис. Такие меры предосторожности обусловлены тем, что появление ошибки говорит о возможной поломке жесткого диска.
Возможные причины ошибки
Ошибка «Windows обнаружила неполадки жесткого диска» может быть вызвана целым списком причин, в который входят:
- Физические поломки HDD или SSD.
- Логические проблемы с файловой системой, разделами, загрузочной записью.
- Проблемы с реестром операционной системы.
- Действие вредоносного вирусного ПО.
- Неправильный «разгон» компонентов компьютера.
- Неисправность компонентов.
- Перегруженность системы требовательными программами и другими утилитами.
- Проблемы с системными файлами, отвечающими за работу жесткого диска.
Как исправить ошибку «Windows обнаружила неполадки жесткого диска»?
Вне зависимости от причины возникновения ошибки, следует обязательно сделать резервные копии важной информации, после чего можно приступать к различным манипуляциям, способных решить проблему.
Не перезагружайте компьютер при возникновении ошибки, поскольку возможно система не сможет запуститься в следующий раз! Стоит отметить, что в некоторых случаях ошибка может возникать при сильном износе или неисправности жесткого диска. В таком случае ошибку можно исправить лишь с помощью замены накопителя на новый.
Проверка диска chkdsk
Поскольку ошибка может быть вызвана проблемным жестким диском, первым делом следует проверить диск встроенной утилитой для проверки дисков chkdsk.
Для ёё активации необходимо:
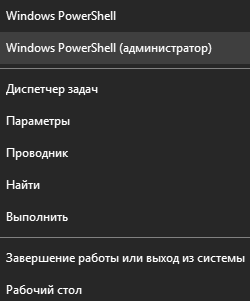
Шаг 1. Нажать правой кнопкой мыши по «Пуск» и выбрать пункт «Windows PowerShell (администратор)» или «Командная строка (администратор)».
Шаг 2. В открывшемся окне следует ввести команду «chkdsk C: /f» и Enter (вместо диска C может быть любой другой. Если установлен один диск, разбитый на логические разделы, следует провести проверку для всех отдельных разделов). В некоторых случаях система попросит подтвердить действие буквой Y.

После выполнения данных действий система автоматически проверит диск и попробует исправить его проблемы.
Более детально узнать про команду chkdsk можно в статье «Команда CHKDSK».
Оценка состояния носителя
Чтобы исключить проблему с накопителем следует воспользоваться утилитами для оценки состояния накопителя. Для этого следует получить и самостоятельно проанализировать показания SMART. Проверка и получение показаний, зачастую, выполняются при помощи сторонних программ.
Одной из самых популярных является утилита для проверки дисков Victoria. В статье «Как протестировать и исправить жесткий диск используя бесплатную программу Victoria» Вы сможете найти детальное описание работы программы, а также способы исправления ошибок, удаления плохих секторов и других манипуляций, которые позволят вернуть накопителю работоспособность.
Проверка и исправление системных файлов
Возможно причина ошибки кроется в системных файлах, неправильная работы которых вызывает проблемы.
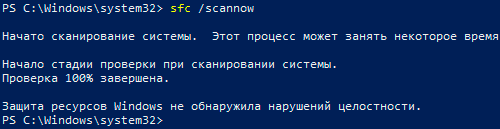
Что проверить и исправить это, следует также открыть командную строку, подобно первому способу, и ввести команду «sfc /scannow».

Проверка системных файлов может занимать значительное время. Результат станет доступен после проверки, поэтому рекомендуем внимательно ознакомиться с текстом, который выдаст утилита sfc. Если в тексте проверки будет обнаружено, что программа не может восстановить некоторые файлы, это может говорить о серьезных логических неполадках или поражении системы.
Пример сообщения после проверки, при котором системные файлы работают корректно:
Если присутствует сообщение, о невозможности исправления, в таком случае лучшим выходом станет переустановка операционной системы.
Как убрать сообщение об ошибке «Windows обнаружила неполадки жесткого диска»?
Если причиной ошибки стал выходящий из строя жесткий диск с плохими показателями SMART, избавиться от ошибки можно, но стоит понимать, что такое действие не является исправлением проблемы, а просто маскирует её.
Также следует помнить, что диск с замаскированным сообщением об ошибке может выйти из строя в любую минуту, поэтому рекомендуем не хранить на таком носителе важную информацию или сделать резервные копии данных.
Для отключения сообщения об ошибке следует:
Шаг 1. Нажимаем правой кнопкой мыши по «Пуск», выбираем пункт «Выполнить», в открывшемся окне вводим команду «gpedit.msc» и нажимаем «Ок».
Шаг 2. Переходим по пути: «Конфигурация компьютера», «Административные шаблоны», «Система», «Диагностика», «Диагностика диска». В последнем каталоге следует найти раздел «Диагностика диска. Настроить пользовательский текст оповещения» и дважды кликнуть по нему.
Шаг 3. В открывшемся окне выбираем «Отключено» и подтверждаем действие кнопкой «Применить».
После этого уведомление больше не будет демонстрироваться системой.
Что делать, если в результате ошибки были утеряны файлы?
Проблемы с жестким диском являются частой причиной утери ценной информации, которая храниться на компьютере, поэтому к любым сообщениям с ошибками винчестера следует относиться со всей серьезностью. Мы настоятельно рекомендуем создавать резервные копии важных файлов при любых подозрениях неисправности накопителя. Странные звуки, заторможенная работа, ошибки, «мертвые зависания» при копировании или считывании информации – все это лишь небольшая часть симптомов, свидетельствующих о скорой поломке.
Если в ходе работы Вы заметили, что некоторые важные данные исчезли или не сохранились, рекомендуем воспользоваться специальной утилитой для восстановления данных с проблемных жестких дисков RS Partition Recovery.
Данная программа сможет вернуть все возможные для восстановления данные даже в самых трудных случаях. Для быстрой работы RS Partition Recovery не требуется мощных ресурсов компьютера, поэтому программа отлично справляется с восстановлением любых файлов даже на офисных системах и слабых нетбуках. Отметим, что RS Partition Recovery сможет вернуть данные после форматирования, случайного удаления, проблем с физическим или программным состоянием накопителя, уничтожения вирусами и т.д.
Помимо этого, RS Partition Recovery превосходно подходит для восстановления файлов с флешек, HDD и SSD жестких дисков, карт памяти и любых других носителей. Это позволяет получить максимально широкий спектр применения для самых различных ситуаций.
Часто задаваемые вопросы
Это сильно зависит от емкости вашего жесткого диска и производительности вашего компьютера. В основном, большинство операций восстановления жесткого диска можно выполнить примерно за 3-12 часов для жесткого диска объемом 1 ТБ в обычных условиях.
Если файл не открывается, это означает, что файл был поврежден или испорчен до восстановления.
Используйте функцию «Предварительного просмотра» для оценки качества восстанавливаемого файла.
Когда вы пытаетесь получить доступ к диску, то получаете сообщение диск «X: \ не доступен». или «Вам нужно отформатировать раздел на диске X:», структура каталога вашего диска может быть повреждена. В большинстве случаев данные, вероятно, все еще остаются доступными. Просто запустите программу для восстановления данных и отсканируйте нужный раздел, чтобы вернуть их.
Пожалуйста, используйте бесплатные версии программ, с которыми вы можете проанализировать носитель и просмотреть файлы, доступные для восстановления.
Сохранить их можно после регистрации программы – повторное сканирование для этого не потребуется.


